
Grow Radicchio Indoors Easily? Absolutely! Imagine plucking fresh, slightly bitter, and beautifully colored radicchio leaves right from your windowsill, even in the dead of winter. Sounds like a dream, right? Well, it doesn’t have to be! For centuries, radicchio has been a staple in Italian cuisine, adding a vibrant touch and unique flavor to salads and grilled dishes. But you don’t need a sprawling Italian garden to enjoy this delicacy.
I’m here to tell you that cultivating your own radicchio indoors is surprisingly simple and incredibly rewarding. In today’s busy world, we often rely on grocery stores for our produce, but there’s something truly special about growing your own food. Not only do you know exactly what’s going into it (no mystery pesticides!), but you also get the satisfaction of nurturing something from seed to harvest. Plus, let’s be honest, store-bought radicchio can be expensive and sometimes lacks that fresh, vibrant flavor.
This DIY guide will walk you through every step of the process, from selecting the right container and soil to providing the perfect amount of light and water. You’ll learn all the tricks and hacks you need to grow radicchio indoors easily and successfully, even if you don’t have a green thumb. Get ready to impress your friends and family with your homegrown radicchio and elevate your culinary creations!
Grow Radicchio Indoors: A Beginner’s Guide
Hey there, fellow plant enthusiasts! Ever thought about growing radicchio indoors? It’s easier than you might think, and the vibrant colors and slightly bitter taste add a unique touch to salads and other dishes. I’m going to walk you through everything you need to know to successfully cultivate this chicory relative right in your home.
What You’ll Need
Before we dive in, let’s gather our supplies. Having everything ready beforehand will make the process smooth and enjoyable.
* Radicchio Seeds: Choose a variety that suits your taste. Some popular options include ‘Chioggia’, ‘Treviso’, and ‘Castelfranco’.
* Seed Starting Tray or Small Pots: These will be used to germinate the seeds.
* Seed Starting Mix: A light, well-draining mix is crucial for successful germination.
* Larger Pots (6-8 inches): Once the seedlings are big enough, they’ll need to be transplanted into larger containers.
* Potting Soil: A good quality potting mix that retains moisture but also drains well is ideal.
* Grow Lights (Optional but Recommended): Radicchio needs plenty of light, especially indoors.
* Watering Can or Spray Bottle: For gentle watering.
* Fertilizer: A balanced liquid fertilizer to feed your radicchio plants.
* Small Trowel or Spoon: For transplanting.
* Labels and a Marker: To keep track of your different varieties (if you’re growing more than one).
Starting Your Radicchio Seeds
This is where the magic begins! Getting the seeds to germinate properly is the first step to a successful harvest.
1. Prepare Your Seed Starting Tray: Fill your seed starting tray or small pots with seed starting mix. Gently press the mix down to create a level surface.
2. Sow the Seeds: Sow the radicchio seeds about ¼ inch deep and space them about an inch apart. I usually put 2-3 seeds in each cell or pot to increase my chances of germination.
3. Water Gently: Use a spray bottle or watering can with a gentle nozzle to moisten the soil. Avoid overwatering, as this can lead to damping off (a fungal disease that affects seedlings).
4. Provide Warmth: Radicchio seeds germinate best in temperatures between 60-70°F (15-21°C). You can use a heat mat to provide bottom heat if your home is cooler.
5. Cover and Wait: Cover the seed starting tray with a clear plastic lid or plastic wrap to create a humid environment. This will help the seeds germinate.
6. Monitor and Water: Check the soil moisture daily and water as needed to keep it consistently moist but not soggy.
7. Remove Cover After Germination: Once the seedlings emerge (usually within 5-10 days), remove the plastic lid or wrap.
8. Provide Light: Place the seedlings under grow lights or in a bright, sunny window. If using a window, rotate the tray regularly to ensure even growth.
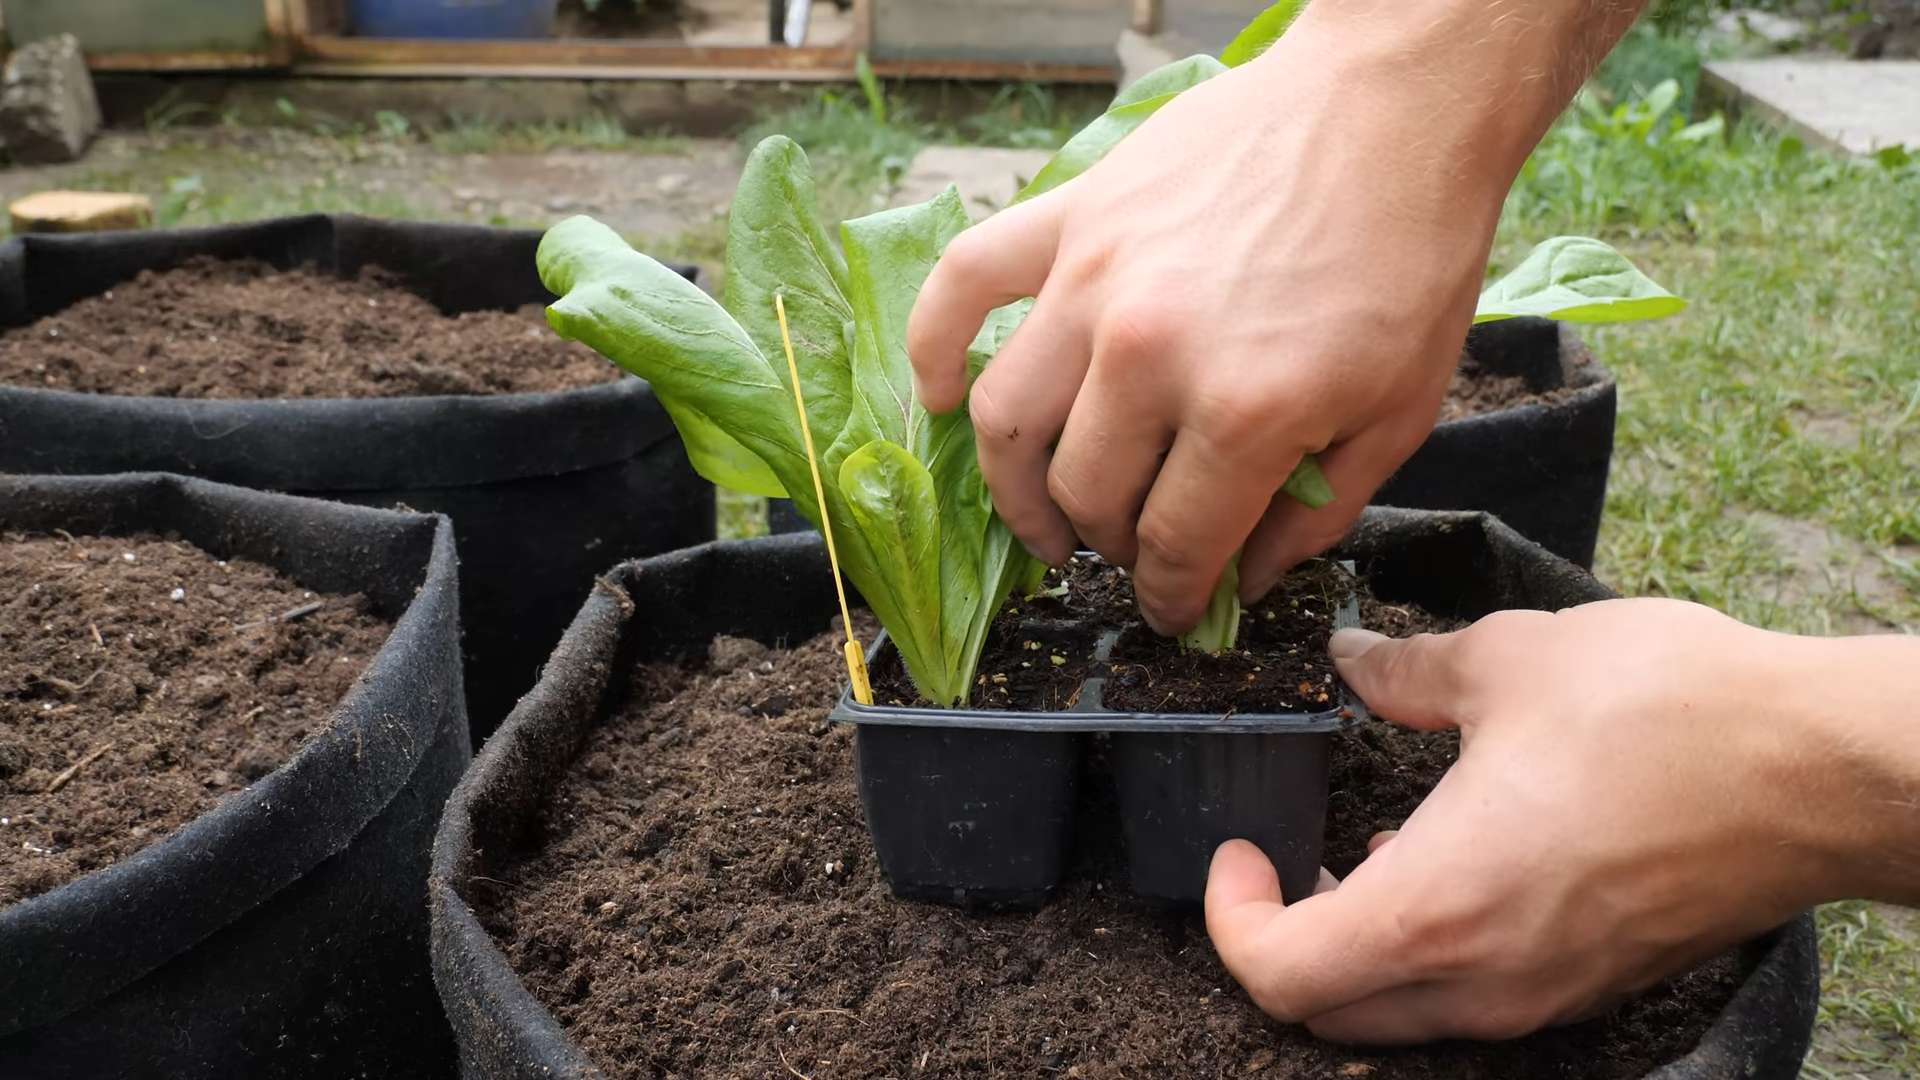
Transplanting Your Radicchio Seedlings
Once your seedlings have developed a few sets of true leaves (the leaves that look like miniature versions of the adult plant’s leaves), it’s time to transplant them into larger pots.
1. Prepare Your Larger Pots: Fill your 6-8 inch pots with potting soil. Leave about an inch of space at the top of the pot.
2. Gently Remove Seedlings: Carefully remove the seedlings from the seed starting tray or small pots. Use a small trowel or spoon to gently loosen the soil around the roots.
3. Transplant Seedlings: Make a small hole in the center of the potting soil in the larger pot. Place the seedling in the hole and gently backfill with soil.
4. Water Thoroughly: Water the transplanted seedlings thoroughly to help settle the soil and reduce transplant shock.
5. Provide Support (Optional): If your seedlings are leggy (tall and spindly), you can provide support with small stakes or chopsticks.
Caring for Your Indoor Radicchio Plants
Now that your radicchio plants are in their permanent homes, it’s time to provide them with the care they need to thrive.
1. Light: Radicchio needs at least 6 hours of direct sunlight per day. If you don’t have a sunny window, use grow lights to supplement the natural light. I’ve found that LED grow lights work really well and are energy-efficient.
2. Watering: Water your radicchio plants when the top inch of soil feels dry to the touch. Avoid overwatering, as this can lead to root rot. Make sure the pots have drainage holes to allow excess water to escape.
3. Fertilizing: Feed your radicchio plants every 2-3 weeks with a balanced liquid fertilizer. Follow the instructions on the fertilizer label. I like to use an organic fertilizer to keep things natural.
4. Temperature: Radicchio prefers cool temperatures, ideally between 60-75°F (15-24°C). Avoid placing your plants near heat sources, such as radiators or vents.
5. Humidity: Radicchio prefers moderate humidity. If your home is dry, you can increase the humidity by placing a tray of water near the plants or using a humidifier.
6. Air Circulation: Good air circulation is important to prevent fungal diseases. Make sure your plants are not overcrowded and that there is good airflow around them. A small fan can help with this.
7. Pest Control: Keep an eye out for pests, such as aphids, spider mites, and whiteflies. If you notice any pests, treat them promptly with insecticidal soap or neem oil. I prefer to use organic pest control methods whenever possible.
8. Bolting Prevention: Bolting (premature flowering) can occur if radicchio plants are exposed to high temperatures or stress. To prevent bolting, keep your plants cool, well-watered, and fertilized.
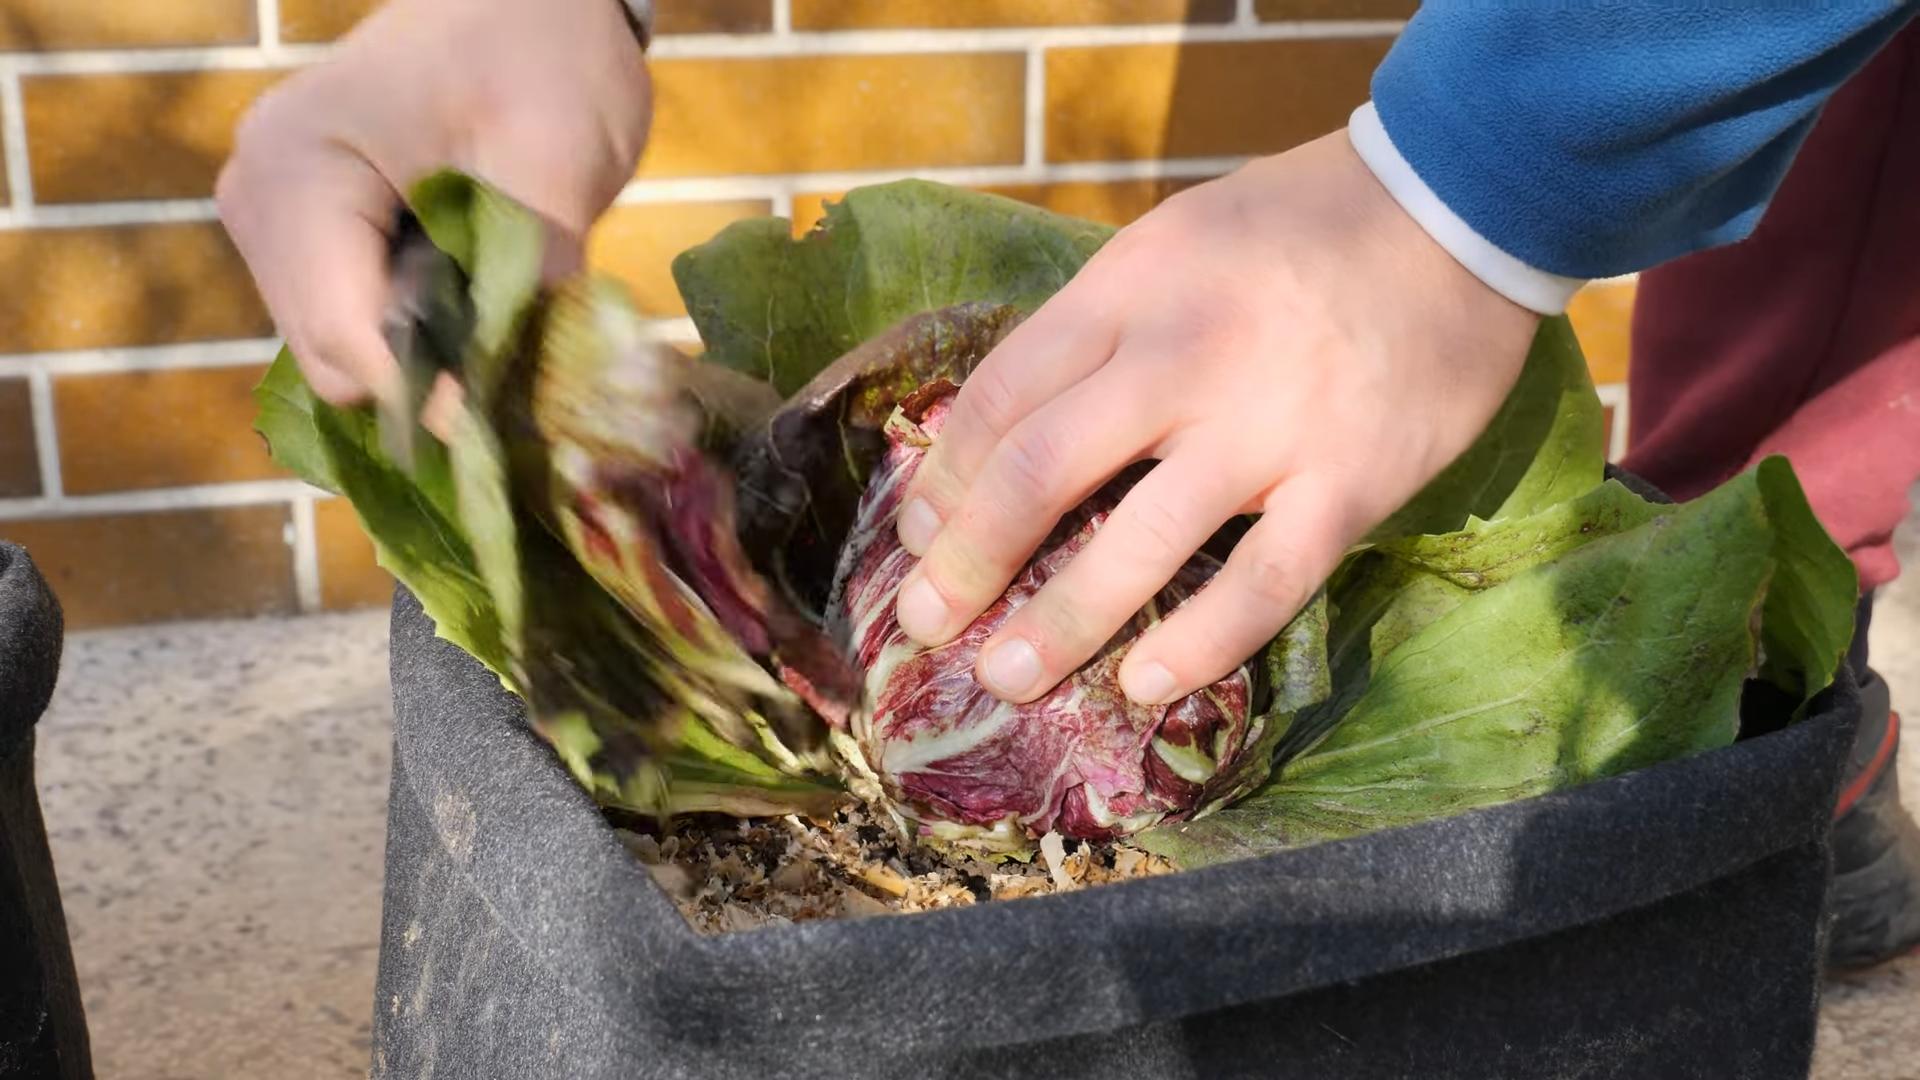
Harvesting Your Radicchio
The best part! Harvesting your own homegrown radicchio is incredibly satisfying.
1. Harvest Time: Radicchio is typically ready to harvest 70-90 days after sowing. The heads should be firm and well-formed.
2. Harvesting Method: Use a sharp knife to cut the radicchio head at the base of the plant.
3. Succession Planting: To ensure a continuous harvest, sow new seeds every few weeks. This is called succession planting.
4. Storage: Store harvested radicchio in the refrigerator for up to a week. Wrap it in a damp paper towel to keep it fresh.
Troubleshooting
Even with the best care, you might encounter some challenges along the way. Here are a few common problems and how to address them:
* Leggy Seedlings: This is usually caused by insufficient light. Provide more light by moving the seedlings to a sunnier location or using grow lights.
* Yellowing Leaves: This can be caused by overwatering, underwatering, or nutrient deficiencies. Check the soil moisture and adjust your watering accordingly. Fertilize your plants regularly.
* Root Rot: This is caused by overwatering and poor drainage. Make sure your pots have drainage holes and avoid overwatering.
* Pests: Treat pests promptly with insecticidal soap or neem oil.
* Bolting: Prevent bolting by keeping your plants cool, well-watered, and fertilized.
Choosing the Right Radicchio Variety
There are several different varieties of radicchio, each with its own unique characteristics. Here are a few popular options:
* Chioggia: This is the most common variety of radicchio. It has round, compact heads with deep red leaves and white veins. It has a slightly bitter taste.
* Treviso: This variety has elongated heads with red leaves and white veins. It has a milder, sweeter taste than Chioggia.
* Castelfranco: This variety has loose, open heads with pale green leaves and red speckles. It has a delicate, slightly bitter taste.
* Verona: Similar to Chioggia, but often slightly smaller and more compact.
Experiment with different varieties to find your favorite! I personally love the slightly more bitter taste of Chioggia, but Treviso is great for those who prefer a milder flavor.
Tips for Success
Here are a few extra tips to help you succeed in growing radicchio indoors:
* Use High-Quality Potting Soil: The quality of your potting soil can make a big difference in the health and growth of your plants. Choose a well-draining potting mix that is specifically formulated for container gardening.
* Don’t Overcrowd Your Plants: Give your radicchio plants enough space to grow. Overcrowding can lead to poor air circulation and increased risk of disease.
*
Conclusion
So, there you have it! Growing radicchio indoors easily is not just a possibility; it’s a rewarding and surprisingly simple endeavor. Forget the complexities of outdoor gardening and the unpredictable weather patterns. With a little bit of planning and the right setup, you can enjoy the slightly bitter, beautifully colored leaves of fresh radicchio right from your own home.
Why is this DIY trick a must-try? Because it puts you in control. You control the environment, the nutrients, and the harvest. You bypass the need for a large garden space, making it perfect for apartment dwellers or anyone with limited outdoor access. Plus, there’s something incredibly satisfying about nurturing a plant from seed to table, knowing exactly where your food comes from and how it was grown.
But the benefits extend beyond convenience and control. Radicchio is packed with nutrients, including vitamins K and C, as well as antioxidants. By growing your own, you ensure you’re getting the freshest, most nutrient-rich leaves possible. And let’s not forget the aesthetic appeal! A pot of vibrant radicchio adds a touch of elegance and visual interest to any indoor space.
Ready to take your indoor gardening to the next level? Consider these variations and suggestions to personalize your radicchio-growing experience:
* Experiment with different varieties: Radicchio comes in various shapes, sizes, and colors. Try growing the classic Chioggia, the elongated Treviso, or the speckled Castelfranco to discover your favorite.
* Succession planting: Plant new seeds every few weeks to ensure a continuous supply of fresh radicchio throughout the season.
* Companion planting: Grow radicchio alongside other compatible herbs and vegetables, such as basil, parsley, or carrots, to create a thriving indoor ecosystem.
* Hydroponics: For a more advanced approach, explore growing radicchio hydroponically. This soilless method can lead to faster growth and higher yields.
* Use grow lights: While a sunny windowsill can work, supplementing with grow lights, especially during the darker months, will significantly improve your radicchio’s growth and color.
* Blanching: For a milder flavor, try blanching your radicchio by covering the heads with a pot or cardboard box for a few days before harvesting. This reduces the bitterness and enhances the sweetness.
Don’t be intimidated if you’re new to indoor gardening. Radicchio is a relatively forgiving plant, and the learning process is part of the fun. Start small, be patient, and don’t be afraid to experiment.
We’re confident that you’ll find growing radicchio indoors easily a rewarding and enjoyable experience. So, grab your seeds, prepare your pots, and get ready to enjoy the taste of homegrown goodness.
We’d love to hear about your experiences! Share your tips, tricks, and photos of your indoor radicchio gardens in the comments below. Let’s create a community of indoor radicchio enthusiasts and inspire others to embrace the joy of growing their own food. Happy gardening!
Frequently Asked Questions (FAQ)
What is the best time of year to start growing radicchio indoors?
You can start growing radicchio indoors at any time of year, as you are controlling the environment. However, starting in late summer or early fall is ideal if you want to harvest during the cooler months. This is because radicchio prefers cooler temperatures for optimal growth and flavor development. If you are starting in the spring or summer, ensure your indoor space is adequately cooled to prevent bolting (premature flowering).
How much light does indoor radicchio need?
Radicchio requires at least 6 hours of direct sunlight per day. If you don’t have a sunny windowsill, consider using grow lights. LED grow lights are energy-efficient and provide the full spectrum of light needed for healthy growth. Position the lights about 6-12 inches above the plants and adjust as they grow. Insufficient light can result in leggy growth and pale leaves.
What type of soil is best for growing radicchio indoors?
A well-draining potting mix is essential for growing radicchio indoors. Avoid using garden soil, as it can become compacted and waterlogged in containers. A mix of peat moss, perlite, and vermiculite is a good option. You can also purchase pre-made potting mixes specifically formulated for vegetables. Ensure the pot has drainage holes to prevent root rot.
How often should I water my indoor radicchio plants?
Water radicchio plants when the top inch of soil feels dry to the touch. Avoid overwatering, as this can lead to root rot. Water thoroughly until water drains out of the drainage holes. During warmer months, you may need to water more frequently. Check the soil moisture regularly and adjust your watering schedule accordingly.
How often should I fertilize my indoor radicchio plants?
Radicchio benefits from regular fertilization, especially during its active growth phase. Use a balanced liquid fertilizer diluted to half strength every 2-3 weeks. Look for a fertilizer with an NPK ratio (nitrogen, phosphorus, potassium) of around 10-10-10. Avoid over-fertilizing, as this can lead to excessive leaf growth and reduced head formation.
How long does it take for radicchio to mature indoors?
Radicchio typically takes 80-90 days to mature from seed to harvest. However, this can vary depending on the variety, growing conditions, and your desired size. You can start harvesting individual leaves earlier for a continuous supply of fresh greens. The heads are ready to harvest when they are firm and well-formed.
How do I harvest radicchio indoors?
You can harvest radicchio by either cutting the entire head at the base or by harvesting individual leaves as needed. If you cut the entire head, leave about an inch of the stem intact, and it may regrow for a second harvest. When harvesting individual leaves, start with the outer leaves and work your way inwards.
Why is my radicchio bitter?
Radicchio is naturally slightly bitter, but several factors can influence its bitterness. Hot weather, insufficient watering, and over-fertilizing can all contribute to a more bitter flavor. To reduce bitterness, try blanching the heads by covering them with a pot or cardboard box for a few days before harvesting. This reduces the chlorophyll content and enhances the sweetness.
What pests and diseases affect indoor radicchio?
Indoor radicchio is generally less susceptible to pests and diseases than outdoor-grown radicchio. However, aphids, spider mites, and whiteflies can sometimes be a problem. Regularly inspect your plants for signs of infestation and treat accordingly with insecticidal soap or neem oil. Root rot can also be a concern if the soil is poorly drained or overwatered.
Can I grow radicchio from cuttings?
While it’s more common to grow radicchio from seed, you can propagate it from root cuttings. After harvesting a head of radicchio, you can try replanting the remaining stem and roots. Keep the soil moist and provide adequate light, and new shoots may emerge. However, this method is not always successful, and growing from seed is generally more reliable.
Leave a Comment