
Growing Sweet Potatoes Easy? Absolutely! Imagine harvesting a bounty of vibrant, nutrient-rich sweet potatoes right from your own backyard. Forget those bland, store-bought spuds – we’re talking about homegrown sweetness bursting with flavor. For centuries, sweet potatoes have been a staple in diets across the globe, from their origins in Central and South America to their widespread cultivation in Asia and Africa. They’re not just delicious; they’re packed with vitamins, minerals, and antioxidants, making them a powerhouse of nutrition.
But let’s be honest, the thought of growing your own can seem daunting. Where do you even start? That’s where this DIY guide comes in! I’m here to show you that growing sweet potatoes easy is not only possible, but also incredibly rewarding. Whether you have a sprawling garden or just a sunny balcony, I’ll share simple, step-by-step tricks and hacks that will transform you into a sweet potato pro.
In today’s world, where we’re increasingly conscious of where our food comes from, knowing how to grow your own produce is more important than ever. Plus, there’s nothing quite like the satisfaction of nurturing a plant from start to finish and enjoying the fruits (or, in this case, the roots!) of your labor. So, grab your gardening gloves, and let’s dive into the wonderful world of sweet potato cultivation!
Growing Sweet Potatoes: A Beginner’s Guide to Bountiful Harvests
Hey there, fellow gardening enthusiasts! I’m so excited to share my experience with growing sweet potatoes. They’re not only delicious and nutritious but also surprisingly easy to cultivate, even if you’re a beginner like I was not too long ago. Get ready to enjoy a homegrown harvest of these vibrant orange treasures!
Choosing Your Sweet Potato Variety
Before we dive into the nitty-gritty, let’s talk varieties. Sweet potatoes come in a range of colors, textures, and flavors. Here are a few popular choices:
* Beauregard: This is a classic, reliable variety with reddish-purple skin and orange flesh. It’s known for its sweetness and moist texture. It’s also a relatively early maturing variety, which is great for shorter growing seasons.
* Jewel: Another popular choice, Jewel sweet potatoes have copper-colored skin and deep orange flesh. They’re slightly drier than Beauregard but still incredibly flavorful.
* Garnet: Garnet sweet potatoes boast a deep red skin and vibrant orange flesh. They’re known for their sweetness and creamy texture.
* Japanese Sweet Potato (Muraski): If you’re looking for something different, try Japanese sweet potatoes. They have purple skin and white flesh that turns golden when cooked. They’re less sweet than other varieties and have a slightly nutty flavor.
* Okinawan Sweet Potato: These have tan skin and purple flesh. They are less sweet than orange varieties and have a dry, almost crumbly texture.
I recommend choosing a variety that’s well-suited to your climate and personal preferences. Check with your local nursery or agricultural extension office for recommendations.
Preparing Your Sweet Potato Slips
Sweet potatoes are typically grown from “slips,” which are sprouts that grow from the sweet potato itself. You can purchase slips from a nursery or grow your own. Growing your own is a fun project, and it’s more economical. Here’s how I do it:
1. Choose a Healthy Sweet Potato: Select a firm, disease-free sweet potato from your local grocery store or farmer’s market. Organic is always a good choice.
2. Prepare the Sweet Potato: There are two main methods for sprouting slips:
* Water Method: Suspend the sweet potato in a jar or glass of water, with the bottom half submerged. You can use toothpicks to hold it in place. Place the jar in a warm, sunny location.
* Soil Method: Bury the sweet potato horizontally in a container filled with moist potting mix, leaving the top exposed. Place the container in a warm, sunny location.
3. Wait for Sprouts: Within a few weeks, you should see sprouts emerging from the sweet potato. Keep the water fresh (for the water method) and the soil moist (for the soil method).
4. Separate the Slips: Once the sprouts are 6-8 inches tall, gently twist or cut them off the sweet potato.
5. Root the Slips: Place the slips in a jar of water, with the bottom inch or two submerged. Within a few days, roots should start to develop.
6. Harden Off the Slips: Before planting, gradually acclimate the slips to outdoor conditions by placing them outside for a few hours each day, increasing the time over a week. This helps them adjust to the sun and wind.
Preparing the Garden Bed
Sweet potatoes thrive in warm weather and well-drained soil. Here’s how to prepare your garden bed:
1. Choose a Sunny Location: Sweet potatoes need at least 6-8 hours of sunlight per day.
2. Prepare the Soil: Sweet potatoes prefer loose, sandy loam soil. If your soil is heavy clay, amend it with compost, aged manure, or other organic matter to improve drainage.
3. Create Mounds or Ridges: Sweet potatoes grow best in raised mounds or ridges. This helps with drainage and allows the tubers to expand easily. I usually make mounds that are about 12 inches high and 12 inches wide, spaced about 3 feet apart.
4. Fertilize the Soil: Sweet potatoes don’t need a lot of fertilizer, but a light application of a balanced fertilizer (like 10-10-10) before planting can help them get off to a good start. Avoid using too much nitrogen, as this can promote leafy growth at the expense of tuber development.
Planting Your Sweet Potato Slips
Now comes the fun part – planting your sweet potato slips!
1. Wait for Warm Weather: Sweet potatoes are sensitive to frost, so wait until the soil has warmed up to at least 65°F (18°C) before planting. This is usually a few weeks after the last frost.
2. Water the Slips: Before planting, soak the roots of the slips in water for about an hour.
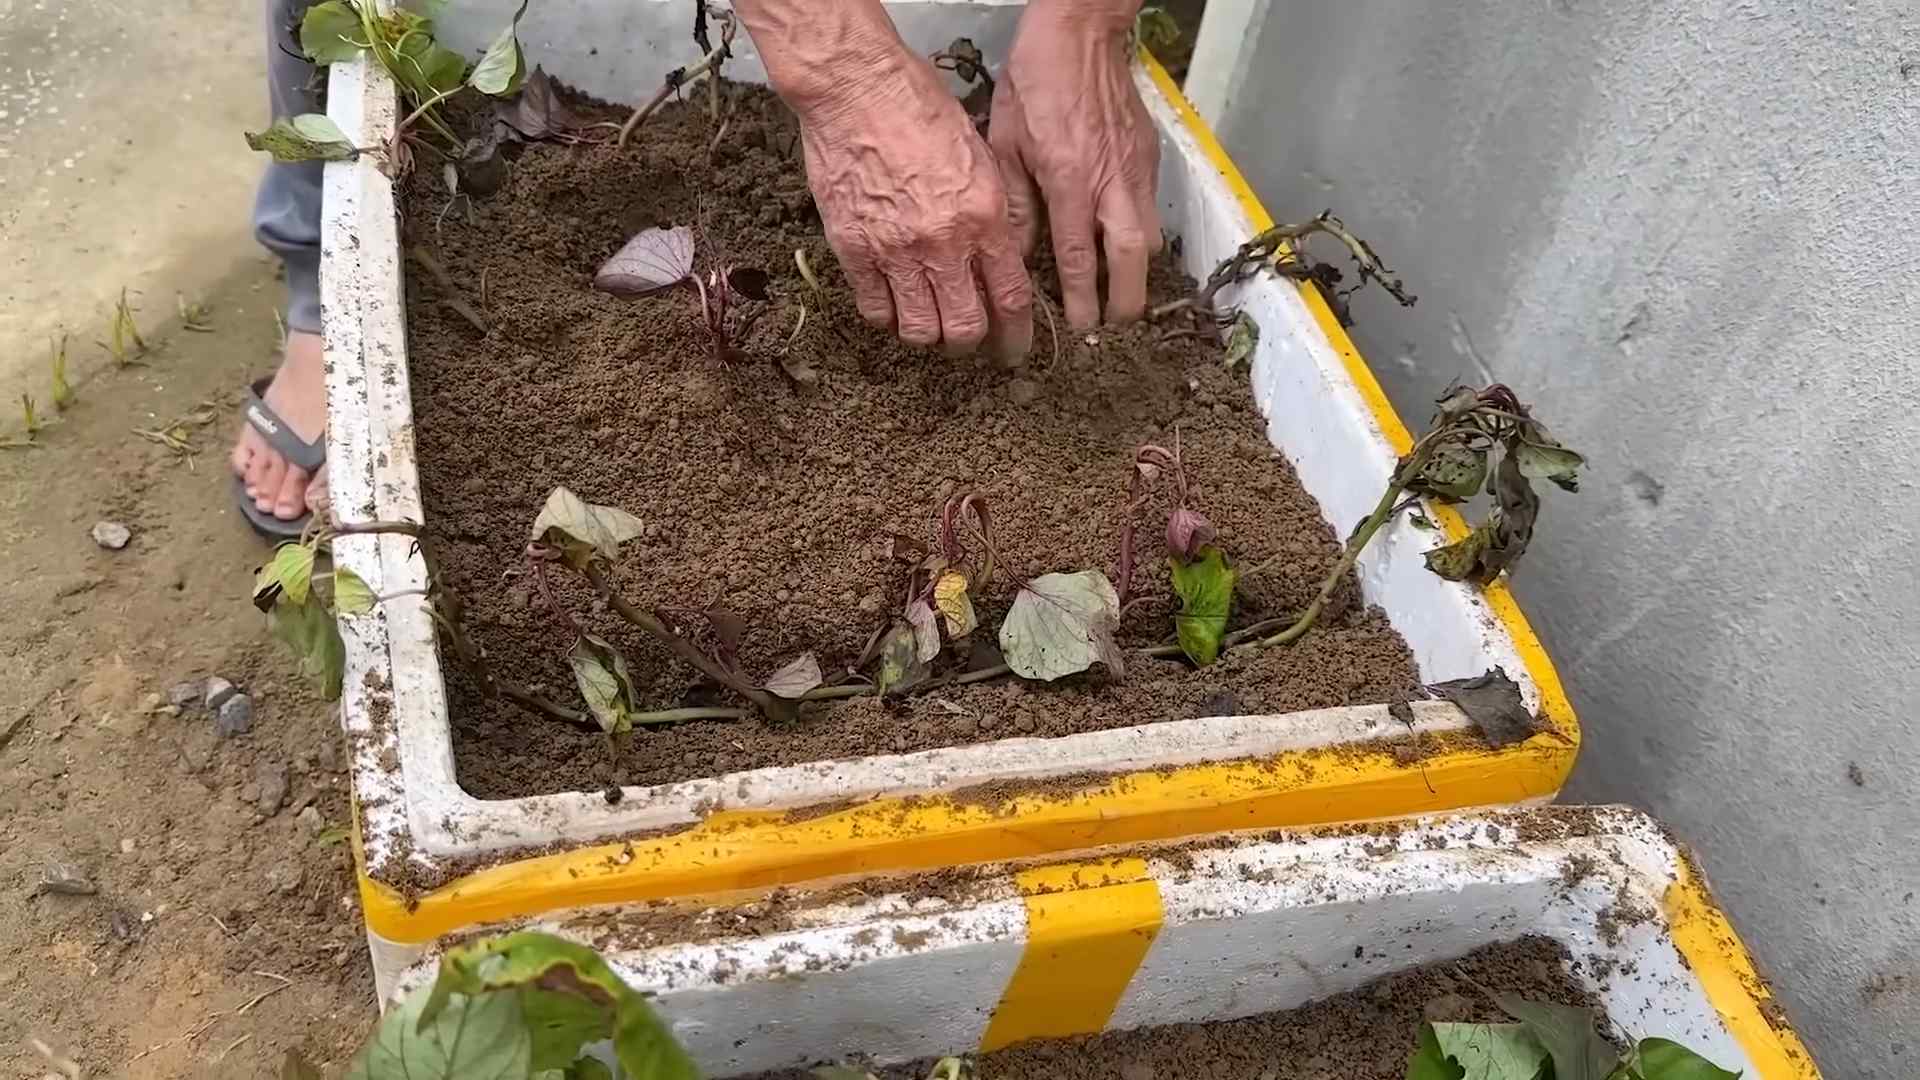
3. Plant the Slips: Plant the slips about 4-6 inches deep, spacing them about 12-18 inches apart on the mounds or ridges. Make sure to bury the roots and the bottom part of the stem.
4. Water Thoroughly: After planting, water the slips thoroughly to help them settle in.
Caring for Your Sweet Potato Plants
Sweet potatoes are relatively low-maintenance plants, but here are a few things you can do to help them thrive:
1. Water Regularly: Water the plants regularly, especially during dry periods. Sweet potatoes need consistent moisture to develop healthy tubers. Aim for about 1 inch of water per week.
2. Weed Regularly: Keep the garden bed free of weeds, which can compete with the sweet potatoes for nutrients and water.
3. Fertilize Sparingly: If the plants are growing slowly, you can apply a light application of a balanced fertilizer. Avoid over-fertilizing, as this can lead to excessive leafy growth.
4. Control Pests and Diseases: Sweet potatoes are generally resistant to pests and diseases, but keep an eye out for common problems like sweet potato weevils and fungal diseases. If you notice any problems, take action promptly to prevent them from spreading. I prefer using organic pest control methods whenever possible.
5. Vine Management: Sweet potato vines can spread quite a bit. While some gardeners let them sprawl, I prefer to gently lift and redirect the vines to keep them within the garden bed. You can also prune the vines if they become too unruly. Be careful not to damage the developing tubers when moving the vines.
Harvesting Your Sweet Potatoes
The moment we’ve all been waiting for – harvesting your sweet potatoes!
1. Timing is Key: Sweet potatoes are typically ready to harvest about 90-120 days after planting, depending on the variety. A good indicator is when the leaves start to turn yellow and the vines begin to die back.
2. Choose a Dry Day: Harvest your sweet potatoes on a dry day to prevent them from rotting.
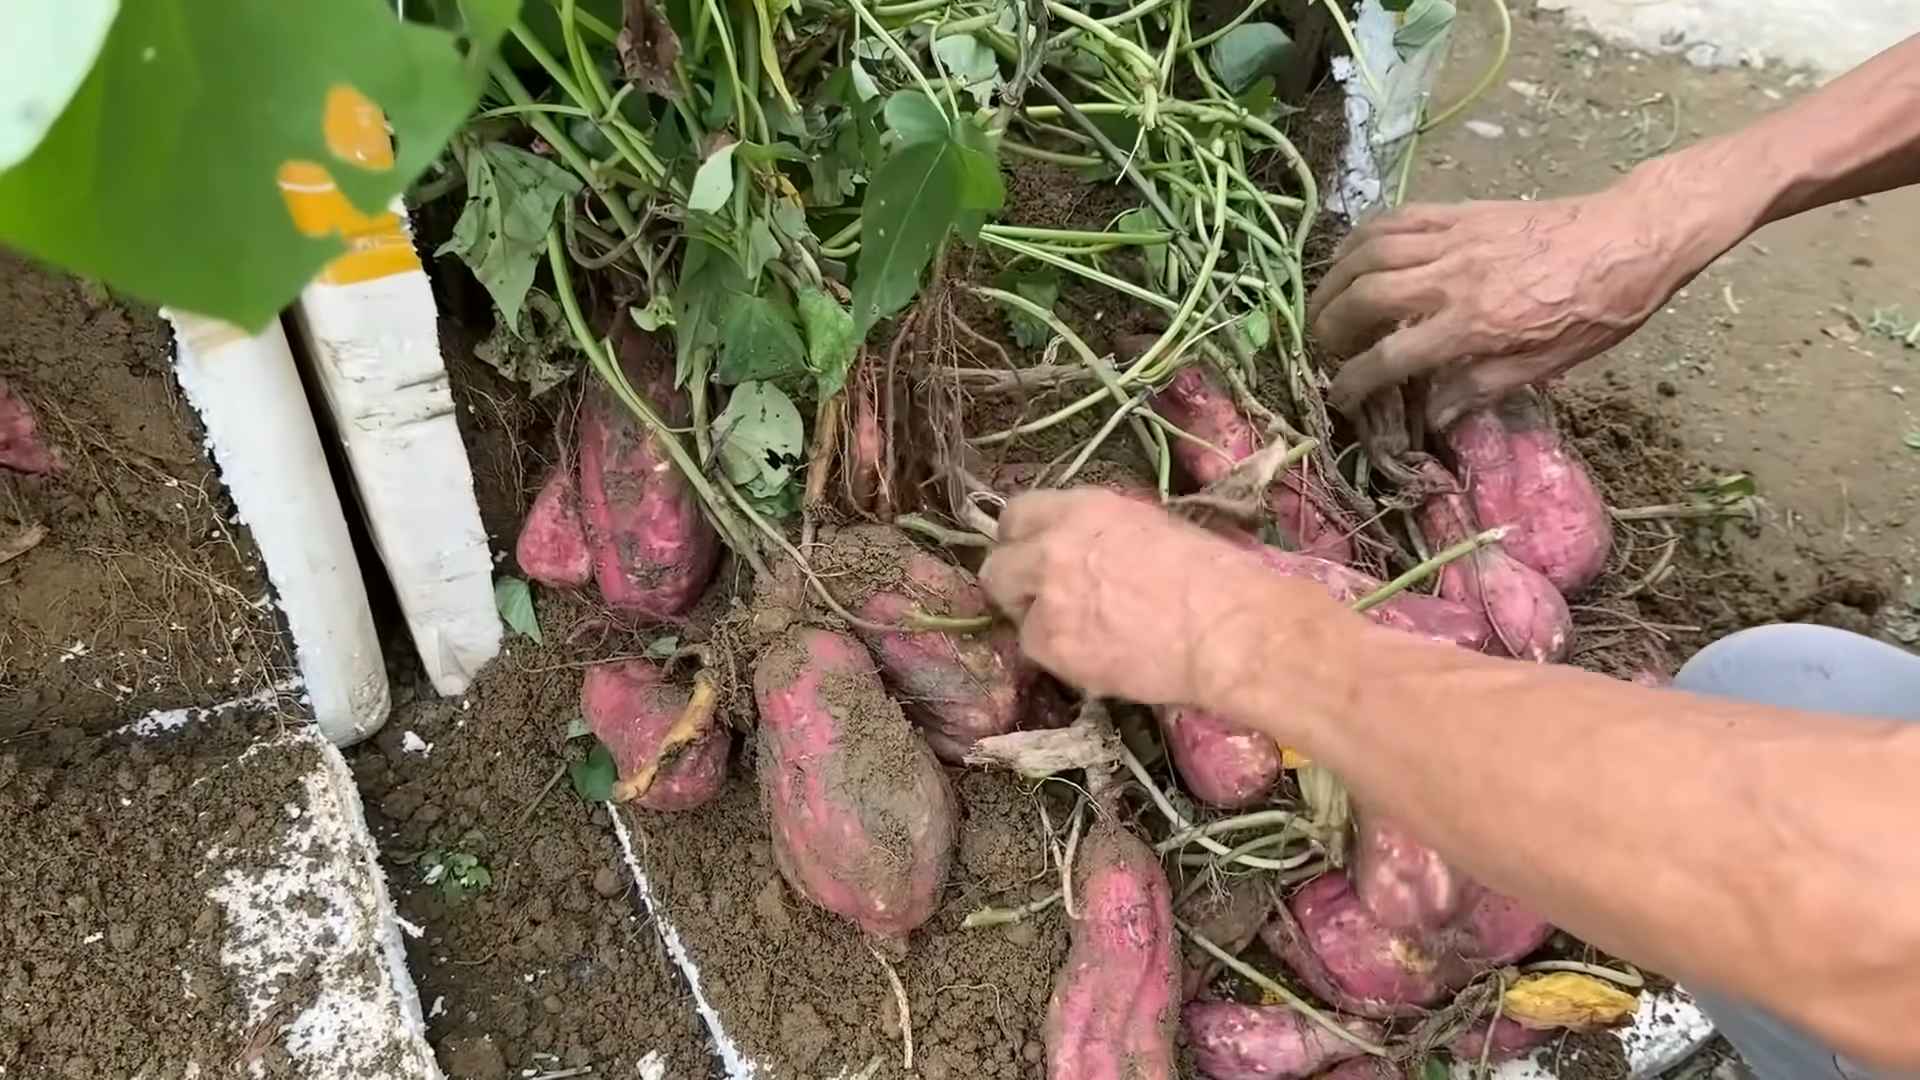
3. Dig Carefully: Use a garden fork or shovel to carefully dig around the plants, being careful not to damage the tubers. Start digging a foot or so away from the plant to avoid accidentally spearing the sweet potatoes.
4. Lift the Tubers: Gently lift the tubers from the soil.
5. Curing Your Sweet Potatoes: Curing is an essential step for improving the flavor and storage life of sweet potatoes.
* Clean the Tubers: Gently brush off any excess soil from the tubers. Avoid washing them, as this can promote rotting.
* Cure in a Warm, Humid Place: Place the sweet potatoes in a warm (80-85°F or 27-29°C), humid (85-90% humidity) place for 7-10 days. This allows the skins to harden and the starches to convert to sugars. I use my garage for this, but you can also use a shed or even a spare room with a humidifier.
* Store Properly: After curing, store the sweet potatoes in a cool (55-60°F or 13-16°C), dry, and well-ventilated place. Avoid storing them in the refrigerator, as this can cause them to develop a hard core. Properly cured and stored sweet potatoes can last for several months.
Troubleshooting Common Problems
Even with the best care, you might encounter a few challenges along the way. Here are some common problems and how to address them:
* Poor Tuber Development: This can be caused by several factors, including poor soil drainage, lack of sunlight, or over-fertilizing with nitrogen. Make sure your soil is well-drained, the plants are getting enough sunlight, and you’re not using too much nitrogen fertilizer.
* Sweet Potato Weevils: These pests can damage the tubers and vines. Use row covers to protect the plants, and consider using organic insecticides if necessary. Crop rotation can also help prevent infestations.
*
Conclusion
So, there you have it! Growing sweet potatoes doesn’t have to be a daunting task reserved for seasoned gardeners. With this simple DIY trick, you can unlock a bountiful harvest of these nutritious and delicious root vegetables, even if you’re a beginner. The beauty of this method lies in its accessibility and affordability. You don’t need fancy equipment or a sprawling garden; just a sweet potato, some water, and a little patience.
Why is this DIY trick a must-try? Because it’s a game-changer! It allows you to propagate your own sweet potato slips (the sprouts that grow into new plants) from a single sweet potato. This saves you money on buying slips from a nursery and gives you complete control over the variety you grow. Plus, it’s incredibly rewarding to watch those little sprouts emerge and transform into thriving plants. Imagine the satisfaction of harvesting your own sweet potatoes, knowing you nurtured them from the very beginning.
But the fun doesn’t stop there! Feel free to experiment with different varieties of sweet potatoes. Each variety boasts a unique flavor profile and texture, from the classic orange-fleshed sweet potatoes to the more exotic purple or white varieties. Try growing multiple varieties side-by-side to discover your personal favorite.
Variations and Suggestions:
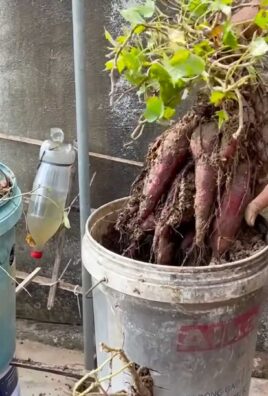
* Container Gardening: If you’re short on space, you can absolutely grow sweet potatoes in containers. Choose a large container (at least 20 gallons) with good drainage and fill it with a well-draining potting mix.
* Vertical Gardening: Get creative and try growing your sweet potato vines vertically on a trellis or fence. This not only saves space but also adds a beautiful ornamental element to your garden.
* Soil Enrichment: Sweet potatoes thrive in well-drained soil that is rich in organic matter. Amend your soil with compost or aged manure before planting to give your plants a boost.
* Sunlight is Key: Ensure your sweet potato plants receive at least 6-8 hours of direct sunlight per day for optimal growth and tuber development.
* Watering Wisely: Water your sweet potato plants regularly, especially during dry spells. However, avoid overwatering, as this can lead to root rot.
* Harvesting Time: Knowing when to harvest is crucial. Typically, sweet potatoes are ready to harvest about 90-120 days after planting. The leaves will start to turn yellow and the vines will begin to die back. Gently dig around the plants to check the size of the tubers.
We are confident that this DIY trick will revolutionize your sweet potato growing experience. It’s simple, effective, and incredibly satisfying. So, what are you waiting for? Grab a sweet potato, follow our instructions, and get ready to embark on a rewarding gardening adventure.
We encourage you to try this DIY trick for growing sweet potatoes and share your experiences with us! Post photos of your sweet potato slips and your bountiful harvests on social media using #DIYSweetPotatoes. We can’t wait to see your success stories and learn from your experiences. Happy growing!
Frequently Asked Questions (FAQ)
Q: What kind of sweet potato should I use for this DIY trick?
A: You can use any variety of sweet potato you like! However, it’s best to use an organic sweet potato, as conventionally grown sweet potatoes may be treated with sprout inhibitors. Choose a sweet potato that is firm, free of blemishes, and has a few “eyes” (small indentations where sprouts will emerge).
Q: How long does it take for the sweet potato to sprout?
A: The time it takes for a sweet potato to sprout can vary depending on the temperature and humidity. Generally, you can expect to see sprouts within 2-4 weeks. Be patient and keep the bottom half of the sweet potato submerged in water.
Q: What do I do with the sprouts once they’re big enough?
A: Once the sprouts (slips) are about 6-8 inches long, they’re ready to be transplanted. Gently twist or cut them off the sweet potato. Place the slips in a glass of water for a few days to allow them to develop roots. Once the roots are about an inch long, you can transplant them into your garden or containers.
Q: What kind of soil is best for growing sweet potatoes?
A: Sweet potatoes prefer well-drained, sandy loam soil that is rich in organic matter. Avoid heavy clay soils, as they can become waterlogged and inhibit tuber development. Amend your soil with compost or aged manure before planting to improve drainage and fertility.
Q: How much sunlight do sweet potatoes need?
A: Sweet potatoes need at least 6-8 hours of direct sunlight per day to thrive. Choose a sunny location in your garden or on your patio for your sweet potato plants.
Q: How often should I water sweet potatoes?
A: Water your sweet potato plants regularly, especially during dry spells. However, avoid overwatering, as this can lead to root rot. Water deeply and less frequently, allowing the soil to dry out slightly between waterings.
Q: When is the best time to plant sweet potato slips?
A: The best time to plant sweet potato slips is after the last frost, when the soil has warmed up to at least 60°F (15°C). In most regions, this is typically in late spring or early summer.
Q: How do I know when my sweet potatoes are ready to harvest?
A: Sweet potatoes are typically ready to harvest about 90-120 days after planting. The leaves will start to turn yellow and the vines will begin to die back. Gently dig around the plants to check the size of the tubers. If they are large enough, you can harvest them.
Q: How do I cure sweet potatoes after harvesting?
A: Curing sweet potatoes is essential for improving their flavor and storage life. After harvesting, gently brush off any excess soil and allow the sweet potatoes to dry in a warm, humid place (80-85°F or 27-29°C) for about 7-10 days. This process allows the skins to harden and the starches to convert to sugars.
Q: How should I store sweet potatoes?
A: Store cured sweet potatoes in a cool, dry, and well-ventilated place (55-60°F or 13-16°C). Avoid storing them in the refrigerator, as this can cause them to develop a hard core and lose their flavor. Properly stored sweet potatoes can last for several months.
Q: Can I grow sweet potatoes in containers?
A: Yes, you can grow sweet potatoes in containers! Choose a large container (at least 20 gallons) with good drainage and fill it with a well-draining potting mix. Be sure to provide adequate sunlight and water.
Q: Are there any common pests or diseases that affect sweet potatoes?
A: Sweet potatoes can be susceptible to certain pests and diseases, such as sweet potato weevils, wireworms, and fungal diseases. Practice good garden hygiene, such as removing plant debris and rotating crops, to prevent these problems. You can also use organic pest control methods if necessary.
Q: Can I eat the sweet potato leaves?
A: Yes, sweet potato leaves are edible and nutritious! They can be cooked like spinach or other leafy greens. Choose young, tender leaves for the best flavor.
Q: What are some creative ways to use my homegrown sweet potatoes?
A: The possibilities are endless! You can roast them, bake them, mash them, fry them, or use them in soups, stews, and desserts. Get creative and experiment with different recipes to discover your favorite ways to enjoy your homegrown sweet potatoes.

Leave a Comment