
Honey Sesame Chicken is more than just a weeknight meal; it’s a culinary journey that brings the beloved flavors of your favorite takeout right into your kitchen. I’ve always been captivated by the irresistible aroma and the glistening, sticky perfection of this dish. Imagine sinking your teeth into tender, crispy chicken pieces coated in a luscious, savory-sweet glaze, finished with a scattering of aromatic sesame seeds. It’s truly a symphony of textures and tastes that promises to delight every palate and transform an ordinary evening into something special.
While dishes featuring honey and sesame have roots deep in various Asian cuisines, the rendition we often adore as Honey Sesame Chicken has beautifully evolved into a popular staple in American Chinese restaurants and, increasingly, in home kitchens worldwide. It represents a wonderful blend of traditional inspirations with a modern, accessible twist, making it a universally cherished comfort food. I believe its widespread appeal lies in its ability to offer gourmet-level satisfaction with surprisingly straightforward preparation, making it a fantastic option for both seasoned cooks and culinary novices.
Why Everyone Loves This Dish: The Perfect Balance
What truly sets this dish apart and makes people repeatedly crave it? It’s the exquisite balance. The rich, golden honey provides a delightful sweetness, perfectly complemented by the savory depth of soy and the nutty crunch of sesame. This combination creates a glaze that is both sticky and tantalizing, adhering beautifully to every piece of succulent chicken. Making homemade Honey Sesame Chicken allows you to control the quality of ingredients and customize the flavor profile to your exact liking, ensuring a fresher, more vibrant experience than any takeout can offer. Get ready to impress your family and friends with a dish that’s both familiar and extraordinary.
Ingredients:
For the Chicken:
- 1.5 lbs Boneless, Skinless Chicken Thighs (or chicken breast, cut into 1-inch pieces. Thighs offer more flavor and tend to stay juicier.)
- 1 large Egg (for binding the coating)
- 2 tablespoons Soy Sauce (low sodium preferred, for umami in the marinade)
- 1 tablespoon Rice Vinegar (unseasoned, for a slight tang and to tenderize)
- 1 tablespoon Fresh Ginger, grated (adds a pungent, aromatic kick to the marinade)
- 2 cloves Garlic, minced (essential aromatic for depth of flavor)
- 1/2 cup Cornstarch (for the initial dredge, ensuring crispiness)
- 1/2 cup All-Purpose Flour (combined with cornstarch for the ultimate crispy coating)
- 1/2 teaspoon Salt (fine sea salt is great)
- 1/4 teaspoon Black Pepper (freshly ground, for a little warmth)
For the Honey Sesame Sauce:
- 1/2 cup Honey (the star sweetener, providing that signature sticky glaze)
- 1/4 cup Soy Sauce (low sodium, forming the savory backbone of the sauce)
- 2 tablespoons Rice Vinegar (unseasoned, to balance the sweetness with a touch of acidity)
- 1 tablespoon Toasted Sesame Oil (adds a distinct, nutty aroma and flavor that defines the dish)
- 2 tablespoons Brown Sugar (light or dark, enhances sweetness and adds molasses notes)
- 1 tablespoon Fresh Ginger, grated (for a spicy, aromatic warmth that pairs beautifully with the chicken)
- 3 cloves Garlic, minced (more garlic for a robust, savory punch)
- 1/4 cup Water or Chicken Broth (to thin the sauce and help it simmer)
- 2 tablespoons Cornstarch (mixed with 2 tablespoons cold water to create a slurry, used for thickening the sauce)
For Frying and Garnish:
- 4-6 cups Vegetable Oil or Canola Oil (or enough to fill your pot about 2-3 inches deep for frying)
- 2 tablespoons Toasted Sesame Seeds (for garnish, adding texture and more nutty flavor)
- 2 tablespoons Fresh Green Onions, sliced (for garnish, offering a fresh, mild oniony bite and vibrant color)
Preparation Phase: Setting Up for Success
-
Prepping the Chicken for Maximum Flavor and Tenderness
Begin our journey by preparing the chicken, the very heart of our “Honey Sesame Chicken” masterpiece. If you’re using boneless, skinless chicken thighs, which I highly recommend for their inherent juiciness and flavor, start by patting them thoroughly dry with paper towels. This step is crucial for achieving a crispy crust later on. Once dry, place them on a clean cutting board and carefully cut them into uniform 1-inch bite-sized pieces. Aim for consistency in size, as this ensures that all pieces cook evenly. If some pieces are significantly larger or smaller, they will either be undercooked or overcooked, respectively. If using chicken breast, follow the same sizing guidelines, but be mindful that breast meat tends to dry out quicker, so precise cooking times will be even more important. Transfer all the cut chicken pieces into a large mixing bowl.
-
Crafting the Marinade: The Foundation of Flavor
Now, let’s infuse our chicken with a burst of flavor even before it hits the pan. In the bowl with your chicken, add the 1 large egg, 2 tablespoons of soy sauce, 1 tablespoon of rice vinegar, 1 tablespoon of grated fresh ginger, and 2 cloves of minced garlic. Using your clean hands or a spoon, thoroughly mix all these ingredients together, ensuring that every piece of chicken is well coated with this aromatic marinade. The egg acts as a binder, helping the subsequent coating adhere better, while the soy sauce, vinegar, ginger, and garlic work together to tenderize the chicken and impart a deep, savory foundation. Allow the chicken to marinate for at least 15-20 minutes at room temperature. If you have more time, feel free to cover the bowl and refrigerate it for up to 30 minutes, or even an hour for a more profound flavor absorption. Don’t marinate for too long if the marinade contains acidic ingredients, as this can start to break down the chicken’s texture too much.
-
The Perfect Coating: Ensuring Ultimate Crispiness
While our chicken is marinating, we’ll prepare the dry coating mixture that will give our “Honey Sesame Chicken” its irresistible crispy exterior. In a separate, shallow dish or a wide bowl, combine the 1/2 cup of cornstarch, 1/2 cup of all-purpose flour, 1/2 teaspoon of salt, and 1/4 teaspoon of freshly ground black pepper. Whisk these dry ingredients together thoroughly until they are uniformly combined. The combination of cornstarch and flour is key here; cornstarch contributes to an extra-crispy, almost airy crust, while flour provides structure. Once your chicken has finished marinating, take a piece of chicken from the wet marinade, allowing any excess liquid to drip off, and then dredge it in the dry coating mixture. Press the chicken lightly into the flour mixture, ensuring it’s completely coated on all sides. Gently shake off any excess flour, as too much coating can result in a pasty texture rather than a crispy one. Place the coated chicken pieces onto a clean plate or a wire rack set over a baking sheet. Repeat this process with all the remaining chicken pieces. It’s helpful to ensure the pieces are not overlapping too much on the plate, giving them space.
Cooking Phase: Achieving Golden Perfection
-
Frying the Chicken to a Golden, Crispy Perfection
Now comes the exciting part – cooking our beautifully coated chicken! In a large, heavy-bottomed pot or a deep skillet, pour in enough vegetable or canola oil to reach a depth of about 2-3 inches. Heat the oil over medium-high heat until it reaches a temperature of 350-375°F (175-190°C). If you don’t have a thermometer, you can test the oil by dropping a tiny pinch of the flour mixture into it; if it sizzles vigorously and immediately floats to the surface, your oil is ready.
Carefully lower the coated chicken pieces into the hot oil, working in batches to avoid overcrowding the pot. Overcrowding will drastically lower the oil’s temperature, leading to greasy, less crispy chicken. Give each piece enough space to fry properly. Fry the chicken for approximately 4-6 minutes per batch, or until the pieces are deep golden brown and cooked through. They should feel firm to the touch. It’s important to maintain a consistent oil temperature throughout the frying process; if the temperature drops too low, the chicken will absorb too much oil, and if it’s too high, the outside will burn before the inside is cooked. Use a slotted spoon or a spider strainer to carefully remove the cooked chicken from the oil. As you take them out, immediately transfer the crispy chicken pieces to a wire rack set over a baking sheet lined with paper towels. This setup allows excess oil to drain away, keeping the chicken as crispy as possible. Repeat this process until all the chicken is fried. -
Simmering the Irresistible Honey Sesame Sauce
While your glorious chicken is resting, let’s bring together the sweet and savory magic of our “Honey Sesame Chicken” sauce. In a medium saucepan, combine the 1/2 cup of honey, 1/4 cup of soy sauce, 2 tablespoons of rice vinegar, 1 tablespoon of toasted sesame oil, 2 tablespoons of brown sugar, 1 tablespoon of grated fresh ginger, 3 cloves of minced garlic, and 1/4 cup of water or chicken broth. Whisk these ingredients together until the brown sugar is mostly dissolved and everything is well combined.
Place the saucepan over medium heat and bring the mixture to a gentle simmer, stirring occasionally. Once it starts simmering, reduce the heat to low. In a small bowl, whisk together the 2 tablespoons of cornstarch with 2 tablespoons of cold water until you have a smooth slurry – ensure there are no lumps, as these will lead to a lumpy sauce. While continuously stirring the simmering sauce in the saucepan, slowly pour in the cornstarch slurry. Continue stirring gently as the sauce thickens. This usually takes just 1-2 minutes. The sauce should reach a consistency that lightly coats the back of a spoon. If it becomes too thick, you can add a tablespoon or two of water or broth to thin it out slightly. If it’s not thick enough, you can quickly make another small cornstarch slurry and add a bit more, but do so carefully. Remove the sauce from the heat once it reaches your desired consistency.
Assembling & Serving Phase: Bringing It All Together
-
Tossing and Coating Our “Honey Sesame Chicken”
Now for the grand finale – bringing the crispy chicken and the luscious sauce together! In a large mixing bowl, gently add all of your perfectly fried chicken pieces. Pour the warm honey sesame sauce evenly over the chicken. Using a spatula or tongs, gently toss the chicken, ensuring that every single piece is thoroughly coated with that beautiful, glistening sauce. Be careful not to toss too aggressively, as we want to maintain that wonderful crispiness we worked so hard to achieve. This step is where the dish truly transforms into “Honey Sesame Chicken”, as the sauce clings to each piece, creating an irresistible sticky glaze. Work quickly so the chicken retains some of its heat and the sauce doesn’t cool too much.
-
Final Touches and Serving Suggestions for an Unforgettable Meal
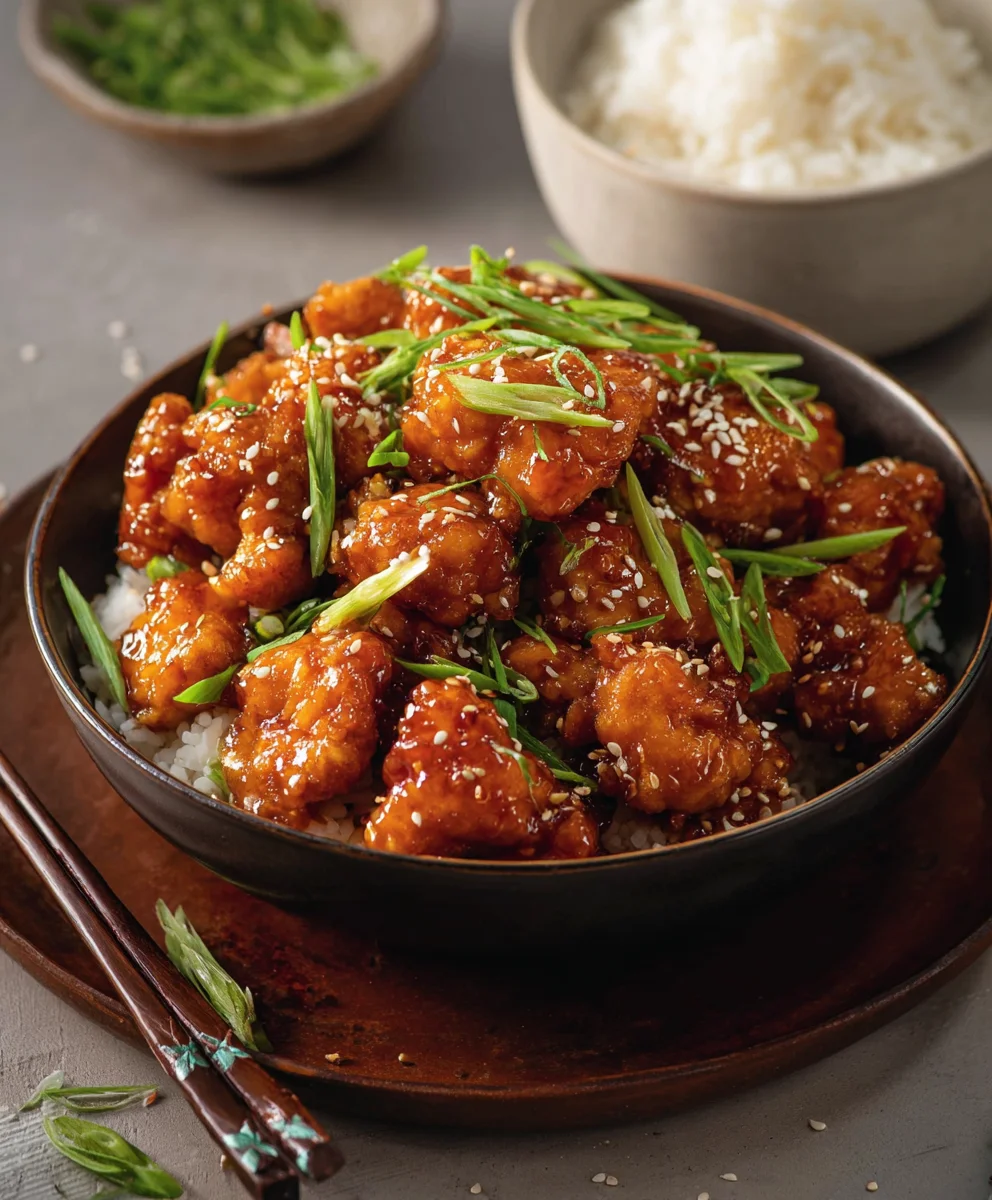
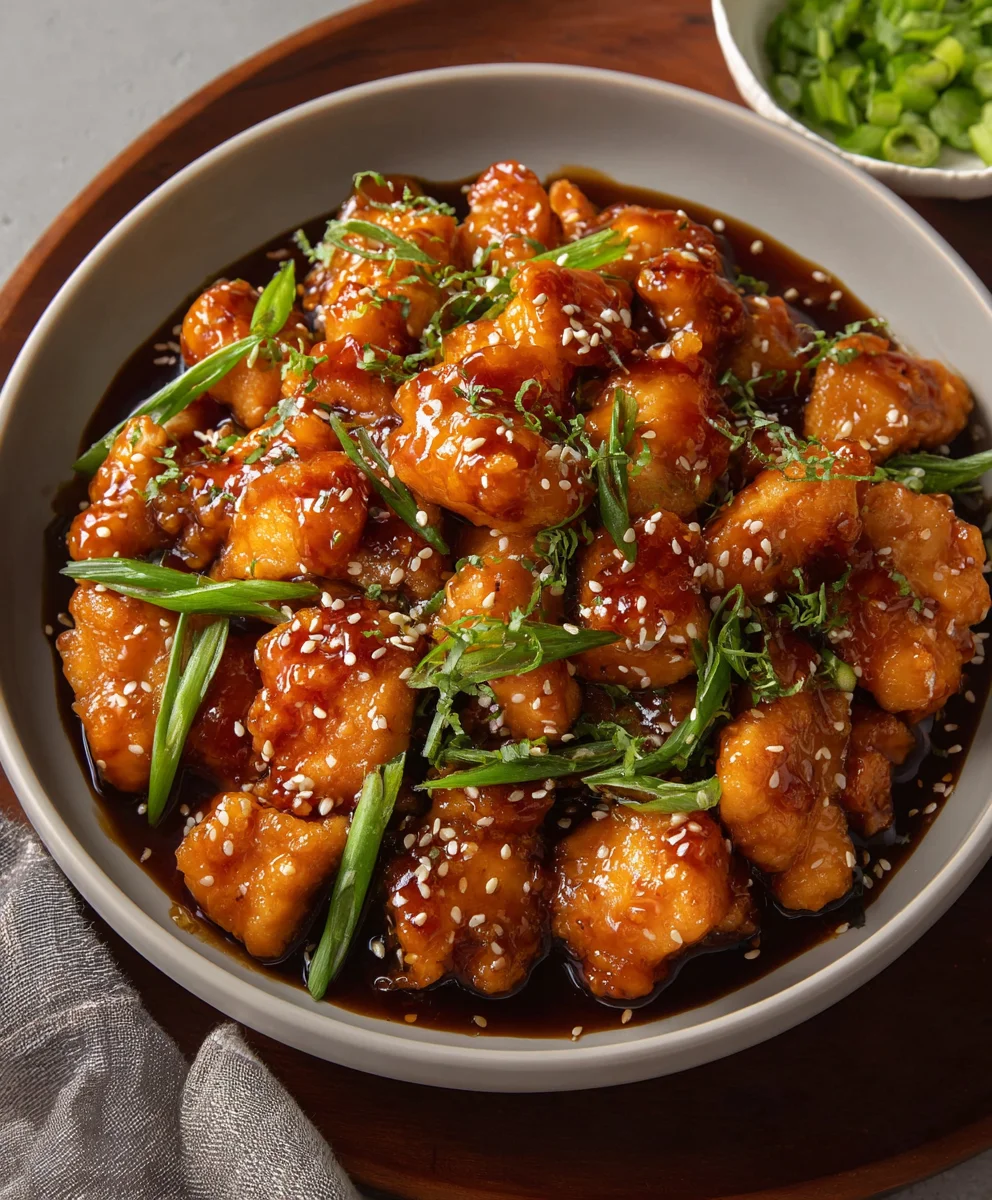
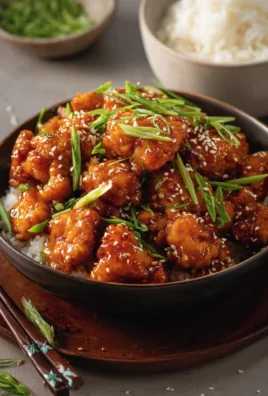
Once your chicken is glistening with the honey sesame sauce, it’s time for the final flourishes. Immediately transfer the “Honey Sesame Chicken” to a serving platter. Sprinkle generously with the 2 tablespoons of toasted sesame seeds. The sesame seeds not only add a wonderful nutty crunch but also a beautiful visual appeal that is iconic for this dish. Finally, scatter the 2 tablespoons of freshly sliced green onions over the top. The vibrant green of the onions provides a fresh counterpoint to the rich sauce and a slight sharpness that brightens the overall flavor profile.
Serve your delicious “Honey Sesame Chicken” immediately while it’s hot and crispy. It pairs wonderfully with steamed white rice or brown rice, which can absorb some of the extra sauce. For a more complete meal, consider serving it alongside a side of steamed broccoli, stir-fried green beans, or a simple crisp Asian-inspired salad. Enjoy the fruits of your labor – a truly satisfying and flavorful homemade “Honey Sesame Chicken” that rivals any restaurant version!
This dish is a fantastic weeknight treat or a show-stopping meal for entertaining. The combination of crispy chicken, sweet and savory sauce, and the aromatic garnishes creates an unforgettable culinary experience that will have everyone asking for your secret recipe.
Conclusion:
And there you have it, my friends! We’ve reached the delicious culmination of our culinary journey with this incredible Honey Sesame Chicken recipe. I genuinely hope you’re feeling inspired to roll up your sleeves and bring this magic to your own kitchen. This isn’t just another weeknight meal; it’s an experience, a symphony of flavors that will undoubtedly earn a permanent spot in your recipe rotation. Why is it a must-try? Imagine perfectly tender chicken, coated in a glistening, sweet-and-savory glaze that offers just the right amount of sticky goodness, all topped with a delightful crunch from toasted sesame seeds. It’s the kind of dish that lights up faces around the dinner table, making even the pickiest eaters ask for seconds.
What I adore most about this particular rendition of Honey Sesame Chicken is its masterful balance. We’ve meticulously crafted a sauce that avoids being overly sweet, instead offering a complex profile that sings with notes of ginger, garlic, and a hint of tang, perfectly complementing the rich honey. It’s significantly fresher and more vibrant than any takeout option, giving you complete control over the quality of your ingredients and the intensity of flavors. Plus, knowing you created such a restaurant-worthy dish from scratch? That feeling of accomplishment is simply unparalleled.
Elevate Your Meal: Serving Suggestions & Creative Variations
Now that you’re ready to dive into the world of homemade Honey Sesame Chicken, let’s talk about how to make it a complete feast. My absolute favorite way to serve this dish is alongside fluffy, steamed jasmine rice – it’s the perfect canvas to soak up every last drop of that glorious sauce. Don’t forget a side of vibrant, steamed or stir-fried broccoli, asparagus, or green beans for a pop of color and a boost of nutrients.
But don’t stop there! This recipe is incredibly versatile, inviting you to experiment and make it truly your own. For a healthier, low-carb option, consider serving it with cauliflower rice or zucchini noodles. If you’re looking to pack in more veggies, feel free to toss in some bell peppers, snap peas, shredded carrots, or even some thinly sliced mushrooms directly into the pan during the last few minutes of cooking, allowing them to gently wilt and absorb the sauce.
Feeling adventurous? Here are a few ways to switch things up:
- Spicy Kick: For those who love a bit of heat, a pinch of red pepper flakes or a dash of sriracha in the sauce will take it to a whole new level.
- Citrus Brightness: A squeeze of fresh lime or lemon juice right before serving can add a wonderful zesty counterpoint to the sweetness.
- Ginger-Garlic Boost: Don’t hesitate to add extra fresh grated ginger or minced garlic if you’re a fan of those aromatic powerhouses.
- Protein Swap: While chicken is classic, this sauce works beautifully with crispy pan-fried tofu, shrimp, or even pork tenderloin. Just adjust cooking times accordingly.
- Appetizer Style: Cut the chicken into smaller pieces and serve them on skewers for a fantastic party appetizer, or wrap them in fresh lettuce cups for a light and refreshing bite.
Don’t just dream about it, make it happen! I promise you, the joy of creating this dish in your own kitchen, filling your home with its irresistible aroma, and then savoring every bite, is an experience you won’t regret. This Honey Sesame Chicken isn’t just a recipe; it’s an invitation to create lasting memories around your dinner table. So, gather your ingredients, follow these simple steps, and prepare to be amazed.
Once you’ve whipped up your own batch, I would absolutely love to hear about your experience! Did you add a unique twist? What did your family think? Please share your photos and stories with me on social media – tag me, use our recipe hashtag, or simply drop a comment below. Your culinary adventures inspire me just as much as I hope this recipe inspires you. Happy cooking, and get ready to enjoy one of the most satisfying meals you’ll ever make at home!
Frequently Asked Questions (FAQs)
Q: What’s the best way to get crispy Honey Sesame Chicken?
A: The key to crispy chicken lies in two main areas: coating and cooking method. First, ensure your chicken pieces are patted very dry before dredging them in cornstarch. This creates a thin, even coating that fries up beautifully. Second, pan-frying in a moderate amount of oil (enough to coat the bottom of the pan and lightly submerge the chicken) over medium-high heat is crucial. Don’t overcrowd the pan, and allow each side to brown well before flipping. If you prefer baking, tossing the chicken in cornstarch and baking at a higher temperature (around 400°F or 200°C) on a wire rack for 20-25 minutes, flipping halfway, can also yield a nice crispness before tossing with the sauce.
Q: Can I make Honey Sesame Chicken ahead of time?
A: While the chicken is best enjoyed fresh off the stove when it’s crispiest, you can definitely do some prep work in advance. The sauce can be made 2-3 days ahead and stored in an airtight container in the refrigerator. You can also cut and cornstarch-dredge the chicken a few hours before cooking and keep it covered in the fridge. To assemble, simply cook the chicken and then toss it with the pre-made warm sauce. Leftovers also reheat well, though the chicken might lose some of its initial crispness.
Q: How long does Honey Sesame Chicken last in the fridge?
A: Properly stored in an airtight container in the refrigerator, homemade Honey Sesame Chicken will last for 3-4 days. It makes for fantastic lunch leftovers! To reheat, you can use a microwave for convenience, but for better texture, gently warm it in a pan on the stovetop over low heat until heated through, or in an oven at 300°F (150°C) for about 10-15 minutes.
Q: Can I use chicken thighs instead of breasts for this recipe?
A: Absolutely, and many people prefer chicken thighs for their richer flavor and tendency to stay more moist! If using boneless, skinless chicken thighs, cut them into similar-sized pieces as you would chicken breasts. The cooking time will be roughly the same, but keep an eye on them to ensure they’re cooked through. Thighs are more forgiving and less likely to dry out, making them an excellent choice for this saucy dish.
Q: Is Honey Sesame Chicken healthy?
A: Compared to many deep-fried, heavily processed takeout versions, homemade Honey Sesame Chicken can be a much healthier option. You control the amount of oil used for cooking, and the sauce, while containing sugar (from honey), is free from artificial flavors and excessive sodium often found in restaurant dishes. To make it even healthier, pair it with plenty of steamed vegetables or a generous salad, opt for brown rice or quinoa, and consider baking or air-frying the chicken instead of pan-frying. It’s all about balance and conscious choices!
Q: How do I prevent the sauce from being too thin or too thick?
A: The key to a perfect sauce consistency is often the cornstarch slurry. Ensure your cornstarch and cold water are thoroughly mixed before adding to the hot sauce – this prevents lumps. When you add the slurry, stir constantly. The sauce will thicken rapidly as it heats. If it’s too thick, you can thin it out a tablespoon at a time with a little hot water or chicken broth until desired consistency. If it’s too thin, create another small slurry (1 teaspoon cornstarch mixed with 1 teaspoon cold water) and slowly whisk it into the simmering sauce until it thickens to your liking. Remember, the sauce will continue to thicken slightly as it cools.
Honey Sesame Chicken
Honey Sesame Chicken is more than just a weeknight meal; it’s a culinary journey that brings the beloved flavors of your favorite takeout right into your kitchen. Imagin extracte sinking your teeth into tender, crispy chicken pieces coated in a luscious, savory-sweet glaze. It’s truly a symphony of textures and tastes that promises to delight every palate and transform an ordinary evening into something special.
Ingredients
-
1 ½ lb chicken breast or thighs, cut into 1-inch pieces
-
1 teaspoon chicken bouillon powder
-
½ teaspoon white pepper
-
1 tablespoon water
-
2 large eggs
-
½ cup all-purpose flour
-
½ cup cornstarch
-
2 teaspoon baking powder
-
½ teaspoon salt
-
¼ cup water
-
2 teaspoon vegetable oil
-
3 tablespoon light soy sauce
-
1 tablespoon oyster sauce
-
2 tablespoon rice vinegar
-
2 tablespoon ketchup
Instructions
-
Step 1
Prepare the chicken: Pat 1 ½ lb chicken dry, then cut into 1-inch pieces. In a bowl, combine chicken with 2 large eggs, 3 tablespoon light soy sauce, 2 tablespoon rice vinegar, 1 teaspoon chicken bouillon powder, ½ teaspoon white pepper, and 1 tablespoon water. Mix well and marinate for 15-20 minutes. -
Step 2
Prepare the coating: In a separate shallow dish, whisk together ½ cup all-purpose flour, most of the ½ cup cornstarch (reserving 2 tablespoons for slurry), 2 teaspoon baking powder, and ½ teaspoon salt. Dredge marinated chicken pieces in the dry mixture, ensuring full coating and shaking off any excess. -
Step 3
Fry the chicken: Heat vegetable oil (sufficient for deep frying, exact quantity not specified in provided ingredients) in a deep pot to 350-375°F (175-190°C). Fry chicken in batches for 4-6 minutes per batch, until golden brown and cooked through. Transfer to a wire rack to drain excess oil. -
Step 4
Simmer the sauce: In a saucepan, combine 3 tablespoon light soy sauce, 2 tablespoon rice vinegar, 1 tablespoon oyster sauce, 2 tablespoon ketchup, ¼ cup water, 1 teaspoon chicken bouillon powder, and 2 teaspoon vegetable oil. Bring to a gentle simmer. In a small bowl, whisk 2 tablespoons cornstarch (taken from the ½ cup) with 2 tablespoons cold water to form a smooth slurry. Slowly pour slurry into simmering sauce, stirring until thickened to desired consistency. -
Step 5
Combine and serve: In a large bowl, gently toss the fried chicken pieces with the warm sauce until evenly coated. Transfer to a serving platter and serve immediately, ideally with rice or vegetables.
Important Information
Nutrition Facts (Per Serving)
It is important to consider this information as approximate and not to use it as definitive health advice.
Allergy Information
Please check ingredients for potential allergens and consult a health professional if in doubt.

Leave a Comment