
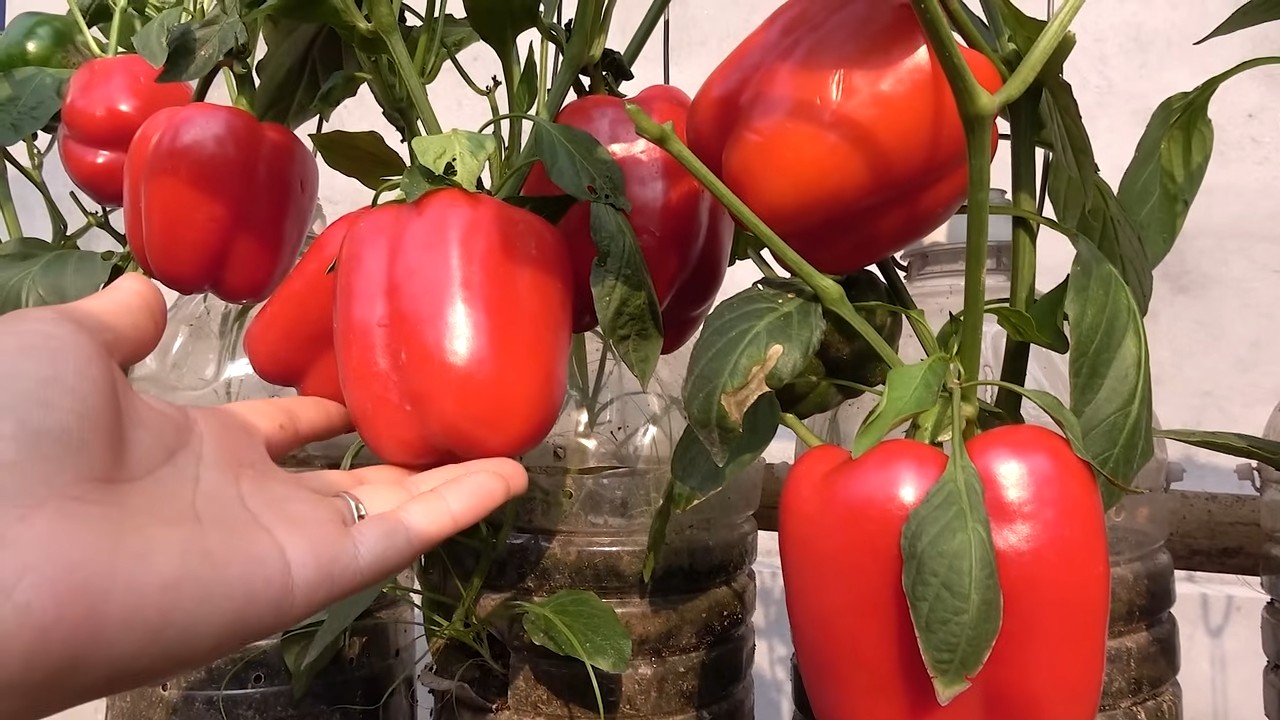
Upcycled Bottle Bell Peppers: Imagine harvesting vibrant, juicy bell peppers right from your balcony, all thanks to a clever and eco-friendly DIY project! Forget expensive gardening supplies and complicated setups. This article unveils a simple yet ingenious method to grow your own bell peppers using something you probably already have lying around: plastic bottles.
The concept of repurposing materials for gardening isn’t new. Throughout history, resourceful gardeners have found innovative ways to cultivate food using whatever was available. From ancient civilizations utilizing terracotta pots to modern-day urban farmers transforming discarded pallets, the spirit of sustainability has always been intertwined with the art of growing. This DIY project taps into that same resourceful spirit, offering a modern twist on a time-honored tradition.
Why should you try growing upcycled bottle bell peppers? Well, for starters, it’s incredibly budget-friendly! But beyond the cost savings, it’s a fantastic way to reduce waste and contribute to a more sustainable lifestyle. Plus, let’s be honest, there’s something incredibly satisfying about nurturing a plant from seed to harvest, knowing you played a direct role in providing fresh, healthy food for yourself and your family. I’m excited to share this easy-to-follow guide that will empower you to transform those empty bottles into thriving bell pepper planters. Get ready to unleash your inner gardener and enjoy the delicious rewards!
Upcycled Bottle Bell Peppers: A DIY Garden Delight!
Hey there, fellow garden enthusiasts! I’m so excited to share this super fun and eco-friendly project with you: turning old plastic bottles into adorable bell pepper planters! Not only is this a great way to recycle, but it also adds a quirky and colorful touch to your garden or balcony. Plus, it’s surprisingly easy! Let’s get started!
What You’ll Need:
Before we dive in, let’s gather our supplies. Here’s what you’ll need to create your upcycled bottle bell pepper planters:
* Plastic Bottles: The star of the show! I recommend using 2-liter soda bottles or larger water bottles. The more, the merrier! Make sure they are clean and dry.
* Bell Pepper Seeds or Seedlings: Choose your favorite bell pepper variety! I personally love the vibrant colors of red, yellow, and orange bell peppers.
* Potting Soil: A good quality potting mix is essential for healthy bell pepper growth.
* Scissors or Utility Knife: For cutting the plastic bottles. Be careful!
* Drill or Nail and Hammer: To create drainage holes.
* Spray Paint (Optional): If you want to add some extra flair to your planters.
* Gloves (Optional): To protect your hands while painting.
* Watering Can or Hose: For watering your bell pepper plants.
* Measuring Tape or Ruler: To ensure accurate cuts.
* Permanent Marker: For marking cutting lines.
Preparing the Bottles: The Foundation of Your Planter
This is where we transform those discarded bottles into something beautiful and functional.
1. Clean the Bottles: First things first, give your plastic bottles a good wash with soap and water. Remove any labels and sticky residue. Make sure they are completely dry before moving on. This will help the paint adhere better if you choose to paint them.
2. Mark the Cutting Line: Decide how tall you want your planters to be. I usually aim for around 8-10 inches. Use your measuring tape and permanent marker to draw a line around the bottle at your desired height. This will be your cutting guide.
3. Cut the Bottles: Now, carefully cut along the marked line using your scissors or utility knife. If you’re using a utility knife, be extra cautious and use a cutting board or mat to protect your work surface. I find that starting with a small puncture and then following the line works best.
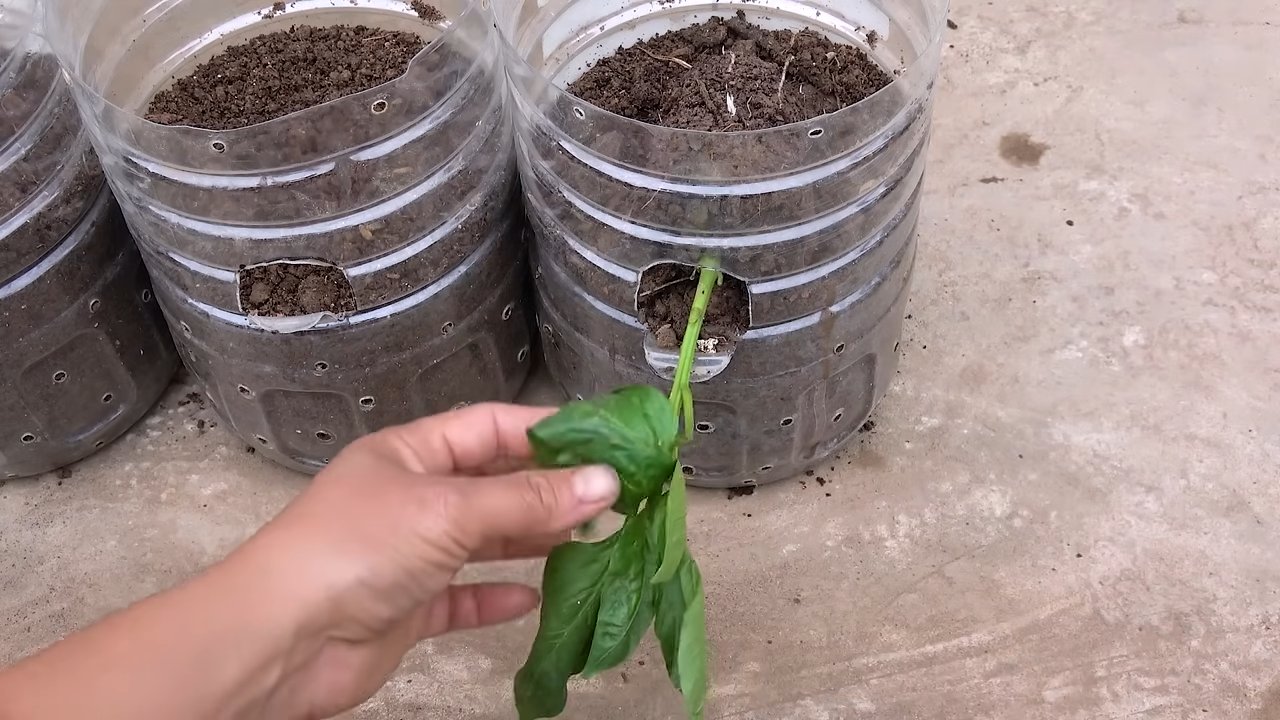
4. Create Drainage Holes: Drainage is crucial for healthy bell pepper plants. Use your drill or nail and hammer to create several drainage holes in the bottom of each bottle. I usually make about 5-6 holes, evenly spaced. If you’re using a nail and hammer, place the bottle on a piece of wood to protect your work surface.
5. (Optional) Sand the Edges: To prevent any sharp edges, you can lightly sand the cut edges of the bottles with sandpaper. This is especially important if you have kids or pets around.
Adding Color and Personality (Optional):
This step is all about making your planters unique and eye-catching!
1. Choose Your Colors: Select your favorite spray paint colors. I love using bright and cheerful colors like red, yellow, green, and blue. You can also get creative with patterns and designs.
2. Prepare Your Work Area: Find a well-ventilated area and cover your work surface with newspaper or a drop cloth to protect it from paint splatters.
3. Apply the Paint: Put on your gloves (if using) and shake the spray paint can well. Hold the can about 8-10 inches away from the bottle and apply a thin, even coat of paint. Avoid spraying too much paint in one spot, as this can cause drips.
4. Let it Dry: Allow the paint to dry completely according to the manufacturer’s instructions. This usually takes about 30 minutes to an hour. You may need to apply a second coat for better coverage.
Planting Your Bell Peppers: Nurturing New Life
Now for the exciting part – planting your bell peppers!
1. Fill with Potting Soil: Carefully fill each bottle planter with potting soil, leaving about an inch of space at the top. Gently pat down the soil to remove any air pockets.
2. Plant Your Seeds or Seedlings: If you’re starting from seeds, follow the instructions on the seed packet for planting depth and spacing. If you’re using seedlings, gently remove them from their containers and plant them in the center of the bottle planter.
3. Water Thoroughly: After planting, water your bell peppers thoroughly until the water drains out of the drainage holes. This will help settle the soil and encourage root growth.
4. Choose a Sunny Location: Bell peppers need plenty of sunlight to thrive. Place your upcycled bottle planters in a sunny location that receives at least 6-8 hours of direct sunlight per day. A south-facing balcony or garden is ideal.
Caring for Your Bell Pepper Plants: Ensuring a Bountiful Harvest
Proper care is essential for healthy bell pepper plants and a delicious harvest.
1. Water Regularly: Bell peppers need consistent moisture, especially during hot weather. Water your plants whenever the top inch of soil feels dry to the touch. Avoid overwatering, as this can lead to root rot.
2. Fertilize: Feed your bell pepper plants with a balanced fertilizer every 2-3 weeks. Follow the instructions on the fertilizer package for application rates.
3. Provide Support: As your bell pepper plants grow, they may need support to prevent the branches from breaking under the weight of the fruit. You can use stakes or tomato cages to provide support.
4. Pest Control: Keep an eye out for common bell pepper pests like aphids, whiteflies, and spider mites. If you notice any pests, treat them with an appropriate insecticide or organic pest control method.
5. Harvesting: Bell peppers are typically ready to harvest when they are fully colored and firm to the touch. Use a sharp knife or scissors to cut the peppers from the plant, leaving a small stem attached.
Troubleshooting Tips:
Even with the best care, you might encounter some challenges. Here are a few common issues and how to address them:
* Yellowing Leaves: This could be a sign of overwatering, underwatering, or nutrient deficiency. Adjust your watering schedule and fertilize your plants as needed.
* Blossom End Rot: This is a condition where the bottom of the pepper turns black and leathery. It’s usually caused by calcium deficiency. Add calcium to the soil or use a calcium-rich fertilizer.
* Lack of Fruit: This could be due to insufficient sunlight, poor pollination, or extreme temperatures. Make sure your plants are getting enough sunlight and consider hand-pollinating the flowers if necessary.
Extra Tips and Tricks:
* Vertical Gardening: Hang your upcycled bottle planters on a fence or wall to create a vertical garden. This is a great way to save space and add visual interest to your garden.
* Companion Planting: Plant basil, marigolds, or other companion plants near your bell peppers to deter pests and attract beneficial insects.
* Label Your Planters: Use a permanent marker to label each bottle planter with the type of bell pepper you’re growing. This will help you keep track of your different varieties.
* Get Creative with Decoration: Don’t be afraid to get creative with decorating your bottle planters! You can use stencils, paint markers, or even decoupage to add your personal touch.
I hope you enjoyed this DIY project! It’s a fun, rewarding, and eco-friendly way to grow your own delicious bell peppers. Happy gardening!
Conclusion
So, there you have it! Transforming discarded plastic bottles into miniature greenhouses for nurturing your bell pepper seedlings is not just a clever upcycling project; it’s a game-changer for any gardener, regardless of experience level. This simple, cost-effective method offers a multitude of benefits, from protecting your delicate seedlings from harsh weather and pests to extending your growing season and maximizing your yield.
Why is this DIY trick a must-try? Because it empowers you to take control of your gardening journey, reduces waste, and provides a nurturing environment for your bell peppers to thrive. Imagine the satisfaction of harvesting vibrant, juicy bell peppers knowing that you played an active role in their growth, starting from the very beginning with a recycled bottle.
But the beauty of this upcycled bottle bell pepper method lies in its adaptability. Feel free to experiment with different types of plastic bottles. Clear bottles work best for maximizing sunlight exposure, but you can also use colored bottles for a unique aesthetic. Just be mindful of how the color might affect the temperature inside the mini-greenhouse.
Consider adding small drainage holes to the bottom of your bottles to prevent waterlogging. You can also use different types of soil mixes depending on your local climate and the specific needs of your bell pepper variety. For example, if you live in a particularly hot climate, you might want to use a soil mix that retains moisture well.
Don’t limit yourself to just bell peppers! This upcycling technique can be applied to other vegetables and herbs as well. Try it with tomatoes, cucumbers, or even basil. The possibilities are endless!
We wholeheartedly encourage you to give this DIY upcycled bottle bell pepper trick a try. It’s a fun, rewarding, and sustainable way to enhance your gardening experience. And most importantly, it’s a testament to the power of creativity and resourcefulness.
Once you’ve tried it, we’d love to hear about your experience! Share your photos, tips, and variations in the comments section below. Let’s build a community of upcycling gardeners and inspire each other to create beautiful and bountiful gardens, one recycled bottle at a time. Your insights could help others discover the joy of growing their own food in an environmentally conscious way. Let’s make the world a greener place, one bell pepper at a time!
Frequently Asked Questions (FAQ)
What type of plastic bottles are best for this project?
Ideally, you want to use clear plastic bottles, such as those from water or soda. Clear bottles allow the maximum amount of sunlight to reach your bell pepper seedlings, which is crucial for their growth. However, you can experiment with colored bottles as well. Just be aware that darker colors might absorb more heat, potentially overheating the seedlings in warmer climates. Ensure the bottles are clean and free of any residue before using them. Remove any labels and wash the bottles thoroughly with soap and water.
How do I prepare the plastic bottles for planting?
First, thoroughly clean the bottles as mentioned above. Then, cut off the bottom of the bottle, leaving enough of the bottle intact to create a mini-greenhouse effect. The height of the remaining bottle will depend on the size of your bell pepper seedlings. You can also cut off the top of the bottle to create a vent for air circulation, especially during warmer days. Make sure to smooth out any sharp edges to prevent injury. Consider adding small drainage holes to the bottom of the bottle to prevent waterlogging.
What kind of soil should I use for my bell pepper seedlings?
A well-draining potting mix is essential for healthy bell pepper seedlings. You can use a commercially available potting mix or create your own by combining equal parts of peat moss, perlite, and vermiculite. Avoid using garden soil, as it can be too heavy and may contain pests or diseases. Consider adding compost to your soil mix to provide additional nutrients for your seedlings. The pH level of the soil should be slightly acidic, around 6.0 to 6.8.
How often should I water my bell pepper seedlings in the upcycled bottles?
The frequency of watering will depend on the climate, the type of soil you’re using, and the size of your seedlings. Generally, you should water your seedlings when the top inch of soil feels dry to the touch. Avoid overwatering, as this can lead to root rot. When watering, make sure to moisten the entire soil evenly. You can use a watering can or a spray bottle to gently water your seedlings.
How much sunlight do my bell pepper seedlings need?
Bell peppers need at least 6-8 hours of direct sunlight per day to thrive. Place your upcycled bottle greenhouses in a sunny location, such as a south-facing window or a sunny spot in your garden. If you don’t have enough natural sunlight, you can supplement with grow lights. Rotate the bottles regularly to ensure that all sides of the seedlings receive adequate sunlight.
How do I protect my bell pepper seedlings from pests and diseases?
The upcycled bottle acts as a physical barrier against many common pests, such as snails, slugs, and cutworms. However, you should still monitor your seedlings regularly for any signs of pests or diseases. If you notice any problems, you can use organic pest control methods, such as insecticidal soap or neem oil. Ensure good air circulation around your seedlings to prevent fungal diseases.
When should I transplant my bell pepper seedlings from the upcycled bottles to the garden?
You should transplant your bell pepper seedlings when they have developed several sets of true leaves and the weather is warm enough. The ideal time to transplant is after the last frost, when the soil temperature has reached at least 60 degrees Fahrenheit. Harden off your seedlings by gradually exposing them to outdoor conditions for a week or two before transplanting. This will help them adjust to the change in environment and prevent transplant shock.
Can I use this method for other vegetables or herbs?
Yes, absolutely! This upcycling technique can be applied to a wide variety of vegetables and herbs, such as tomatoes, cucumbers, basil, and lettuce. The key is to choose plants that are appropriate for the size of the bottle and that have similar growing requirements. Experiment with different plants and see what works best for you.
What are some variations I can try with this upcycling method?
There are many ways to customize this upcycling method to suit your needs and preferences. You can try using different types of plastic bottles, such as milk jugs or juice bottles. You can also add a layer of mulch to the top of the soil to help retain moisture and suppress weeds. Consider adding a small trellis inside the bottle to support the growth of taller plants. You can also experiment with different soil mixes and fertilizers to optimize the growth of your seedlings.
How does this method help the environment?
This upcycling method is a great way to reduce waste and promote sustainability. By reusing plastic bottles, you are preventing them from ending up in landfills or polluting the environment. You are also reducing the need for new plastic production, which consumes valuable resources and contributes to greenhouse gas emissions. This method also encourages you to grow your own food, which reduces your reliance on commercially produced food that is often transported long distances, further reducing your carbon footprint.

Leave a Comment