
Grow Bottle Gourd Easily, even if you think you don’t have a green thumb! Have you ever dreamed of harvesting your own plump, homegrown bottle gourds, ready for delicious curries or even crafting into unique, rustic decor? I know I have! For centuries, the bottle gourd, also known as calabash, has been a staple in cultures around the world, from being used as water containers in ancient civilizations to playing a vital role in traditional medicine and cuisine.
But let’s be honest, the thought of cultivating these impressive vegetables can feel a little daunting. That’s where this DIY guide comes in! I’m going to share some simple, yet effective tricks and hacks that will empower you to grow bottle gourd easily, regardless of your gardening experience or space constraints.
Imagine the satisfaction of nurturing a tiny seed into a thriving vine, laden with these versatile gourds. Not only will you enjoy fresh, organic produce, but you’ll also connect with a rich history and add a touch of natural beauty to your home. So, grab your gardening gloves, and let’s embark on this exciting journey together! I’m here to guide you every step of the way, making the process fun, rewarding, and, most importantly, successful!
Grow Bottle Gourds Like a Pro: My Foolproof DIY Guide
Hey there, fellow gardening enthusiasts! I’m so excited to share my tried-and-true method for growing bottle gourds – those fascinating, versatile vegetables that can be transformed into everything from birdhouses to musical instruments! I’ve had incredible success with this DIY approach, and I’m confident you can too. Get ready to have your own bumper crop of bottle gourds!
What You’ll Need: The Essential Supplies
Before we dive in, let’s gather all the necessary materials. Trust me, having everything on hand will make the process so much smoother.
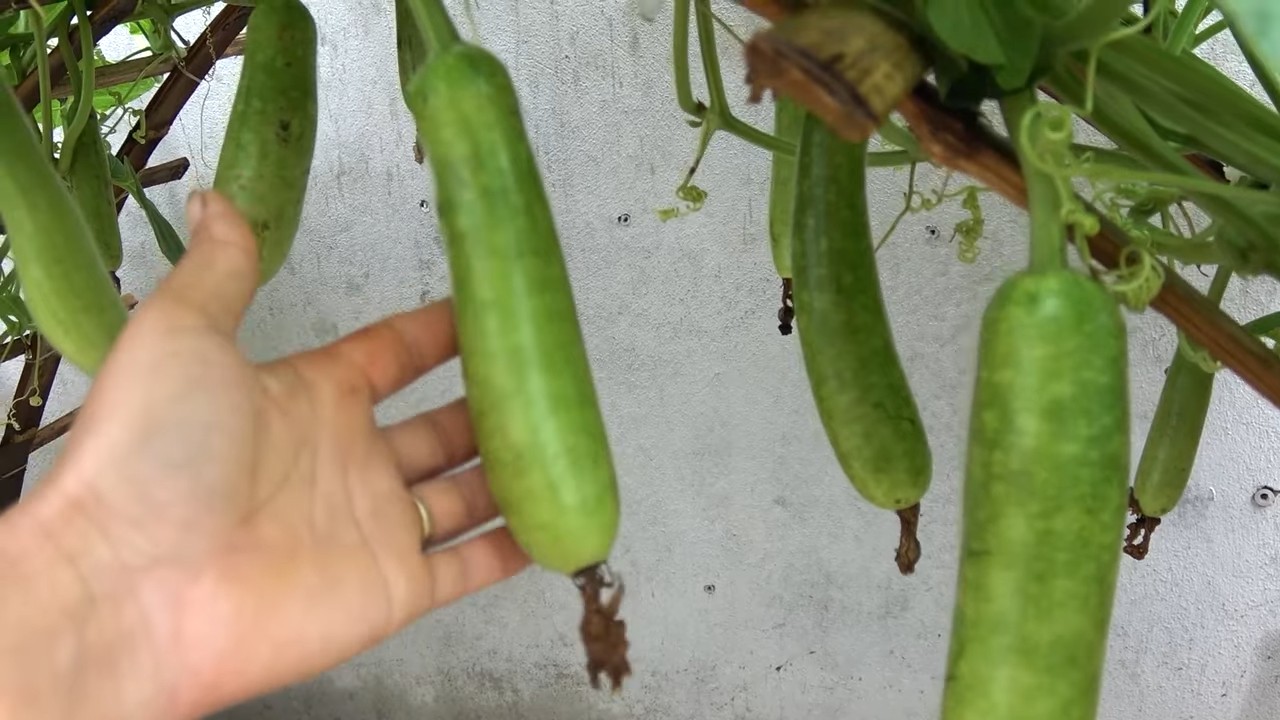
* Bottle Gourd Seeds: Choose a variety that suits your climate and desired gourd shape. I personally love the ‘Long Bottle’ variety for its impressive length and smooth skin.
* Seed Starting Tray or Small Pots: These are perfect for getting your seedlings off to a strong start.
* Seed Starting Mix: A light, well-draining mix is crucial for healthy germination.
* Larger Pots (at least 12 inches in diameter): You’ll need these when transplanting your seedlings.
* Potting Soil: A nutrient-rich potting mix will provide the necessary nourishment for your growing gourds.
* Compost or Well-Rotted Manure: This is the secret ingredient for boosting soil fertility.
* Trellis or Strong Support Structure: Bottle gourds are climbers, so they need something to grow on. A sturdy trellis, fence, or even a pergola will work wonders.
* Gardening Gloves: Protect your hands from dirt and potential irritants.
* Watering Can or Hose: Essential for keeping your plants hydrated.
* Fertilizer (Optional): A balanced fertilizer can give your gourds an extra boost, especially during the fruiting stage. I prefer an organic option.
* Pruning Shears or Scissors: For trimming and shaping your plants.
* Twine or Plant Ties: To help train your gourds to climb the trellis.
* Patience and Enthusiasm: Growing anything takes time and care, so bring your positive attitude!
Phase 1: Seed Starting – Nurturing Your Future Gourds
This is where the magic begins! Starting your seeds indoors gives them a head start, especially if you live in a region with a shorter growing season.
1. Soaking the Seeds: To encourage faster germination, soak your bottle gourd seeds in warm water for 24 hours before planting. This helps soften the hard outer shell. I usually put them in a small bowl and cover them completely.
2. Preparing the Seed Starting Tray: Fill your seed starting tray or small pots with seed starting mix. Gently press the mix down to remove any air pockets.
3. Planting the Seeds: Make a small hole (about ½ inch deep) in the center of each cell or pot. Place one seed in each hole and cover it with the seed starting mix.
4. Watering Gently: Water the seeds gently using a watering can or spray bottle. Avoid overwatering, as this can lead to rot. The soil should be moist but not soggy.
5. Providing Warmth and Light: Place the seed starting tray in a warm location, ideally between 70-80°F (21-27°C). A heat mat can be helpful if your home is cooler. Ensure the seedlings receive plenty of light. A sunny windowsill or grow lights will work well.
6. Monitoring Germination: Keep the soil consistently moist and watch for signs of germination. Bottle gourd seeds typically germinate within 7-14 days.
7. Thinning Seedlings (If Necessary): If more than one seedling emerges in a single cell or pot, thin them out by snipping off the weaker seedlings at the base. This will ensure that the remaining seedling has enough space and nutrients to thrive.
Phase 2: Transplanting – Giving Your Seedlings Room to Grow
Once your seedlings have developed a few sets of true leaves (the leaves that look like miniature versions of the adult leaves), it’s time to transplant them into larger pots.
1. Preparing the Larger Pots: Fill your larger pots (at least 12 inches in diameter) with a mixture of potting soil and compost or well-rotted manure. This will provide your gourds with the nutrients they need to grow strong.
2. Carefully Removing the Seedlings: Gently remove the seedlings from the seed starting tray or small pots. Be careful not to damage the roots. I usually use a small trowel or spoon to help loosen the soil around the roots.
3. Planting the Seedlings: Make a hole in the center of each larger pot that is large enough to accommodate the root ball of the seedling. Place the seedling in the hole and cover the roots with the potting soil mixture.
4. Watering Thoroughly: Water the transplanted seedlings thoroughly to help them settle in.
5. Providing Support: If your seedlings are already starting to vine, you can insert a small stake or trellis into the pot to provide support.
Phase 3: Planting Outdoors – Setting the Stage for Abundant Growth
Once the weather has warmed up and the risk of frost has passed, it’s time to transplant your bottle gourds outdoors. Bottle gourds love warm weather, so make sure the soil temperature is consistently above 60°F (15°C).
1. Choosing the Right Location: Select a sunny location with well-draining soil. Bottle gourds need at least 6-8 hours of sunlight per day.
2. Preparing the Soil: Amend the soil with compost or well-rotted manure to improve its fertility and drainage.
3. Digging the Planting Holes: Dig holes that are large enough to accommodate the root balls of your transplanted seedlings. Space the holes about 3-4 feet apart.
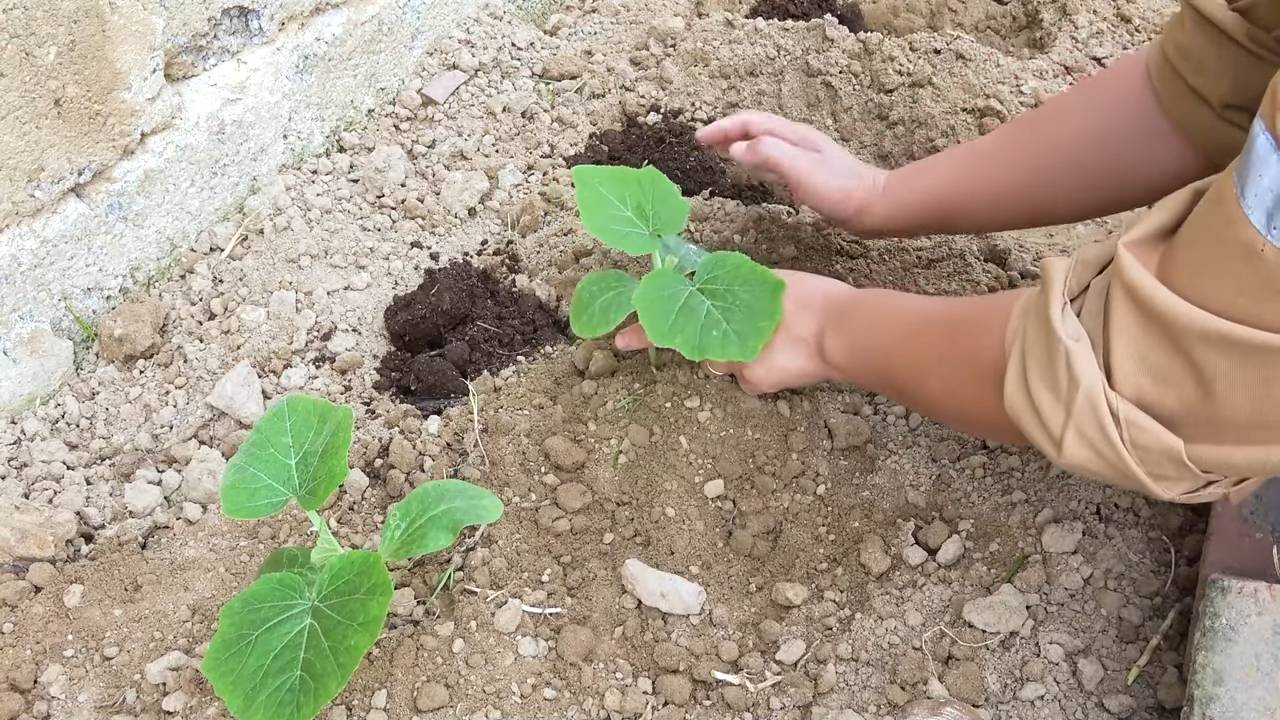
4. Transplanting the Seedlings: Carefully remove the seedlings from their pots and place them in the prepared holes. Cover the roots with soil and gently firm the soil around the base of the plants.
5. Watering Thoroughly: Water the transplanted seedlings thoroughly to help them settle in.
6. Installing the Trellis: Install your trellis or support structure near the newly planted gourds. Make sure it’s sturdy enough to support the weight of the mature vines and gourds. I’ve found that a strong wooden trellis works best.
7. Mulching (Optional): Apply a layer of mulch around the base of the plants to help retain moisture, suppress weeds, and regulate soil temperature.
Phase 4: Ongoing Care – Nurturing Your Growing Gourds
Now that your bottle gourds are planted outdoors, it’s important to provide them with the ongoing care they need to thrive.
1. Watering Regularly: Water your bottle gourds regularly, especially during dry periods. They need consistent moisture to produce healthy vines and gourds. Aim for deep watering, allowing the water to soak into the soil.
2. Fertilizing (Optional): If you choose to fertilize, apply a balanced fertilizer every few weeks, following the instructions on the package. I like to use an organic fertilizer to avoid harsh chemicals.
3. Training the Vines: As the vines grow, gently train them to climb the trellis. Use twine or plant ties to secure the vines to the trellis. This will help keep the vines organized and prevent them from becoming tangled.
4. Pruning (Optional): Pruning can help improve air circulation and encourage fruit production. Remove any dead or diseased leaves and stems. You can also prune back the tips of the vines to encourage branching.
5. Pest and Disease Control: Keep an eye out for pests and diseases. Common pests that affect bottle gourds include aphids, squash bugs, and vine borers. Common diseases include powdery mildew and downy mildew. Treat any infestations or infections promptly using appropriate organic or chemical controls. I always try organic methods first!
6. Hand-Pollination (If Necessary): Bottle gourds have separate male and female flowers. If you’re not seeing many gourds developing, you may need to hand-pollinate the flowers. To do this, use a small paintbrush to transfer pollen from the male flowers to the female flowers. The female flowers have a small gourd-like structure at the base.
Phase 5: Harvesting – Enjoying the Fruits (or Gourds!) of Your Labor
The moment you’ve been waiting for! Harvesting your bottle gourds is a rewarding experience.
1. Determining Maturity: Bottle gourds are typically ready to harvest when they are mature and the skin has hardened. The stem will also start to dry out and turn brown.
2. Harvesting Carefully: Use pruning shears or a sharp knife to cut the gourd from the vine, leaving a few inches of stem attached.
3. Curing (Optional): If you plan to use your bottle gourds for crafts or decoration, you’ll need to cure them first. To cure a
Conclusion
So, there you have it! Growing bottle gourd doesn’t have to be a daunting task. By implementing this simple yet effective DIY trick, you’re not just cultivating a vegetable; you’re nurturing a thriving plant that will reward you with an abundance of fresh, homegrown bottle gourds. This method, focusing on optimizing the soil and providing consistent support, significantly increases your chances of success, even if you’re a beginner gardener.
Why is this a must-try? Because it addresses the two most critical factors for bottle gourd cultivation: nutrient availability and structural support. The enriched soil mix, created using readily available materials, provides the essential nutrients that bottle gourds need for vigorous growth and fruit production. The sturdy support system, whether it’s a trellis, pergola, or even a strong fence, allows the vines to climb freely, maximizing sunlight exposure and preventing the gourds from rotting on the ground.
But don’t stop there! Feel free to experiment and adapt this DIY trick to suit your specific needs and preferences. For instance, you could try different types of organic fertilizers in your soil mix, such as compost tea or bone meal, to further boost nutrient levels. You could also explore various support structures, like creating a decorative archway for your bottle gourd vines to climb on, adding an aesthetic touch to your garden. Consider companion planting with beneficial herbs and flowers to deter pests naturally. Marigolds, basil, and nasturtiums are excellent choices for keeping unwanted insects away from your precious bottle gourd plants.
Remember, gardening is all about learning and adapting. Don’t be afraid to make mistakes and try new things. The most important thing is to have fun and enjoy the process of nurturing your plants.
We are confident that this DIY trick will revolutionize your bottle gourd growing experience. It’s a game-changer that will help you achieve impressive results, even in challenging growing conditions. So, grab your gardening tools, gather your materials, and get ready to embark on a rewarding journey of growing your own delicious and nutritious bottle gourds.
We’re eager to hear about your experiences! Once you’ve tried this DIY trick, please share your results and any variations you’ve implemented in the comments section below. Your feedback will not only help us improve this guide but also inspire other gardeners to try their hand at growing bottle gourd. Let’s create a community of passionate gardeners who are dedicated to sharing their knowledge and helping each other succeed. Happy gardening, and may your bottle gourd harvest be bountiful! This **grow bottle gourd easily** method is sure to impress.
Frequently Asked Questions (FAQ)
What kind of soil is best for growing bottle gourd?
Bottle gourds thrive in well-drained, fertile soil that is rich in organic matter. A loamy soil is ideal, but you can amend sandy or clay soils to improve their texture and drainage. Adding compost, well-rotted manure, or other organic materials will significantly enhance the soil’s fertility and water-holding capacity. Aim for a soil pH between 6.0 and 7.0 for optimal growth.
How often should I water my bottle gourd plants?
Bottle gourds require consistent moisture, especially during hot and dry weather. Water deeply and regularly, ensuring that the soil remains consistently moist but not waterlogged. The frequency of watering will depend on the weather conditions and the type of soil you have. Generally, watering every 2-3 days is sufficient, but you may need to water more frequently during heat waves. Check the soil moisture level regularly by sticking your finger into the soil. If the top inch feels dry, it’s time to water.
What type of support structure is best for bottle gourd vines?
Bottle gourd vines are vigorous climbers and require a sturdy support structure to grow properly. A trellis, pergola, arbor, or even a strong fence can be used to support the vines. The support structure should be at least 6-8 feet tall to accommodate the vine’s growth. Ensure that the support structure is strong enough to bear the weight of the mature vines and the developing gourds. You can also train the vines to climb on existing structures, such as trees or walls, but be mindful of the potential damage to these structures.
How do I prevent pests and diseases from affecting my bottle gourd plants?
Preventing pests and diseases is crucial for a successful bottle gourd harvest. Practice good garden hygiene by removing weeds and debris around the plants. Companion planting with beneficial herbs and flowers, such as marigolds, basil, and nasturtiums, can help deter pests naturally. Regularly inspect your plants for signs of pests or diseases, such as aphids, squash bugs, or powdery mildew. If you detect any problems, take action immediately by using organic pest control methods, such as neem oil or insecticidal soap. Ensure good air circulation around the plants to prevent fungal diseases.
When is the best time to harvest bottle gourds?
The harvesting time for bottle gourds depends on the intended use. For culinary purposes, harvest the gourds when they are young and tender, typically around 6-8 inches in length. The skin should be smooth and easily punctured with your fingernail. For crafting or decorative purposes, allow the gourds to mature fully on the vine until the skin becomes hard and the stem dries out. This can take several months. Once the gourds are fully mature, carefully cut them from the vine, leaving a few inches of stem attached.
Can I grow bottle gourd in containers?
Yes, you can grow bottle gourd in containers, but you’ll need a large container with a minimum capacity of 20 gallons. Ensure that the container has drainage holes to prevent waterlogging. Use a well-draining potting mix that is rich in organic matter. Provide a sturdy support structure for the vines to climb on. Water and fertilize regularly, as container-grown plants tend to dry out and deplete nutrients more quickly than those grown in the ground.
How do I pollinate bottle gourd flowers?
Bottle gourds have separate male and female flowers. Pollination is essential for fruit development. If you’re not seeing fruit set, you may need to hand-pollinate the flowers. Identify the male and female flowers. The female flowers have a small, immature gourd at the base, while the male flowers do not. Use a small paintbrush or cotton swab to collect pollen from the male flower and transfer it to the stigma of the female flower. Hand-pollinate in the morning when the flowers are open.
What are some common problems when growing bottle gourd and how can I fix them?
Some common problems include:
* **Lack of fruit set:** This can be due to poor pollination. Hand-pollinate the flowers as described above.
* **Yellowing leaves:** This can be caused by nutrient deficiencies. Amend the soil with compost or fertilizer.
* **Pest infestations:** Use organic pest control methods, such as neem oil or insecticidal soap.
* **Powdery mildew:** Ensure good air circulation and treat with a fungicide if necessary.
* **Fruit rot:** This can be caused by excessive moisture. Ensure good drainage and avoid overhead watering.
How long does it take for bottle gourds to mature?
The time it takes for bottle gourds to mature depends on the variety and growing conditions. Generally, it takes about 90-120 days from planting to harvest for culinary purposes. For mature gourds intended for crafting, it can take several months.
Can I save seeds from my bottle gourds?
Yes, you can save seeds from your bottle gourds. Allow the gourds to mature fully on the vine. Once the gourds are dry and hard, cut them open and remove the seeds. Wash the seeds thoroughly and allow them to dry completely before storing them in an airtight container in a cool, dry place.
Leave a Comment