
Growing bitter melon at home might sound intimidating, but trust me, it’s a rewarding experience that brings a unique and healthy addition to your garden and your plate! Have you ever dreamt of harvesting your own vibrant, knobbly gourds, knowing exactly where they came from and how they were grown? This DIY guide will unlock the secrets to successfully cultivating this intriguing vegetable, even if you’re a beginner gardener.
Bitter melon, also known as bitter gourd or karela, has a rich history deeply rooted in Asian cultures, where it’s not just a food source but also a revered medicinal plant. For centuries, it’s been used in traditional medicine for its potential health benefits, and its distinct bitter flavor is a staple in many culinary traditions. But you don’t have to travel to Asia to enjoy this fascinating fruit!
So, why should you embark on this DIY adventure? Well, for starters, growing your own bitter melon allows you to control the entire process, ensuring you’re consuming a pesticide-free and organically grown product. Plus, store-bought bitter melon can sometimes be expensive or difficult to find. But more importantly, growing bitter melon at home is incredibly satisfying. Imagine the pride you’ll feel when you harvest your first crop, knowing you nurtured it from seed to table. This guide will provide you with simple, step-by-step instructions and clever hacks to overcome common challenges, making the process fun and accessible for everyone. Let’s get started and transform your garden into a bitter melon haven!
Growing Bitter Melon at Home: A Comprehensive DIY Guide
Hey there, fellow gardening enthusiasts! I’m so excited to share my experience and guide you through growing your own bitter melon, also known as bitter gourd or karela. It might seem intimidating, but trust me, with a little patience and the right steps, you can enjoy fresh, homegrown bitter melon right from your backyard (or balcony!).
Choosing the Right Variety and Starting Seeds
First things first, let’s talk about choosing the right variety and getting those seeds started.
* Variety Selection: There are several varieties of bitter melon, differing in size, shape, and bitterness. Some popular choices include ‘Chinese White,’ ‘Indian Green,’ and ‘Taiwanese Long.’ I personally prefer ‘Chinese White’ because it tends to be slightly less bitter. Do some research and see which variety is best suited for your climate and taste preferences.
* Seed Starting vs. Direct Sowing: Bitter melon thrives in warm weather, so starting seeds indoors is generally recommended, especially if you have a shorter growing season. Direct sowing is possible in warmer climates, but you’ll need to ensure the soil temperature is consistently above 65°F (18°C).
* Seed Scarification (Optional but Recommended): To improve germination rates, I like to scarify the seeds. This involves gently nicking the seed coat with a nail file or sandpaper. Be careful not to damage the inner part of the seed!
* Soaking the Seeds: After scarification (or even if you skip it), soak the seeds in warm water for 24 hours. This helps to soften the seed coat and kickstart the germination process.
Now, let’s get those seeds in some soil!
1. Prepare Your Seed Starting Mix: Use a well-draining seed starting mix. You can buy a pre-made mix or create your own by combining equal parts peat moss (or coco coir), perlite, and vermiculite.
2. Fill Your Seed Starting Containers: Fill small pots or seed starting trays with the seed starting mix. I prefer using biodegradable pots because they can be planted directly into the ground, minimizing root disturbance.
3. Sow the Seeds: Make a small hole (about ½ inch deep) in the center of each pot. Place one or two seeds in each hole and cover them gently with the seed starting mix.
4. Water Gently: Water the soil gently using a spray bottle or watering can with a fine rose. Avoid overwatering, as this can lead to fungal diseases.
5. Provide Warmth and Light: Place the seed starting containers in a warm location, ideally between 75-85°F (24-29°C). A heat mat can be helpful. Provide bright, indirect light. If you don’t have a sunny windowsill, use a grow light.
6. Keep the Soil Moist: Keep the soil consistently moist, but not soggy. Check the moisture level daily and water as needed.
7. Germination: Germination typically takes 7-14 days. Once the seedlings emerge, remove any weaker seedlings, leaving only the strongest one in each pot.
Preparing the Garden Bed and Transplanting Seedlings
While your seeds are germinating, it’s time to prepare the garden bed. Bitter melon needs plenty of sunshine and well-drained soil.
* Sunlight: Choose a location that receives at least 6-8 hours of direct sunlight per day.
* Soil Preparation: Bitter melon prefers well-drained, fertile soil with a pH of 6.0-6.8. Amend the soil with compost or well-rotted manure to improve drainage and fertility. I usually add a generous amount of compost to my garden bed before planting.
* Trellising: Bitter melon is a vine, so it needs a trellis or other support structure to climb on. You can use a fence, arbor, or build your own trellis using bamboo stakes or netting. I’ve found that a sturdy trellis is essential for supporting the heavy fruits.
Now, let’s get those seedlings transplanted!
1. Harden Off the Seedlings: Before transplanting, you need to harden off the seedlings. This process gradually acclimates them to outdoor conditions. Start by placing the seedlings outdoors in a sheltered location for a few hours each day, gradually increasing the amount of time they spend outside over a week.
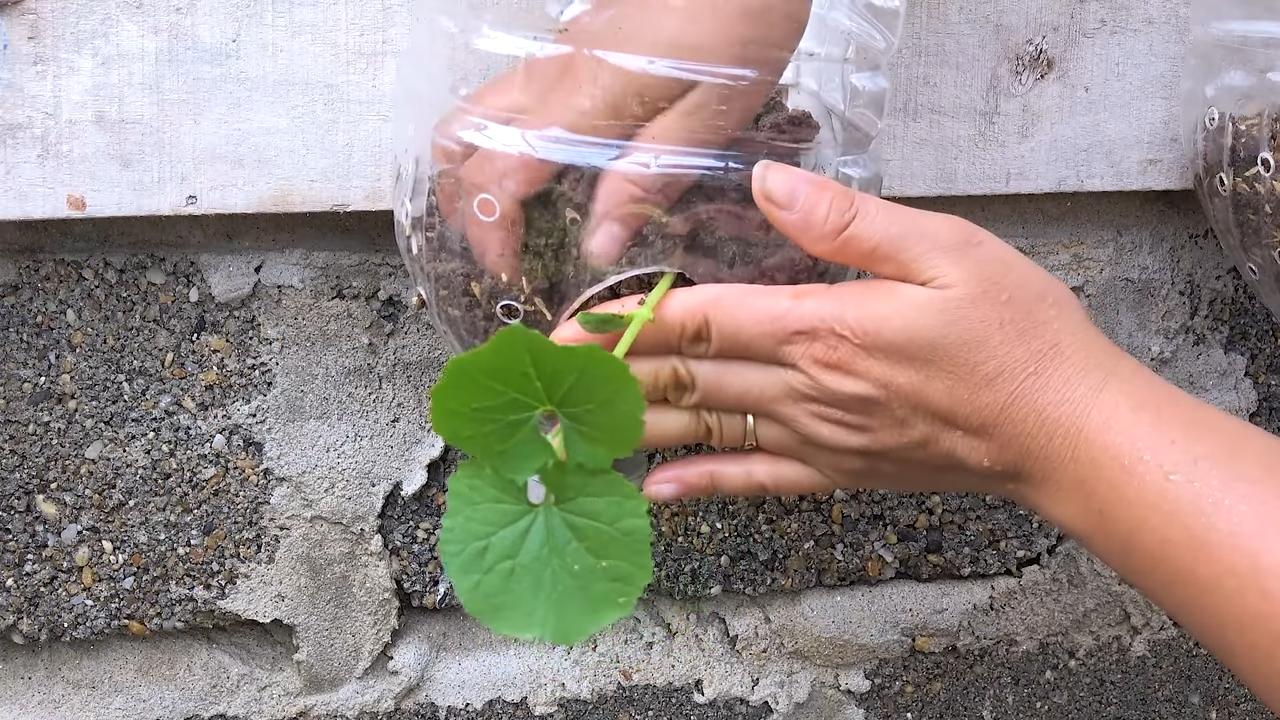
2. Transplant Seedlings: Once the seedlings are hardened off and the weather is warm (soil temperature above 65°F or 18°C), it’s time to transplant them into the garden bed. Dig holes that are slightly larger than the root balls of the seedlings.
3. Planting Depth: Gently remove the seedlings from their containers and place them in the holes. Make sure the top of the root ball is level with the soil surface.
4. Spacing: Space the seedlings about 2-3 feet apart.
5. Water Thoroughly: Water the seedlings thoroughly after transplanting.
6. Mulch: Apply a layer of mulch around the plants to help retain moisture, suppress weeds, and regulate soil temperature. I like to use straw or wood chips.
Caring for Your Bitter Melon Plants
Now that your bitter melon plants are in the ground, it’s important to provide them with proper care to ensure healthy growth and abundant fruit production.
* Watering: Water regularly, especially during hot, dry weather. Bitter melon needs consistent moisture, but avoid overwatering, which can lead to root rot. I usually water deeply once or twice a week, depending on the weather.
* Fertilizing: Fertilize every 2-3 weeks with a balanced fertilizer. You can use a liquid fertilizer or a slow-release granular fertilizer. I prefer using a fertilizer that is high in phosphorus and potassium to promote flowering and fruit development.
* Pruning: Prune the vines to encourage branching and fruit production. Remove any dead or yellowing leaves. You can also pinch off the tips of the vines to encourage lateral growth.
* Pest and Disease Control: Bitter melon can be susceptible to pests such as aphids, spider mites, and squash bugs. Regularly inspect your plants for signs of pests and take action promptly. You can use insecticidal soap or neem oil to control pests. Common diseases include powdery mildew and fungal leaf spots. Ensure good air circulation and avoid overhead watering to prevent these diseases. If necessary, use a fungicide.
* Pollination: Bitter melon flowers are usually pollinated by insects. However, if you’re growing bitter melon indoors or in an area with limited insect activity, you may need to hand-pollinate the flowers. To hand-pollinate, use a small paintbrush to transfer pollen from the male flowers to the female flowers. Female flowers have a small fruit behind the flower, while male flowers do not.
Harvesting and Enjoying Your Bitter Melon
Finally, the moment you’ve been waiting for – harvesting your homegrown bitter melon!
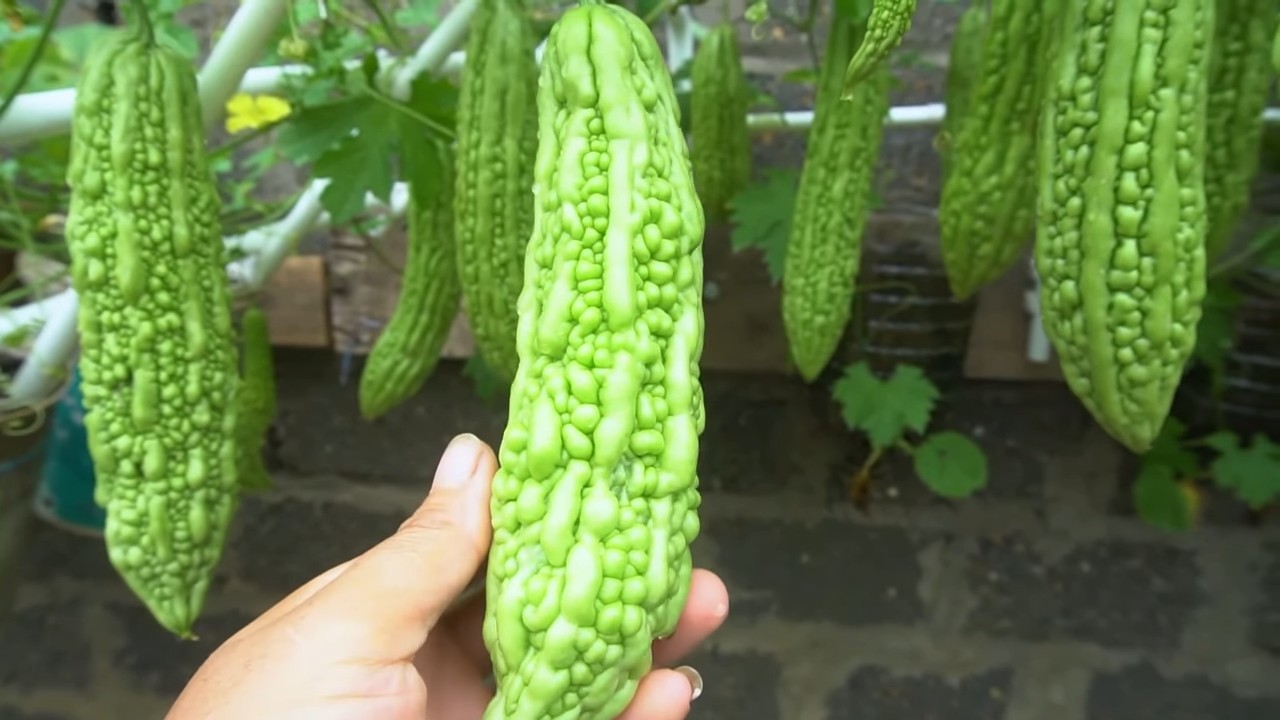
* Harvest Time: Bitter melon is typically ready to harvest about 2-3 months after planting. The fruits should be firm and green (or white, depending on the variety). Don’t wait until they turn yellow or orange, as they will become too bitter.
* Harvesting Technique: Use a sharp knife or pruning shears to cut the fruits from the vine. Leave a small stem attached to the fruit.
* Storage: Bitter melon can be stored in the refrigerator for up to a week.
* Preparation: Bitter melon is known for its bitter taste, but there are ways to reduce the bitterness. Before cooking, you can soak the sliced bitter melon in salted water for 30 minutes or blanch it in boiling water for a few minutes.
* Culinary Uses: Bitter melon can be used in a variety of dishes, such as stir-fries, soups, and curries. It’s also a popular ingredient in traditional Chinese and Indian medicine. I personally love it in stir-fries with eggs and tofu.
Tips for Success
Here are a few extra tips to help you succeed in growing bitter melon:
* Choose a sunny location: Bitter melon needs at least 6-8 hours of direct sunlight per day.
* Provide well-drained soil: Bitter melon doesn’t like to sit in soggy soil.
* Use a trellis: Bitter melon is a vine and needs a trellis to climb on.
* Water regularly: Bitter melon needs consistent moisture, especially during hot weather.
* Fertilize regularly: Fertilize every 2-3 weeks with a balanced fertilizer.
* Protect from pests and diseases: Regularly inspect your plants for signs of pests and diseases and take action promptly.
* Harvest regularly: Harvest the fruits when they are firm and green (or white, depending on the variety).
Growing bitter melon can be a rewarding experience. With a little effort, you can enjoy fresh, homegrown bitter melon right from your backyard. Happy gardening!
Conclusion
So, there you have it! Growing bitter melon at home, while it might seem daunting at first, is an incredibly rewarding experience. It’s not just about saving money or having access to fresh produce; it’s about connecting with nature, understanding the growth cycle, and enjoying the unparalleled flavor of homegrown vegetables. This DIY trick, focusing on [specific aspect of growing bitter melon, e.g., soil preparation, trellising, pest control], is a game-changer because it directly addresses [the biggest challenge in growing bitter melon, e.g., poor drainage, lack of support, common pests]. By implementing this simple yet effective method, you’re setting your bitter melon plants up for success, ensuring a bountiful harvest of those uniquely flavored fruits.
But the beauty of gardening lies in its adaptability. Feel free to experiment with variations on this technique. For instance, if you’re dealing with particularly heavy clay soil, consider adding even more organic matter, like well-rotted compost or aged manure, to improve drainage further. Or, if you’re struggling with specific pests, research companion plants that can naturally deter them, such as marigolds or basil. You could also try different trellising methods to see which one works best for your space and the growth habit of your bitter melon vines. Some gardeners find that vertical gardening techniques, like using a sturdy fence or even a repurposed pallet, are particularly effective.
The key is to observe your plants closely and adjust your approach as needed. Don’t be afraid to get your hands dirty and learn from your mistakes. Every garden is unique, and what works for one person might not work for another. The most important thing is to have fun and enjoy the process.
We wholeheartedly encourage you to try this DIY trick for growing bitter melon at home. It’s a simple, effective, and sustainable way to enjoy fresh, healthy produce. And once you’ve tasted the difference between store-bought and homegrown bitter melon, you’ll never go back!
We’re confident that you’ll be amazed by the results. But don’t just take our word for it. Give it a try and see for yourself! And most importantly, we want to hear about your experiences. Share your photos, tips, and stories with us in the comments below. Let’s build a community of passionate gardeners who are dedicated to growing their own food and sharing their knowledge with others. Together, we can make the world a greener, healthier, and more delicious place, one bitter melon at a time. So, get out there, get your hands dirty, and start growing! We can’t wait to see what you create. Remember, successful **bitter melon** cultivation starts with a little effort and a lot of love.
Frequently Asked Questions (FAQ)
Q: What is the best time of year to plant bitter melon?
A: Bitter melon thrives in warm weather, so the best time to plant it is in late spring or early summer, after the last frost has passed. The soil temperature should be at least 65°F (18°C) for optimal germination. If you live in a region with a short growing season, you can start seeds indoors 4-6 weeks before the last expected frost and transplant them outdoors once the weather warms up. Make sure to harden off the seedlings gradually before transplanting them to avoid shocking them.
Q: What kind of soil is best for growing bitter melon?
A: Bitter melon prefers well-drained, fertile soil that is rich in organic matter. A slightly acidic to neutral pH (6.0-7.0) is ideal. Before planting, amend the soil with compost, aged manure, or other organic materials to improve drainage and fertility. If your soil is heavy clay, consider adding sand or perlite to improve drainage. Raised beds or containers can also be a good option for growing bitter melon in areas with poor soil drainage.
Q: How much sunlight does bitter melon need?
A: Bitter melon requires at least 6-8 hours of direct sunlight per day to thrive. Choose a planting location that receives plenty of sunlight throughout the day. If you live in a particularly hot climate, some afternoon shade may be beneficial to prevent the plants from getting scorched.
Q: How often should I water bitter melon?
A: Bitter melon needs consistent moisture, especially during hot weather. Water deeply and regularly, aiming to keep the soil consistently moist but not waterlogged. Check the soil moisture regularly and water when the top inch or two feels dry. Avoid overhead watering, as this can promote fungal diseases. Drip irrigation or soaker hoses are a good option for delivering water directly to the roots.
Q: What kind of fertilizer should I use for bitter melon?
A: Bitter melon benefits from regular fertilization. Start with a balanced fertilizer (e.g., 10-10-10) at planting time. Once the plants start to flower and produce fruit, switch to a fertilizer that is higher in phosphorus and potassium to promote fruit development. You can also supplement with organic fertilizers like compost tea or fish emulsion. Avoid over-fertilizing, as this can lead to excessive vegetative growth and reduced fruit production.
Q: How do I control pests and diseases in bitter melon?
A: Bitter melon can be susceptible to various pests and diseases, including aphids, spider mites, squash bugs, and powdery mildew. Regularly inspect your plants for signs of pests or diseases and take action promptly. You can use organic pest control methods like insecticidal soap, neem oil, or diatomaceous earth to control pests. For diseases, ensure good air circulation around the plants and avoid overhead watering. If necessary, you can use a fungicide to control fungal diseases.
Q: How do I harvest bitter melon?
A: Bitter melon is typically harvested when the fruits are still green and firm, before they start to turn yellow or orange. The exact size and color at harvest will depend on the variety. Use a sharp knife or pruning shears to cut the fruits from the vine, leaving a short stem attached. Handle the fruits carefully to avoid bruising them.
Q: How do I store bitter melon?
A: Bitter melon can be stored in the refrigerator for up to a week. Wrap the fruits in a paper towel or plastic bag to prevent them from drying out. You can also freeze bitter melon for longer storage. Blanch the slices for a few minutes, then cool them in ice water before freezing.
Q: Is bitter melon really that bitter? How can I reduce the bitterness?
A: Yes, bitter melon is known for its distinctively bitter taste. However, there are several ways to reduce the bitterness. Soaking the slices in salted water for 30 minutes to an hour before cooking can help draw out some of the bitterness. You can also blanch the slices in boiling water for a few minutes. Cooking bitter melon with acidic ingredients like vinegar or lemon juice can also help to balance the bitterness. Some people also find that younger, smaller fruits are less bitter than larger, more mature ones. Experiment with different cooking methods and ingredients to find what works best for you.
Q: Can I grow bitter melon in a container?
A: Yes, you can successfully grow bitter melon in a container, provided that the container is large enough (at least 15-20 gallons) and has good drainage. Use a high-quality potting mix and provide a trellis or other support for the vines to climb. Container-grown bitter melon may require more frequent watering and fertilization than plants grown in the ground.
Leave a Comment