
Water Coriander Growing can seem like a delicate dance, but trust me, with a few clever tricks, you can transform your kitchen windowsill into a thriving herb garden! Have you ever dreamt of snipping fresh, fragrant coriander straight from your own plant to garnish your tacos or add a zing to your curry? Well, stop dreaming and start doing! This DIY guide is packed with simple, effective techniques to help you master the art of growing coriander at home.
Coriander, also known as cilantro in some parts of the world, has a rich history dating back thousands of years. Evidence suggests it was cultivated in ancient Egypt and even mentioned in the Bible! Its versatility in cuisines across the globe speaks volumes about its enduring appeal. But let’s face it, buying fresh coriander from the store can be expensive, and it often wilts before you even get a chance to use it all. That’s where this DIY guide comes in.
I’m going to share my favorite tips and tricks for successful water coriander growing, ensuring you have a constant supply of this flavorful herb right at your fingertips. From understanding the ideal watering schedule to choosing the right container, we’ll cover everything you need to know. Say goodbye to limp, lifeless coriander and hello to a vibrant, aromatic herb garden that will elevate your cooking and impress your friends!
Regrowing Coriander from Cuttings: A Simple Water Propagation Guide
Hey there, fellow plant enthusiasts! Ever find yourself with leftover coriander stems after cooking? Don’t toss them! You can easily regrow them into fresh, vibrant plants using a simple water propagation method. It’s a fantastic way to save money, reduce waste, and enjoy a continuous supply of this flavorful herb. I’ve been doing this for ages, and trust me, it’s super rewarding. Let’s dive in!
What You’ll Need
Before we get started, gather these essential supplies:
* Coriander Stems: Choose healthy-looking stems with at least 2 inches of length and a few leaves at the top. Avoid stems that are wilted, damaged, or showing signs of disease.
* A Clean Glass or Jar: A small glass or jar is perfect for holding the water and supporting the stems. Make sure it’s clean to prevent bacterial growth.
* Water: Use filtered or tap water that has been left to sit for 24 hours to allow chlorine to dissipate.
* Sharp Scissors or a Knife: You’ll need these to trim the stems properly. Ensure they are clean and sharp to avoid damaging the plant tissue.
* Optional: Rooting Hormone: While not essential, rooting hormone can speed up the rooting process. I sometimes use it, especially if the stems seem a bit weak.
* Potting Mix: Once the roots have developed, you’ll need a well-draining potting mix to transplant the coriander.
* Small Pots: Choose pots that are appropriately sized for your new coriander plants.
Selecting and Preparing Your Coriander Stems
This is a crucial step, so pay close attention! The quality of your stems directly impacts the success of your propagation.
1. Choose Healthy Stems: Look for vibrant green stems that are firm and upright. Avoid any stems that are yellowing, browning, or showing signs of rot. The leaves should be healthy and not wilted.
2. Trim the Stems: Using your clean scissors or knife, trim the stems to about 2-3 inches in length. Make the cut just below a node (the point where leaves grow from the stem). This is where the roots will emerge.
3. Remove Lower Leaves: Gently remove the leaves from the bottom half of the stem. This prevents them from rotting in the water and contaminating the water. Leaving a few leaves at the top is fine, as they will help with photosynthesis.
4. Optional: Apply Rooting Hormone: If you’re using rooting hormone, dip the cut end of the stem into the powder or liquid. Follow the instructions on the product label. This step isn’t necessary, but it can give your coriander a boost.
Water Propagation: The Step-by-Step Guide
Now for the fun part! This is where the magic happens.
1. Fill the Glass with Water: Pour fresh, clean water into your glass or jar. Make sure the water level is high enough to cover the nodes where you removed the leaves, but not so high that it submerges the remaining leaves.
2. Place the Stems in the Water: Carefully place the prepared coriander stems into the water, ensuring that the cut ends are submerged. Don’t overcrowd the glass; give each stem enough space.
3. Find the Right Spot: Place the glass in a bright, indirect light location. Avoid direct sunlight, as it can scorch the leaves and overheat the water. A windowsill that receives morning sun or a spot near a bright window is ideal.
4. Change the Water Regularly: This is super important! Change the water every 1-2 days to prevent bacterial growth and keep the water fresh. This will also provide the stems with a fresh supply of oxygen.
5. Observe Root Growth: Be patient! It usually takes about 1-2 weeks for roots to start appearing. You’ll see small, white roots emerging from the nodes.
6. Wait for Root Development: Allow the roots to grow to about 1-2 inches long before transplanting. This will give them a good start in the soil.
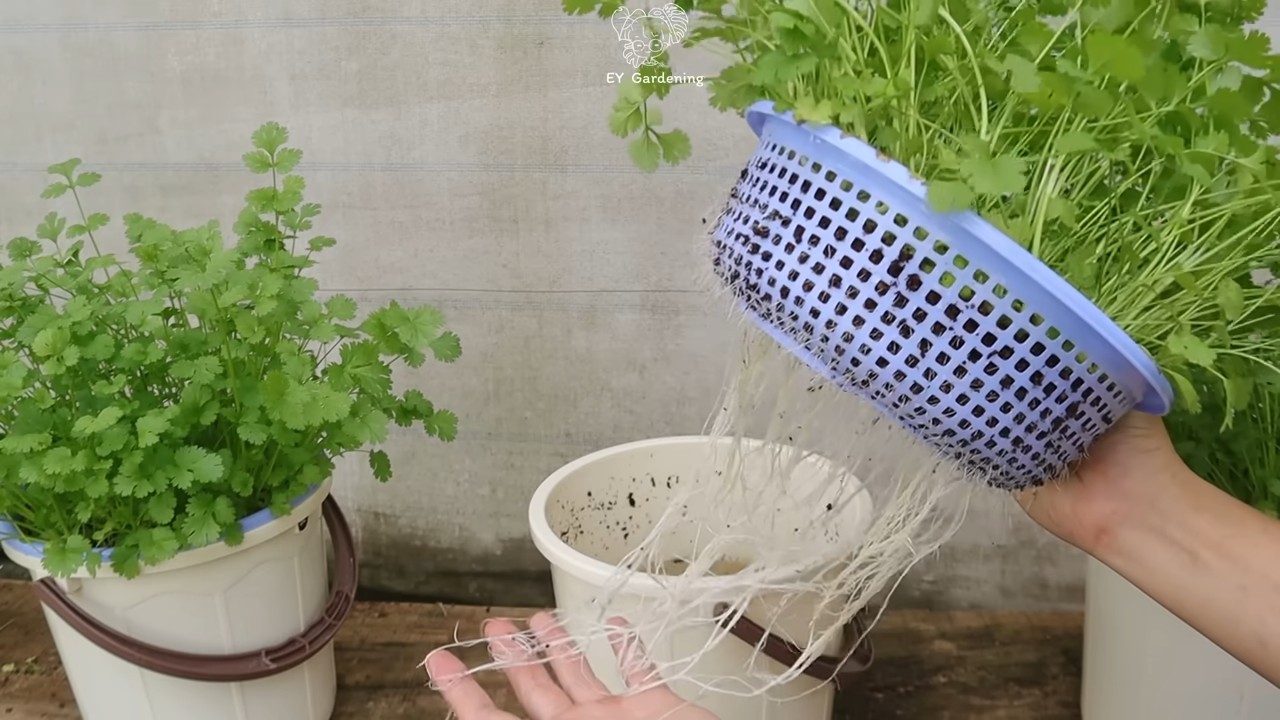
Transplanting Your Rooted Coriander
Once your coriander has developed a good root system, it’s time to move it to soil.
1. Prepare Your Pots: Fill your small pots with well-draining potting mix. You can also add some compost to enrich the soil.
2. Gently Remove the Stems: Carefully remove the rooted coriander stems from the water. Be gentle to avoid damaging the delicate roots.
3. Plant the Stems: Make a small hole in the potting mix and gently place the rooted stem into the hole. Cover the roots with soil and gently pat it down.
4. Water Thoroughly: Water the newly planted coriander thoroughly until the water drains out of the bottom of the pot.
5. Provide Adequate Light: Place the pots in a bright, indirect light location. Avoid direct sunlight for the first few days to allow the plants to adjust to their new environment.
6. Maintain Moisture: Keep the soil consistently moist, but not waterlogged. Water when the top inch of soil feels dry to the touch.
7. Fertilize (Optional): After a few weeks, you can start fertilizing your coriander with a diluted liquid fertilizer. Follow the instructions on the fertilizer label.
Caring for Your Regrown Coriander
Now that you’ve successfully regrown your coriander, here are a few tips to keep it thriving:
* Light: Coriander needs at least 6 hours of sunlight per day. If you don’t have enough natural light, you can supplement with a grow light.
* Watering: Water regularly, keeping the soil consistently moist but not waterlogged. Overwatering can lead to root rot.
* Temperature: Coriander prefers cooler temperatures, between 60-75°F (15-24°C). Avoid exposing it to extreme heat or cold.
* Fertilizing: Fertilize every few weeks with a diluted liquid fertilizer.
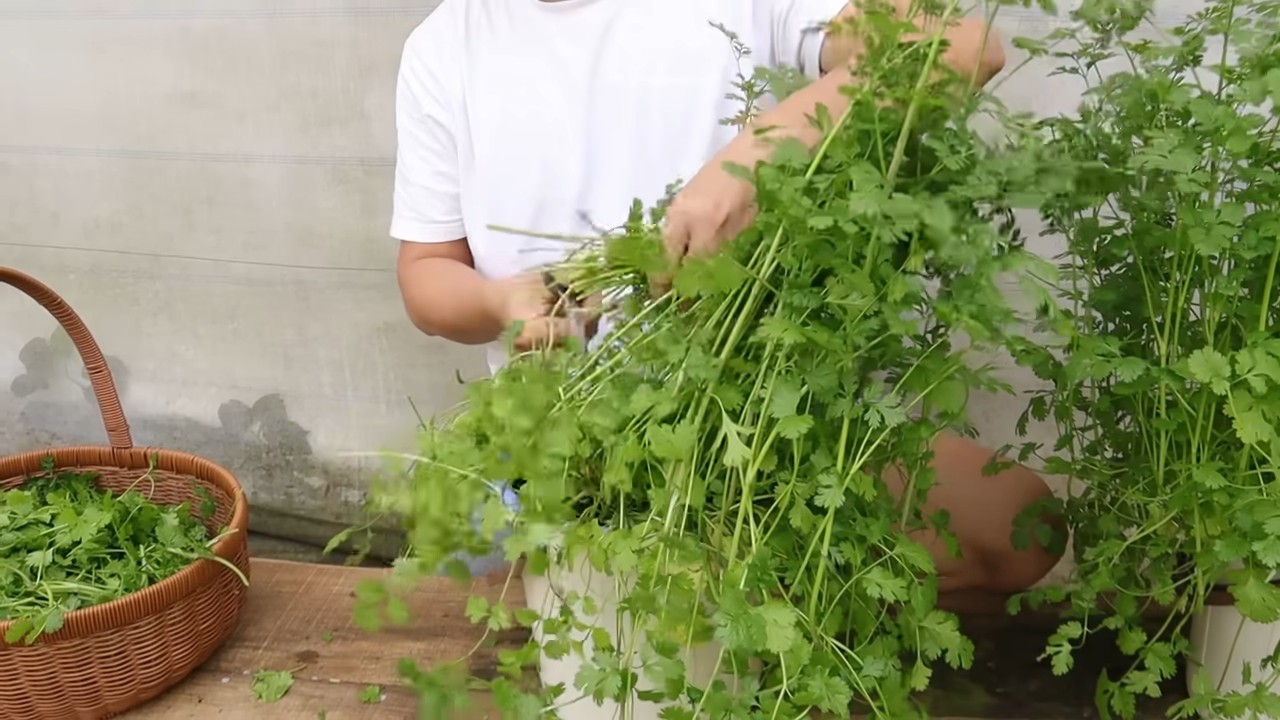
* Harvesting: You can start harvesting your coriander leaves once the plants are established. Snip off the leaves as needed, being careful not to remove more than one-third of the plant at a time.
* Pest Control: Keep an eye out for pests like aphids and spider mites. If you notice any pests, treat them with an insecticidal soap or neem oil.
* Bolting: Coriander tends to bolt (go to seed) in hot weather. To prevent bolting, keep the plants well-watered and provide shade during the hottest part of the day. You can also pinch off any flower buds that appear.
Troubleshooting
Sometimes, things don’t go exactly as planned. Here are a few common issues you might encounter and how to address them:
* Stems Rotting: This is usually caused by bacterial growth in the water. Make sure to change the water regularly and use clean water.
* No Root Growth: This could be due to several factors, such as poor stem quality, insufficient light, or cold temperatures. Try using fresh stems, providing more light, and keeping the water at a warmer temperature.
* Yellowing Leaves: This could be a sign of overwatering, underwatering, or nutrient deficiency. Adjust your watering schedule and fertilize if necessary.
* Wilting: This could be due to underwatering, excessive heat, or transplant shock. Water thoroughly, provide shade, and allow the plants to adjust to their new environment.
Extra Tips for Success
Here are a few extra tips that I’ve learned over time that can help you achieve even better results:
* Use Filtered Water: Filtered water is generally better for plants than tap water, as it contains fewer chemicals.
* Experiment with Different Varieties: There are many different varieties of coriander, each with its own unique flavor and characteristics. Try experimenting with different varieties to find your favorite.
* Successive Planting: To ensure a continuous supply of coriander, plant new stems every few weeks.
* Consider Hydroponics: If you’re feeling adventurous, you can even try growing coriander hydroponically. This involves growing plants in water without soil.
Enjoy Your Homegrown Coriander!
And there you have it! You’ve successfully regrown coriander from cuttings using water propagation. Now you can enjoy fresh, flavorful coriander in your cooking whenever you want. It’s a simple, sustainable, and rewarding way to add a touch of green to your life. Happy gardening! I hope you found this guide helpful. Let me know if you have any questions or tips of your own in the comments below!
Conclusion
So, there you have it! Transforming humble water into a thriving coriander haven is not just a fun experiment; it’s a game-changer for any home cook or gardening enthusiast. Forget those wilting bunches from the grocery store that seem to lose their flavor the moment you get them home. With this simple water propagation method, you can have a constant supply of fresh, vibrant coriander, ready to elevate your dishes with its bright, citrusy notes.
Why is this DIY trick a must-try? Because it’s incredibly easy, cost-effective, and sustainable. You’re essentially recycling coriander stems that would otherwise end up in the compost bin, turning them into a continuous source of fresh herbs. Imagine the satisfaction of snipping off exactly the amount of coriander you need, knowing it’s bursting with flavor and free from any unwanted chemicals. Plus, it’s a fantastic way to reduce your reliance on store-bought herbs, saving you money and minimizing food waste.
But the benefits don’t stop there. Growing coriander in water allows you to observe the fascinating process of root development firsthand. It’s a mini science experiment right in your kitchen, perfect for engaging children and sparking their curiosity about the natural world. And let’s be honest, a jar filled with lush green coriander adds a touch of freshness and vibrancy to any windowsill or countertop.
Looking for variations? Absolutely! Experiment with different types of containers. While a simple glass jar works perfectly well, you could also use repurposed bottles, mason jars, or even decorative vases. Just make sure the container is clean and allows enough light to reach the stems. You can also try adding a diluted liquid fertilizer to the water every few weeks to give your coriander an extra boost. Be careful not to over-fertilize, as this can lead to leggy growth and a less intense flavor.
Another variation is to transition your water-propagated coriander to soil once the roots are well-established. This will allow the plant to grow larger and produce even more leaves. Choose a well-draining potting mix and a sunny location for optimal growth. Remember to water regularly and fertilize occasionally.
Don’t be afraid to experiment with different varieties of coriander as well. Some varieties are more heat-tolerant than others, so choose one that’s well-suited to your climate. You can also try growing other herbs in water using the same method, such as mint, basil, or oregano.
Ultimately, the best way to discover the magic of growing coriander in water is to simply try it yourself. It’s a low-risk, high-reward endeavor that will transform the way you think about fresh herbs. So, grab a bunch of coriander, a jar of water, and get ready to embark on a flavorful adventure.
We’re confident that you’ll be amazed by the results. And once you’ve experienced the joy of harvesting your own fresh coriander, we encourage you to share your experience with us. Post photos of your water-propagated coriander on social media using #WaterCorianderMagic and tell us about your successes (and any challenges you encounter along the way). We can’t wait to see your thriving coriander gardens! This simple method of growing **water coriander** is sure to become a staple in your kitchen.
Frequently Asked Questions (FAQ)
1. What kind of coriander should I use for water propagation?
The best coriander to use for water propagation is fresh coriander from the grocery store or your garden that has stems at least 4-6 inches long. Look for bunches that are vibrant green and have healthy-looking leaves. Avoid coriander that is wilted, yellowing, or has signs of mold. Organic coriander is always a good choice, as it’s free from pesticides and other chemicals. You can also use coriander that you’ve already started to grow in soil, as long as the stems are long enough to be submerged in water.
2. How long does it take for coriander to grow roots in water?
Generally, you should start to see roots developing within 7-14 days. The exact time will depend on factors such as the temperature of the water, the amount of light the coriander receives, and the overall health of the stems. Be patient and change the water regularly to keep it fresh and oxygenated. If you don’t see any roots after two weeks, try using a different bunch of coriander or adjusting the environmental conditions.
3. What kind of water should I use?
It’s best to use filtered or dechlorinated water for water propagation. Tap water often contains chlorine and other chemicals that can inhibit root growth. If you don’t have a water filter, you can let tap water sit out in an open container for 24 hours to allow the chlorine to evaporate. Avoid using distilled water, as it lacks the minerals that plants need to thrive.
4. How often should I change the water?
Change the water every 1-2 days to keep it fresh and prevent the growth of bacteria or algae. This is especially important in warmer temperatures. When you change the water, gently rinse the stems and the inside of the container to remove any debris.
5. Where should I place the coriander while it’s growing roots?
Place the coriander in a bright location that receives indirect sunlight. Avoid placing it in direct sunlight, as this can scorch the leaves and overheat the water. A windowsill that faces east or west is usually a good choice. You can also use a grow light if you don’t have access to a sunny location.
6. Can I grow coriander in water indefinitely?
While you can grow coriander in water for an extended period, it will eventually need to be transplanted to soil to reach its full potential. Coriander grown in water tends to be less robust and produce fewer leaves than coriander grown in soil. Once the roots are well-established (about 2-3 inches long), you can transplant the coriander to a pot filled with well-draining potting mix.
7. What kind of soil should I use if I transplant the coriander?
Use a well-draining potting mix that is rich in organic matter. You can also add some perlite or vermiculite to improve drainage. Avoid using garden soil, as it can be too heavy and compact.
8. How often should I water the coriander if I transplant it to soil?
Water the coriander regularly, keeping the soil moist but not soggy. Allow the top inch of soil to dry out between waterings. Avoid overwatering, as this can lead to root rot.
9. How can I encourage my coriander to produce more leaves?
To encourage your coriander to produce more leaves, provide it with plenty of light, water, and nutrients. Fertilize it every few weeks with a diluted liquid fertilizer. You can also pinch off the flower buds to prevent the plant from going to seed, which will encourage it to produce more leaves.
10. What if my coriander starts to turn yellow or wilt?
If your coriander starts to turn yellow or wilt, it could be a sign of several problems, such as overwatering, underwatering, lack of light, or nutrient deficiency. Check the soil moisture and adjust your watering schedule accordingly. Make sure the coriander is receiving enough light. If you suspect a nutrient deficiency, fertilize it with a diluted liquid fertilizer. If the problem persists, try transplanting the coriander to a new pot with fresh potting mix.
11. Can I use this method to grow other herbs?
Yes, you can use this method to grow other herbs, such as mint, basil, oregano, and rosemary. The process is generally the same: take cuttings from healthy stems, place them in water, and wait for roots to develop. Some herbs may root more easily than others, so experiment and see what works best for you.
12. Is it possible to grow coriander from seed in water?
While you can sprout coriander seeds in water using a sprouting tray or a similar setup, this method is primarily for starting seeds, not for long-term growth in water. The seeds will germinate and produce small sprouts, which can then be transplanted to soil. Water propagation, as described in this article, is best suited for growing coriander from stem cuttings.
Leave a Comment