
Sweet Potato Growing Tips: Ever dreamt of harvesting a bounty of vibrant, earthy sweet potatoes right from your own backyard? Imagine the satisfaction of roasting those homegrown beauties, knowing you nurtured them from tiny slips to deliciousness! This isn’t just a pipe dream; it’s an achievable reality with a few simple tricks and a little DIY spirit.
Sweet potatoes, a staple in many cultures for centuries, boast a rich history. Originating in Central and South America, they’ve journeyed across continents, becoming a beloved ingredient in dishes ranging from savory stews to sweet pies. Their resilience and nutritional value have made them a vital food source throughout history.
But why should *you* delve into the world of sweet potato cultivation? Well, beyond the sheer joy of gardening, growing your own sweet potatoes offers a fantastic way to ensure you’re consuming fresh, organic produce. Plus, let’s be honest, store-bought sweet potatoes just don’t compare to the flavor of those you’ve lovingly grown yourself. In this article, I’m going to share some easy-to-follow sweet potato growing tips and DIY hacks that will transform your garden into a sweet potato paradise, even if you’re a complete beginner. Get ready to get your hands dirty and enjoy the sweet rewards!
Growing Sweet Potatoes in Containers: A Beginner’s Guide
Hey there, fellow gardening enthusiasts! I’m so excited to share my experience with growing sweet potatoes in containers. It’s surprisingly easy, even if you don’t have a huge backyard. Trust me, there’s nothing quite like harvesting your own homegrown sweet potatoes – the taste is just incredible! So, let’s dive into how you can grow these delicious tubers right on your patio or balcony.
Choosing the Right Sweet Potato Variety
First things first, you need to pick the right sweet potato variety. Not all sweet potatoes are created equal, especially when it comes to container gardening. You’ll want to choose varieties that are more compact and bush-like rather than those that produce long, sprawling vines. Here are a few of my favorites:
* ‘Bush Porto Rico’: This is a classic choice and a reliable producer. It’s known for its reddish-orange skin and moist, orange flesh. It’s also relatively compact, making it perfect for containers.
* ‘Georgia Jet’: If you’re looking for a faster-maturing variety, ‘Georgia Jet’ is a great option. It has reddish-purple skin and deep orange flesh.
* ‘Beauregard’: This is a widely popular variety that’s known for its high yields and disease resistance. It has reddish-orange skin and orange flesh. While it can vine a bit, it’s still manageable in a large container.
* ‘Centennial’: Another good choice with orange skin and flesh, known for its sweetness.
Tip: Check with your local nursery or garden center to see what varieties are best suited for your climate.
Preparing Your Sweet Potato Slips
Okay, so you’ve chosen your variety. Now, you need to get your hands on some “slips.” Slips are basically sprouts that grow from a mature sweet potato. You can buy them online or at a nursery, but it’s also super easy (and cheaper!) to grow your own. Here’s how I do it:
1. Choose a Healthy Sweet Potato: Select a firm, healthy sweet potato from the grocery store or your last harvest. Organic ones are preferable, as they are less likely to be treated with sprout inhibitors.
2. Prepare the Potato: There are two main methods:
* Water Method: Suspend the sweet potato halfway in a jar or glass of water, using toothpicks to hold it in place. Make sure the bottom half of the potato is submerged.
* Soil Method: Bury the sweet potato horizontally in a container filled with moist potting mix, leaving the top exposed.
3. Provide Warmth and Light: Place the jar or container in a warm, sunny location. A temperature of around 75-85°F (24-29°C) is ideal.
4. Wait for Sprouts: Be patient! It can take several weeks for sprouts (slips) to emerge from the potato. Keep the water fresh and the soil moist.
5. Harvest the Slips: Once the slips are about 6-8 inches long, carefully twist or cut them off the sweet potato.
6. Root the Slips: Place the slips in a glass of water, making sure the bottom inch or two is submerged. In a few days, roots will start to form.
7. Ready to Plant: Once the slips have a good root system (about an inch or two long), they’re ready to be planted in your container.
Setting Up Your Container Garden
Now for the fun part – setting up your container! This is crucial for a successful sweet potato harvest.
1. Choose the Right Container: Sweet potatoes need plenty of room to grow. I recommend using a container that’s at least 20 gallons in size. The bigger, the better! A half-barrel planter or a large plastic tub works well.
2. Ensure Proper Drainage: Make sure your container has plenty of drainage holes. Sweet potatoes don’t like to sit in soggy soil.
3. Use a High-Quality Potting Mix: Don’t use garden soil! It’s too heavy and doesn’t drain well. Instead, use a lightweight, well-draining potting mix. I like to add some compost to the mix for extra nutrients.
4. Consider Location: Sweet potatoes need at least 6-8 hours of sunlight per day. Choose a sunny spot for your container.
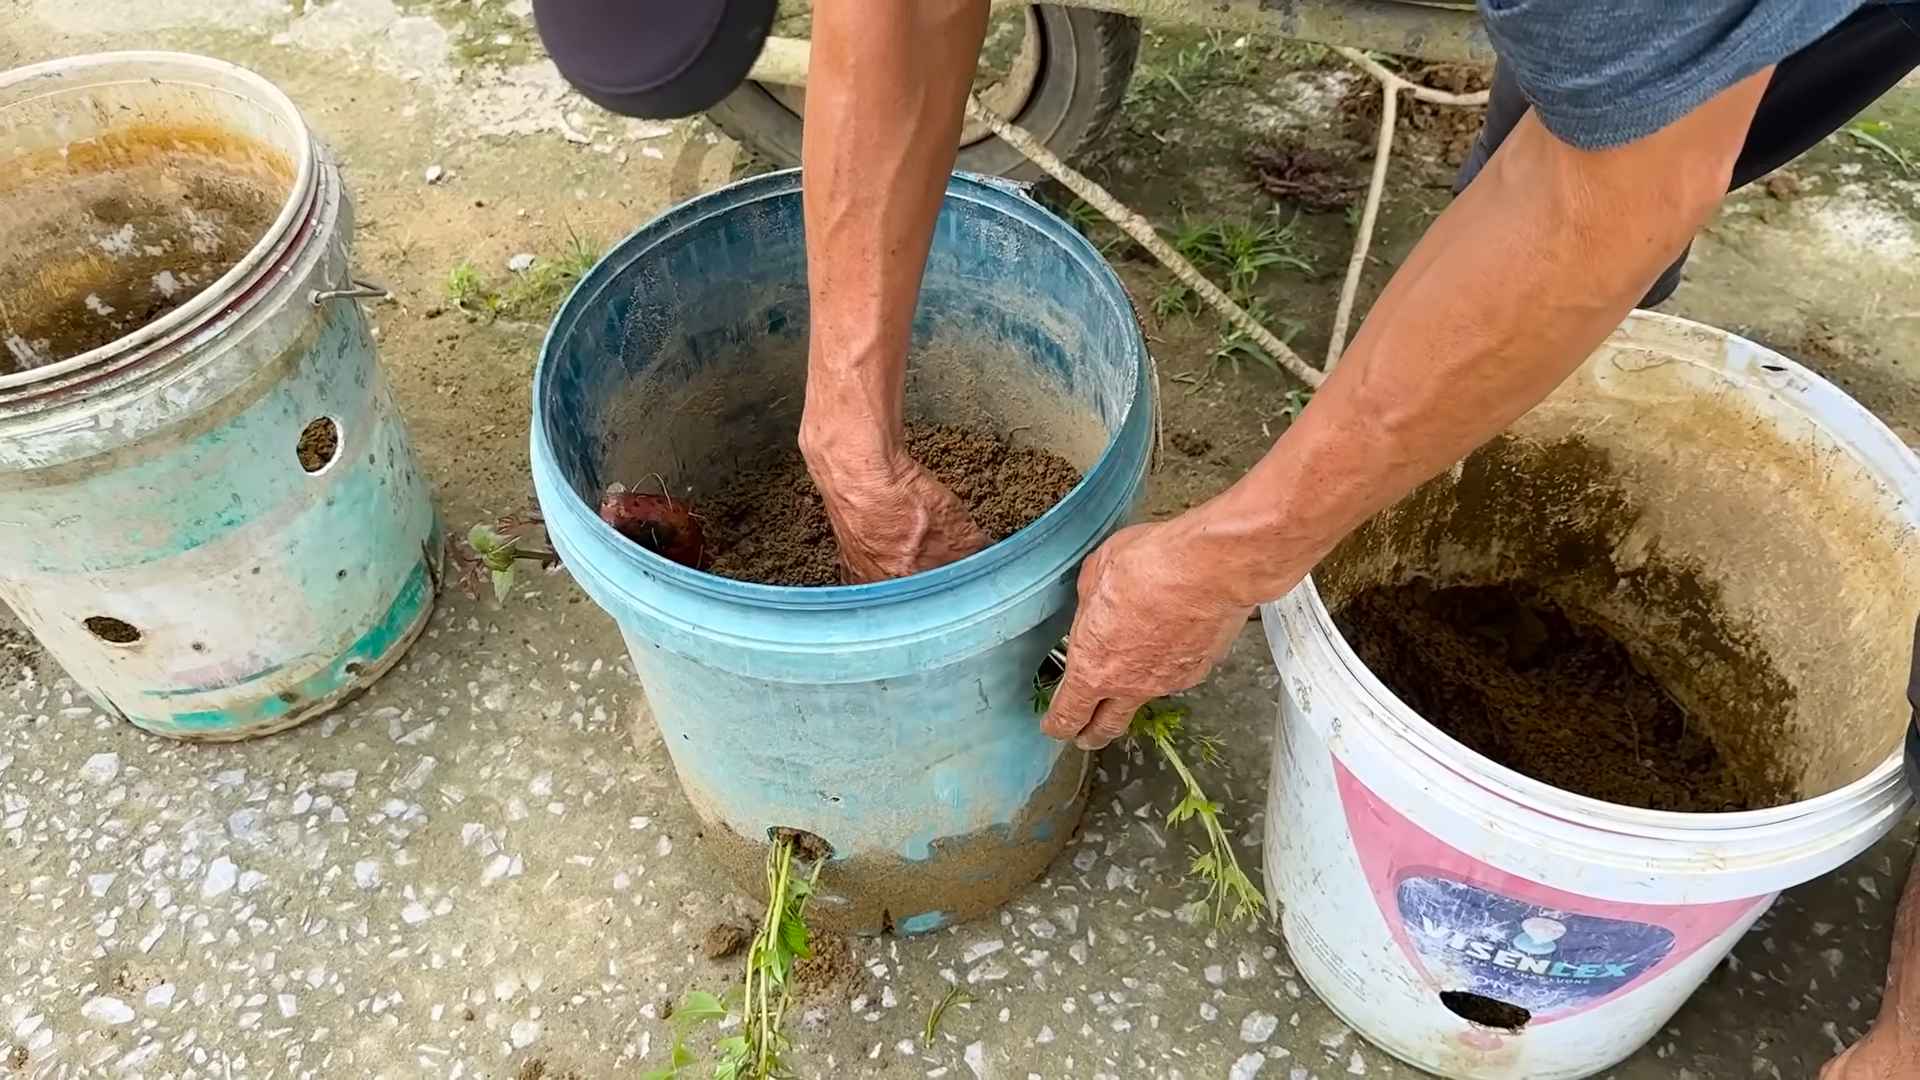
Planting Your Sweet Potato Slips
Alright, your container is ready, and your slips are rooted. Let’s get planting!
1. Prepare the Planting Hole: Dig a hole in the potting mix that’s deep enough to accommodate the roots of the slip.
2. Plant the Slip: Gently place the slip in the hole and cover the roots with potting mix. Make sure the base of the slip is just below the soil surface.
3. Water Thoroughly: Water the newly planted slip thoroughly.
4. Space Multiple Slips: If you’re planting multiple slips in the same container, space them about 12-18 inches apart.
Caring for Your Sweet Potato Plants
Once your sweet potato slips are planted, it’s time to provide them with the care they need to thrive.
1. Watering: Sweet potatoes need consistent moisture, especially during hot weather. Water deeply whenever the top inch of soil feels dry to the touch. Avoid overwatering, as this can lead to root rot.
2. Fertilizing: Sweet potatoes are heavy feeders. Fertilize them every 2-3 weeks with a balanced liquid fertilizer. Look for a fertilizer with an NPK ratio of around 10-10-10. You can also amend the soil with compost tea.
3. Weeding: Keep the container free of weeds. Weeds can compete with your sweet potato plants for nutrients and water.
4. Sunlight: Ensure your sweet potato plants receive at least 6-8 hours of sunlight per day.
5. Pest Control: Keep an eye out for pests like aphids, spider mites, and sweet potato weevils. Treat any infestations promptly with insecticidal soap or neem oil.
6. Vine Management: While some varieties are bush-like, others may produce vines. You can prune the vines to keep them under control, but don’t prune too heavily, as this can reduce your yield. You can also train the vines to grow up a trellis or stake.
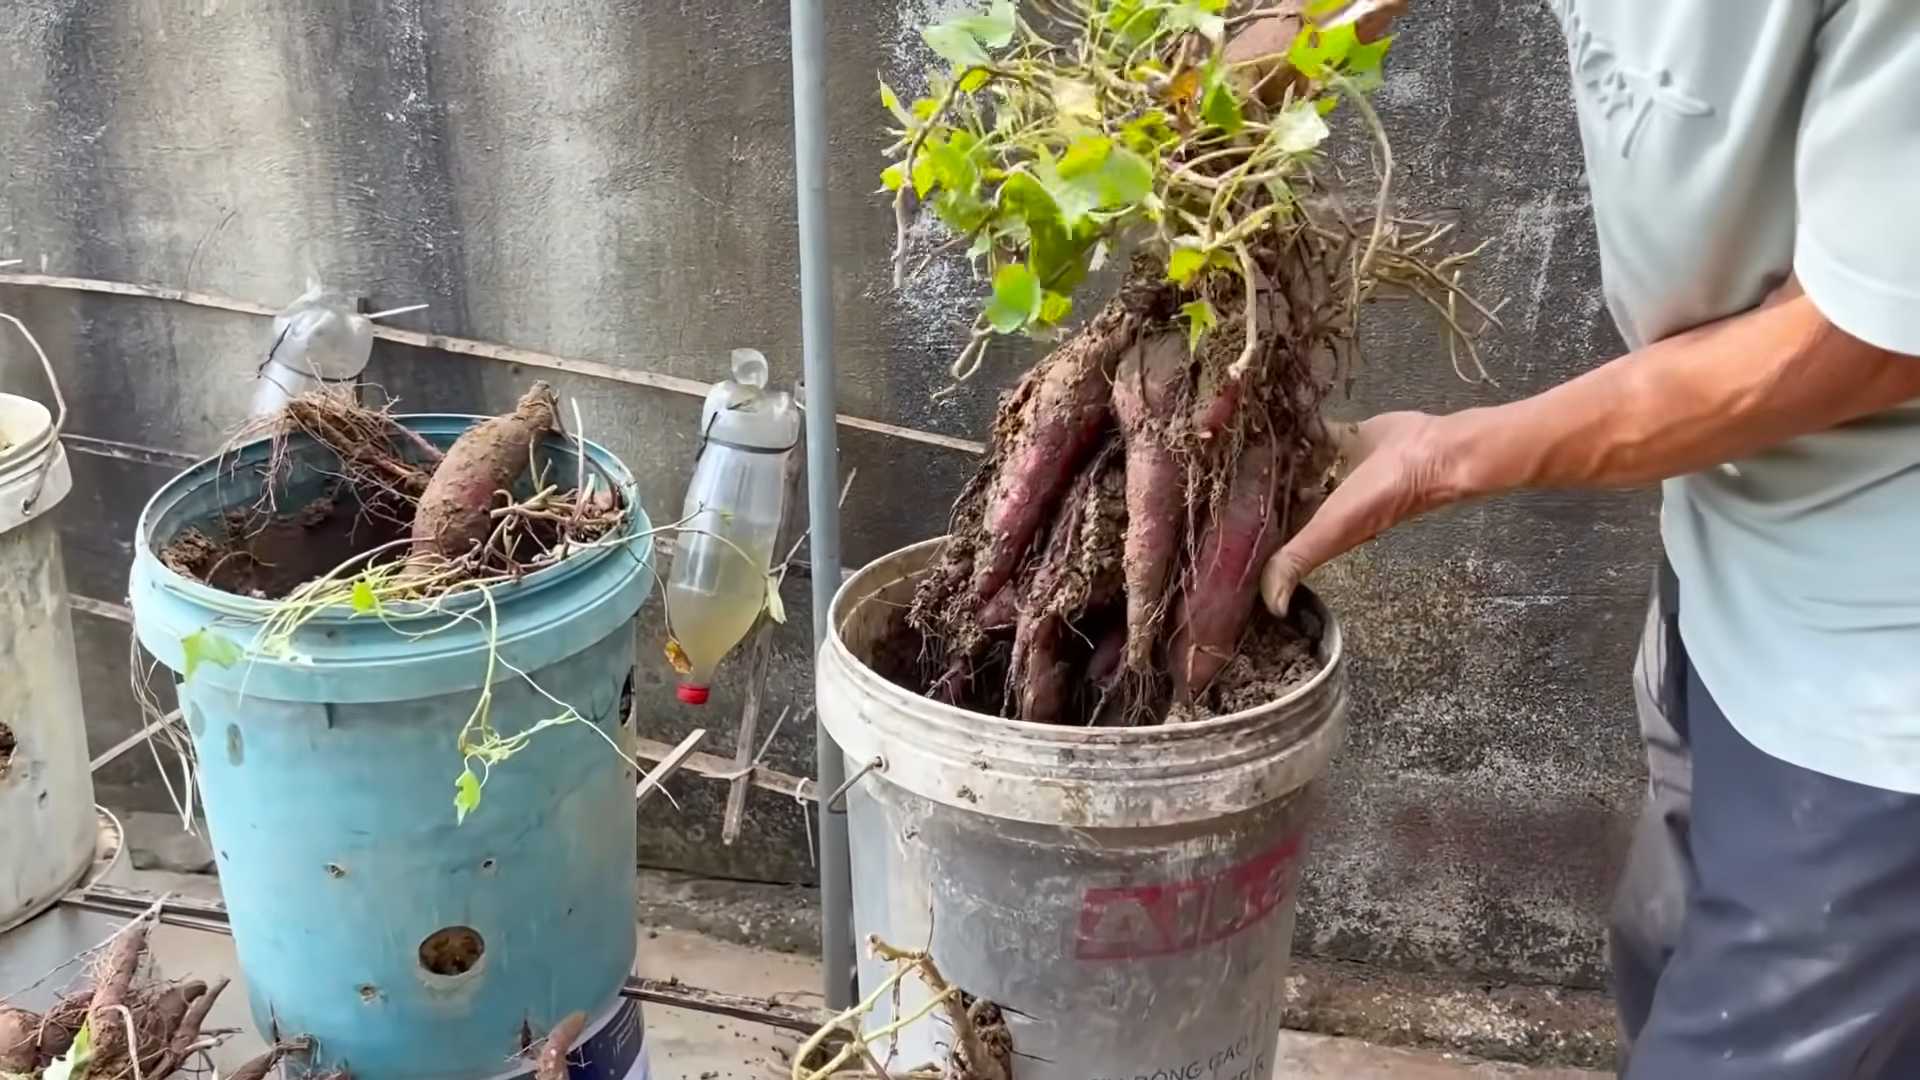
Harvesting Your Sweet Potatoes
This is the moment you’ve been waiting for! Harvesting your own sweet potatoes is incredibly rewarding.
1. Timing is Key: Sweet potatoes typically take 90-120 days to mature. The best time to harvest is before the first frost.
2. Look for Signs of Maturity: The leaves of the plant will start to turn yellow and die back when the sweet potatoes are ready to harvest.
3. Carefully Dig Them Up: Gently dig around the base of the plant with a garden fork or trowel. Be careful not to damage the sweet potatoes.
4. Handle with Care: Sweet potatoes are delicate and can bruise easily. Handle them with care.
5. Curing Your Sweet Potatoes: Curing is essential for developing the sweetness and flavor of your sweet potatoes.
* Clean the Potatoes: Gently brush off any excess soil from the sweet potatoes. Don’t wash them!
* Cure in a Warm, Humid Place: Place the sweet potatoes in a warm, humid place (80-85°F or 27-29°C) for 7-10 days. A garage or shed works well. You can increase the humidity by placing a pan of water nearby.
* Store Properly: After curing, store the sweet potatoes in a cool, dry place (55-60°F or 13-16°C). They should keep for several months.
Troubleshooting Common Problems
Even with the best care, you might encounter some problems while growing sweet potatoes in containers. Here are a few common issues and how to address them:
* Yellowing Leaves: This could be a sign of nutrient deficiency. Fertilize your plants with a balanced fertilizer.
* Slow Growth: Make sure your plants are getting enough sunlight and water. Also, check the soil pH. Sweet potatoes prefer a slightly acidic soil (pH 6.0-6.5).
* Root Rot: This is caused by overwatering. Make sure your container has good drainage and avoid watering too frequently.
* Pest Infestations: Treat any pest infestations promptly with insecticidal soap or neem oil.
Enjoying Your Homegrown Sweet Potatoes
Congratulations! You’ve successfully grown your own sweet potatoes in containers. Now it’s time to enjoy the fruits (or rather, tubers) of your labor. There are so many delicious ways to prepare sweet potatoes:
* Roasted: Simply toss sweet potato cubes
Conclusion
So, there you have it! Growing your own sweet potatoes doesn’t have to be a daunting task. With a little patience, some simple supplies, and these tried-and-true tips, you can transform your garden (or even a sunny balcony!) into a sweet potato haven. This DIY approach not only saves you money but also allows you to enjoy the unparalleled satisfaction of harvesting your own homegrown produce. The vibrant orange flesh of a freshly dug sweet potato, knowing you nurtured it from slip to supper, is a reward unlike any other.
But why is this DIY trick a must-try? Beyond the cost savings and the sheer joy of gardening, growing your own sweet potatoes offers a level of control over the quality and origin of your food that you simply can’t achieve with store-bought varieties. You know exactly what went into growing them – no mystery pesticides or questionable farming practices. Plus, the taste is undeniably superior. Freshly harvested sweet potatoes boast a sweetness and depth of flavor that diminishes significantly during transportation and storage.
Don’t be afraid to experiment! Consider these variations to personalize your sweet potato growing experience:
* Container Gardening: If you’re short on space, sweet potatoes thrive in large containers. Choose a container at least 20 gallons in size and ensure it has excellent drainage.
* Different Varieties: Explore the diverse world of sweet potato varieties! Beauregard is a classic choice, but consider trying Japanese sweet potatoes with their purple skin and white flesh, or the Covington variety known for its vibrant orange color and smooth texture.
* Vertical Gardening: Get creative and train your sweet potato vines to grow vertically on a trellis or fence. This not only saves space but also adds a beautiful ornamental element to your garden.
* Companion Planting: Enhance your sweet potato patch by planting beneficial companion plants like beans, peas, or thyme. These plants can help deter pests and improve soil health.
Ultimately, the best way to learn is by doing. Don’t be intimidated by the process. Start small, be observant, and adjust your approach as needed. The rewards of growing your own sweet potatoes are well worth the effort.
We are confident that these sweet potato growing tips will set you on the path to a bountiful harvest. Now it’s your turn! Grab some sweet potatoes, start those slips, and get ready to enjoy the delicious fruits (or rather, roots!) of your labor. We encourage you to share your experiences, successes, and even your challenges in the comments below. Let’s build a community of sweet potato enthusiasts and learn from each other. Happy growing!
Frequently Asked Questions (FAQ)
Q: How long does it take to grow sweet potatoes?
A: Sweet potatoes typically take between 90 and 120 days to mature from planting slips to harvest. The exact time depends on the variety, climate, and growing conditions. Warmer climates generally result in faster growth. Keep an eye on the foliage; when it starts to yellow and die back, it’s a good indication that your sweet potatoes are ready to harvest.
Q: What kind of soil is best for growing sweet potatoes?
A: Sweet potatoes prefer well-drained, sandy loam soil with a slightly acidic pH (between 5.5 and 6.5). Avoid heavy clay soils, as they can restrict root development and lead to misshapen tubers. If you have clay soil, amend it with plenty of organic matter, such as compost or well-rotted manure, to improve drainage and aeration. Raised beds are also an excellent option for growing sweet potatoes in areas with poor soil drainage.
Q: How often should I water my sweet potato plants?
A: Sweet potatoes need consistent moisture, especially during the initial stages of growth. Water deeply and regularly, aiming for about 1 inch of water per week. Once the plants are established, you can reduce watering slightly, allowing the soil to dry out slightly between waterings. Avoid overwatering, as this can lead to root rot. Monitor the soil moisture regularly and adjust your watering schedule accordingly, depending on the weather conditions.
Q: What are sweet potato slips, and how do I start them?
A: Sweet potato slips are sprouts that grow from a mature sweet potato. They are the starting point for growing new sweet potato plants. To start slips, suspend a sweet potato in a jar of water, with the bottom half submerged. Place the jar in a warm, sunny location. Within a few weeks, sprouts will begin to emerge from the sweet potato. Once the sprouts are 6-8 inches long, gently twist them off and root them in water for a few days before planting them in the garden. You can also start slips by burying a sweet potato horizontally in a bed of moist sand or potting mix.
Q: What are some common pests and diseases that affect sweet potatoes?
A: Sweet potatoes are relatively pest-resistant, but some common pests include sweet potato weevils, flea beetles, and wireworms. Diseases that can affect sweet potatoes include stem rot, black rot, and scurf. To prevent pest and disease problems, practice good garden hygiene, such as removing plant debris and rotating crops. Use organic pest control methods, such as insecticidal soap or neem oil, if necessary. Choose disease-resistant varieties whenever possible.
Q: How do I harvest sweet potatoes?
A: Harvest sweet potatoes on a dry day, ideally before the first frost. Use a garden fork or shovel to carefully dig around the plants, being careful not to damage the tubers. Gently lift the sweet potatoes from the soil, brushing off any excess dirt. Cure the sweet potatoes by placing them in a warm, humid location (80-85°F and 85-90% humidity) for 7-10 days. This process allows the skins to harden and the starches to convert to sugars, resulting in a sweeter flavor.
Q: How do I store sweet potatoes?
A: After curing, store sweet potatoes in a cool, dry, and dark place (55-60°F) with good ventilation. Avoid storing them in the refrigerator, as this can cause them to develop a hard core and lose their flavor. Properly cured and stored sweet potatoes can last for several months. Check them periodically for signs of spoilage and discard any that are soft or rotten.
Q: Can I grow sweet potatoes in containers?
A: Yes, sweet potatoes can be successfully grown in containers. Choose a large container (at least 20 gallons) with good drainage. Fill the container with a well-draining potting mix and plant the sweet potato slips. Provide adequate sunlight, water, and fertilizer. Container-grown sweet potatoes may not produce as many tubers as those grown in the ground, but you can still enjoy a decent harvest.
Q: What kind of fertilizer should I use for sweet potatoes?
A: Sweet potatoes benefit from a balanced fertilizer with a lower nitrogen content than phosphorus and potassium. A 5-10-10 fertilizer is a good option. Avoid over-fertilizing with nitrogen, as this can promote excessive vine growth at the expense of tuber development. Amend the soil with compost or well-rotted manure before planting to provide a slow-release source of nutrients.
Q: Can I eat the sweet potato leaves?
A: Yes, sweet potato leaves are edible and nutritious. They can be cooked and eaten like spinach or other leafy greens. Choose young, tender leaves for the best flavor and texture. Avoid eating leaves from plants that have been treated with pesticides.

Leave a Comment