
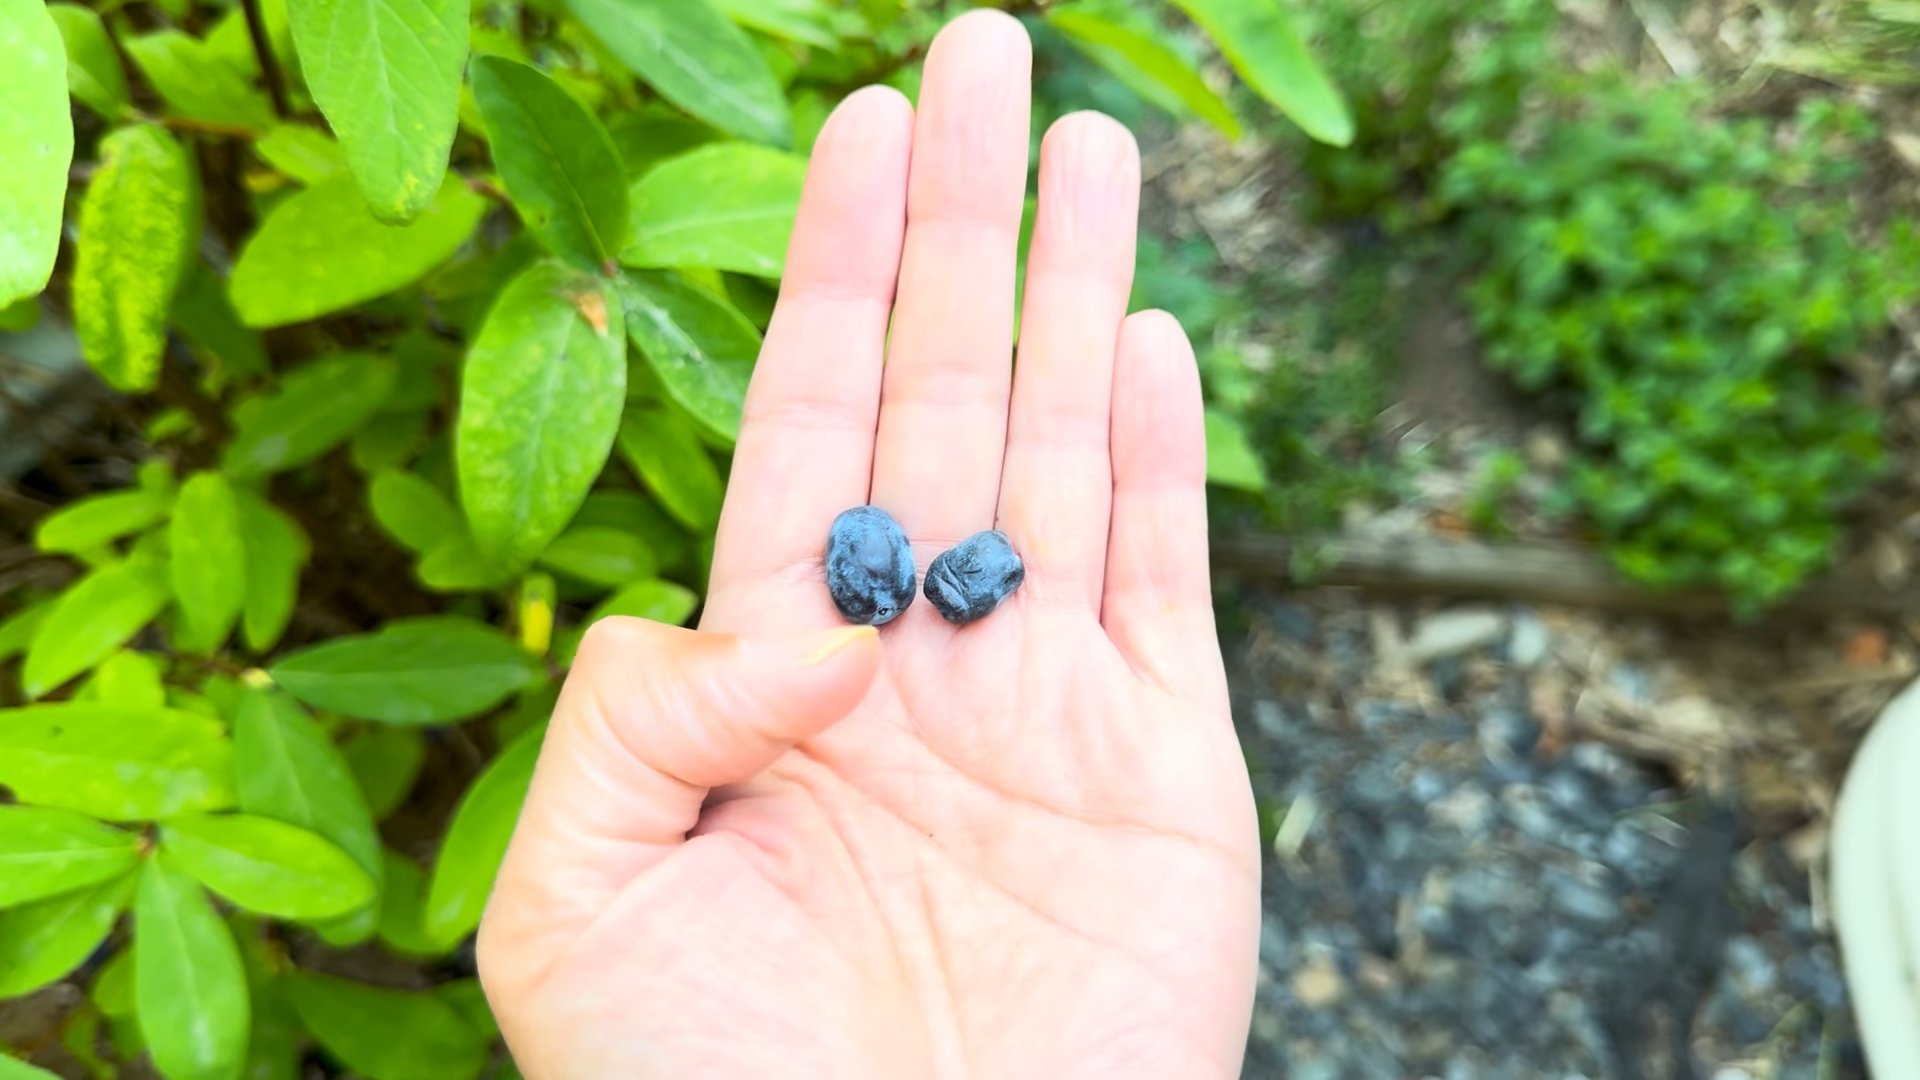
Honeyberry Garden Tour: Ever dreamed of strolling through your backyard, plucking sweet, juicy berries straight from the bush, and knowing you grew them yourself? I know I have! Forget those bland, store-bought berries – we’re diving headfirst into the wonderful world of honeyberries, and I’m so excited to take you on a virtual tour of my own honeyberry haven!
Honeyberries, also known as Haskap berries, have a fascinating history, deeply rooted in the cold climates of Russia and Japan. For centuries, these hardy berries have been cherished for their unique flavor, a delightful blend of blueberry, raspberry, and black currant, and their incredible resilience. They’re practically a superfood powerhouse!
But why should *you* consider adding honeyberries to your garden? Well, besides the obvious deliciousness, they’re incredibly easy to grow, even for beginner gardeners like I once was. This DIY guide will equip you with all the tips and tricks you need to cultivate your own thriving honeyberry patch. We’ll explore everything from choosing the right varieties for your climate to simple propagation techniques, ensuring you’ll be harvesting buckets of these delightful berries in no time. Plus, a Honeyberry Garden Tour is a fantastic way to add beauty and biodiversity to your outdoor space. So, grab your gardening gloves, and let’s get started!
DIY Vertical Strawberry Tower from Repurposed Pallet Wood
Hey there, fellow gardening enthusiasts! I’m so excited to share one of my favorite DIY projects with you: building a vertical strawberry tower from repurposed pallet wood. Not only is this project incredibly rewarding, but it’s also a fantastic way to maximize your growing space, especially if you’re short on yard real estate like I am. Plus, it’s a sustainable way to give old pallets a new life! Get ready to enjoy a bountiful harvest of juicy, homegrown strawberries right at your fingertips.
Why Build a Vertical Strawberry Tower?
Before we dive into the nitty-gritty, let’s talk about why a vertical strawberry tower is such a great idea.
* **Space Saving:** This is the biggest advantage! If you have a small balcony, patio, or even just a sunny corner, you can grow a surprising number of strawberry plants.
* **Pest Control:** Elevating your strawberries helps keep them away from ground-dwelling pests like slugs and snails.
* **Improved Air Circulation:** Better airflow reduces the risk of fungal diseases.
* **Easy Harvesting:** No more bending over to pick your berries!
* **Aesthetic Appeal:** Let’s be honest, a vertical strawberry tower is just plain beautiful and adds a touch of rustic charm to any outdoor space.
Materials You’ll Need
Okay, let’s gather our supplies. Here’s what you’ll need to build your own vertical strawberry tower:
* **Pallet Wood:** You’ll need at least one pallet, preferably a sturdy one that hasn’t been chemically treated. Look for the HT (heat treated) stamp, which indicates it’s safe for gardening. Avoid pallets marked with MB (methyl bromide), as this is a toxic fumigant.
* **Landscape Fabric:** This will line the inside of your tower and prevent soil from washing out.
* **Staple Gun and Staples:** To secure the landscape fabric.
* **Measuring Tape:** For accurate cuts and measurements.
* **Saw:** A circular saw or hand saw will work, depending on your preference and the thickness of the pallet wood.
* **Drill and Screws:** To assemble the tower. I recommend using exterior-grade screws to withstand the elements.
* **Gloves:** To protect your hands from splinters.
* **Safety Glasses:** Always protect your eyes when working with power tools.
* **Potting Soil:** Choose a high-quality potting mix that’s well-draining.
* **Strawberry Plants:** Of course! Choose everbearing varieties for a continuous harvest throughout the season.
* **Optional: Wood Preservative or Stain:** To protect the wood and enhance its appearance.
* **Optional: Sandpaper:** For smoothing rough edges.
Step-by-Step Instructions: Building Your Strawberry Tower
Alright, let’s get building! This project might seem a little daunting at first, but trust me, it’s totally doable with a little patience and elbow grease.
1. Disassembling the Pallet
This is often the most challenging part, but don’t worry, I’ll walk you through it.
1. **Inspect the Pallet:** Before you start, carefully inspect the pallet for any loose nails, staples, or broken boards. Remove any hazards.
2. **Pry the Boards:** Use a pry bar or hammer to carefully pry the boards apart. Be gentle to avoid splitting the wood. You can also use a reciprocating saw with a metal-cutting blade to cut through the nails or screws holding the pallet together. This is often faster and easier, but be sure to wear safety glasses!
3. **Remove Nails and Staples:** Once the boards are separated, remove any remaining nails or staples with pliers or a hammer.
4. **Sort the Boards:** Sort the boards by size and condition. Discard any boards that are severely damaged or rotten.
2. Cutting the Wood
Now that you have your pallet wood, it’s time to cut it into the pieces you’ll need for the tower.
1. **Determine the Size:** Decide how tall and wide you want your tower to be. I recommend a height of around 4-5 feet and a width of about 2-3 feet. This will give you plenty of growing space without being too unwieldy.
2. **Cut the Side Pieces:** Cut four pieces of wood to the desired height of your tower. These will be the vertical supports.
3. **Cut the Horizontal Pieces:** Cut the horizontal pieces that will form the tiers of your tower. The length of these pieces will depend on the desired width of your tower. You’ll need enough pieces to create several tiers, spaced about 12-18 inches apart.
4. **Cut the Bottom Pieces:** Cut pieces to form a solid base for your tower. This will help to contain the soil and prevent it from spilling out.
5. **Sand the Edges (Optional):** If you want a smoother finish, sand the edges of the boards with sandpaper. This will also help to prevent splinters.
3. Assembling the Tower Frame
Time to put it all together!
1. **Build the Frame:** Attach the horizontal pieces to the vertical supports using screws. Make sure the frame is square and level. I like to use a level to ensure everything is aligned properly.
2. **Attach the Base:** Attach the bottom pieces to the frame to create a solid base.
3. **Reinforce the Corners:** For added stability, you can reinforce the corners of the frame with corner braces.
4. Lining the Tower with Landscape Fabric
This step is crucial for preventing soil erosion.
1. **Cut the Fabric:** Cut pieces of landscape fabric to fit the inside of each tier of the tower. Make sure the fabric is large enough to overlap the edges of the frame.
2. **Staple the Fabric:** Staple the landscape fabric to the inside of the frame, overlapping the edges. Make sure the fabric is securely attached to prevent it from tearing.
5. Adding the Soil and Planting the Strawberries
The fun part!
1. **Add Soil to the Bottom Tier:** Fill the bottom tier of the tower with potting soil.
2. **Plant the Strawberries:** Plant the strawberry plants in the soil, spacing them about 6-8 inches apart.
3. **Repeat for Each Tier:** Repeat steps 1 and 2 for each tier of the tower.
4. **Water Thoroughly:** Water the plants thoroughly after planting.
6. Finishing Touches (Optional)
These steps are optional, but they can help to protect the wood and enhance the appearance of your tower.
1. **Apply Wood Preservative or Stain:** Apply a wood preservative or stain to the exterior of the tower to protect it from the elements. This will help to extend the life of your tower.
2. **Add Decorative Elements:** Add decorative elements such as paint, stencils, or climbing vines to personalize your tower.
Maintaining Your Strawberry Tower
Now that your strawberry tower is complete, here are a few tips for keeping it healthy and productive:
* **Water Regularly:** Strawberries need consistent moisture, especially during hot weather. Water deeply whenever the soil feels dry to the touch.
* **Fertilize:** Feed your strawberry plants with a balanced fertilizer every few weeks.
* **Remove Runners:** Pinch off any runners that develop to encourage the plants to focus their energy on producing fruit.
* **Protect from Pests:** Keep an eye out for pests and diseases. Use organic pest control methods if necessary.
* **Winter Care:** In colder climates, protect your strawberry plants from frost by covering them with a layer of mulch or burlap.
Troubleshooting
Sometimes things don’t go exactly as planned. Here are a few common problems you might encounter and how to fix them:
* **Soil Drying Out Too Quickly:** This can be a problem in hot, sunny locations. Try adding a layer of mulch to the top of the soil to help retain moisture. You can also try using a self-watering system.
* **Plants Not Producing Fruit:** This could be due to a lack of sunlight, poor soil, or insufficient watering. Make sure your plants are getting at least 6 hours of sunlight per day, and fertilize them regularly.
* **Pests and Diseases:** Inspect your plants regularly for signs of pests and diseases. Treat any problems promptly with organic pest control methods.
Enjoy Your Harvest!
And there you have it! Your very own vertical strawberry tower, built from repurposed pallet wood. Now, sit back, relax, and enjoy the fruits (literally!) of your labor. There’s nothing quite like the taste of homegrown strawberries, and you’ll be amazed at how much you can grow in such a small space. Happy gardening!

Conclusion
So, there you have it! This simple yet effective DIY trick for propagating honeyberries is a game-changer for any gardener looking to expand their berry patch without breaking the bank. We’ve walked you through the process, highlighting the ease and affordability of taking cuttings and nurturing them into thriving new plants. Forget expensive nursery stock – with a little patience and this method, you can create a flourishing honeyberry garden from just a few parent plants.
Why is this a must-try? Because it empowers you to take control of your garden’s growth. It’s a sustainable and cost-effective way to multiply your honeyberry bushes, ensuring a bountiful harvest for years to come. Imagine the satisfaction of harvesting buckets of juicy honeyberries, knowing that you propagated each plant yourself! Plus, it’s a fantastic way to share the joy of honeyberries with friends and family, gifting them rooted cuttings to start their own gardens.
Don’t be afraid to experiment with variations! While we’ve focused on softwood cuttings, you can also try hardwood cuttings in late fall or early winter. Some gardeners have success using rooting hormones to further boost the propagation rate. You could also explore different potting mixes to find what works best for your local climate and soil conditions. Consider using a humidity dome or plastic bag to create a mini-greenhouse environment, especially in drier climates.
The possibilities are endless, and the rewards are well worth the effort. This DIY honeyberry propagation method is not just about saving money; it’s about connecting with nature, learning new skills, and experiencing the joy of watching new life emerge from your own hands.
We wholeheartedly encourage you to give this DIY trick a try. It’s easier than you might think, and the results are incredibly rewarding. Once you’ve successfully propagated your own honeyberry plants, we’d love to hear about your experience! Share your tips, tricks, and photos in the comments below. Let’s build a community of honeyberry enthusiasts and help each other grow thriving gardens filled with these delicious and nutritious berries. Let us know if you have any questions, and happy gardening!
Frequently Asked Questions (FAQ)
What are honeyberries, and why should I grow them?
Honeyberries, also known as Haskap berries, are early-fruiting berries that resemble elongated blueberries. They are incredibly hardy, tolerating temperatures well below freezing, making them ideal for colder climates. They are packed with antioxidants and have a unique sweet-tart flavor, often described as a blend of blueberry, raspberry, and black currant. Growing your own honeyberries ensures a fresh, local source of these nutritious berries, and they are relatively easy to care for once established.
When is the best time to take honeyberry cuttings for propagation?
The ideal time to take softwood cuttings is in late spring or early summer, when the new growth is still flexible and green. Hardwood cuttings are best taken in late fall or early winter after the plant has gone dormant. The timing is crucial for successful rooting, so pay attention to the plant’s growth cycle.
What type of cutting should I take: softwood or hardwood?
Softwood cuttings are generally easier to root, especially for beginners. They are taken from the new, green growth of the current season. Hardwood cuttings, taken from dormant, woody stems, require a longer rooting period and may have a lower success rate, but they are still a viable option.
What is the ideal length for a honeyberry cutting?
Aim for cuttings that are 4-6 inches long. This provides enough stem length for rooting while also minimizing moisture loss. Make sure to remove the lower leaves to prevent them from rotting in the soil.
What kind of potting mix should I use for rooting honeyberry cuttings?
A well-draining potting mix is essential to prevent root rot. A mixture of peat moss, perlite, and vermiculite works well. You can also use a commercial rooting mix specifically designed for cuttings. Ensure the mix is moist but not waterlogged.
Do I need to use rooting hormone?
While not strictly necessary, rooting hormone can significantly increase the success rate of honeyberry propagation. It contains auxins, which stimulate root development. Dip the cut end of the cutting in rooting hormone powder or liquid before planting it in the potting mix.
How often should I water the cuttings?
Keep the potting mix consistently moist but not soggy. Water gently to avoid disturbing the cuttings. A spray bottle can be helpful for misting the cuttings without overwatering.
How much light do the cuttings need?
Honeyberry cuttings need bright, indirect light. Avoid direct sunlight, which can scorch the leaves. A shaded area or a north-facing window is ideal.
How long does it take for honeyberry cuttings to root?
Rooting typically takes 4-8 weeks, depending on the environmental conditions and the type of cutting. You can gently tug on the cutting to check for root development. If you feel resistance, it indicates that roots have formed.
How do I know if my honeyberry cuttings have rooted successfully?
The most reliable sign of successful rooting is the appearance of new growth. You may see new leaves emerging from the cutting. You can also gently tug on the cutting to check for resistance, indicating that roots have formed.
What do I do after the cuttings have rooted?
Once the cuttings have developed a strong root system, you can transplant them into individual pots filled with a well-draining potting mix. Gradually acclimate them to outdoor conditions before planting them in their permanent location in the garden.
When is the best time to plant the rooted honeyberry cuttings in the garden?
The best time to plant the rooted cuttings in the garden is in the spring or fall, when the weather is mild. Choose a sunny location with well-drained soil.
How far apart should I plant honeyberry bushes?
Honeyberry bushes typically need 4-5 feet of space between plants to allow for adequate growth and air circulation.
What kind of soil do honeyberries prefer?
Honeyberries prefer well-drained soil that is slightly acidic to neutral (pH 6.0-7.0). Amend the soil with compost or other organic matter to improve drainage and fertility.
How do I care for my honeyberry bushes after planting?
Water regularly, especially during dry periods. Fertilize in the spring with a balanced fertilizer. Prune annually to remove dead or damaged branches and to encourage new growth. Protect the bushes from pests and diseases as needed.
Can I propagate honeyberries from seed?
While it is possible to propagate honeyberries from seed, it is a much slower and less reliable method than taking cuttings. Seedlings may also not be true to type, meaning they may not produce the same quality of fruit as the parent plant.
What are some common problems when propagating honeyberries?
Common problems include root rot, fungal diseases, and pest infestations. Ensure proper drainage, provide good air circulation, and monitor the cuttings regularly for any signs of problems.
Can I propagate different varieties of honeyberries using this method?
Yes, this method can be used to propagate different varieties of honeyberries. However, it is important to label the cuttings carefully to keep track of the different varieties.
Where can I find honeyberry plants to take cuttings from?
You can purchase honeyberry plants from local nurseries or online retailers. You can also ask friends or neighbors who grow honeyberries if they are willing to share cuttings.
Is this DIY honeyberry propagation method suitable for beginners?
Yes, this method is relatively simple and straightforward, making it suitable for beginners. With a little patience and attention to detail, anyone can successfully propagate their own honeyberry plants.


Leave a Comment