
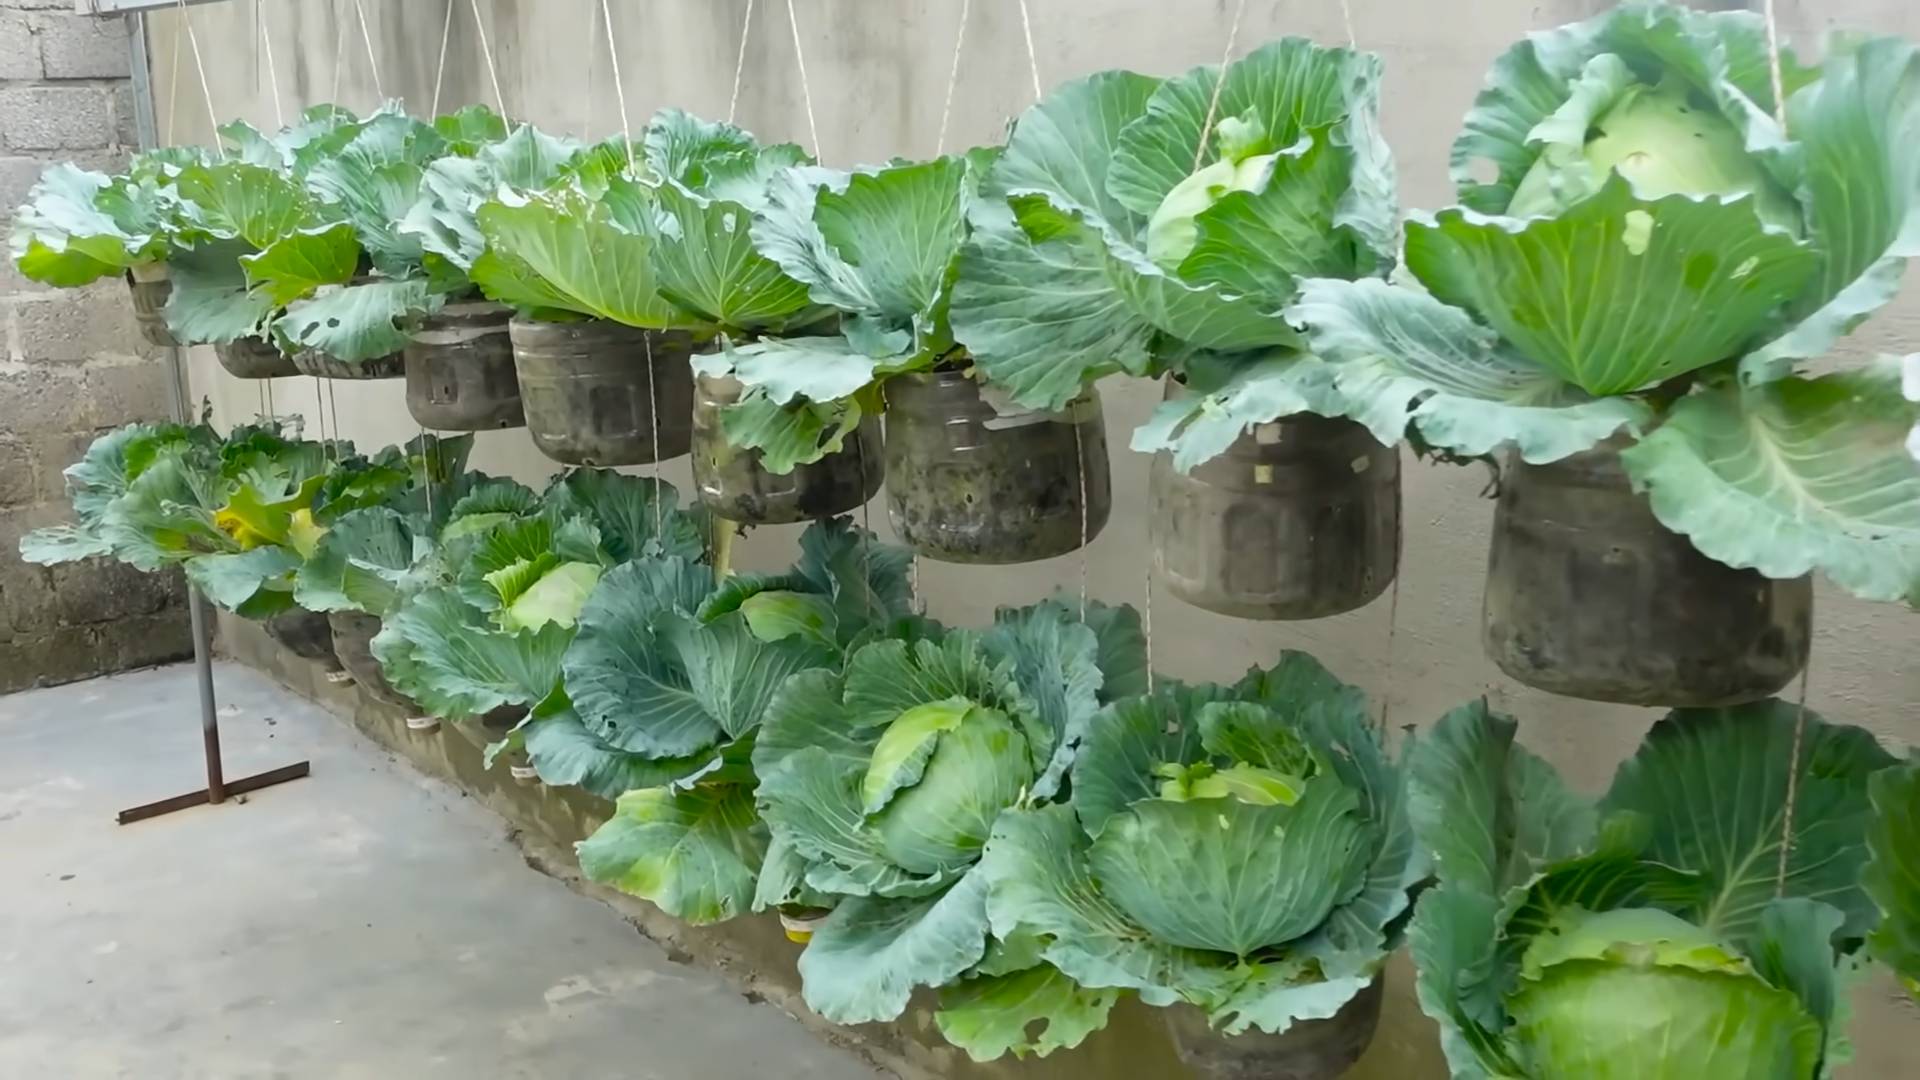
Growing Cabbage in Bottles? Sounds a little crazy, right? But trust me, this ingenious DIY trick is about to revolutionize your small-space gardening game! Forget sprawling garden beds and endless weeding – we’re taking cabbage cultivation vertical and compact.
For centuries, cabbage has been a staple in diets around the world, from the hearty stews of Eastern Europe to the vibrant slaws of Asia. Its resilience and nutritional value have made it a beloved crop. But what if you live in an apartment, have limited mobility, or simply want to try something new and exciting? That’s where this bottle-growing hack comes in!
I know what you’re thinking: “Why bottles?” Well, this method is not only incredibly space-saving, but it also offers excellent drainage, protects your precious cabbages from soil-borne pests, and allows you to easily move them around to chase the sun. Plus, it’s a fantastic way to recycle those plastic bottles we all seem to accumulate. In this article, I’ll walk you through every step of growing cabbage in bottles, from selecting the right variety to harvesting your own delicious, homegrown cabbage. Get ready to impress your friends and neighbors with your innovative gardening skills!
Growing Cabbage in Bottles: A Fun and Space-Saving DIY Project!
Hey there, fellow gardening enthusiasts! Are you short on space but still dreaming of fresh, homegrown cabbage? Well, I’ve got a fantastic solution for you: growing cabbage in bottles! It’s a fun, eco-friendly, and surprisingly effective way to cultivate these leafy greens, even if you only have a balcony or a small patio. I’ve tried this myself, and let me tell you, the results are pretty amazing. So, grab your empty plastic bottles, and let’s get started!
What You’ll Need
Before we dive into the nitty-gritty, let’s gather all the necessary materials. Trust me, having everything ready beforehand will make the whole process much smoother.
* Plastic Bottles: The bigger, the better! I recommend using 2-liter soda bottles or even larger water bottles. Make sure they’re clean and free of any residue. You’ll need one bottle per cabbage plant.
* Cabbage Seeds or Seedlings: You can start from seeds or buy small cabbage seedlings from your local nursery. If you’re a beginner, seedlings might be easier to manage. I personally prefer starting with seedlings because it gives me a head start.
* Potting Mix: Use a high-quality potting mix that’s well-draining and rich in nutrients. Cabbage plants are heavy feeders, so a good potting mix is crucial.
* Perlite or Vermiculite: Adding perlite or vermiculite to your potting mix will improve drainage and aeration. This is especially important when growing in containers.
* Fertilizer: A balanced, slow-release fertilizer will provide your cabbage plants with the nutrients they need to thrive. Alternatively, you can use liquid fertilizer every few weeks.
* Scissors or a Utility Knife: For cutting the plastic bottles. Be careful!
* Drill or Nail: To create drainage holes in the bottom of the bottles.
* Watering Can or Hose: For watering your cabbage plants.
* Gloves (Optional): To keep your hands clean.
* Labels and a Marker (Optional): To label your cabbage varieties.
Preparing the Bottles
This is where the magic begins! We’re going to transform those ordinary plastic bottles into mini cabbage gardens.
1. Clean the Bottles: Thoroughly wash the plastic bottles with soap and water to remove any dirt or residue. Rinse them well and let them dry completely. This step is crucial to prevent any contamination that could harm your plants.
2. Cut the Bottles: Using scissors or a utility knife, carefully cut the top portion of the bottle off. I usually cut it about one-third of the way down. You can discard the top portion or save it for other gardening projects. I’ve used them as mini-greenhouses for starting seeds!
3. Create Drainage Holes: Drill or poke several drainage holes in the bottom of each bottle. This is essential to prevent waterlogging, which can lead to root rot. I usually make about 4-5 holes, depending on the size of the bottle.
4. Optional: Paint the Bottles: While not necessary, painting the bottles can make them more aesthetically pleasing. Use a paint that is safe for plants and the environment. Light colors are better as they reflect sunlight and keep the soil cooler. I’ve seen some really creative designs – get inspired!
Planting Your Cabbage
Now comes the exciting part – planting your cabbage!
1. Prepare the Potting Mix: In a large container, mix your potting mix with perlite or vermiculite. I usually use a ratio of about 3 parts potting mix to 1 part perlite or vermiculite. This will ensure good drainage and aeration.
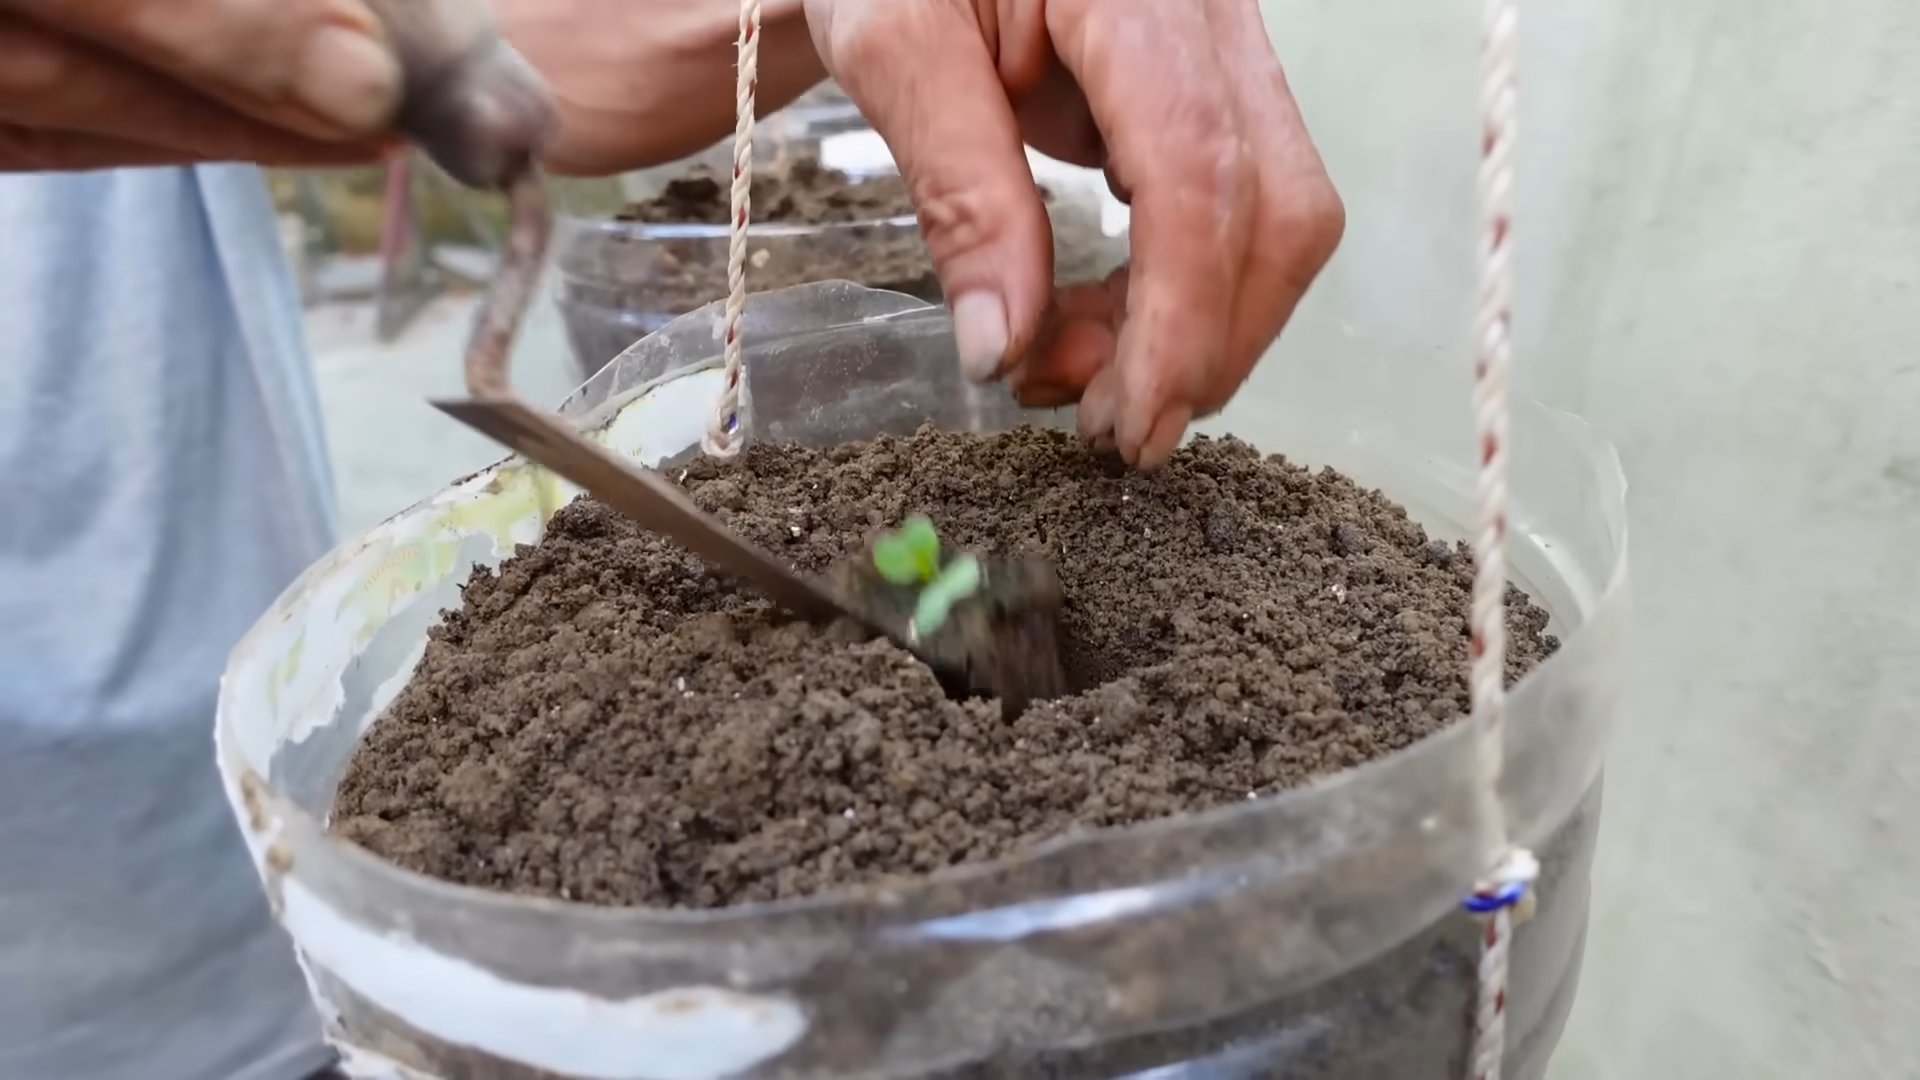
2. Fill the Bottles: Fill each bottle with the prepared potting mix, leaving about an inch of space at the top. Gently pat down the soil to remove any air pockets.
3. Plant the Seeds or Seedlings:
* From Seeds: Sow the cabbage seeds about half an inch deep in the potting mix. Gently cover them with soil and water lightly. Keep the soil moist until the seeds germinate, which usually takes about 5-10 days.
* From Seedlings: Carefully remove the cabbage seedlings from their containers. Gently loosen the roots and plant them in the center of each bottle. Make sure the top of the root ball is level with the soil surface.
4. Water Thoroughly: After planting, water the cabbage plants thoroughly until water drains out of the drainage holes. This will help settle the soil and ensure that the roots are well-hydrated.
5. Add Fertilizer: Sprinkle a slow-release fertilizer on top of the soil, following the instructions on the package. Alternatively, you can use liquid fertilizer every few weeks.
Caring for Your Cabbage Plants
Cabbage plants need consistent care to thrive. Here’s what you need to do:
1. Sunlight: Cabbage plants need at least 6 hours of sunlight per day. Place your bottles in a sunny location, such as a balcony, patio, or windowsill. If you don’t have enough sunlight, you can supplement with grow lights.
2. Watering: Water your cabbage plants regularly, especially during hot and dry weather. The soil should be consistently moist but not waterlogged. Check the soil moisture by sticking your finger into the soil. If it feels dry, it’s time to water. I usually water every 2-3 days, depending on the weather.
3. Fertilizing: Fertilize your cabbage plants every few weeks with a balanced liquid fertilizer. Follow the instructions on the package. Cabbage plants are heavy feeders, so regular fertilization is essential for healthy growth.
4. Pest Control: Cabbage plants are susceptible to various pests, such as cabbage worms, aphids, and slugs. Inspect your plants regularly for signs of infestation. If you find any pests, you can remove them by hand or use an organic insecticide. I’ve had good luck with neem oil.
5. Weed Control: Keep the soil around your cabbage plants free of weeds. Weeds can compete with your plants for nutrients and water.
6. Rotating the Bottles: If your plants are only getting sunlight from one direction, rotate the bottles regularly to ensure even growth.
Harvesting Your Cabbage
The moment you’ve been waiting for! Harvesting your homegrown cabbage is incredibly rewarding.
1. Check for Maturity: Cabbage plants are usually ready to harvest in about 60-80 days from planting, depending on the variety. The head should be firm and compact.
2. Harvesting: Use a sharp knife to cut the cabbage head from the stem. Leave a few outer leaves on the plant, as they can sometimes produce smaller side heads.
3. Enjoy Your Harvest: Enjoy your fresh, homegrown cabbage in salads, soups, stews, or any other dish you like. The possibilities are endless!
Troubleshooting
Even with the best care, you might encounter some problems along the way. Here are a few common issues and how to address them:
* Yellowing Leaves: This could be a sign of nutrient deficiency. Try fertilizing your plants with a balanced fertilizer.
* Stunted Growth: This could be due to insufficient sunlight, poor soil, or pest infestation. Make sure your plants are getting enough sunlight, use a high-quality potting mix, and inspect them regularly for pests.
* Root Rot: This is caused by overwatering. Make sure your bottles have adequate drainage holes and avoid overwatering.
* Pest Infestation: As mentioned earlier, cabbage plants are susceptible to various pests. Inspect your plants regularly and take action as soon as you notice any signs of infestation.
Tips for Success
Here are a few extra tips to help you succeed in growing cabbage in bottles:
* Choose the Right Variety: Some cabbage varieties are better suited for container gardening than others. Look for compact varieties that don’t get too large.
* Start with Healthy Seedlings: If you’re using seedlings, choose healthy, vigorous plants from a reputable nursery.
* Provide Adequate Support: As your cabbage plants grow, they may become top-heavy. Provide support by staking the plants or using a tomato cage.
* Monitor the Soil Temperature: Cabbage plants prefer cool temperatures. If the soil gets too hot, it can stress the plants. You can help keep the soil cool by mulching around the plants.
* Don’t Give Up! Gardening can be challenging, but it’s also incredibly rewarding. Don’t be discouraged if you encounter some problems along the way. Just keep learning and experimenting, and you’ll eventually get the hang of it.
Growing cabbage in bottles is a fun and rewarding project that anyone can do. With a little bit of effort and care, you can enjoy fresh, homegrown cabbage even if you have limited space. So, what are you waiting for? Grab your bottles and get planting! Happy gardening!
Conclusion
So, there you have it – a surprisingly simple and effective method for growing cabbage in bottles! This isn’t just about saving space or recycling; it’s about unlocking a new level of control over your cabbage cultivation. Think of it: fewer pests, better drainage, and the sheer satisfaction of nurturing a thriving plant in an unexpected container.
Why is this DIY trick a must-try? Because it offers a unique blend of practicality and innovation. For urban gardeners with limited space, it’s a game-changer. For those battling persistent soil pests, it provides a protective barrier. And for anyone who enjoys a bit of gardening experimentation, it’s an incredibly rewarding project. The controlled environment of the bottle allows you to fine-tune the growing conditions, resulting in healthier, more robust cabbage heads.
But don’t stop there! Experiment with different bottle sizes to see what works best for your cabbage variety. Try adding a layer of activated charcoal to the bottom of the bottle for enhanced drainage and odor control. Consider using a nutrient-rich potting mix specifically formulated for vegetables to give your cabbage an extra boost. You can even explore different types of bottles – clear, tinted, or even repurposed plastic containers – to see how they affect plant growth. Just remember to ensure adequate drainage and sunlight exposure.
The beauty of this method lies in its adaptability. You can easily move your bottle-grown cabbage to different locations to optimize sunlight exposure or protect them from harsh weather conditions. This is particularly useful in regions with unpredictable climates. Furthermore, the contained environment makes it easier to monitor and address any potential problems, such as nutrient deficiencies or pest infestations.
Ultimately, growing cabbage in bottles is more than just a gardening hack; it’s a testament to the power of resourcefulness and creativity. It’s a chance to connect with nature in a new and meaningful way, and to enjoy the fruits (or rather, vegetables) of your labor.
We wholeheartedly encourage you to give this DIY trick a try. It’s a fun, educational, and ultimately delicious experience. And once you’ve harvested your first bottle-grown cabbage, we’d love to hear about your experience! Share your photos, tips, and stories in the comments below. Let’s build a community of bottle-cabbage enthusiasts and inspire others to embrace this innovative gardening technique. Let us know what variety of cabbage you grew and how it turned out. Happy gardening!
Frequently Asked Questions (FAQ)
Q: What type of cabbage is best suited for growing in bottles?
A: While you can technically grow any type of cabbage in a bottle, smaller varieties like Bok Choy, Napa cabbage, or smaller head cabbages tend to thrive best. Larger varieties might outgrow the space too quickly. Consider the mature size of the cabbage when selecting your seeds or seedlings. Also, early-maturing varieties are often a good choice, as they will reach harvestable size before becoming root-bound.
Q: What size bottle should I use?
A: A good starting point is a 2-liter plastic bottle, but larger bottles (3-5 liters) will provide more room for root development and are generally recommended for larger cabbage varieties. The key is to ensure the bottle is sturdy enough to support the weight of the soil and the growing plant. You can also use larger repurposed containers, such as buckets or tubs, as long as they have adequate drainage holes.
Q: How do I ensure proper drainage in the bottle?
A: Drainage is crucial to prevent root rot. Before adding soil, create a layer of drainage material at the bottom of the bottle. This can be gravel, pebbles, or even broken pieces of terracotta pots. Make sure to drill several drainage holes in the bottom of the bottle to allow excess water to escape. You can also add a layer of landscape fabric between the drainage material and the soil to prevent the soil from clogging the drainage holes.
Q: What type of soil should I use?
A: Use a well-draining potting mix specifically formulated for vegetables. Avoid using garden soil, as it can be too heavy and compact, leading to poor drainage. You can also amend your potting mix with compost or other organic matter to improve its fertility and water-holding capacity. A slightly acidic to neutral pH (around 6.0-7.0) is ideal for cabbage.
Q: How often should I water my bottle-grown cabbage?
A: Water thoroughly when the top inch of soil feels dry to the touch. Avoid overwatering, as this can lead to root rot. The frequency of watering will depend on the weather conditions and the size of the bottle. Check the soil moisture regularly and adjust your watering schedule accordingly. During hot, dry weather, you may need to water more frequently.
Q: How much sunlight does bottle-grown cabbage need?
A: Cabbage needs at least 6 hours of direct sunlight per day to thrive. Place your bottle-grown cabbage in a sunny location where it will receive ample sunlight. If you live in a region with intense sunlight, you may need to provide some shade during the hottest part of the day to prevent the leaves from scorching.
Q: Do I need to fertilize my bottle-grown cabbage?
A: Yes, cabbage is a heavy feeder and will benefit from regular fertilization. Use a balanced fertilizer specifically formulated for vegetables, following the instructions on the package. You can also use organic fertilizers, such as compost tea or fish emulsion. Fertilize every 2-3 weeks during the growing season.
Q: How do I protect my bottle-grown cabbage from pests?
A: The bottle itself provides some protection from soil-borne pests. However, you may still need to protect your cabbage from above-ground pests, such as cabbage worms and aphids. You can use insecticidal soap or neem oil to control these pests. You can also cover your cabbage with netting to prevent pests from reaching the plants. Regularly inspect your cabbage for signs of pests and take action promptly to prevent infestations.
Q: How do I know when my cabbage is ready to harvest?
A: Cabbage is ready to harvest when the head is firm and compact. The size of the head will vary depending on the variety. Gently squeeze the head to check for firmness. If it feels solid, it’s likely ready to harvest. Use a sharp knife to cut the head from the stem, leaving a few outer leaves intact.
Q: Can I reuse the bottle for future plantings?
A: Yes, you can reuse the bottle as long as it is cleaned thoroughly. Wash the bottle with soap and water to remove any soil or debris. Disinfect the bottle with a solution of bleach and water (1 part bleach to 9 parts water) to kill any pathogens. Rinse the bottle thoroughly before reusing it.

Leave a Comment