
Bay leaf cuttings propagation might sound intimidating, but trust me, it’s a rewarding journey that connects you to centuries of culinary tradition! Bay leaves, those aromatic gems we often toss into soups and stews, have a rich history, dating back to ancient Greece and Rome, where they symbolized victory and honor. Imagine growing your own supply of these fragrant leaves, ready to elevate your dishes with their distinct flavor.
But why bother with propagation? Well, for starters, it’s incredibly satisfying to nurture a plant from a simple cutting. Plus, buying bay leaf plants can be expensive, and sometimes, you just want to expand your existing collection. This DIY guide will walk you through the process of bay leaf cuttings propagation step-by-step, ensuring you have a thriving bay laurel tree in no time. Think of it as a fun, budget-friendly way to bring a touch of the Mediterranean into your home garden.
I know, the idea of propagating plants can seem daunting, especially if you’re new to gardening. But don’t worry! I’m here to share some easy-to-follow tricks and hacks that will make the process a breeze. We’ll cover everything from selecting the right cuttings to providing the optimal growing conditions. So, grab your gardening gloves, and let’s get started on this exciting adventure of growing your own bay leaf tree!
Propagating Bay Leaf Cuttings: A Gardener’s Guide
Hey there, fellow plant enthusiasts! Have you ever admired the fragrant leaves of a bay laurel ( *Laurus nobilis* ) and wished you could have more of these culinary treasures in your own garden? Well, you’re in luck! Propagating bay leaf cuttings is a rewarding and relatively straightforward process. I’m going to walk you through everything you need to know to successfully grow new bay laurel plants from cuttings.
What You’ll Need
Before we dive into the nitty-gritty, let’s gather our supplies. Having everything ready beforehand will make the process smoother and more enjoyable.
* Healthy Bay Laurel Plant: This is your source for cuttings. Choose a mature, healthy plant that’s free from pests and diseases.
* Sharp, Clean Pruning Shears or Knife: Sharpness is crucial for clean cuts, which minimize the risk of infection and promote rooting. Sterilize your tools with rubbing alcohol or a bleach solution (1 part bleach to 9 parts water) to prevent the spread of diseases.
* Rooting Hormone (Optional but Recommended): Rooting hormone contains auxins, which stimulate root development. While bay laurel cuttings can root without it, using rooting hormone significantly increases your chances of success. I personally prefer using a powdered rooting hormone.
* Rooting Medium: This is what your cuttings will root in. A well-draining mix is essential to prevent rot. I recommend a mix of:
* Peat moss or coco coir (for moisture retention)
* Perlite or vermiculite (for aeration and drainage)
* You can also use a commercially available seed starting mix.
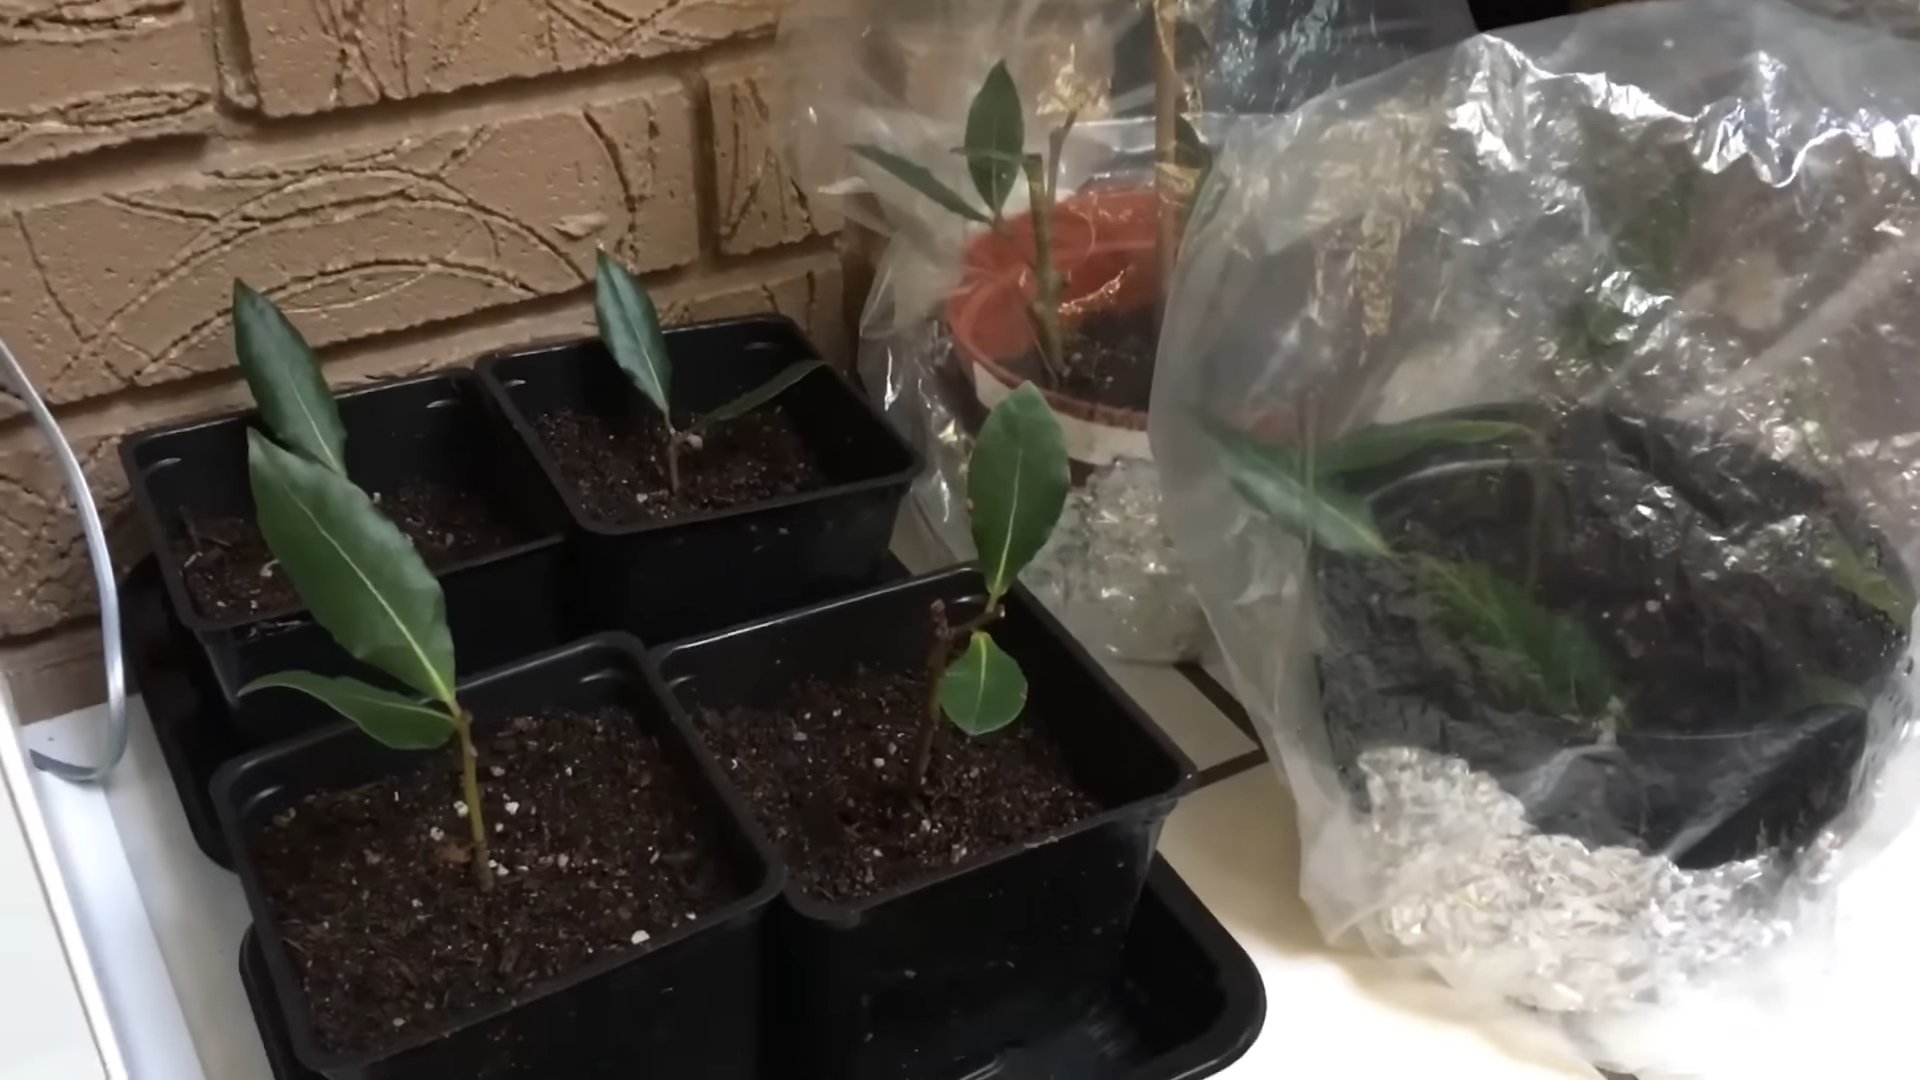
* Small Pots or Containers: Choose pots that are about 2-3 inches in diameter. Make sure they have drainage holes!
* Clear Plastic Bags or a Humidity Dome: Bay laurel cuttings need high humidity to root successfully. A plastic bag or humidity dome will help create a mini-greenhouse environment.
* Spray Bottle with Water: For misting the cuttings to maintain humidity.
* Warm, Bright Location: Indirect sunlight is ideal. Avoid direct sunlight, which can scorch the cuttings.
* Labels: To keep track of your cuttings, especially if you’re propagating multiple varieties.
Taking the Cuttings
The timing of taking cuttings can influence your success rate. I’ve found that taking cuttings in late spring or early summer, when the plant is actively growing, yields the best results.
1. Select Healthy Shoots: Look for semi-hardwood shoots that are about 4-6 inches long. These are stems that have started to mature but are still somewhat flexible. Avoid taking cuttings from very new, soft growth or very old, woody growth.
2. Make the Cut: Using your sterilized pruning shears or knife, make a clean cut just below a node (the point where leaves emerge from the stem). A node is where the highest concentration of rooting hormones are located.
3. Remove Lower Leaves: Remove the leaves from the bottom 1-2 inches of the cutting. This prevents the leaves from rotting in the rooting medium and encourages root development.
4. Prepare the Cutting: Gently scrape the bottom inch of the cutting with your knife. This will slightly wound the stem and encourage root formation.
5. Apply Rooting Hormone (Optional): If you’re using rooting hormone, moisten the bottom inch of the cutting and dip it into the rooting hormone powder. Tap off any excess powder.
Planting the Cuttings
Now that we have our prepared cuttings, it’s time to plant them in our rooting medium.
1. Prepare the Pots: Fill your pots with the rooting medium, leaving about half an inch of space at the top. Moisten the medium thoroughly, but don’t let it become waterlogged.
2. Make a Hole: Use a pencil or your finger to create a hole in the center of the rooting medium, deep enough to accommodate the bottom inch of the cutting.
3. Insert the Cutting: Gently insert the cutting into the hole, being careful not to rub off the rooting hormone (if used).
4. Firm the Soil: Gently firm the rooting medium around the cutting to provide support.
5. Water the Cutting: Water the cutting gently to settle the soil.
Creating a Humid Environment
Bay laurel cuttings need high humidity to prevent them from drying out before they can develop roots.
1. Cover the Pots: Place the pots inside a clear plastic bag or under a humidity dome. Make sure the bag or dome doesn’t touch the leaves of the cuttings. You can use skewers or chopsticks to prop up the bag if needed.
2. Misting: Mist the cuttings with water every day or every other day to maintain humidity.
3. Ventilation: Open the bag or dome for a few minutes every day to allow for air circulation and prevent fungal growth.
Caring for the Cuttings
Patience is key! Rooting can take several weeks, so don’t get discouraged if you don’t see results immediately.
1. Location: Place the cuttings in a warm, bright location with indirect sunlight. Avoid direct sunlight, which can scorch the cuttings.
2. Watering: Keep the rooting medium consistently moist, but not waterlogged. Check the moisture level regularly and water when the top inch of the medium feels dry.
3. Monitoring: Check the cuttings regularly for signs of root development. After a few weeks, you can gently tug on the cuttings. If you feel resistance, it means roots have started to form.
4. Fertilizing: Once the cuttings have developed roots, you can start fertilizing them with a diluted liquid fertilizer. Follow the instructions on the fertilizer label.
Transplanting the Rooted Cuttings
Once the cuttings have developed a healthy root system, it’s time to transplant them into larger pots or directly into the garden.
1. Choose a Pot or Location: Select a pot that’s at least 6 inches in diameter or choose a location in your garden with well-draining soil and partial to full sun.
2. Prepare the Potting Mix: Use a well-draining potting mix that’s suitable for bay laurel plants.
3. Gently Remove the Cutting: Carefully remove the rooted cutting from its original pot, being careful not to damage the roots.
4. Plant the Cutting: Plant the cutting in the new pot or location, making sure the top of the root ball is level with the soil surface.
5. Water Thoroughly: Water the newly transplanted cutting thoroughly to settle the soil.
6. Care for the Plant: Continue to care for the plant as you would any other bay laurel plant. Water regularly, fertilize as needed, and protect it from frost.
Troubleshooting
Even with the best care, sometimes things don’t go as planned. Here are some common problems you might encounter and how to address them:
* Cuttings Rotting: This is usually caused by overwatering or poor drainage. Make sure your rooting medium is well-draining and avoid overwatering. Remove any rotting cuttings immediately to prevent the spread of disease.
* Cuttings Drying Out: This is usually caused by low humidity. Make sure the cuttings are covered with a plastic bag or humidity dome and mist them regularly.
* Cuttings Not Rooting: This could be due to a variety of factors, including poor cutting selection, improper rooting medium, or lack of humidity. Try taking cuttings from different parts of the plant, using a different rooting medium, or increasing the humidity.
Final Thoughts
Propagating bay leaf cuttings is a rewarding experience that allows you to expand your collection of these fragrant and useful plants. With a little patience and attention to detail, you can successfully grow new bay laurel plants from cuttings and enjoy their culinary and ornamental benefits for years to come. Happy gardening!

Conclusion
So, there you have it! Propagating bay leaf cuttings might seem a little daunting at first, but with a little patience and the right approach, you can successfully cultivate your own thriving bay leaf plants. This DIY trick is a must-try for any herb enthusiast, offering a cost-effective and rewarding way to expand your culinary garden. Imagine the satisfaction of seasoning your favorite dishes with bay leaves harvested from a plant you nurtured from a simple cutting!
Beyond the sheer joy of gardening, propagating bay leaf cuttings offers several compelling advantages. Firstly, it’s incredibly economical. Instead of repeatedly purchasing bay leaves from the store, you’ll have a continuous supply at your fingertips. Secondly, you’ll know exactly where your bay leaves are coming from and how they were grown, ensuring they are free from unwanted pesticides or chemicals. Finally, it’s a fantastic way to share the bounty of your garden with friends and family, gifting them with their own bay leaf plants to enjoy.
Don’t be afraid to experiment with different variations of this propagation method. Some gardeners have found success using rooting hormones to accelerate the process, while others prefer to use different types of rooting mediums, such as perlite or vermiculite. You could also try propagating multiple cuttings at once to increase your chances of success. Consider the size of the container you are using, and ensure adequate drainage to prevent root rot.
Remember, patience is key. It can take several weeks, or even months, for bay leaf cuttings to develop roots. Don’t be discouraged if your first attempt isn’t successful. Keep trying, and learn from your mistakes. The reward of having your own thriving bay leaf plant is well worth the effort.
We encourage you to give this DIY trick a try and share your experience with us! Let us know in the comments below how your bay leaf cuttings are progressing, what challenges you encountered, and any tips or tricks you discovered along the way. Your insights could be invaluable to other gardeners who are embarking on this journey. Successfully propagating bay leaf cuttings is a testament to your green thumb, and we’re excited to hear about your success stories. Happy gardening!
Frequently Asked Questions (FAQs)
What is the best time of year to propagate bay leaf cuttings?
The ideal time to propagate bay leaf cuttings is during the late spring or early summer. This is when the plant is actively growing, and the cuttings are more likely to root successfully. The warmer temperatures and longer daylight hours provide optimal conditions for root development. However, you can attempt propagation at other times of the year, but the success rate may be lower. If you live in a region with mild winters, you might have some success in early fall as well. Just be sure to protect the cuttings from frost.
How long does it take for bay leaf cuttings to root?
Rooting time can vary depending on several factors, including the time of year, the health of the cutting, and the environmental conditions. Generally, it can take anywhere from 4 to 12 weeks for bay leaf cuttings to develop roots. Be patient and monitor the cuttings regularly for signs of growth. Look for new leaf development or resistance when gently tugging on the cutting. Remember, consistent moisture and warmth are crucial for successful rooting.
What type of rooting medium should I use?
A well-draining rooting medium is essential for propagating bay leaf cuttings. A mixture of equal parts perlite and peat moss is a popular choice, as it provides good aeration and moisture retention. You can also use a commercial rooting mix specifically designed for cuttings. Avoid using garden soil, as it can be too heavy and may contain pathogens that can harm the cuttings. Ensure the container you use has drainage holes to prevent waterlogging.
Do I need to use rooting hormone?
While not strictly necessary, using a rooting hormone can significantly increase the success rate of bay leaf cutting propagation. Rooting hormones contain auxins, which are plant hormones that promote root development. Dip the cut end of the cutting into the rooting hormone powder or liquid before planting it in the rooting medium. Follow the instructions on the rooting hormone package for proper application.
How often should I water the cuttings?
Keep the rooting medium consistently moist, but not waterlogged. Water the cuttings whenever the top inch of the medium feels dry to the touch. Avoid overwatering, as this can lead to root rot. You can also mist the cuttings regularly to increase humidity, which can help prevent them from drying out. A humidity dome or plastic bag can also be used to maintain high humidity levels.
What kind of light do bay leaf cuttings need?
Bay leaf cuttings need bright, indirect light. Avoid placing them in direct sunlight, as this can scorch the leaves. A location near a window that receives filtered sunlight is ideal. You can also use grow lights to provide supplemental lighting, especially during the winter months. Ensure the cuttings receive at least 6 hours of light per day.
How do I know if my bay leaf cuttings have rooted?
The best way to tell if your bay leaf cuttings have rooted is to gently tug on them. If they resist being pulled out of the rooting medium, it means that they have developed roots. You may also see new leaf growth, which is another sign that the cuttings have rooted successfully. Once the cuttings have rooted, you can transplant them into individual pots filled with well-draining potting mix.
What should I do after transplanting the rooted cuttings?
After transplanting the rooted cuttings, water them thoroughly and place them in a location with bright, indirect light. Keep the soil consistently moist, but not waterlogged. Fertilize the plants with a balanced fertilizer every few weeks to promote healthy growth. As the plants grow, you can gradually acclimate them to more direct sunlight.
Can I propagate bay leaf cuttings in water?
While it is possible to propagate bay leaf cuttings in water, it is generally less successful than propagating them in a rooting medium. Cuttings propagated in water tend to develop weaker roots that are more susceptible to rot. If you choose to propagate in water, change the water every few days to prevent the growth of bacteria. Once the cuttings have developed roots, transplant them into a pot filled with well-draining potting mix.
What are some common problems when propagating bay leaf cuttings?
Some common problems when propagating bay leaf cuttings include root rot, fungal diseases, and pest infestations. Root rot is caused by overwatering and can be prevented by using a well-draining rooting medium and avoiding overwatering. Fungal diseases can be prevented by providing good air circulation and avoiding overcrowding the cuttings. Pest infestations can be controlled by regularly inspecting the cuttings and treating them with an appropriate insecticide or fungicide.
How do I care for my mature bay leaf plant?
Mature bay leaf plants prefer well-draining soil and full sun to partial shade. Water them regularly, especially during dry periods. Fertilize them with a balanced fertilizer in the spring and summer. Prune them regularly to maintain their shape and size. Bay leaf plants are relatively pest and disease resistant, but they can be susceptible to scale and aphids. Inspect your plants regularly and treat any infestations promptly. With proper care, your bay leaf plant will provide you with a continuous supply of fresh bay leaves for years to come.
Leave a Comment