
Clean jewelry with salt – sounds too good to be true, right? I thought so too, until I tried it! We all adore our sparkling necklaces, rings, and earrings, but let’s face it, keeping them gleaming can feel like a constant battle. Tarnish, grime, and everyday wear can quickly dull their shine, leaving them looking less than their best. But before you rush off to buy expensive jewelry cleaners or resign yourself to lackluster bling, let me let you in on a little secret: your kitchen pantry holds the key to restoring your jewelry’s brilliance!
For centuries, people have sought simple, effective ways to care for their precious possessions. While the exact origins of using salt for cleaning jewelry are a bit murky, the practice likely stems from the understanding of salt’s natural abrasive and chemical properties. Salt has been used for cleaning and preserving items for millennia, so it’s not a huge leap to see how it could be applied to jewelry.
Why is this DIY trick so essential? Because it’s affordable, eco-friendly, and incredibly easy! You don’t need harsh chemicals or specialized equipment. Plus, it’s a fantastic way to avoid those hefty jewelry cleaning bills. I’m going to show you how to clean jewelry with salt using items you probably already have at home. Get ready to rediscover the sparkle in your favorite pieces – you’ll be amazed at the results!
DIY Jewelry Cleaning with Salt: A Sparkling Solution!
Hey there, fellow jewelry lovers! Are your favorite necklaces, rings, and earrings looking a little dull? Don’t rush out to buy expensive jewelry cleaners just yet! I’m going to show you a super simple and effective way to clean your jewelry using something you probably already have in your kitchen: salt! This method is fantastic for removing tarnish and grime, bringing back that beautiful shine.
What Kind of Jewelry Can You Clean with Salt?
Before we dive in, it’s important to know what kind of jewelry is safe for this method. Generally, this salt cleaning hack works best for:
* Solid Gold: Gold is pretty durable and can handle this cleaning process well.
* Sterling Silver: Salt is excellent for removing tarnish from silver.
* Platinum: Similar to gold, platinum is a sturdy metal that can be cleaned with salt.
* Stainless Steel: This is another durable metal that can benefit from a salt bath.
Important Note: Avoid using this method on jewelry with delicate gemstones like pearls, opals, turquoise, or emeralds. These stones are porous and can be damaged by the salt and water. Also, avoid cleaning plated jewelry, as the salt can wear away the plating over time. If you’re unsure, always test a small, inconspicuous area first.
What You’ll Need
Gathering your supplies is the first step to success! Here’s what you’ll need for this DIY jewelry cleaning project:
* Salt: Plain old table salt works perfectly fine. You don’t need anything fancy.
* Baking Soda (Optional): Adding baking soda can boost the cleaning power, especially for heavily tarnished items.
* Aluminum Foil: This is crucial! The aluminum foil creates a chemical reaction that helps remove the tarnish.
* Hot Water: Hot (but not boiling) water helps to activate the cleaning process.
* A Glass or Ceramic Bowl: Avoid using metal bowls, as they can interfere with the cleaning process.
* Soft Cloth or Brush: A soft cloth or an old, soft-bristled toothbrush will help you gently scrub away any remaining grime.
* Dish Soap (Optional): A drop of mild dish soap can help to degrease your jewelry before cleaning.
* Tongs or Tweezers (Optional): These can be helpful for retrieving small jewelry pieces from the hot water.
Step-by-Step Instructions: The Salt Cleaning Method
Alright, let’s get down to the nitty-gritty! Follow these steps carefully to clean your jewelry like a pro:
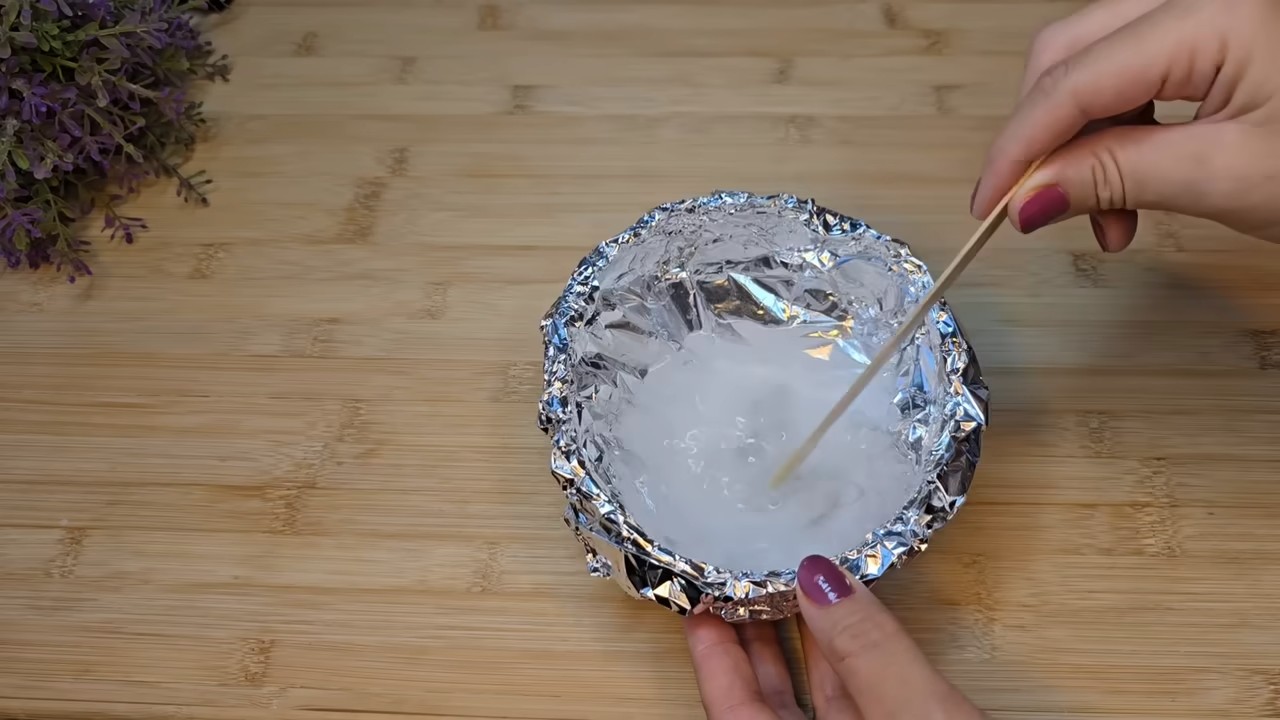
1. Prepare the Cleaning Solution:
* Line your glass or ceramic bowl with a sheet of aluminum foil, shiny side up. Make sure the foil covers the entire bottom of the bowl and extends up the sides.
* Add 1 tablespoon of salt and 1 tablespoon of baking soda (if using) to the bowl.
* Slowly pour in about 1 cup of hot water. Be careful not to burn yourself! The mixture will fizz a bit, which is perfectly normal.
* Stir the mixture until the salt and baking soda are completely dissolved.
2. Submerge Your Jewelry:
* Carefully place your jewelry pieces into the bowl, making sure they are touching the aluminum foil. This is essential for the cleaning process to work.
* If you have a lot of jewelry, you may need to clean it in batches to ensure that each piece is in contact with the foil.
3. Let It Soak:
* Let your jewelry soak in the solution for 5-10 minutes. The amount of time will depend on how tarnished your jewelry is. For heavily tarnished items, you can let them soak for up to 30 minutes, checking periodically.
* You should start to see the tarnish transferring from the jewelry to the aluminum foil. It’s like magic!
4. Rinse and Scrub:
* Carefully remove your jewelry from the bowl using tongs or tweezers (if needed).
* Rinse each piece thoroughly under warm running water.
* If there’s any stubborn grime remaining, gently scrub the jewelry with a soft cloth or an old, soft-bristled toothbrush. Be extra gentle with delicate pieces.
5. Dry and Polish:
* Pat your jewelry dry with a clean, soft cloth.
* For extra shine, you can use a jewelry polishing cloth to buff each piece.
Dealing with Stubborn Tarnish
Sometimes, tarnish can be particularly stubborn. If your jewelry isn’t as sparkling as you’d like after the first cleaning, don’t despair! Here are a few tips for tackling tough tarnish:
* Repeat the Process: You can simply repeat the cleaning process, using a fresh batch of salt, baking soda, and aluminum foil.
* Increase the Soaking Time: Try letting your jewelry soak for a longer period, up to an hour, checking it every 15 minutes.
* Use a Jewelry Polishing Cloth: After cleaning, a good jewelry polishing cloth can work wonders for removing any remaining tarnish and restoring shine.
* Make a Paste: For localized tarnish, you can make a paste of baking soda and water. Apply the paste to the tarnished area, let it sit for a few minutes, and then gently scrub with a soft cloth. Rinse thoroughly.
Preventing Tarnish in the Future
Once you’ve got your jewelry sparkling clean, you’ll want to keep it that way! Here are a few tips for preventing tarnish:
* Store Your Jewelry Properly: Store your jewelry in a cool, dry place, away from direct sunlight and humidity. Individual jewelry boxes or pouches are ideal.
* Avoid Contact with Chemicals: Remove your jewelry before showering, swimming, or using cleaning products. Chemicals like chlorine, bleach, and hairspray can accelerate tarnishing.
* Wipe Your Jewelry Regularly: After wearing your jewelry, wipe it down with a soft cloth to remove any oils or sweat.
* Use Anti-Tarnish Strips: You can place anti-tarnish strips in your jewelry box to help absorb moisture and prevent tarnishing.
A Few Extra Tips and Tricks
* Test on a Small Area First: If you’re unsure about cleaning a particular piece of jewelry, always test the method on a small, inconspicuous area first.
* Don’t Overcrowd the Bowl: Avoid overcrowding the bowl with too much jewelry, as this can prevent each piece from making proper contact with the aluminum foil.
* Be Gentle: When scrubbing your jewelry, be gentle to avoid scratching or damaging delicate pieces.
* Use Distilled Water: If you have hard water, consider using distilled water for the cleaning solution to prevent mineral deposits from forming on your jewelry.
* Clean Regularly: Regular cleaning will help prevent tarnish from building up in the first place, making the cleaning process easier in the long run.
Conclusion
So there you have it! A simple, effective, and affordable way to clean your jewelry using salt. I hope this guide has been helpful and that your jewelry is now sparkling like new. Remember to always be gentle and cautious when cleaning your jewelry, and enjoy the process! Happy cleaning!

Conclusion
So, there you have it! Cleaning your jewelry with salt isn’t just a clever hack; it’s a game-changer for keeping your precious pieces sparkling without harsh chemicals or expensive trips to the jeweler. We’ve walked you through the simple process, highlighting its effectiveness and ease. But why is this DIY trick a must-try?
Firstly, it’s incredibly cost-effective. You likely already have salt, baking soda, and aluminum foil in your kitchen – the only ingredients you need! Compared to professional cleaning services or specialized jewelry cleaners, this method saves you a significant amount of money. Secondly, it’s gentle. Many commercial jewelry cleaners contain abrasive chemicals that can damage delicate stones or metals over time. The salt solution provides a much milder, yet effective, cleaning action. Thirdly, it’s convenient. You can clean your jewelry in the comfort of your own home, whenever it suits you. No need to schedule appointments or wait for days to get your jewelry back.
But the benefits don’t stop there. This method is also environmentally friendly. By avoiding harsh chemicals, you’re reducing your impact on the environment. Plus, it’s a great way to repurpose aluminum foil that might otherwise end up in the trash.
Looking for variations? Absolutely! For heavily tarnished silver, you can add a tablespoon of white vinegar to the solution. The vinegar’s acidity will help to break down the tarnish more effectively. However, be cautious when using vinegar on jewelry with porous stones like pearls or opals, as it can damage them. Another variation is to use a soft-bristled toothbrush to gently scrub any stubborn dirt or grime after soaking the jewelry in the salt solution. This can help to dislodge any remaining particles and leave your jewelry even cleaner.
Remember to always test the solution on a small, inconspicuous area of your jewelry first, especially if it contains delicate stones or intricate details. This will ensure that the solution doesn’t damage the piece. And while this method is generally safe for most metals, it’s not recommended for certain types of jewelry, such as those with glued-on components or very delicate settings.
We’re confident that you’ll be amazed by the results of cleaning your jewelry with salt. It’s a simple, effective, and affordable way to keep your jewelry looking its best. So, go ahead and give it a try! We encourage you to experiment with the variations and find what works best for your specific jewelry collection.
Most importantly, we want to hear about your experience! Share your before-and-after photos, tips, and tricks in the comments below. Let us know what types of jewelry you cleaned, what variations you tried, and what results you achieved. Your feedback will help other readers discover the magic of this DIY jewelry cleaning method and keep their treasures sparkling for years to come. We believe that sharing our experiences is the best way to learn and improve, so don’t be shy – let’s create a community of sparkling jewelry enthusiasts!
Frequently Asked Questions (FAQ)
Is cleaning jewelry with salt safe for all types of jewelry?
Generally, cleaning jewelry with salt is safe for most gold, silver, platinum, and even some diamond jewelry. However, it’s not recommended for jewelry with delicate or porous stones like pearls, opals, emeralds, turquoise, or coral. The salt solution can damage these stones, causing them to become dull or discolored. Also, avoid using this method on jewelry with glued-on components, as the water can weaken the adhesive. Always test the solution on a small, inconspicuous area first to ensure it doesn’t cause any damage. If you’re unsure about a particular piece, it’s best to consult a professional jeweler.
How often should I clean my jewelry with salt?
The frequency of cleaning depends on how often you wear your jewelry and how much it’s exposed to dirt, oils, and other substances. For jewelry that you wear daily, cleaning it every two to four weeks is a good guideline. For jewelry that you only wear occasionally, cleaning it every few months should suffice. However, if you notice that your jewelry is becoming visibly dull or tarnished, you can clean it more frequently. Remember to always handle your jewelry with care and store it properly to minimize the need for frequent cleaning.
What kind of salt should I use?
Plain table salt is perfectly fine for cleaning jewelry. You don’t need to use expensive sea salt or kosher salt. The key ingredient is the sodium chloride, which is present in all types of salt. Just make sure the salt is clean and free of any additives or impurities.
Can I use this method to clean costume jewelry?
While cleaning jewelry with salt can work on some costume jewelry, it’s generally not recommended. Costume jewelry often contains base metals and delicate coatings that can be easily damaged by the salt solution. If you choose to try it, test the solution on a small, inconspicuous area first and only soak the jewelry for a very short period of time. Be very gentle when scrubbing and rinse thoroughly with clean water. However, it’s often safer to use a specialized costume jewelry cleaner or simply wipe the jewelry with a soft, damp cloth.
Why does the aluminum foil work in the cleaning process?
The aluminum foil plays a crucial role in the cleaning process due to a chemical reaction called ion exchange. When the tarnished silver jewelry comes into contact with the aluminum foil in the salt solution, a chemical reaction occurs. The tarnish, which is silver sulfide, reacts with the aluminum, causing the sulfur to transfer from the silver to the aluminum. This process effectively removes the tarnish from the silver jewelry and restores its shine. The salt and baking soda act as electrolytes, facilitating the transfer of electrons and accelerating the reaction.
What if my jewelry is heavily tarnished?
For heavily tarnished jewelry, you may need to repeat the cleaning process several times. You can also try adding a tablespoon of white vinegar to the solution, as the vinegar’s acidity will help to break down the tarnish more effectively. However, be cautious when using vinegar on jewelry with porous stones. You can also use a soft-bristled toothbrush to gently scrub any stubborn tarnish after soaking the jewelry in the solution.
How do I prevent my jewelry from tarnishing in the future?
To prevent your jewelry from tarnishing, store it in a cool, dry place, away from direct sunlight and humidity. Avoid storing your jewelry in bathrooms or other damp areas. You can also store your jewelry in airtight bags or containers to protect it from exposure to air, which can cause tarnishing. Additionally, remove your jewelry before showering, swimming, or exercising, as exposure to water, chlorine, and sweat can accelerate tarnishing. Finally, avoid exposing your jewelry to harsh chemicals, such as cleaning products, perfumes, and lotions.
What if my jewelry has gemstones?
If your jewelry has gemstones, it’s important to be extra careful when cleaning it. Avoid using harsh chemicals or abrasive cleaners, as these can damage the stones. Also, avoid soaking jewelry with porous stones like pearls, opals, emeralds, turquoise, or coral in the salt solution. Instead, gently wipe the stones with a soft, damp cloth. You can also use a specialized gemstone cleaner, but always follow the manufacturer’s instructions carefully.
Can I use this method to clean gold-plated jewelry?
Cleaning gold-plated jewelry with salt is generally not recommended. The gold plating is very thin and can be easily damaged by the salt solution. If you choose to try it, test the solution on a small, inconspicuous area first and only soak the jewelry for a very short period of time. Be very gentle when scrubbing and rinse thoroughly with clean water. However, it’s often safer to simply wipe the jewelry with a soft, damp cloth.
What should I do after cleaning my jewelry with salt?
After cleaning your jewelry with salt, rinse it thoroughly with clean water to remove any remaining salt residue. Then, pat it dry with a soft, lint-free cloth. You can also use a polishing cloth to restore the shine and luster of the metal. Finally, store your jewelry in a cool, dry place, away from direct sunlight and humidity.
Leave a Comment