
Compact garden radishes: Tiny space, big flavor! Ever dreamt of harvesting your own crunchy, peppery radishes but thought you didn’t have the room? I’m here to tell you that dream can absolutely become a reality, even if your “garden” is just a sunny windowsill or a small balcony.
Radishes have been cultivated for centuries, with roots (pun intended!) tracing back to ancient Egypt and Greece. They were prized not only for their taste but also for their medicinal properties. Today, they’re a global staple, adding a zesty kick to salads, sandwiches, and countless other dishes. But let’s face it, buying radishes from the store just isn’t the same as plucking them fresh from your own little garden.
That’s where this DIY guide comes in! I’m going to share some simple, effective tricks and hacks that will allow you to grow a bountiful crop of compact garden radishes, no matter how limited your space. We’ll cover everything from choosing the right containers and soil to mastering the art of succession planting for a continuous harvest. Forget those bland, store-bought radishes – get ready to enjoy the vibrant flavor and satisfying crunch of homegrown goodness! Plus, who doesn’t love a quick and easy gardening project that yields delicious results in just a few weeks? Let’s get planting!
Growing Radishes in Small Spaces: A DIY Guide to a Bountiful Harvest
Hey there, fellow gardening enthusiasts! I’m so excited to share my tried-and-true method for growing radishes, even if you’re short on space. Radishes are fantastic because they’re quick to mature, adding a peppery zing to salads and snacks. Plus, they’re surprisingly easy to grow in containers, making them perfect for balconies, patios, or even a sunny windowsill. Let’s dive in!
What You’ll Need
Before we get our hands dirty, let’s gather the essentials. Here’s a checklist of everything you’ll need to successfully grow radishes in a compact space:
* Container: Choose a container that’s at least 6 inches deep. Radishes need room to develop their roots. I personally love using rectangular planters, but any pot with drainage holes will work.
* Potting Mix: Use a high-quality potting mix, not garden soil. Potting mix is lighter and provides better drainage, which is crucial for radishes.
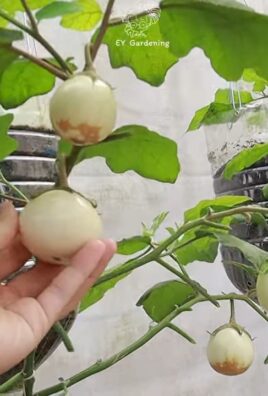
* Radish Seeds: Select a radish variety that suits your taste. Cherry Belle, French Breakfast, and Easter Egg are all popular choices.
* Watering Can or Hose: For gentle and consistent watering.
* Sunlight: Radishes need at least 6 hours of sunlight per day. Choose a sunny spot for your container.
* Fertilizer (Optional): A balanced liquid fertilizer can give your radishes a boost, but it’s not strictly necessary.
* Small Trowel or Hand Rake: For preparing the soil and thinning seedlings.
* Labels and Marker: To keep track of what you’ve planted.
Preparing Your Container
Getting your container ready is the first step towards a successful radish harvest. Here’s how I do it:
1. Clean Your Container: If you’re reusing a container, make sure to clean it thoroughly with soap and water to remove any lingering dirt or pathogens.
2. Ensure Proper Drainage: Check that your container has adequate drainage holes. If not, drill a few more. Radishes hate soggy soil!
3. Fill with Potting Mix: Fill the container with potting mix, leaving about an inch of space at the top. Gently pat down the soil to remove any air pockets.
4. Water the Soil: Moisten the potting mix thoroughly before planting. This will help the seeds germinate.
Planting Your Radish Seeds
Now for the fun part – planting the seeds! Here’s my method for ensuring good germination and healthy growth:
1. Sow the Seeds: Sprinkle the radish seeds evenly over the surface of the soil. Aim for about ½ inch spacing between seeds. Don’t worry about being perfect; we’ll thin them out later.
2. Cover the Seeds: Lightly cover the seeds with about ¼ inch of potting mix.
3. Water Gently: Water the soil gently with a watering can or hose, being careful not to dislodge the seeds.
4. Label Your Container: Use a label and marker to note the date you planted the seeds and the radish variety. This will help you keep track of your progress.
Caring for Your Radishes
Radishes are relatively low-maintenance, but they do need consistent care to thrive. Here’s what I do to keep my radishes happy and healthy:
1. Water Regularly: Keep the soil consistently moist, but not waterlogged. Water when the top inch of soil feels dry to the touch. Radishes need consistent moisture to develop properly.
2. Provide Sunlight: Ensure your container receives at least 6 hours of sunlight per day. If you don’t have a sunny spot, you can supplement with a grow light.
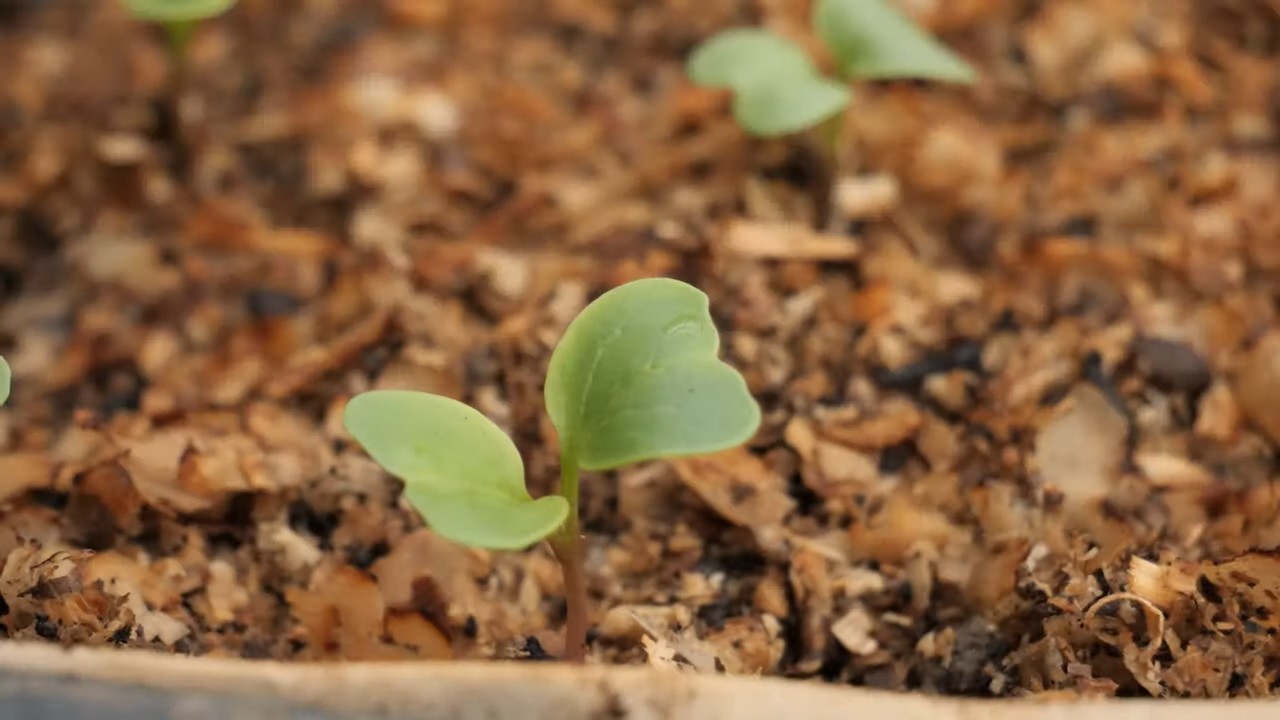
3. Thin Seedlings: Once the seedlings emerge (usually within 3-7 days), thin them out to about 1-2 inches apart. This will give the remaining plants enough room to grow. Use small scissors to snip off the unwanted seedlings at soil level. Don’t pull them out, as this can disturb the roots of the remaining plants.
4. Fertilize (Optional): If you want to give your radishes a boost, you can fertilize them with a balanced liquid fertilizer every 2-3 weeks. Follow the instructions on the fertilizer label. I usually dilute the fertilizer to half strength to avoid burning the plants.
5. Weed Regularly: Keep an eye out for weeds and remove them promptly. Weeds can compete with your radishes for nutrients and water.
6. Monitor for Pests: Radishes are generally pest-resistant, but they can sometimes be affected by flea beetles or aphids. If you notice any pests, you can try spraying them with insecticidal soap or neem oil.
Harvesting Your Radishes
The best part of growing radishes is, of course, harvesting them! Radishes are typically ready to harvest in 3-4 weeks, depending on the variety. Here’s how I know when it’s time to harvest:
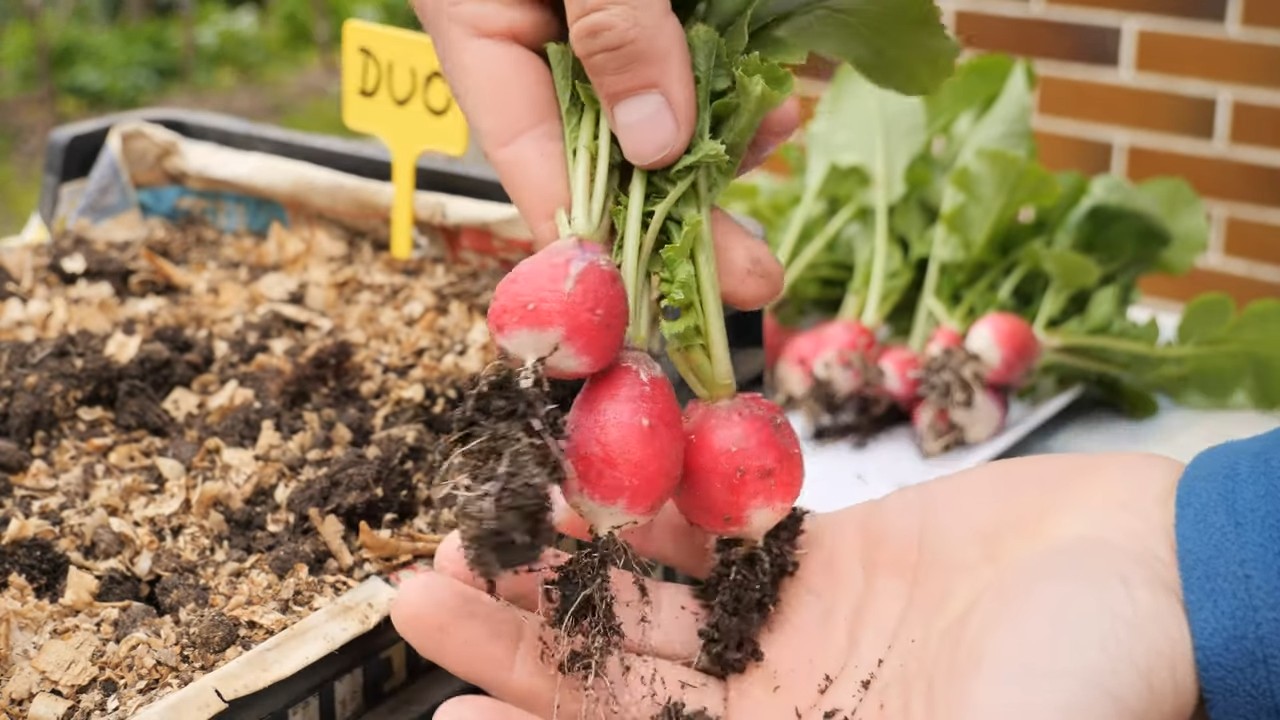
1. Check the Size: Radishes are usually ready to harvest when they are about 1 inch in diameter. You can gently brush away some of the soil around the base of the plant to check the size of the radish.
2. Harvest Promptly: Don’t let your radishes get too big, as they can become woody and bitter. Harvest them as soon as they reach the desired size.
3. Pull Gently: To harvest, gently pull the radish from the soil. If the soil is dry, you may need to water it first to make it easier to pull.
4. Wash and Enjoy: Wash the radishes thoroughly and enjoy them fresh in salads, sandwiches, or as a crunchy snack. You can also roast them or pickle them for a longer shelf life.
Troubleshooting Common Problems
Even with the best care, you might encounter a few challenges along the way. Here are some common problems and how to address them:
* Radishes Not Bulbing: This is often caused by overcrowding, lack of sunlight, or poor soil. Make sure you thin your seedlings properly, provide adequate sunlight, and use a high-quality potting mix.
* Radishes Cracking: This is usually caused by inconsistent watering. Keep the soil consistently moist, but not waterlogged.
* Radishes Bitter: This can be caused by letting the radishes get too big or by growing them in hot weather. Harvest your radishes promptly and choose a radish variety that is heat-tolerant.
* Pests: As mentioned earlier, flea beetles and aphids can sometimes be a problem. Spray them with insecticidal soap or neem oil.
Choosing the Right Radish Variety
The variety of radish you choose can significantly impact your gardening experience. Here are a few of my favorites and why I love them:
* Cherry Belle: This is a classic, round, bright red radish that’s known for its mild flavor and quick maturity. It’s a great choice for beginners.
* French Breakfast: These radishes are elongated with a red top and white bottom. They have a slightly spicier flavor than Cherry Belle and are delicious sliced on buttered bread with a sprinkle of sea salt.
* Easter Egg: This variety produces a mix of radishes in different colors, including red, pink, purple, and white. They’re a fun and colorful addition to any garden.
* Watermelon Radish: This radish has a green exterior and a bright pink interior, resembling a watermelon. It has a mild, slightly sweet flavor and is beautiful sliced in salads.
* Black Spanish Round: For those who like a bit of a kick, this radish has a black exterior and a white interior with a strong, pungent flavor.
Succession Planting for a Continuous Harvest
One of the best things about radishes is that you can succession plant them for a continuous harvest. This means planting a new batch of seeds every 1-2 weeks. Here’s how I do it:
1. Plant a New Batch: Every 1-2 weeks, plant a new batch of radish seeds in a separate container or in the same container after harvesting the previous batch.
2. Follow the Same Steps: Follow the same steps for preparing the container, planting the seeds, and caring for the radishes.
3. Enjoy a Continuous Harvest: By succession planting, you can enjoy a continuous harvest of fresh radishes throughout the growing season.
Creative Ways to Use Your Radishes
Once you’ve harvested your radishes, the possibilities are endless! Here are a few of my favorite ways to use them:
* Salads: Slice or chop radishes and add them to salads for a peppery crunch.
* Sandwiches: Thinly slice radishes and add them to sandwiches for a burst of flavor.
* Snacks: Enjoy radishes raw with a sprinkle of sea salt or dipped in hummus or ranch dressing.
* Roasted Radishes
Conclusion
So, there you have it! Transforming your radish harvest into delicious, long-lasting compact garden radishes is not only achievable but surprisingly simple. We’ve walked you through the process, highlighting the ease and cost-effectiveness of pickling as a preservation method. Forget about limp, forgotten radishes languishing in the crisper drawer. With this method, you can enjoy the crisp, peppery bite of your garden’s bounty for months to come.
But why is this DIY trick a must-try? Beyond the obvious benefit of extending the shelf life of your radishes, pickling unlocks a whole new dimension of flavor. The brine mellows the radish’s sharpness while infusing it with a delightful tang. Imagine adding these pickled gems to salads, sandwiches, tacos, or even enjoying them straight from the jar as a zesty snack. The possibilities are truly endless.
And don’t feel limited by the basic recipe we’ve provided. This is where your creativity can truly shine! Experiment with different spices and herbs to create your own signature pickled radish blend. A pinch of red pepper flakes can add a fiery kick, while a sprig of dill or a few coriander seeds can impart a more subtle, aromatic flavor. Consider adding sliced ginger or garlic cloves to the brine for an extra layer of complexity. You could even try different vinegars, such as apple cider vinegar or rice vinegar, to alter the overall taste profile. For a sweeter pickle, add a touch of honey or maple syrup to the brine.
For a vibrant visual appeal, consider pickling different varieties of radishes together. The contrasting colors of red, pink, purple, and white radishes will create a stunning jar that’s as beautiful as it is delicious. You can also add other vegetables to the pickle jar, such as sliced carrots, onions, or even green beans, for a mixed vegetable pickle.
We understand that trying a new DIY project can sometimes feel daunting, but we assure you that this one is incredibly straightforward and rewarding. The satisfaction of preserving your own garden produce and enjoying the fruits (or rather, vegetables) of your labor is truly unparalleled. Plus, you’ll be reducing food waste and saving money in the process.
So, what are you waiting for? Gather your radishes, prepare your brine, and get pickling! We are confident that you’ll be amazed by the results. And most importantly, we want to hear about your experience. Share your photos, tips, and variations in the comments below. Let’s build a community of radish-pickling enthusiasts and inspire others to embrace the joys of DIY food preservation. We can’t wait to see what delicious creations you come up with! Remember, mastering the art of pickling compact garden radishes is a skill that will serve you well for years to come, allowing you to savor the taste of summer long after the growing season has ended.
Frequently Asked Questions (FAQ)
What kind of radishes work best for pickling?
While you can pickle any type of radish, smaller, more compact varieties like cherry belle or French breakfast radishes tend to hold their texture better during the pickling process. Larger radishes can become a bit soft, but they are still perfectly edible and flavorful. If using larger radishes, consider cutting them into smaller pieces before pickling. The key is to use fresh, firm radishes for the best results. Avoid radishes that are soft, mushy, or have blemishes.
How long do pickled radishes last?
When properly stored in a sterilized jar in the refrigerator, pickled radishes can last for several months, typically up to 2-3 months. However, it’s always best to check for any signs of spoilage before consuming them. Look for changes in color, texture, or smell. If the radishes appear slimy or have an off-putting odor, discard them. To maximize their shelf life, ensure that the radishes are fully submerged in the brine and that the jar is tightly sealed.
Can I use a different type of vinegar?
Yes, you can definitely experiment with different types of vinegar to create your own unique flavor profile. White vinegar is a classic choice for pickling due to its neutral flavor, but other options like apple cider vinegar, rice vinegar, or even white wine vinegar can add interesting nuances. Apple cider vinegar will impart a slightly sweeter and more complex flavor, while rice vinegar will offer a milder and more delicate taste. White wine vinegar will provide a subtle fruity note. Just be sure to use a vinegar with at least 5% acidity to ensure proper preservation.
Do I need to sterilize the jars before pickling?
Yes, sterilizing the jars is crucial for preventing the growth of harmful bacteria and ensuring the longevity of your pickled radishes. There are several ways to sterilize jars. One method is to wash the jars and lids in hot, soapy water, rinse them thoroughly, and then place them in a boiling water bath for 10 minutes. Another method is to wash the jars and lids in the dishwasher on the sanitize cycle. You can also sterilize them in the oven by placing them on a baking sheet and heating them at 250°F (120°C) for 20 minutes. Always handle sterilized jars with clean tongs to avoid contamination.
Can I add other vegetables to the pickle jar?
Absolutely! Pickled radishes are delicious on their own, but you can also add other vegetables to create a mixed vegetable pickle. Sliced carrots, onions, cucumbers, green beans, or even bell peppers can be added to the jar along with the radishes. Just be sure to wash and prepare the vegetables properly before adding them to the brine. Consider cutting the vegetables into similar sizes to ensure even pickling.
What spices and herbs can I use to flavor the pickled radishes?
The possibilities are endless when it comes to flavoring pickled radishes! Some popular choices include dill, garlic, peppercorns, mustard seeds, coriander seeds, red pepper flakes, bay leaves, and ginger. You can also experiment with other herbs and spices like thyme, rosemary, oregano, or even star anise. Start with a small amount of each spice and adjust to your liking. Remember that the flavors will intensify over time, so it’s best to err on the side of caution.
My pickled radishes are soft. What did I do wrong?
There are a few reasons why your pickled radishes might be soft. One possibility is that you used radishes that were already past their prime. Always use fresh, firm radishes for pickling. Another possibility is that the brine was not strong enough. Make sure to use the correct ratio of vinegar, water, and salt. Overcooking the radishes during the pickling process can also cause them to become soft. Avoid boiling the radishes for too long. Finally, improper storage can also contribute to softening. Make sure the jars are properly sealed and stored in the refrigerator.
Can I use this recipe for other vegetables?
While this recipe is specifically tailored for radishes, the basic pickling principles can be applied to other vegetables as well. However, you may need to adjust the brine and pickling time depending on the type of vegetable you are using. For example, harder vegetables like carrots and beets may require a longer pickling time than softer vegetables like cucumbers and zucchini. Research specific pickling recipes for each vegetable to ensure the best results.
Are pickled radishes healthy?
Pickled radishes can be a healthy addition to your diet. Radishes are low in calories and rich in vitamins and minerals, including vitamin C, potassium, and folate. The pickling process can also enhance the bioavailability of certain nutrients. However, it’s important to note that pickled radishes can be high in sodium due to the salt in the brine. If you are watching your sodium intake, consider using a lower-sodium salt or reducing the amount of salt in the brine.
How can I use pickled radishes?
Pickled radishes are incredibly versatile and can be used in a variety of ways. They make a delicious addition to salads, sandwiches, tacos, and burgers. You can also enjoy them as a zesty snack straight from the jar. Try adding them to charcuterie boards or using them as a garnish for soups and stews. Pickled radishes can also be used to make a flavorful relish or chutney. Get creative and experiment with different ways to incorporate them into your meals.
Leave a Comment