
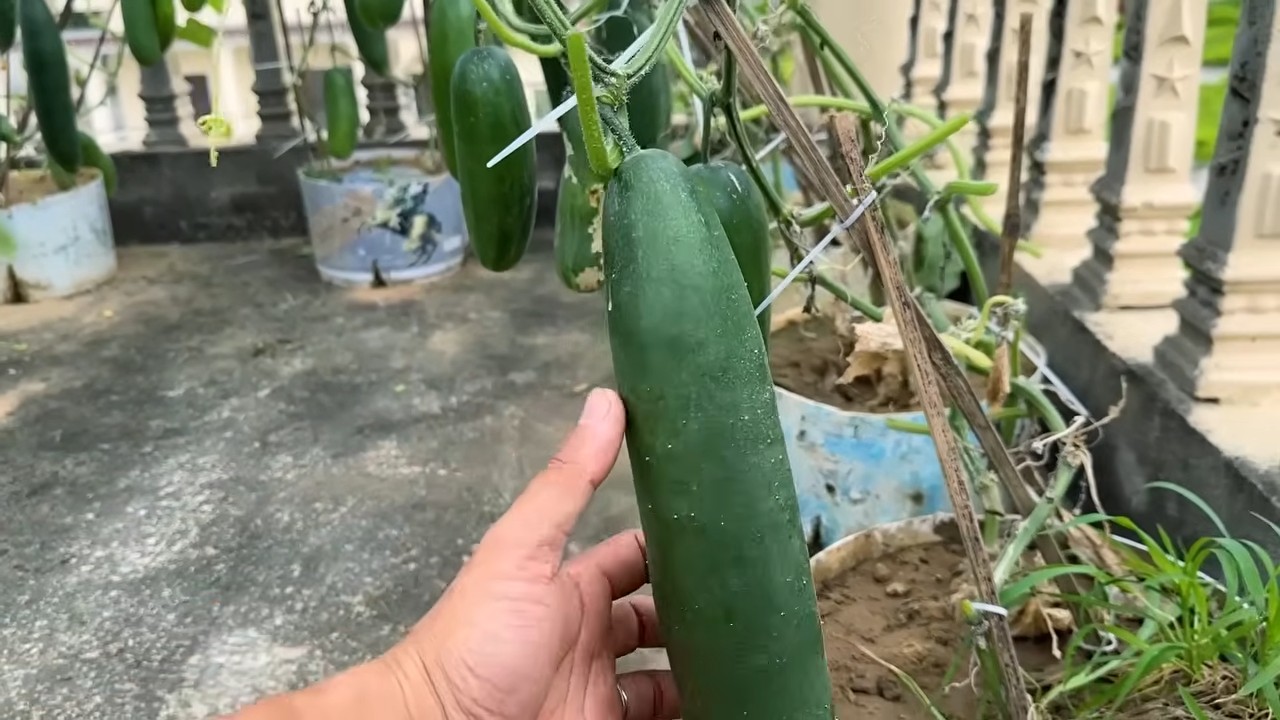
Cucumber yield boosting tips are what every home gardener dreams about, right? Imagine baskets overflowing with crisp, juicy cucumbers, perfect for salads, pickles, or just a refreshing snack on a hot summer day. I know I do! But sometimes, despite our best efforts, our cucumber plants just don’t seem to produce as much as we’d hoped.
For centuries, cucumbers have been cultivated across the globe, from their origins in India to their prominent place in Mediterranean cuisine. They’re not just delicious; they’re packed with nutrients and have even been used in traditional medicine. But getting a bountiful harvest can feel like a secret art. That’s where these DIY tricks come in!
Let’s face it, store-bought cucumbers can be expensive and often lack the fresh, vibrant flavor of homegrown ones. Plus, there’s nothing quite like the satisfaction of nurturing a plant from seed to harvest. But if you’re struggling to get the cucumber yield you desire, don’t despair! I’m here to share some simple, effective, and totally doable DIY hacks that will help you maximize your cucumber production. These aren’t complicated techniques; they’re practical tips that anyone can implement, regardless of their gardening experience. So, get ready to learn how to boost your cucumber yield and enjoy a summer filled with delicious, homegrown goodness!
Growing Water Spinach (Kangkong) at Home: A DIY Guide
Hey there, fellow gardening enthusiasts! I’m so excited to share my experience growing water spinach, also known as kangkong or ong choy, right in my backyard. It’s surprisingly easy, incredibly rewarding, and provides a constant supply of fresh, delicious greens for stir-fries, soups, and salads. Trust me, once you taste homegrown kangkong, you’ll never want to buy it from the store again!
This guide will walk you through everything you need to know, from choosing the right container to harvesting your bountiful crop. Let’s get started!
Choosing Your Growing Method
Before we dive into the nitty-gritty, let’s decide how you want to grow your water spinach. There are two main methods:
* Water Culture (Hydroponics): This method involves growing the kangkong directly in water, without soil. It’s super fun, relatively clean, and allows you to see the roots develop.
* Soil Culture: This is the more traditional method, where you grow the kangkong in a pot or raised bed filled with soil. It’s a bit more forgiving for beginners and can produce larger yields.
I’ll cover both methods in detail, so you can choose the one that best suits your space and preferences.
Water Culture (Hydroponics) Method
This method is perfect if you want a clean and visually appealing way to grow your kangkong.
Materials You’ll Need:
* Kangkong Seeds or Cuttings: You can find kangkong seeds online or at Asian grocery stores. Alternatively, you can use cuttings from mature kangkong plants.
* A Container: A plastic tub, bucket, or even a large bowl will work. Make sure it’s opaque to prevent algae growth.
* Net Pots or Small Containers: These will hold the kangkong seedlings or cuttings.
* Hydroponic Growing Medium: Coco coir, perlite, or rockwool are all good options.
* Nutrient Solution: A balanced hydroponic nutrient solution is essential for healthy growth.
* Air Pump and Air Stone (Optional but Recommended): These will oxygenate the water, promoting faster growth.
* pH Meter (Optional): To monitor and adjust the pH of the water.
Step-by-Step Instructions:
1. Prepare Your Container: Clean your container thoroughly with soap and water. If you’re using a dark-colored container, that’s great! If not, consider painting the outside black or covering it with dark plastic to prevent algae growth.
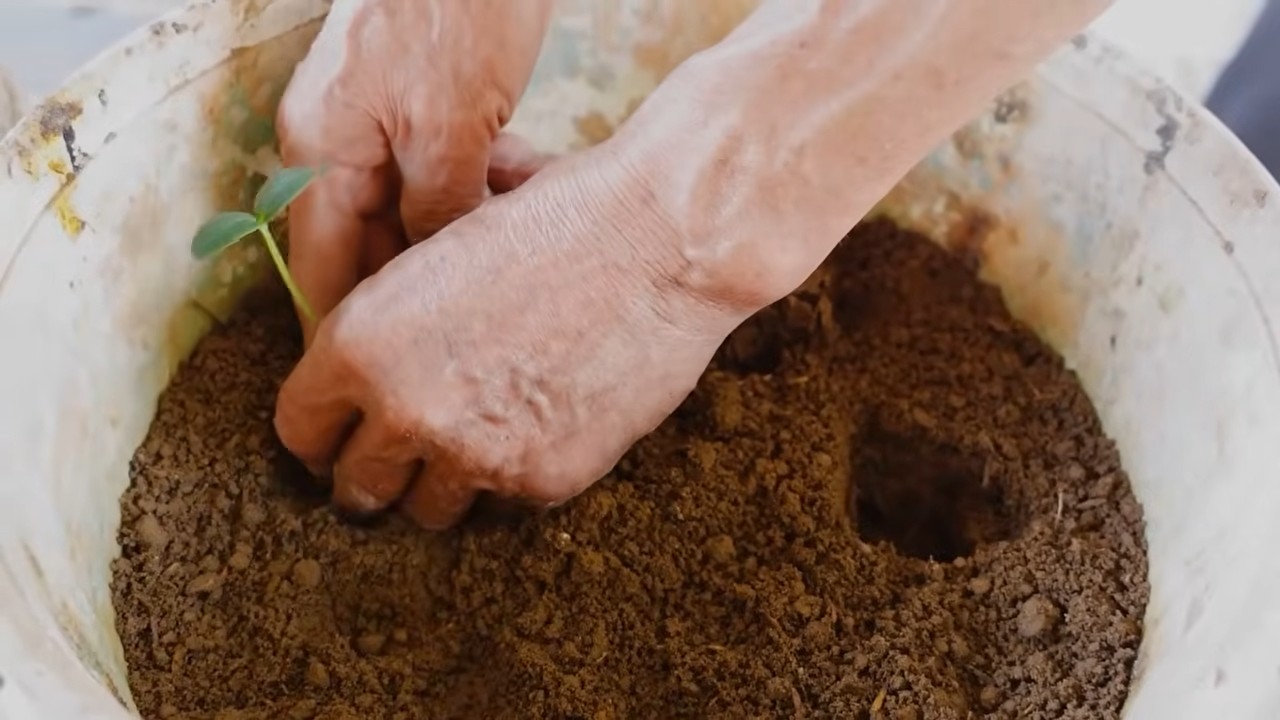
2. Germinate Your Seeds (If Using Seeds): Soak the kangkong seeds in water for 24 hours to soften the seed coat and improve germination. Then, sow the seeds in a small container filled with moist coco coir or perlite. Keep the container in a warm, bright location. You should see sprouts within a few days.
3. Prepare Your Cuttings (If Using Cuttings): Take cuttings from a mature kangkong plant, about 4-6 inches long. Remove the lower leaves, leaving only a few leaves at the top. Place the cuttings in a glass of water until roots develop, which usually takes about a week.
4. Prepare Your Net Pots: Fill the net pots with your chosen hydroponic growing medium (coco coir, perlite, or rockwool). Moisten the medium with water.
5. Transplant Seedlings or Cuttings: Once your seedlings have a few true leaves or your cuttings have developed roots, carefully transplant them into the net pots. Make sure the roots are surrounded by the growing medium.
6. Fill Your Container with Nutrient Solution: Mix the hydroponic nutrient solution according to the manufacturer’s instructions. Fill your container with the solution, making sure the bottom of the net pots are submerged in the water.
7. Add Air Pump and Air Stone (Optional): If you’re using an air pump and air stone, place the air stone at the bottom of the container and connect it to the air pump. This will provide oxygen to the roots, promoting faster growth.
8. Monitor and Adjust pH (Optional): Use a pH meter to monitor the pH of the water. The ideal pH for kangkong is between 6.0 and 7.0. Adjust the pH as needed using pH up or pH down solutions.
9. Provide Light: Kangkong needs plenty of light to thrive. Place your container in a sunny location or under grow lights. Aim for at least 6-8 hours of light per day.
10. Change the Nutrient Solution Regularly: Change the nutrient solution every 1-2 weeks to prevent nutrient deficiencies and algae growth.
Soil Culture Method
This method is more traditional and can be a great option if you’re already familiar with growing plants in soil.
Materials You’ll Need:
* Kangkong Seeds or Cuttings: Again, you can find kangkong seeds online or at Asian grocery stores. Cuttings from mature plants also work well.
* A Container: A pot, raised bed, or even a large bucket will do. Make sure it has drainage holes.
* Potting Soil: Use a well-draining potting mix that’s rich in organic matter.
* Fertilizer: A balanced fertilizer will help your kangkong grow strong and healthy.
Step-by-Step Instructions:
1. Prepare Your Container: Choose a container that’s at least 12 inches deep and has drainage holes. Clean the container thoroughly with soap and water.
2. Fill Your Container with Potting Soil: Fill the container with your chosen potting soil, leaving about an inch of space at the top.
3. Sow Your Seeds or Plant Your Cuttings: If you’re using seeds, sow them about 1/2 inch deep and 1 inch apart. If you’re using cuttings, plant them about 2 inches deep.
4. Water Thoroughly: Water the soil thoroughly after planting.
5. Provide Light: Kangkong needs plenty of light to thrive. Place your container in a sunny location or under grow lights. Aim for at least 6-8 hours of light per day.
6. Water Regularly: Keep the soil consistently moist, but not waterlogged. Water when the top inch of soil feels dry to the touch.
7. Fertilize Regularly: Fertilize your kangkong every 2-3 weeks with a balanced fertilizer. Follow the manufacturer’s instructions for application rates.
8. Pinch Back the Tips: Pinching back the tips of the kangkong plants will encourage them to branch out and produce more leaves.
General Care Tips for Both Methods
Regardless of which method you choose, here are some general care tips to keep in mind:
* Temperature: Kangkong thrives in warm temperatures, between 70°F and 85°F (21°C and 29°C).
* Humidity: Kangkong prefers high humidity. If you live in a dry climate, you can increase humidity by misting the plants regularly or placing a tray of water near the container.
* Pests and Diseases: Kangkong is relatively pest-resistant, but it can be susceptible to aphids and spider mites. Inspect your plants regularly and treat any infestations promptly with insecticidal soap or neem oil.
* Support: As your kangkong plants grow taller, they may need some support. You can use stakes or a trellis to keep them upright.
Harvesting Your Kangkong
The best part! You can start harvesting your kangkong about 4-6 weeks after planting.
* Harvesting Technique: Use scissors or a sharp knife to cut the stems about 6 inches from the base of the plant. This will encourage the plant to regrow and produce more leaves.
* Frequency: You can harvest your kangkong every week or two, depending on how quickly it grows.
* Storage: Freshly harvested kangkong is best used immediately. However, you can store it in the refrigerator for a few days. Wrap the stems in a damp paper towel and place them in a plastic bag.
Troubleshooting
Even with the best care, you might encounter some problems. Here are a few common issues and how to address them:
* Yellowing Leaves: This could be a sign of nutrient deficiency. Make sure you’re using a balanced fertilizer or nutrient solution and that the pH is within the optimal range.
* Slow Growth: This could be due to insufficient light, temperature, or nutrients. Make sure your kangkong is getting enough light and warmth, and that you’re fertilizing it regularly.
* Algae Growth: This is more common in water culture. Make sure your container is opaque and change the nutrient solution regularly. You can also add a
Conclusion
So, there you have it! This simple, yet incredibly effective DIY trick for boosting your cucumber yield is a game-changer for any gardener, whether you’re a seasoned pro or just starting out. We’ve walked you through the process, highlighting the benefits of increased pollination, reduced disease, and ultimately, a significantly larger harvest of crisp, delicious cucumbers.
Why is this a must-try? Because it addresses a fundamental challenge in cucumber cultivation: ensuring adequate pollination. Cucumbers, especially those grown indoors or in areas with limited bee activity, often struggle to produce a bountiful crop. This DIY method bypasses that limitation, putting the power of pollination directly into your hands. Imagine the satisfaction of harvesting basket after basket of cucumbers, knowing that you played a direct role in their abundance.
But don’t stop there! Feel free to experiment with variations. For example, if you’re growing different varieties of cucumbers, you might want to keep separate brushes for each to avoid cross-pollination, especially if you’re saving seeds. You could also try using a small, soft paintbrush instead of a cotton swab, or even a feather for an ultra-gentle touch. The key is to find what works best for you and your garden.
Another variation to consider is the timing of your hand-pollination. While we’ve suggested doing it in the morning, you might find that your cucumbers are more receptive at a different time of day, depending on your local climate and the specific variety you’re growing. Observe your plants closely and adjust your schedule accordingly.
Furthermore, consider supplementing this DIY trick with other cucumber-friendly practices. Ensure your plants are getting adequate sunlight, water, and nutrients. Mulch around the base of the plants to retain moisture and suppress weeds. And regularly inspect your plants for pests and diseases, taking action promptly to prevent any problems from escalating.
This DIY cucumber yield boosting trick isn’t just about getting more cucumbers; it’s about connecting with your garden on a deeper level. It’s about understanding the needs of your plants and taking proactive steps to help them thrive. It’s about experiencing the joy of nurturing life and reaping the rewards of your hard work.
We are confident that this simple technique will revolutionize your cucumber growing experience. So, grab your cotton swab (or paintbrush, or feather!), head out to your garden, and give it a try. We’re eager to hear about your results! Share your experiences, tips, and photos in the comments below. Let’s build a community of cucumber enthusiasts and learn from each other. Let us know if this DIY trick helped you get a better cucumber yield. Happy gardening!
Frequently Asked Questions (FAQ)
What exactly is hand-pollination, and why is it necessary for cucumbers?
Hand-pollination is the process of manually transferring pollen from the male flower of a cucumber plant to the female flower. Cucumbers have separate male and female flowers on the same plant. Female flowers need to be pollinated to produce fruit. In nature, this is typically done by bees and other insects. However, if you’re growing cucumbers indoors, in a greenhouse, or in an area with limited pollinator activity, hand-pollination becomes necessary to ensure a good cucumber yield. Without pollination, the female flowers will wither and die without producing fruit.
How can I tell the difference between male and female cucumber flowers?
This is a crucial step! Male flowers have a long, slender stem behind the flower. Female flowers have a small, immature cucumber (a tiny bulge) between the flower and the stem. This miniature cucumber is the ovary, which will develop into the full-sized fruit if the flower is successfully pollinated. Look closely; it’s usually quite easy to spot the difference once you know what to look for.
What is the best time of day to hand-pollinate cucumbers?
The best time to hand-pollinate is typically in the morning, shortly after the flowers open. This is when the pollen is most viable and receptive. Aim to pollinate between 8:00 AM and 11:00 AM, if possible. However, if you can’t do it in the morning, any time during the day when the flowers are open is better than not pollinating at all.
How do I actually perform the hand-pollination process?
It’s quite simple! Use a clean cotton swab, small paintbrush, or even a feather to gently collect pollen from the male flower. You’ll see the yellow pollen on the swab. Then, carefully transfer the pollen to the stigma (the sticky center) of the female flower. Make sure to cover the stigma with pollen. Repeat this process for all the female flowers that are open on your cucumber plants.
How many times do I need to hand-pollinate each female flower?
You only need to pollinate each female flower once. However, it’s a good idea to repeat the process for all newly opened female flowers every day or every other day, depending on how many flowers are blooming. This will ensure that you’re maximizing your chances of getting a good cucumber yield.
What if I don’t have any male flowers blooming at the same time as the female flowers?
This can happen, especially early in the season. If you don’t have any male flowers available, you can try to collect pollen from male flowers that have already opened and store it in the refrigerator for a day or two. Place the collected pollen in a small, airtight container. Alternatively, you can wait until more male flowers bloom. The male flowers usually appear first, followed by the female flowers.
How long does it take for a pollinated female flower to start developing into a cucumber?
After successful pollination, you should start to see the tiny cucumber behind the female flower begin to swell within a few days. It will gradually grow larger and longer over the next week or two, depending on the variety of cucumber and the growing conditions.
Can I use this hand-pollination technique for other vegetables besides cucumbers?
Yes, you can! Hand-pollination can be beneficial for other vegetables that have separate male and female flowers, such as squash, pumpkins, and melons. The process is essentially the same: transfer pollen from the male flower to the female flower.
What are some signs that my cucumbers are not being properly pollinated?
Signs of poor pollination include:
* Female flowers that wither and die without producing fruit.
* Cucumbers that are pale, misshapen, or stunted.
* Cucumbers that are bitter or have a poor flavor.
If you notice any of these signs, it’s a good indication that you need to start hand-pollinating your cucumbers.
Is there anything else I can do to improve my cucumber yield besides hand-pollination?
Absolutely! Here are some additional tips for maximizing your cucumber yield:
* Provide your cucumber plants with plenty of sunlight (at least 6-8 hours per day).
* Water your plants regularly, especially during hot, dry weather.
* Fertilize your plants with a balanced fertilizer every few weeks.
* Mulch around the base of the plants to retain moisture and suppress weeds.
* Protect your plants from pests and diseases.
* Choose cucumber varieties that are well-suited to your climate and growing conditions.
* Consider growing your cucumbers on a trellis to improve air circulation and prevent disease.
By combining hand-pollination with these other best practices, you’ll be well on your way to a bumper crop of delicious cucumbers!

Leave a Comment