
DIY bean sprouts towel method – sounds intriguing, right? I’m so excited to share this incredibly simple and rewarding technique with you! Forget those expensive store-bought bean sprouts that often lack flavor and freshness. Imagine having a constant supply of crisp, delicious bean sprouts right at your fingertips, grown with your own two hands.
Sprouting seeds, including beans, has a rich history, dating back thousands of years. Cultures across Asia have long valued sprouts for their nutritional benefits and ease of cultivation. They’re packed with vitamins, minerals, and enzymes, making them a fantastic addition to salads, stir-fries, and sandwiches. Plus, there’s something deeply satisfying about nurturing life from a tiny seed!
But why this particular method? Well, let’s be honest, sometimes gardening feels intimidating. We think we need fancy equipment or a green thumb. The DIY bean sprouts towel method throws all that out the window. It’s perfect for beginners, apartment dwellers, or anyone who wants a quick and easy way to boost their diet with fresh, homegrown goodness. This method is so easy, you can even get your kids involved! I’ve found that growing my own bean sprouts saves me money, reduces food waste, and gives me a sense of accomplishment. So, are you ready to ditch the store-bought sprouts and embark on this fun and flavorful adventure with me? Let’s get sprouting!
Grow Your Own Bean Sprouts: The Super Easy Towel Method!
Hey there, fellow sprout enthusiasts! Are you ready to ditch the store-bought bean sprouts and embark on a super simple, incredibly rewarding DIY adventure? I’m going to show you how to grow your own crunchy, delicious bean sprouts right in your kitchen using just a few basic supplies and the magic of the towel method. Trust me, it’s easier than you think, and the fresh taste is unbeatable!
What You’ll Need: Your Sprouting Arsenal
Before we dive in, let’s gather our supplies. This is a low-cost project, so you probably already have most of these items on hand.
* Your Bean of Choice: Mung beans are the classic choice for bean sprouts, but you can also experiment with adzuki beans, lentils, or even chickpeas. Just make sure they are whole, un-split, and intended for sprouting (check the packaging). About 1/2 cup of dry beans is a good starting point.
* A Wide-Mouthed Jar or Container: A quart-sized mason jar works perfectly, but any clean container with a wide opening will do.
* Sprouting Lid or Cheesecloth and Rubber Band: You’ll need something to cover the jar and allow for drainage. A sprouting lid is ideal, but a few layers of cheesecloth secured with a rubber band works just as well.
* Clean Towels (2): Microfiber towels or clean kitchen towels are perfect. Avoid using towels with strong dyes or fragrances.
* Water: Filtered water is best, but tap water that’s been sitting out for a while to let the chlorine dissipate is also fine.
* A Dark, Cool Place: A cupboard, pantry, or even a covered bowl will work.
* A Spray Bottle (Optional): This can be helpful for keeping the towels moist.
Step-by-Step: From Bean to Sprout!
Okay, let’s get sprouting! Follow these steps carefully, and you’ll be enjoying your own homegrown bean sprouts in no time.
1. Rinse and Sort the Beans: Pour your beans into a bowl and cover them with cool water. Gently swirl them around and remove any debris, broken beans, or beans that float to the surface. These won’t sprout properly. Drain the beans thoroughly.
2. Soak the Beans: Transfer the rinsed beans to your jar or container. Add enough cool water to completely cover them, plus a couple of inches extra. Beans will expand as they soak. Cover the jar with your sprouting lid or cheesecloth and rubber band. Let the beans soak for 8-12 hours, or even overnight. This is crucial for kickstarting the germination process. I usually soak mine before I go to bed, so they’re ready to go in the morning.
3. Drain and Rinse Again: After soaking, drain the beans thoroughly using your sprouting lid or cheesecloth. Rinse them well with cool water, making sure to remove any remaining debris. This is important to prevent mold growth.
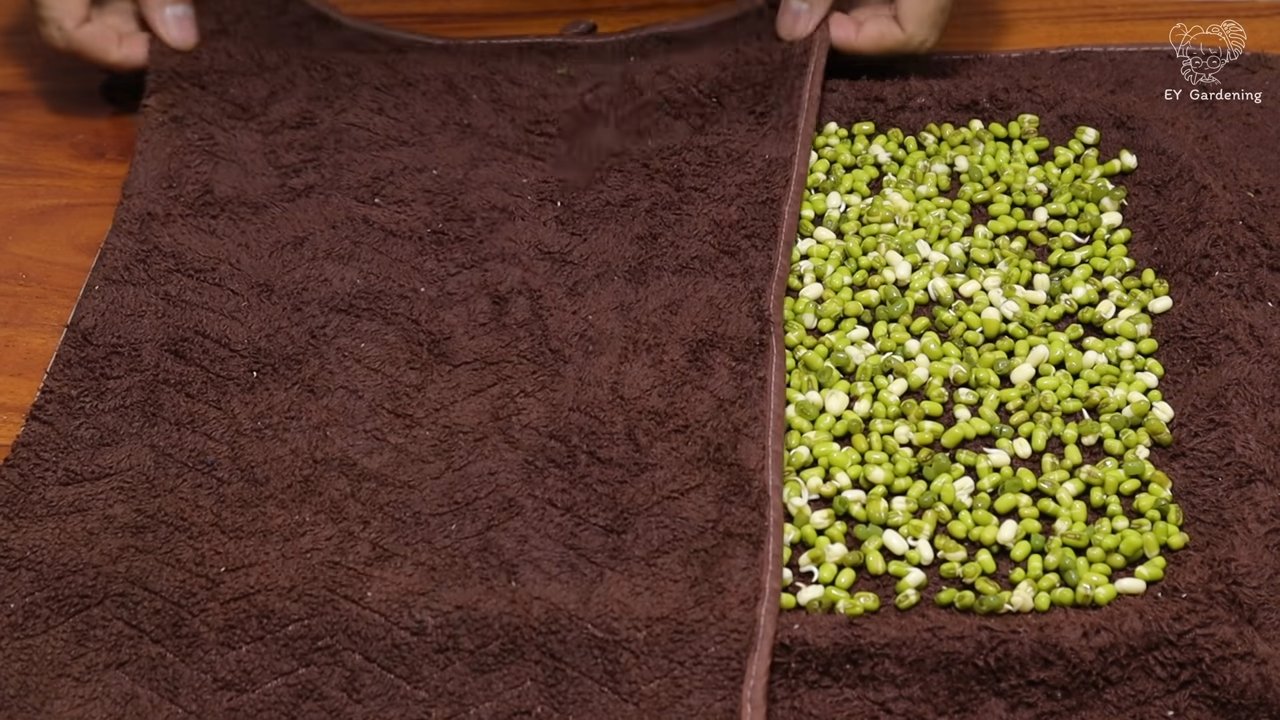
4. Prepare Your Towel Bed: Dampen one of your clean towels with cool water. Wring it out well so it’s damp but not dripping. Lay the damp towel flat in your container. This will be the cozy bed for your beans.
5. Spread the Beans Evenly: Gently spread the soaked and rinsed beans in a single layer on top of the damp towel. Try to distribute them evenly so they have enough space to sprout.
6. Cover with the Second Towel: Dampen the second clean towel with cool water, wring it out well, and gently lay it on top of the beans. This towel will help keep the beans moist and create a dark environment, which is essential for sprouting.
7. Find a Dark, Cool Home: Place your container with the towel-covered beans in a dark, cool place. A cupboard or pantry is ideal. You can also cover the container with a dark cloth or bowl if you don’t have a naturally dark spot.
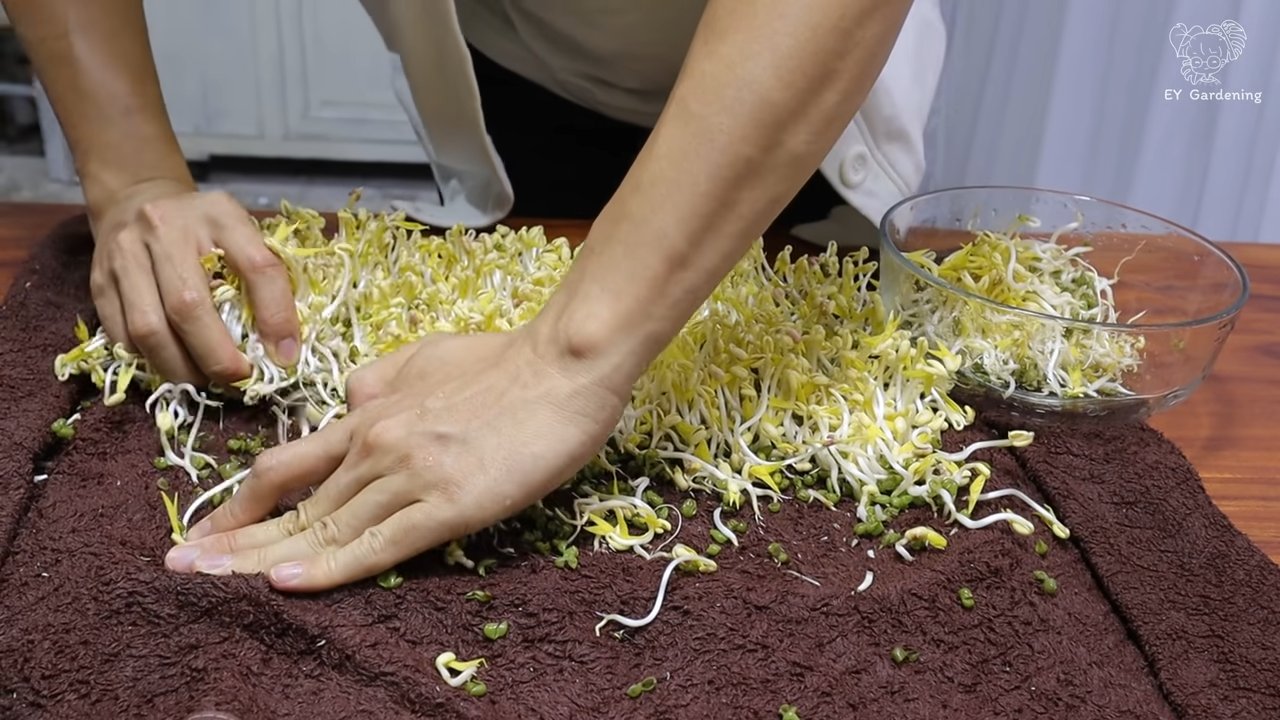
8. Rinse and Re-Dampen (Twice a Day!): This is the most important part! Twice a day (morning and evening), remove the top towel, rinse the beans thoroughly with cool water, and re-dampen both towels. Wring out any excess water before placing the towels back in the container. This keeps the beans hydrated and prevents them from drying out or getting moldy. I like to use a spray bottle to mist the towels in between rinses if they seem a little dry.
9. Observe the Magic: Over the next 3-5 days, you’ll start to see tiny sprouts emerging from the beans. Keep rinsing and re-dampening the towels twice a day. The sprouts will grow quickly, and you’ll be amazed at how much they expand!
10. Harvest Time! Once the sprouts are about 1-2 inches long (or to your desired length), they’re ready to harvest! Give them one final rinse and remove any remaining bean hulls (the outer shells). You can do this by gently agitating the sprouts in a bowl of water; the hulls will float to the surface.
11. Dry and Store: Spread the harvested sprouts on a clean towel to dry for a few minutes. This will help prevent them from getting soggy in storage. Store the sprouts in an airtight container in the refrigerator. They should last for about a week.
Troubleshooting: Common Sprout Problems and Solutions
Even with the simplest methods, sometimes things don’t go exactly as planned. Here are a few common issues you might encounter and how to fix them:
* Mold Growth: If you see any signs of mold (fuzzy white or gray patches), discard the entire batch of sprouts. Mold is usually caused by insufficient rinsing or poor ventilation. Make sure you’re rinsing the beans thoroughly twice a day and that the towels aren’t too wet.
* Slow Sprouting: If your beans aren’t sprouting as quickly as you expect, it could be due to several factors. Make sure the beans are fresh and intended for sprouting. The temperature might also be too cold. Try moving the container to a slightly warmer location (but not too warm!).
* Dry Sprouts: If the sprouts seem dry or shriveled, you’re probably not keeping the towels moist enough. Increase the frequency of rinsing or use a spray bottle to mist the towels in between rinses.
* Rotting Smell: A foul odor indicates that the sprouts are rotting. This is usually caused by overwatering or poor drainage. Make sure you’re wringing out the towels well after rinsing and that the container has adequate ventilation.
Beyond the Basics: Tips and Tricks for Sprout Success
Here are a few extra tips to help you become a sprout-growing pro:
* Experiment with Different Beans: Mung beans are a great starting point, but don’t be afraid to try other types of beans and lentils. Each variety has a unique flavor and texture.
* Control the Light: While sprouts need darkness to germinate, exposing them to a little bit of indirect light for the last day or two can help them develop chlorophyll and turn a slightly greenish color. This can enhance their flavor and nutritional value.
* Use Filtered Water: Filtered water is always a good choice for sprouting, as it’s free of chlorine and other chemicals that can inhibit growth.
* Keep Everything Clean: Cleanliness is key to preventing mold and bacteria growth. Make sure to wash your hands thoroughly before handling the beans and towels, and sterilize your jar or container before each batch.
* Enjoy Your Sprouts! Bean sprouts are incredibly versatile. Add them to salads, sandwiches, stir-fries, soups, or even eat them raw as a healthy snack.
Why Grow Your Own Bean Sprouts? The Benefits are Endless!
Growing your own bean sprouts is not only easy and fun, but it also offers a ton of benefits:
* Freshness: Homegrown sprouts are incredibly fresh and flavorful, much better than anything you can buy in the store.
* Cost Savings: Sprouting your own beans is much cheaper than buying pre-sprouted beans.
* Nutritional Value: Bean sprouts are packed with vitamins, minerals, and enzymes.
* Sustainability: Growing your own sprouts reduces your carbon footprint and supports a more sustainable lifestyle.
* It’s Fun! There’s something incredibly satisfying about watching tiny seeds transform into crunchy, delicious sprouts.
So, what are you waiting for? Grab your beans, your towels, and get sprouting! I promise you’ll be hooked. Happy sprouting!
Conclusion
So, there you have it! The DIY bean sprouts towel method – a simple, cost-effective, and incredibly rewarding way to cultivate fresh, crunchy bean sprouts right in your own kitchen. Forget those expensive, pre-packaged sprouts from the grocery store, often wilted and lacking in flavor. This method puts you in complete control, ensuring you have a constant supply of vibrant, nutritious sprouts whenever you need them.
Why is this a must-try? Because it’s more than just growing food; it’s about connecting with the process, understanding where your food comes from, and experiencing the satisfaction of nurturing something from seed to sprout. It’s a sustainable practice that reduces your reliance on store-bought produce and minimizes food waste. Plus, it’s a fantastic project for kids, teaching them about plant life cycles and healthy eating habits.
Beyond the basic method, there’s plenty of room for experimentation. Try different types of beans! Mung beans are the classic choice, but adzuki beans, lentils, or even chickpeas can be sprouted using the same technique. Each will offer a unique flavor and texture profile, adding variety to your meals. You can also adjust the sprouting time to achieve your preferred sprout length. Some prefer shorter, more delicate sprouts, while others like them longer and crunchier.
Consider the environment in which you are sprouting. While a dark cupboard is ideal, you can also use a covered container to block out light. Just be sure to provide adequate ventilation to prevent mold growth. The key is to maintain consistent moisture and darkness.
Don’t be afraid to get creative with how you use your homegrown bean sprouts. Add them to salads for a refreshing crunch, toss them into stir-fries for added texture and nutrients, or use them as a topping for sandwiches and wraps. They’re also a delicious addition to soups and noodle dishes. The possibilities are endless!
We wholeheartedly encourage you to give this DIY bean sprouts towel method a try. It’s a simple project with a big payoff. Once you taste the difference between fresh, homegrown sprouts and store-bought ones, you’ll never go back.
And most importantly, we want to hear about your experience! Share your photos, tips, and variations in the comments below. Let us know what types of beans you tried, what challenges you encountered, and what delicious dishes you created with your homegrown sprouts. Your feedback will help other readers succeed and inspire them to embark on their own sprouting adventures. Let’s build a community of sprout enthusiasts!
Ready to Grow?
So grab some beans, a towel, and a jar, and get ready to experience the joy of growing your own fresh, delicious bean sprouts. You won’t regret it!
Frequently Asked Questions (FAQ)
Q: What kind of beans can I use for sprouting with the towel method?
A: While mung beans are the most common and readily available choice for sprouting, you can experiment with a variety of other beans and legumes. Adzuki beans, lentils, chickpeas, and even some types of peas can be sprouted using the same towel method. Keep in mind that different beans may have slightly different sprouting times and flavor profiles. For example, lentils tend to sprout faster than mung beans, while chickpeas may take a bit longer. Always ensure you are using beans intended for sprouting or cooking, not ornamental beans, as some ornamental varieties can be toxic.
Q: How long does it take for bean sprouts to grow using this method?
A: The sprouting time can vary depending on the type of bean, the temperature, and the humidity. Generally, mung beans will sprout in 3-5 days. Lentils may sprout in as little as 2-3 days, while chickpeas may take 4-6 days. Keep a close eye on your sprouts and harvest them when they reach your desired length and crunchiness. Remember to rinse them thoroughly before consuming.
Q: How do I prevent mold from growing on my bean sprouts?
A: Mold growth is a common concern when sprouting beans. To prevent mold, ensure proper hygiene and ventilation. Always use clean equipment, including your jar, towel, and beans. Rinse the beans thoroughly at least twice a day with fresh, cool water. This helps to remove any bacteria or mold spores that may be present. Also, ensure that the jar or container you are using has adequate ventilation. You can achieve this by using a sprouting lid or covering the jar with cheesecloth secured with a rubber band. Avoid overcrowding the jar with too many beans, as this can restrict airflow and increase the risk of mold growth. If you notice any signs of mold, discard the entire batch of sprouts immediately.
Q: What if my bean sprouts don’t seem to be growing?
A: If your bean sprouts aren’t growing, there could be several reasons. First, ensure that the beans are consistently moist but not waterlogged. The towel should be damp, not soaking wet. Second, check the temperature. Bean sprouts prefer a warm environment, ideally between 70-80°F (21-27°C). If the temperature is too cold, the sprouting process may be slowed down. Third, make sure the beans are kept in a dark place. Light can inhibit sprouting. Finally, ensure that the beans are viable. Old or damaged beans may not sprout properly. Try using a fresh batch of beans from a reputable source.
Q: How do I store bean sprouts after they have sprouted?
A: Once your bean sprouts have reached your desired length, rinse them thoroughly and drain them well. Pat them dry with a clean paper towel to remove excess moisture. Store the sprouts in a clean, airtight container in the refrigerator. They should last for up to a week if stored properly. Check them regularly for any signs of spoilage and discard them if they become slimy or develop an off odor.
Q: Can I eat the bean sprout roots?
A: Yes, the roots of bean sprouts are perfectly edible and contain nutrients. Some people prefer to trim the roots before eating, but this is purely a matter of personal preference. The roots are generally safe to consume as long as the sprouts have been grown in a clean and hygienic environment.
Q: Are there any health benefits to eating bean sprouts?
A: Absolutely! Bean sprouts are a nutritional powerhouse. They are low in calories and fat but rich in vitamins, minerals, and antioxidants. They are a good source of vitamin C, vitamin K, folate, and fiber. Eating bean sprouts can help boost your immune system, improve digestion, and protect against chronic diseases. However, it’s important to note that raw bean sprouts have been linked to foodborne illnesses in the past, so it’s crucial to sprout them in a clean environment and rinse them thoroughly before consuming. Cooking bean sprouts can further reduce the risk of foodborne illness.
Q: Can I use tap water to sprout my beans?
A: While tap water is generally safe to use, it’s best to use filtered or purified water for sprouting. Tap water may contain chlorine or other chemicals that can inhibit sprouting or affect the flavor of the sprouts. Filtered or purified water will provide a cleaner and more consistent environment for the beans to sprout.
Q: What do I do with the used sprouting towel?
A: After each batch of sprouts, thoroughly wash the sprouting towel with hot, soapy water. You can also add a small amount of bleach to the wash to kill any bacteria or mold spores. Rinse the towel well and allow it to air dry completely before using it again. If the towel becomes stained or damaged, it’s best to replace it with a new one. Using a clean towel is essential for preventing mold growth and ensuring the safety of your sprouts.

Leave a Comment