
DIY Countertop Cleaner Dish Soap: Are you tired of spending a fortune on store-bought cleaners that promise the world but often leave streaks and a lingering chemical smell? I know I was! That’s why I embarked on a mission to create my own effective and affordable solution. For generations, resourceful homemakers have relied on simple, natural ingredients to keep their homes sparkling. Think about it – our grandmothers didn’t have a plethora of fancy cleaning products, yet their homes were often impeccably clean. They understood the power of basic ingredients like vinegar, baking soda, and, yes, even dish soap!
This DIY countertop cleaner dish soap recipe isn’t just about saving money; it’s about taking control of what you’re bringing into your home. Many commercial cleaners contain harsh chemicals that can be harmful to your family and the environment. By making your own, you can choose gentle, non-toxic ingredients that are safe for everyone. Plus, it’s incredibly satisfying to create something yourself that’s both effective and eco-friendly.
In this article, I’m going to share my go-to recipe for a fantastic DIY Countertop Cleaner Dish Soap that will leave your surfaces sparkling clean and smelling fresh. I’ll walk you through each step, explain why each ingredient is important, and even offer some variations to customize the cleaner to your specific needs. Get ready to ditch those expensive store-bought cleaners and embrace the power of DIY!

Growing Bell Peppers on Your Balcony: A DIY Guide
Hey there, fellow balcony gardeners! I’m so excited to share my experience and guide you through growing your very own bell peppers right on your balcony. It’s surprisingly easy and incredibly rewarding to harvest fresh, colorful peppers just steps from your kitchen. Let’s get started!
Choosing the Right Bell Pepper Variety
Before we dive into the nitty-gritty, it’s crucial to select bell pepper varieties that thrive in containers. Not all peppers are created equal; some grow too large for balcony life. Here are a few of my favorites:
* ‘Patio Bell Pepper’: As the name suggests, this variety is specifically bred for container gardening. It’s compact and produces a good yield of medium-sized peppers.
* ‘Mini Bell’: These adorable little peppers are perfect for snacking and salads. They’re also very productive in small spaces.
* ‘Lunchbox Peppers’: Similar to mini bells, these come in a variety of colors and are great for adding a pop of color to your balcony garden.
* ‘Golden Bell’: If you’re looking for something a little different, golden bell peppers are a beautiful and flavorful option.
Gathering Your Supplies
Okay, time to gather our supplies! Here’s what you’ll need to get started:
* Bell Pepper Seeds or Seedlings: You can start from seeds indoors or purchase seedlings from a local nursery. I personally prefer seedlings to save time, but starting from seed is definitely more budget-friendly.
* Large Containers: Choose containers that are at least 12 inches in diameter and depth. Bell peppers need plenty of room for their roots to grow. Fabric pots are a great option because they allow for good drainage and aeration.
* High-Quality Potting Mix: Don’t skimp on the potting mix! Use a well-draining mix specifically formulated for containers. Avoid using garden soil, as it can become compacted and doesn’t drain well.
* Slow-Release Fertilizer: Bell peppers are heavy feeders, so a slow-release fertilizer will provide them with the nutrients they need throughout the growing season.
* Watering Can or Hose: Essential for keeping your peppers hydrated.
* Plant Markers: To keep track of which variety you planted where.
* Gardening Gloves: To protect your hands.
* Optional:
* Tomato Cage or Stakes: To support the plants as they grow. Some bell pepper varieties can get quite tall and may need some extra support.
* Mulch: To help retain moisture and suppress weeds.
Planting Your Bell Peppers
Now for the fun part – planting! Whether you’re starting from seeds or seedlings, the process is pretty straightforward.
Starting from Seeds (Optional)
If you’re starting from seeds, you’ll need to start them indoors about 6-8 weeks before the last expected frost.
1. Sow the Seeds: Fill small pots or seed trays with seed-starting mix. Sow the seeds about ¼ inch deep and gently water them.
2. Provide Warmth and Light: Keep the soil consistently moist and provide warmth (around 70-75°F). A heat mat can be helpful. Place the seedlings under grow lights or in a sunny window.
3. Thin the Seedlings: Once the seedlings have their first true leaves (the second set of leaves), thin them out, leaving only the strongest seedling in each pot.
4. Harden Off the Seedlings: Before transplanting the seedlings outdoors, you’ll need to harden them off. This means gradually exposing them to outdoor conditions over a period of 1-2 weeks. Start by placing them outside for an hour or two each day, gradually increasing the amount of time they spend outdoors.
Transplanting Seedlings
If you purchased seedlings from a nursery, you can skip the seed-starting process and go straight to transplanting.
1. Prepare the Containers: Fill your containers with high-quality potting mix, leaving a few inches of space at the top.
2. Remove the Seedlings from Their Pots: Gently remove the seedlings from their pots, being careful not to damage the roots. If the roots are tightly bound, gently loosen them with your fingers.
3. Plant the Seedlings: Dig a hole in the potting mix that is large enough to accommodate the root ball. Place the seedling in the hole and backfill with potting mix. Gently firm the soil around the base of the plant.
4. Water Thoroughly: Water the seedlings thoroughly after planting.
5. Add Slow-Release Fertilizer: Sprinkle a slow-release fertilizer around the base of the plants, following the instructions on the package.
6. Add Mulch (Optional): Add a layer of mulch around the base of the plants to help retain moisture and suppress weeds.
Caring for Your Bell Peppers
Once your bell peppers are planted, it’s important to provide them with the care they need to thrive.
1. Watering: Bell peppers need consistent moisture, especially during hot weather. Water deeply whenever the top inch of soil feels dry to the touch. Avoid overwatering, as this can lead to root rot.
2. Fertilizing: In addition to the slow-release fertilizer you added at planting time, you can also supplement with a liquid fertilizer every 2-3 weeks. Choose a fertilizer that is high in phosphorus and potassium, which are essential for fruit production.
3. Sunlight: Bell peppers need at least 6-8 hours of sunlight per day. Place your containers in a sunny spot on your balcony.
4. Support: As your bell pepper plants grow, they may need some support to prevent them from falling over. You can use tomato cages or stakes to provide support.
5. Pruning: Pruning is not essential, but it can help to improve air circulation and encourage fruit production. Remove any suckers (small shoots that grow from the base of the plant) and any yellowing or diseased leaves.
6. Pest Control: Keep an eye out for pests such as aphids, whiteflies, and spider mites. If you notice any pests, you can try spraying them with insecticidal soap or neem oil.
7. Pollination: Bell peppers are self-pollinating, but you can help them along by gently shaking the plants or using a small paintbrush to transfer pollen from one flower to another. This is especially important if you’re growing your peppers indoors or in a sheltered location.
Harvesting Your Bell Peppers
The moment we’ve all been waiting for – harvesting! Bell peppers are typically ready to harvest about 60-80 days after transplanting, depending on the variety.
1. Check for Ripeness: The peppers should be firm, glossy, and fully colored. The color will depend on the variety you’re growing (green, red, yellow, orange, etc.).
2. Harvest Carefully: Use a sharp knife or pruning shears to cut the peppers from the plant, leaving a small stem attached.
3. Enjoy Your Harvest: Enjoy your fresh, homegrown bell peppers in salads, stir-fries, or any other dish you like!
Troubleshooting
Even with the best care, you may encounter some problems while growing bell peppers. Here are a few common issues and how to address them:
* Blossom End Rot: This is a common problem that causes the bottom of the peppers to rot. It’s usually caused by a calcium deficiency. To prevent blossom end rot, make sure your soil is well-draining and that you’re watering consistently. You can also add calcium to the soil by using bone meal or calcium nitrate.
* Sunscald: This occurs when the peppers are exposed to too much direct sunlight, causing them to develop white or yellow patches. To prevent sunscald, provide some shade for your plants during the hottest part of the day.
* Pest Infestations: As mentioned earlier, bell peppers can be susceptible to pests such as aphids, whiteflies, and spider mites. Keep an eye out for these pests and take action as soon as you notice them.
* Lack of Fruit Production: If your bell pepper plants are not producing fruit, it could be due to a number of factors, such as lack of sunlight, poor pollination, or nutrient deficiencies. Make sure your plants are getting enough sunlight, water, and fertilizer. You can also try hand-pollinating the flowers.
Tips for Success
Here are a few extra tips to help you succeed in growing bell peppers on your balcony:
* Choose the Right Location: Make sure your balcony gets at least 6-8 hours of sunlight per day.
* Use High-Quality Potting Mix: Don’t skimp on the potting mix! Use a well-draining mix specifically formulated for containers.
* Water Consistently: Bell peppers need consistent moisture, especially during hot weather.
* Fertilize Regularly: Bell peppers are heavy feeders
Conclusion
So, there you have it! Ditching the store-bought chemical cocktails and embracing this simple, effective, and surprisingly versatile DIY countertop cleaner using dish soap is a game-changer for your home. We’ve walked you through the easy steps, highlighted the benefits, and hopefully, convinced you that a cleaner, healthier home is just a few ingredients away.
Why is this a must-try? Because it’s more than just a cleaner; it’s a conscious choice. You’re reducing your exposure to harsh chemicals, saving money, and minimizing your environmental impact, all while achieving sparkling clean countertops. Think about it: no more deciphering confusing ingredient lists or worrying about what you’re spraying around your family and pets. This DIY solution offers peace of mind, knowing exactly what’s going onto the surfaces where you prepare food and gather with loved ones.
But the beauty of this DIY approach lies in its adaptability. Feel free to experiment with different essential oils to create a scent that truly resonates with you. A few drops of lemon essential oil can boost the cleaning power and leave a refreshing citrus aroma. Lavender offers a calming and soothing fragrance, while tea tree oil provides added antibacterial benefits. Just be sure to research the safety of any essential oils you choose, especially if you have pets or small children.
Beyond scent, you can also adjust the concentration of dish soap depending on the type of countertop you have and the level of cleaning power you need. For delicate surfaces like marble or granite, use a more diluted solution to avoid any potential damage. For tougher messes, a slightly higher concentration of dish soap might be necessary. Always test the cleaner in an inconspicuous area first to ensure it doesn’t cause any discoloration or damage.
This DIY countertop cleaner with dish soap isn’t just a trend; it’s a sustainable and effective way to maintain a clean and healthy home. It’s about taking control of the products you use and making informed choices that benefit both your well-being and the environment.
We genuinely believe that once you try this simple recipe, you’ll be hooked. The satisfaction of creating your own cleaning solution, knowing exactly what’s in it, and seeing the sparkling results is truly rewarding.
So, what are you waiting for? Gather your ingredients, mix up a batch, and experience the difference for yourself. We’re confident that you’ll love the results.
And most importantly, we want to hear about your experience! Share your tips, variations, and before-and-after photos in the comments below. Let’s build a community of DIY enthusiasts who are passionate about creating a cleaner, healthier, and more sustainable world, one countertop at a time. Your insights and experiences can inspire others to make the switch and discover the benefits of this simple yet powerful DIY solution. Let us know what essential oil combinations you tried, what types of countertops you used it on, and any other helpful tips you discovered along the way. Together, we can make this DIY countertop cleaner even better!
FAQ
What kind of dish soap should I use?
The best dish soap for your DIY countertop cleaner is a gentle, pH-neutral formula. Avoid dish soaps that contain harsh chemicals, dyes, or strong fragrances, as these can potentially damage your countertops or leave behind a residue. Look for dish soaps labeled as “natural,” “eco-friendly,” or “hypoallergenic.” These options are typically milder and less likely to cause any adverse reactions. Unscented dish soap is also a good choice if you’re sensitive to fragrances or want to customize the scent with essential oils.
Can I use this cleaner on all types of countertops?
While this DIY countertop cleaner is generally safe for most surfaces, it’s essential to exercise caution and test it in an inconspicuous area first, especially on delicate materials like marble, granite, or natural stone. These surfaces can be porous and susceptible to damage from acidic or alkaline cleaners. For these types of countertops, use a more diluted solution of dish soap and water, and avoid using abrasive scrub brushes or sponges. Always wipe the surface dry after cleaning to prevent water spots or mineral buildup. If you’re unsure about the suitability of this cleaner for your specific countertop material, consult the manufacturer’s recommendations or a professional cleaning service.
How often should I use this DIY countertop cleaner?
The frequency of cleaning depends on how often you use your countertops and how prone they are to getting dirty. For daily maintenance, a quick wipe-down with this cleaner is usually sufficient to remove spills, crumbs, and other messes. For deeper cleaning, you can use it once or twice a week, or as needed. If you notice any buildup or stains, you may need to increase the concentration of dish soap or use a slightly more abrasive cleaning tool.
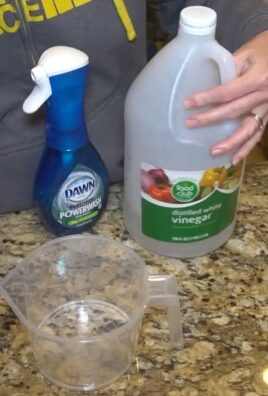
Can I add vinegar to this DIY countertop cleaner?
While vinegar is a popular natural cleaning agent, it’s not recommended to add it to this DIY countertop cleaner, especially if you have marble or granite countertops. Vinegar is acidic and can etch or dull these surfaces over time. If you want to use vinegar as a cleaner, it’s best to use it separately and dilute it with water. However, for most countertops, the dish soap and water solution is sufficient for effective cleaning.
How should I store the DIY countertop cleaner?
Store your DIY countertop cleaner in a clean, airtight spray bottle. Label the bottle clearly with the contents and date of preparation. Keep the cleaner in a cool, dark place away from direct sunlight and heat. This will help to preserve the effectiveness of the ingredients and prevent any degradation. The cleaner should last for several weeks, but it’s best to make a fresh batch every month or so to ensure optimal cleaning performance.
Is this DIY countertop cleaner safe for pets and children?
This DIY countertop cleaner is generally safer than commercial cleaners, as it doesn’t contain harsh chemicals or toxic ingredients. However, it’s still important to exercise caution and keep the cleaner out of reach of pets and children. Dish soap can be irritating if ingested, so avoid spraying it directly onto surfaces where pets or children eat or play. If you’re using essential oils, be sure to research their safety for pets and children, as some essential oils can be toxic to animals. Always supervise children when they’re helping with cleaning and teach them about the importance of using cleaning products safely.
What if I don’t have essential oils? Can I still make the cleaner?
Absolutely! Essential oils are optional and primarily used for fragrance and added antibacterial benefits. You can still make a perfectly effective DIY countertop cleaner with just dish soap and water. The dish soap provides the cleaning power, and the water helps to dilute it and make it easier to spray and wipe. If you prefer a scented cleaner, you can add a few drops of lemon juice or orange peel to the mixture for a natural citrus fragrance.
My countertops are streaky after using the cleaner. What am I doing wrong?
Streaky countertops can be caused by several factors, including using too much dish soap, not rinsing the surface thoroughly, or using a dirty cleaning cloth. To prevent streaks, use a small amount of dish soap and dilute it well with water. After cleaning, rinse the surface with clean water and wipe it dry with a clean, microfiber cloth. Avoid using paper towels, as they can leave behind lint and streaks. If you’re still experiencing streaks, try using a slightly less concentrated solution of dish soap or adding a small amount of white vinegar to the rinse water.
Leave a Comment