
Fast Growing Figs – who doesn’t dream of plucking sweet, juicy figs straight from their own garden? I know I do! For centuries, figs have been cherished, not just for their delicious taste, but also for their rich history and cultural significance. From ancient Greece, where they were considered a sacred fruit, to the Mediterranean, where they’re a staple in countless dishes, figs have always held a special place in our hearts (and stomachs!).
But let’s be honest, waiting for a fig tree to mature and produce can feel like an eternity. That’s where these DIY tricks and hacks come in! I’m going to share some simple, yet effective methods to help you achieve fast growing figs, even if you’re a beginner gardener. Imagine enjoying your own homegrown figs sooner than you ever thought possible.
This article is packed with practical tips to accelerate growth, from selecting the right variety and optimizing soil conditions to mastering pruning techniques and providing the perfect amount of sunlight and water. Why spend years waiting when you can enjoy the fruits (literally!) of your labor much sooner? Let’s dive in and unlock the secrets to cultivating a thriving fig tree that will reward you with an abundance of delicious figs in no time!
DIY: Supercharge Your Fig Tree Growth!
Hey fellow fig fanatics! Are you tired of waiting ages for your fig tree to produce those delicious, juicy fruits? I totally get it! I was in the same boat. That’s why I’ve spent the last few years experimenting with different techniques to accelerate fig tree growth, and I’m excited to share my secrets with you. This guide will walk you through everything you need to know to get your fig tree thriving and fruiting faster than you ever thought possible.
Understanding Fig Tree Growth
Before we dive into the DIY hacks, let’s quickly cover some basics. Fig trees, scientifically known as *Ficus carica*, are relatively fast-growing compared to some other fruit trees, but they still need the right conditions to flourish. Factors like sunlight, soil quality, watering, and fertilization play crucial roles. We’ll be optimizing all of these to give your fig tree the ultimate growth boost.
The Ultimate Fig Growth Hack: A Multi-Pronged Approach
This isn’t just one trick; it’s a combination of techniques that work synergistically to promote rapid growth and fruit production. Think of it as a holistic approach to fig tree happiness!
* Optimized Soil: Fig trees love well-draining soil that’s rich in organic matter. We’ll be amending the soil to create the perfect growing medium.
* Strategic Fertilization: Feeding your fig tree the right nutrients at the right time is essential for vigorous growth and fruit development.
* Proper Watering: Consistent and appropriate watering is key, especially during the growing season.
* Sunlight Maximization: Fig trees need plenty of sunlight to thrive. We’ll discuss how to ensure your tree gets enough.
* Pruning for Productivity: Pruning might seem counterintuitive, but it’s crucial for shaping the tree and encouraging fruit production.
* Root Stimulation: Encouraging a strong root system is vital for overall tree health and growth.
* Protection from Pests and Diseases: Keeping your fig tree healthy and free from pests and diseases will prevent setbacks in growth.
Phase 1: Soil Preparation and Planting (or Re-Potting)
The foundation of a happy fig tree is happy soil! Whether you’re planting a new tree or re-potting an existing one, this step is crucial.
1. Choose the Right Location (or Pot): Fig trees need at least 6-8 hours of direct sunlight per day. If you’re planting in the ground, select a sunny spot with well-draining soil. If you’re using a pot, make sure it’s large enough to accommodate the tree’s root system (at least 15-20 gallons for a young tree) and has drainage holes. I prefer terracotta pots because they allow the soil to breathe.
2. Prepare the Soil Mix: This is where the magic happens! I use a mix of:
* 1/3 high-quality potting soil (I like a mix specifically formulated for fruit trees)
* 1/3 compost (this adds essential nutrients and improves drainage)
* 1/3 perlite or vermiculite (this improves drainage and aeration)
Mix these ingredients thoroughly in a large container or wheelbarrow.
3. Planting (or Re-Potting) the Tree:
* For planting in the ground: Dig a hole that’s twice as wide and as deep as the root ball. Gently loosen the roots of the fig tree before placing it in the hole. Backfill with the prepared soil mix, making sure the top of the root ball is level with the ground. Water thoroughly.
* For re-potting: Gently remove the fig tree from its old pot. Loosen any circling roots. Place a layer of the prepared soil mix in the bottom of the new pot. Position the fig tree in the center of the pot and backfill with the soil mix. Water thoroughly.
4. Mulch Around the Base: Apply a layer of organic mulch (like wood chips or straw) around the base of the tree, keeping it a few inches away from the trunk. This helps retain moisture, suppress weeds, and regulate soil temperature.
Phase 2: Fertilization for Explosive Growth
Feeding your fig tree the right nutrients is like giving it a super-powered energy drink!
1. Choose the Right Fertilizer: I recommend using a balanced fertilizer with an NPK ratio of 10-10-10 or 20-20-20 during the growing season (spring and summer). You can also use a fertilizer specifically formulated for fruit trees. Avoid fertilizers that are too high in nitrogen, as this can promote excessive leaf growth at the expense of fruit production.
2. Fertilize Regularly:
* Spring: Apply fertilizer at the beginning of spring, as new growth emerges. Follow the instructions on the fertilizer package for the correct amount.
* Summer: Apply fertilizer again in mid-summer to support fruit development. Again, follow the package instructions.
* Fall: Avoid fertilizing in the fall, as this can encourage new growth that will be susceptible to frost damage.
3. Supplement with Organic Amendments: In addition to chemical fertilizers, I also like to supplement with organic amendments like compost tea or fish emulsion. These provide a slow-release source of nutrients and beneficial microbes that improve soil health. Apply these every few weeks during the growing season.
4. Foliar Feeding (Optional): For an extra boost, you can try foliar feeding. This involves spraying a diluted fertilizer solution directly onto the leaves of the tree. This allows the tree to absorb nutrients quickly. Use a fertilizer specifically designed for foliar feeding and follow the instructions carefully.
Phase 3: Watering Wisely
Water is essential for fig tree growth, but overwatering can be just as harmful as underwatering.
1. Water Deeply and Infrequently: Water your fig tree deeply whenever the top inch of soil feels dry to the touch. This encourages the roots to grow deeper, making the tree more drought-tolerant.
2. Water Early in the Morning: Watering early in the morning allows the leaves to dry before nightfall, reducing the risk of fungal diseases.
3. Use a Soaker Hose or Drip Irrigation: These methods deliver water directly to the roots, minimizing water loss through evaporation and reducing the risk of foliar diseases.
4. Adjust Watering Based on Weather: During hot, dry weather, you’ll need to water more frequently. During rainy periods, you may not need to water at all.
5. Monitor for Signs of Overwatering or Underwatering:
* Overwatering: Yellowing leaves, leaf drop, root rot.
* Underwatering: Wilting leaves, dry soil, stunted growth.
Phase 4: Pruning for Productivity
Pruning might seem scary, but it’s essential for shaping your fig tree and encouraging fruit production.
1. Prune in Late Winter or Early Spring: The best time to prune fig trees is in late winter or early spring, before new growth emerges.
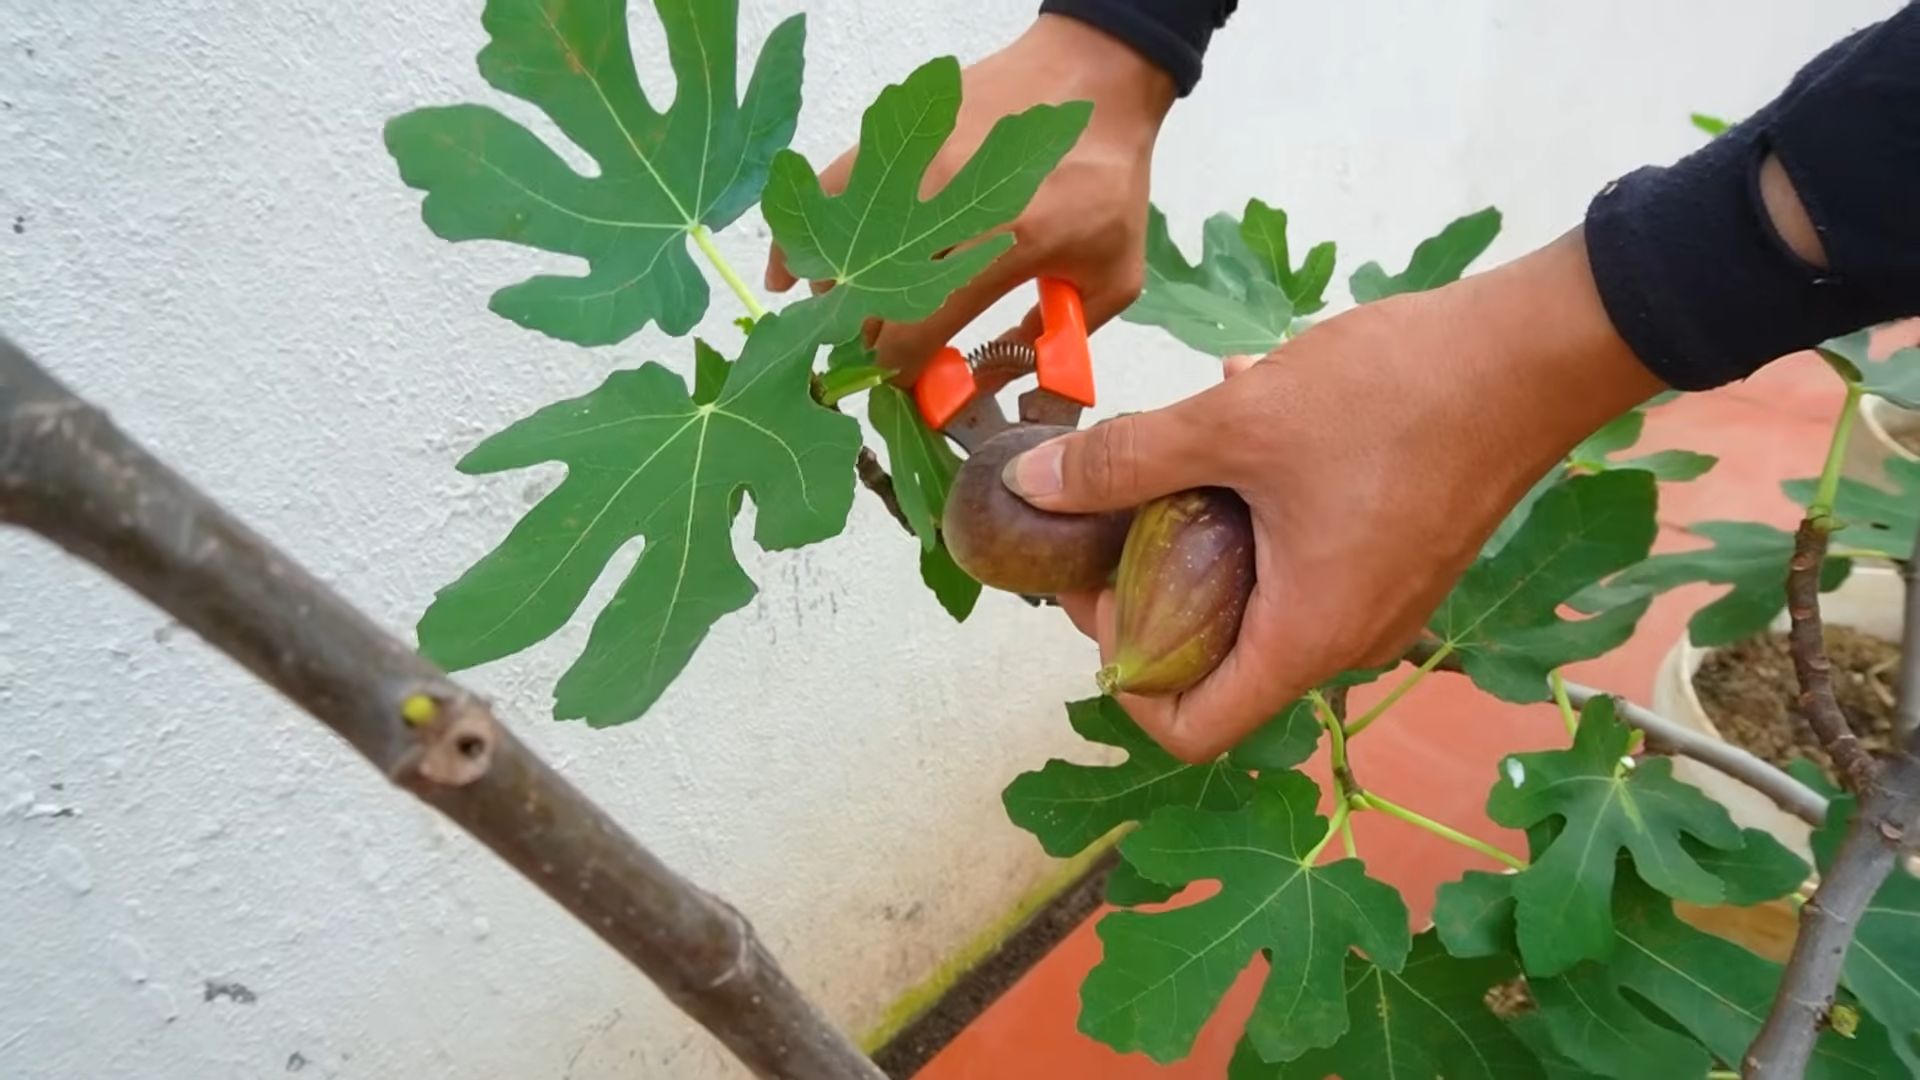
2. Remove Dead, Damaged, or Diseased Branches: This is the first step in any pruning session. Use sharp, clean pruning shears to make clean cuts.
3. Thin Out Crowded Branches: Remove branches that are crossing or rubbing against each other. This improves air circulation and sunlight penetration, reducing the risk of diseases.
4. Shape the Tree: Fig trees can be pruned into a variety of shapes, depending on your preference. You can prune them into a vase shape, a central leader shape, or a bush shape.
5. Encourage Fruit Production: Fig trees produce fruit on new growth. To encourage fruit production, prune back the previous year’s growth by about one-third. This will stimulate new growth and more fruit.
6. Consider the Fig Variety: Some fig varieties produce fruit on both old and new wood, while others only produce fruit on new wood. Adjust your pruning accordingly. Research your specific fig variety to determine the best pruning techniques.
Phase 5: Root Stimulation Techniques
A strong root system is the foundation of a healthy and productive fig tree. Here are some techniques to encourage root growth:
1. Mycorrhizal Inoculation: Mycorrhizae are beneficial fungi that form a symbiotic relationship with plant roots. They help the roots absorb nutrients and water more efficiently. You can purchase mycorrhizal inoculants at most garden centers and apply them to the soil when planting or re-potting your fig tree.
2. Root Pruning (for Potted Trees): Every few years, you may need to root prune your fig tree to prevent it from becoming root-bound. This involves removing the tree from its pot, cutting back the roots by about one-third, and re-potting it in fresh soil.
3. Air Layering (for Propagation): Air layering is a technique for propagating new fig trees from existing branches. It involves wounding a branch, wrapping it in moist sphagnum moss, and covering it with plastic wrap. Roots will eventually form
Conclusion
So, there you have it! This simple yet effective DIY trick for fast growing figs is a game-changer for any fig enthusiast, regardless of your gardening experience. We’ve walked you through the process, highlighting how this method can significantly accelerate growth and boost fruit production. Forget waiting years for your fig tree to mature; with this technique, you could be enjoying delicious, homegrown figs much sooner than you ever thought possible.
The beauty of this DIY approach lies not only in its effectiveness but also in its adaptability. Feel free to experiment with different types of rooting hormones to see which works best for your specific fig variety. Consider using different potting mixes to optimize drainage and nutrient availability. Perhaps you’ll discover that adding a small amount of slow-release fertilizer to the potting mix further enhances growth. The possibilities are endless!
Remember, gardening is all about experimentation and learning. Don’t be afraid to tweak the process to suit your local climate and the specific needs of your fig tree. You might even find that combining this method with other proven techniques, such as proper pruning and fertilization, yields even more impressive results.
We are confident that this DIY trick will revolutionize your fig-growing experience. Imagine the satisfaction of harvesting your own plump, juicy figs, knowing that you played a direct role in their abundance. Think of the delicious jams, preserves, and desserts you can create with your homegrown bounty.
But don’t just take our word for it. We wholeheartedly encourage you to try this DIY trick for yourself. Start small, perhaps with a few cuttings, and observe the results firsthand. Document your progress, take pictures, and share your experiences with us and the wider gardening community. We are eager to hear your success stories, learn from your challenges, and collectively refine this technique for even better results.
Join the growing number of gardeners who are discovering the joy of fast growing figs through this simple, yet powerful, DIY method. Unlock the full potential of your fig tree and enjoy the fruits of your labor sooner than you ever imagined. So, grab your pruning shears, gather your supplies, and get ready to embark on a rewarding fig-growing adventure! We can’t wait to hear about your success!
Frequently Asked Questions (FAQs)
Q: What exactly makes this DIY trick promote fast growing figs?
A: This DIY trick focuses on creating an optimal environment for root development in fig cuttings. By using rooting hormone, we stimulate the production of roots at the cut end of the branch. The humidity dome helps maintain consistent moisture levels, preventing the cutting from drying out before roots can form. A well-draining potting mix ensures that the roots receive adequate oxygen, which is crucial for healthy growth. All these factors combined accelerate the rooting process, leading to faster overall growth of the fig plant.
Q: What type of fig varieties respond best to this fast-growing method?
A: While this method generally works well for most common fig varieties, some varieties are known to root more easily than others. Brown Turkey, Celeste, and Chicago Hardy figs are often cited as being particularly responsive to rooting techniques. However, don’t let this discourage you from trying it with other varieties. Experimentation is key! Even if a particular variety is known to be more challenging, this DIY trick can still significantly improve your chances of success.
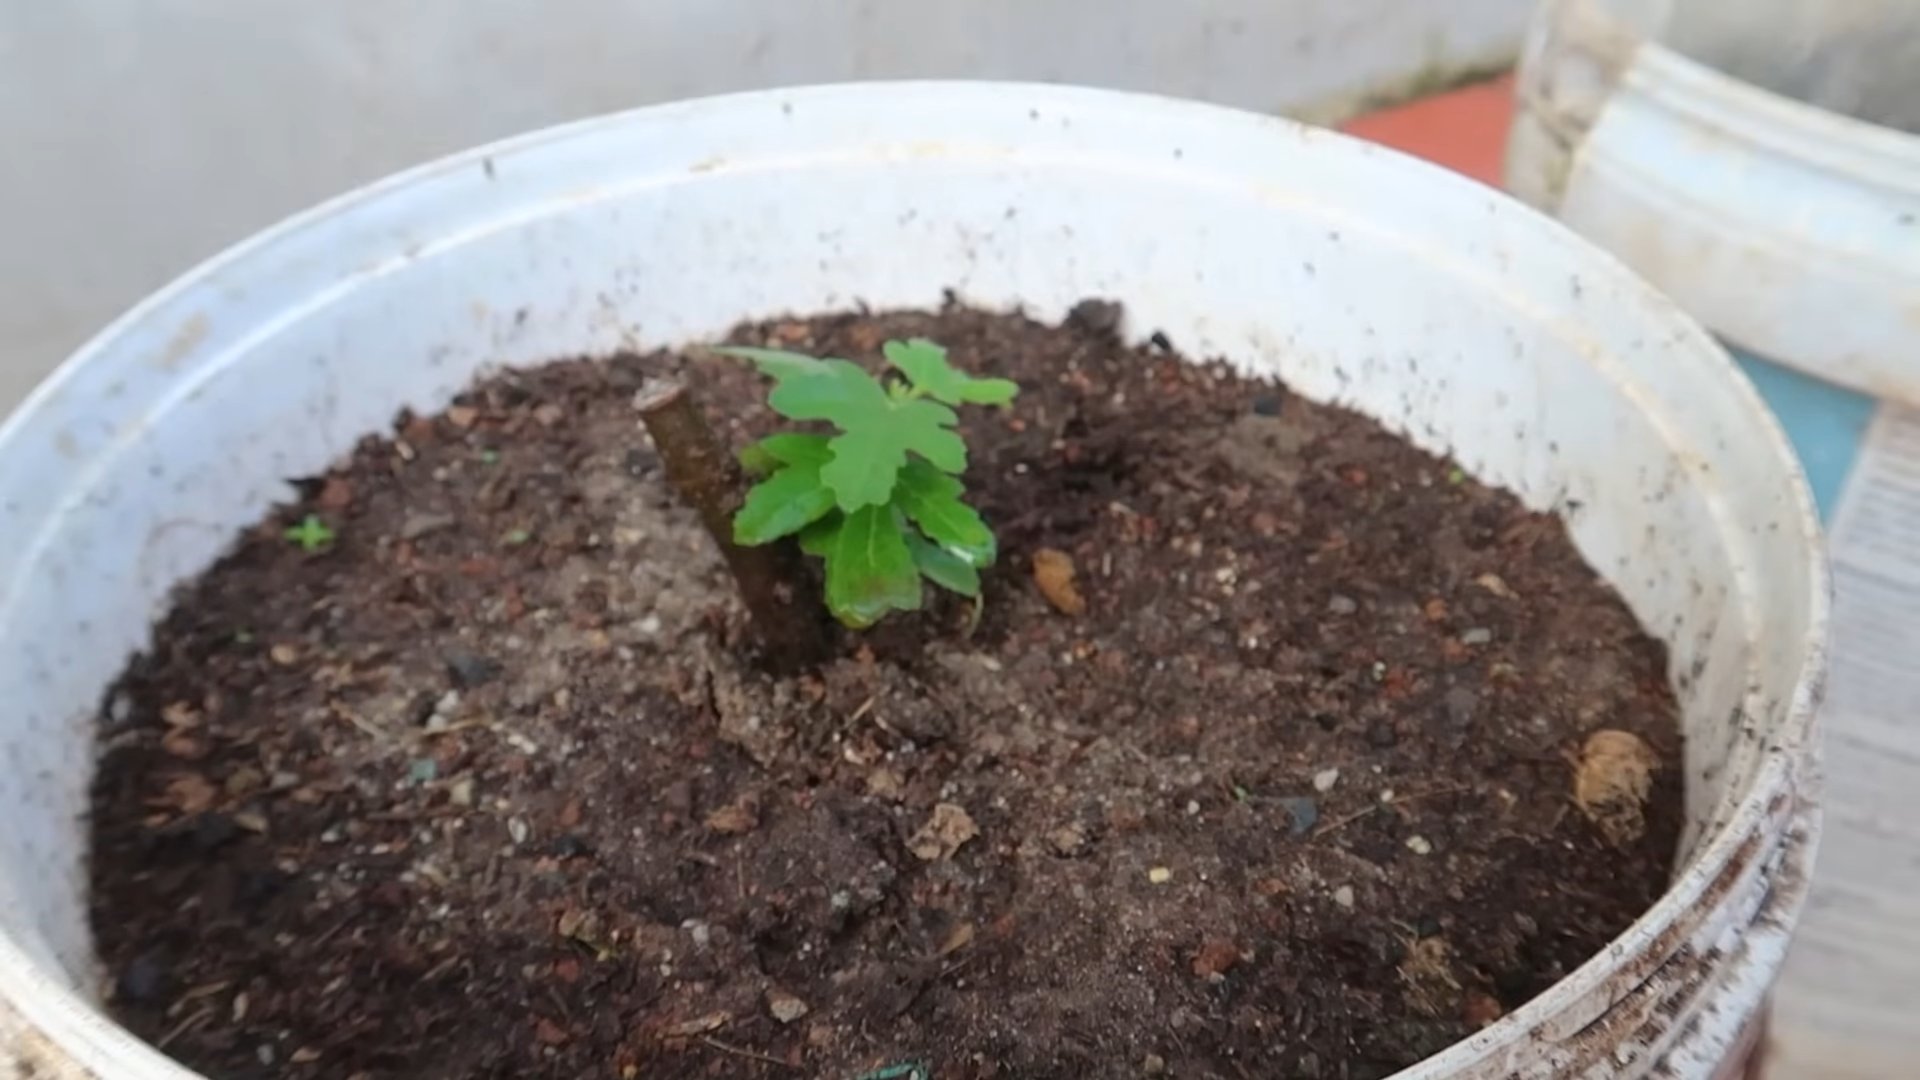
Q: How long does it typically take to see roots develop using this method?
A: The time it takes for roots to develop can vary depending on several factors, including the fig variety, the temperature, and the humidity levels. Generally, you can expect to see roots emerging within 2-4 weeks. It’s important to be patient and avoid disturbing the cuttings too frequently. Gently check for root development by carefully lifting the cutting from the potting mix. If you encounter resistance, it’s a good sign that roots have formed.
Q: Can I use this method to propagate fig trees indoors during the winter?
A: Absolutely! In fact, this DIY trick is particularly well-suited for indoor propagation during the winter months. The controlled environment of an indoor space allows you to maintain consistent temperature and humidity levels, which are crucial for successful rooting. You may need to supplement with artificial lighting if your indoor space doesn’t receive enough natural sunlight. A simple grow light can make a significant difference in the success rate of your cuttings.
Q: What kind of rooting hormone should I use? Are there different strengths?
A: There are several types of rooting hormones available, both in powder and liquid form. Powdered rooting hormones are generally easier to use and are a good choice for beginners. Look for a rooting hormone that contains indole-3-butyric acid (IBA) or naphthaleneacetic acid (NAA) as the active ingredient. These are the most common and effective rooting hormones for fig cuttings. Rooting hormones come in different strengths, typically indicated by a percentage on the label. A lower strength (e.g., 0.1%) is generally sufficient for softwood cuttings, while a higher strength (e.g., 0.8%) may be needed for hardwood cuttings.
Q: What type of potting mix is best for rooting fig cuttings?
A: A well-draining potting mix is essential for successful rooting. Avoid using garden soil, as it can be too heavy and may contain pathogens that can harm the cuttings. A good option is a mix of equal parts peat moss, perlite, and vermiculite. This combination provides good drainage, aeration, and moisture retention. You can also purchase commercially available seed starting mixes, which are specifically formulated for rooting cuttings.
Q: How often should I water the cuttings while they are rooting?
A: The key is to keep the potting mix consistently moist but not waterlogged. Overwatering can lead to root rot, which can kill the cuttings. Check the moisture level of the potting mix regularly by inserting your finger into the soil. If the top inch feels dry, it’s time to water. When watering, use a gentle spray bottle to avoid disturbing the cuttings. The humidity dome will help retain moisture, so you may not need to water as frequently as you would with other propagation methods.
Q: What do I do after the cuttings have developed roots?
A: Once the cuttings have developed a healthy root system, you can gradually acclimate them to outdoor conditions. Start by placing them in a sheltered location with indirect sunlight for a few hours each day. Gradually increase the amount of sunlight they receive over the course of a week or two. Once they are fully acclimated, you can transplant them into larger pots or directly into the ground. Be sure to choose a location with well-draining soil and plenty of sunlight.
Q: Can I use this method to propagate other types of plants besides figs?
A: Yes, this DIY trick can be adapted for propagating other types of plants that are typically propagated by cuttings. The principles of providing a humid environment, using rooting hormone, and ensuring good drainage apply to many different species. However, you may need to adjust the specific techniques based on the needs of the particular plant you are propagating. Research the best practices for propagating the specific plant you are interested in before you begin.
Q: What are some common problems I might encounter, and how can I troubleshoot them?
A: Some common problems include cuttings failing to root, developing root rot, or being attacked by pests or diseases. If cuttings fail to root, make sure you are using fresh cuttings, a good quality rooting hormone, and a well-draining potting mix. If you suspect root rot, reduce watering and ensure that the potting mix is draining properly. If you notice pests or diseases, treat them promptly with an appropriate insecticide or fungicide. Regularly inspect your cuttings for any signs of problems and address them quickly to prevent them from spreading.
Leave a Comment