
DIY Carrot Growing: Your Guide to a Bountiful Harvest
DIY carrot growing might seem daunting, but I’m here to tell you it’s easier than you think! Forget those sad, skinny carrots from the supermarket; I’m going to share my secrets to growing plump, delicious carrots right in your own backyard. This isn’t just about saving money on groceries; it’s about connecting with nature, experiencing the satisfaction of nurturing something from seed to harvest, and enjoying the unparalleled flavor of homegrown vegetables.
The history of carrots is fascinating! Originally purple or yellow, the orange carrot we know and love is a relatively recent development, cultivated in the Netherlands centuries ago. But the joy of growing your own carrots transcends history; it’s a timeless activity that connects us to our agricultural heritage. And let’s be honest, who doesn’t love the sweet crunch of a perfectly grown carrot?
Why You Need These DIY Carrot Growing Tricks
This DIY carrot growing guide is essential because it tackles the common challenges many gardeners face. From preparing the perfect soil to preventing common carrot pests, I’ll walk you through every step of the process. Learning these simple techniques will dramatically increase your chances of success, ensuring a bountiful harvest of those sweet, crunchy carrots you’ve always dreamed of. You’ll discover how to avoid common pitfalls like rocky soil and uneven growth, leading to perfectly shaped carrots every time. So, let’s get started on your DIY carrot growing journey!
I’ll be sharing my tried-and-true DIY carrot growing methods, including tips and tricks I’ve learned over the years. Get ready to transform your garden into a vibrant carrot patch, and experience the pure joy of harvesting your own delicious, homegrown carrots. This DIY carrot growing adventure is about to begin!
Unlocking Organization: My Dollar Tree Storage Solutions
I’m always looking for affordable ways to organize my home, and Dollar Tree has become my secret weapon! Here’s how I transformed my cluttered spaces using their inexpensive finds. These hacks are easy, effective, and won’t break the bank.
Phase 1: Bathroom Organization
- Assess your needs: Before heading to Dollar Tree, take stock of your bathroom. What areas need the most attention? Is it your medicine cabinet, under the sink, or the shower? Making a list will help you stay focused.
- Gather your supplies: This will vary depending on your specific needs, but here’s what I typically grab: small baskets, clear plastic containers, adhesive hooks, shelf liners, and maybe some decorative labels.
- Clear the clutter: Empty out the area you’re working on. This allows you to see what you have and what you need to get rid of. Be ruthless! Toss expired products and anything you haven’t used in months.
- Clean the surfaces: Before you start placing things back, give everything a good wipe down. A clean surface makes everything look better and helps your organizers stay put.
- Organize with baskets and containers: I love using Dollar Tree’s baskets to group similar items. For example, I use one for cotton balls and Q-tips, another for hair accessories, and a third for travel-sized toiletries. The clear containers are great for storing smaller items like makeup brushes or cotton swabs, allowing you to see what’s inside at a glance.
- Utilize vertical space: Don’t forget about the vertical space! Dollar Tree’s adhesive hooks are perfect for hanging things like razors, loofahs, or even small towels. Just make sure the surface you’re sticking them to is clean and dry.
- Line your shelves: Shelf liners not only protect your shelves but also add a nice touch. Dollar Tree has a variety of colors and patterns to choose from, so you can find one that matches your bathroom’s decor.
- Label everything: This step is optional, but it makes a huge difference in keeping things organized. I use a permanent marker to label my containers and baskets, so I know exactly what’s inside.
Phase 2: Kitchen Conquered
- Focus on problem areas: Is your pantry overflowing? Is your utensil drawer a chaotic mess? Identify the areas that need the most help.
- Choose the right containers: For the pantry, I prefer clear containers so I can see what’s inside. For drawers, smaller containers or dividers are ideal for keeping things separated.
- Consider tiered organizers: Dollar Tree often carries tiered organizers that are perfect for maximizing space in cabinets or pantries. These can help you stack items vertically, making better use of the available space.
- Empty and clean: Just like with the bathroom, start by emptying and cleaning the area you’re working on. This gives you a clean slate to work with.
- Sort and group: Sort through your items and group similar items together. This will make it easier to decide which containers to use for each group.
- Fill the containers: Once you’ve grouped your items, start filling your containers. Make sure to label them clearly so you know what’s inside.
- Utilize drawer dividers: Drawer dividers are a game-changer for utensil drawers and other cluttered drawers. They help keep everything separated and organized, preventing things from getting jumbled together.
- Repurpose containers: Don’t be afraid to get creative! I’ve used Dollar Tree’s small plastic containers to store spices, baking supplies, or even small appliances.
- Maximize vertical space: Use tiered organizers or stackable containers to make the most of your vertical space in cabinets and pantries. This helps you fit more items in a smaller area.
Phase 3: Craft Room Chaos to Calm
- Inventory your supplies: Before you start organizing, take inventory of your craft supplies. This will help you determine what kind of storage solutions you’ll need.
- Choose appropriate containers: Consider using clear containers for smaller items like beads or buttons. For larger items like yarn or fabric scraps, larger baskets or bins might be a better option.
- Think about labeling: Clear labeling is essential in a craft room, as it helps you quickly find what you need.
- Sort and categorize: Sort your craft supplies by type or project. This will make it easier to find what you need when you’re working on a project.
- Use clear containers for small items: Clear containers are perfect for storing small items like beads, buttons, or sequins. You can easily see what’s inside without having to open each container.
- Utilize baskets and bins for larger items: Baskets and bins are great for storing larger items like yarn, fabric scraps, or tools.
- Label everything clearly: Use labels to identify the contents of each container or bin. This will save you time and frustration when you’re looking for a specific item.
- Consider using drawer organizers: Drawer organizers can help you keep smaller items organized and prevent them from getting lost in the bottom of a drawer.
- Vertical storage solutions: Use vertical storage solutions like magazine holders or file organizers to store patterns, papers, or other flat items.
- Repurpose items: Don’t be afraid to repurpose items you already have. For example, you can use empty jars or containers to store small craft supplies.
Phase 4: Beyond the Basics – Creative Storage Solutions
Don’t limit yourself! Dollar Tree offers so many versatile items. Think outside the box. Use decorative trays to organize jewelry, repurpose small buckets for paintbrushes, or use decorative tins for storing buttons and other small craft supplies. The possibilities are endless!
Remember: The key to successful Dollar Tree storage hacks is planning and utilizing the space you have effectively. Don’t be afraid to experiment and find what works best for you and your home.
Conclusion
So there you have it – your comprehensive guide to the surprisingly simple and rewarding world of DIY carrot growing! This isn’t just about saving money on grocery bills; it’s about connecting with nature, understanding where your food comes from, and experiencing the pure satisfaction of harvesting your own homegrown, perfectly crisp carrots. This DIY carrot growing method is a must-try for anyone, regardless of gardening experience. The process is straightforward, the results are incredibly delicious, and the sense of accomplishment is unparalleled. You’ll be amazed at how easy it is to cultivate these vibrant root vegetables right in your own backyard, balcony, or even a large container on your patio. The taste difference between a store-bought carrot and one you’ve nurtured from seed is truly remarkable – sweeter, more flavorful, and undeniably fresher. Beyond the superior taste, you’ll also gain a deeper appreciation for the effort and care that goes into producing food, fostering a greater connection to your meals and the environment.
Beyond the basic method outlined, there are countless opportunities for customization and experimentation. Consider trying different carrot varieties – from the classic Nantes to the longer Imperator, each offering a unique flavor and texture. Experiment with companion planting, incorporating herbs like rosemary or thyme to deter pests and enhance the soil. If space is limited, explore vertical gardening techniques or grow carrots in containers using a deep, well-draining potting mix. For those with less sunlight, consider using grow lights to supplement natural light, especially during the early stages of growth. Don’t be afraid to get creative and adapt the method to suit your specific environment and preferences. The beauty of DIY carrot growing lies in its adaptability.
We strongly encourage you to embark on this rewarding journey and try your hand at DIY carrot growing. Share your experiences with us! We’d love to hear about your successes, challenges, and any innovative techniques you discover along the way. Post pictures of your thriving carrot patch on social media using #DIYCarrotGrowing and tag us – we can’t wait to see your bountiful harvest! Remember, even if your first attempt isn’t perfect, the learning process is part of the fun. With a little patience and perseverance, you’ll be enjoying the sweet taste of success – and delicious, homegrown carrots – in no time. This is more than just a gardening project; it’s a journey of discovery, a celebration of nature’s bounty, and a testament to the power of DIY.
Frequently Asked Questions
What type of soil is best for growing carrots?
Carrots thrive in loose, well-drained soil that is free of rocks and stones. Heavy clay soil can hinder root development, resulting in stunted or misshapen carrots. Sandy loam is ideal, but you can amend heavier soils by incorporating plenty of organic matter like compost to improve drainage and aeration. Ensure the soil pH is slightly acidic to neutral (6.0-7.0).
How much sunlight do carrots need?
Carrots need at least six hours of direct sunlight per day to grow properly. Less sunlight can lead to poor growth and reduced yields. Choose a sunny location in your garden or ensure your containers receive ample sunlight.
How often should I water my carrots?
Consistent moisture is crucial for carrot growth, but avoid overwatering, which can lead to root rot. Water deeply and regularly, especially during dry periods. The soil should be consistently moist but not soggy. Mulching can help retain soil moisture and suppress weeds.
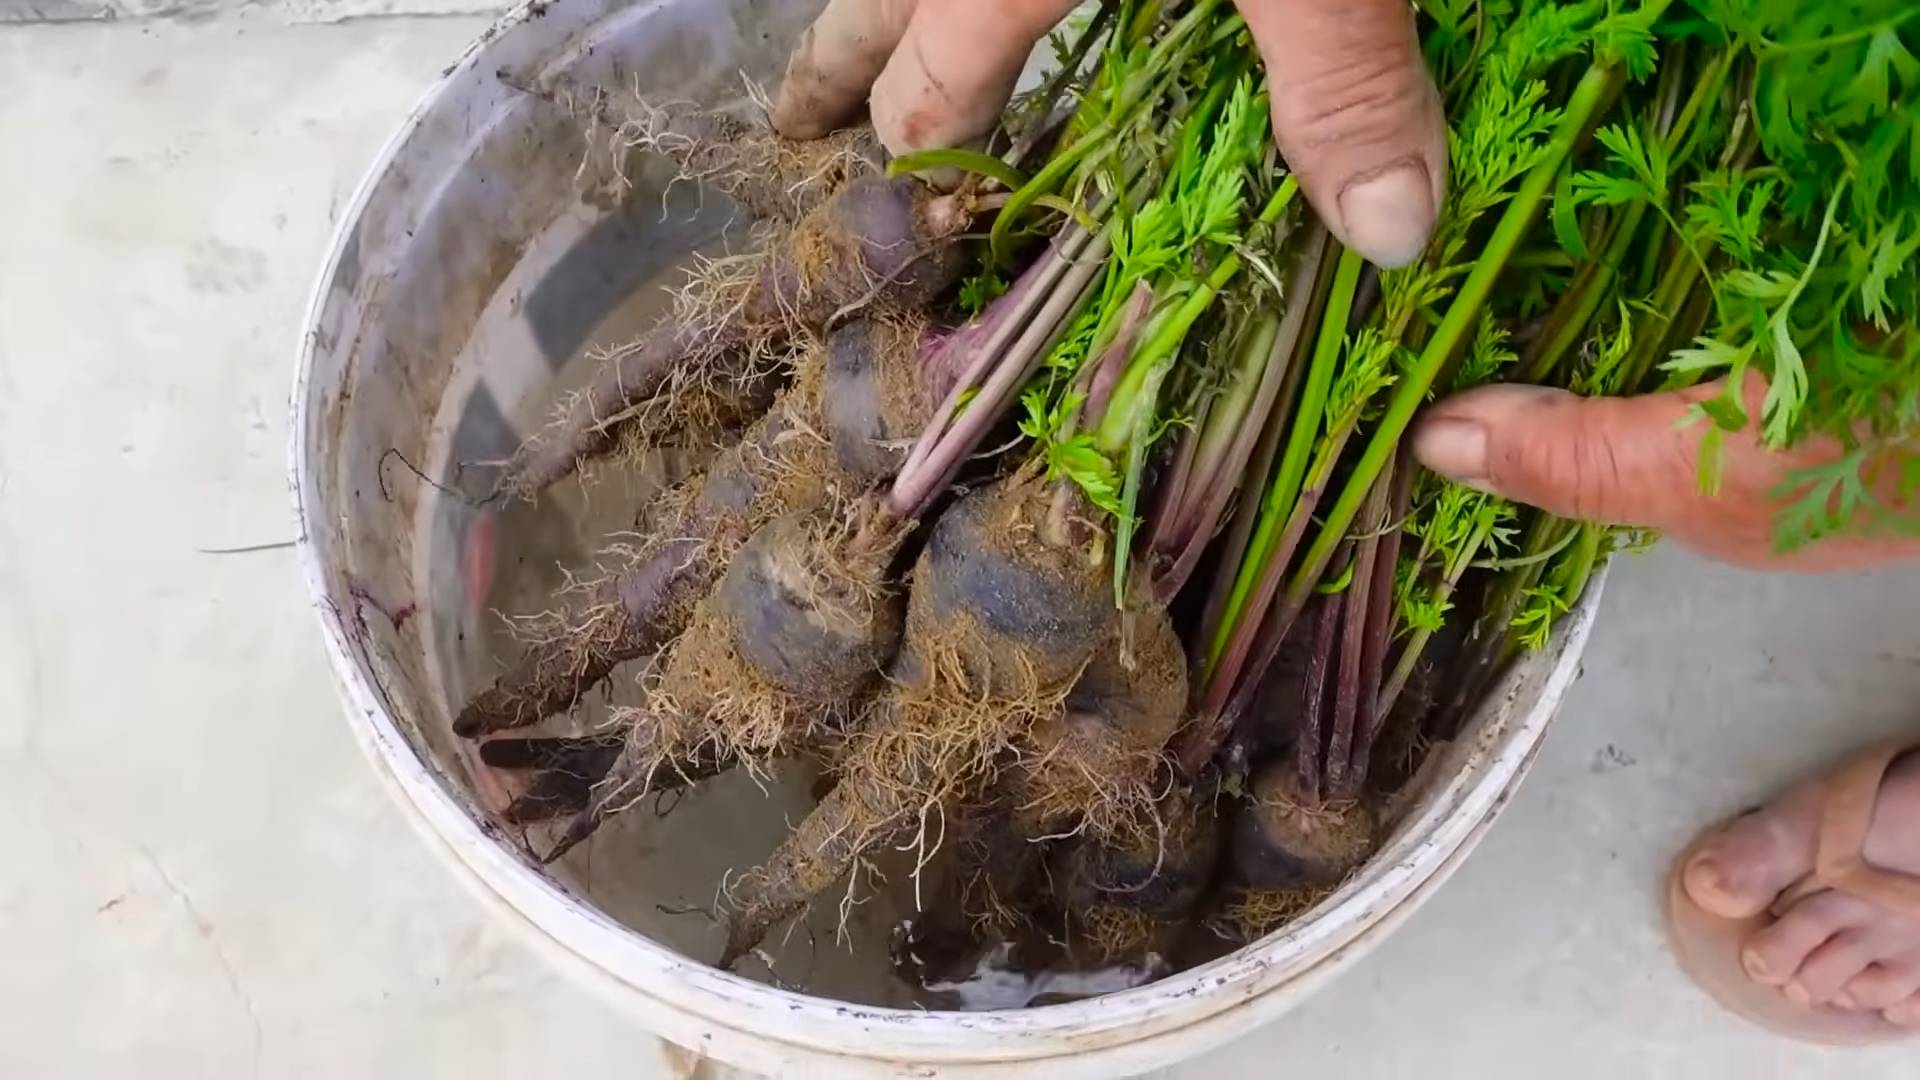
When can I harvest my carrots?
Harvesting time depends on the carrot variety and planting time. Generally, carrots are ready for harvest 70-80 days after sowing. You can check for readiness by gently tugging on a few carrots – if they pull out easily, they’re ready. For larger carrots, you may need to wait a bit longer.
What are some common problems when growing carrots?
Common problems include pests like carrot root flies and diseases like leaf blight. Practicing crop rotation, using row covers to protect against pests, and ensuring good air circulation can help prevent these issues. Regularly inspect your plants for signs of problems and address them promptly.
Can I grow carrots in containers?
Absolutely! Growing carrots in containers is a great option for those with limited space. Use deep containers (at least 12 inches deep) with well-draining potting mix. Ensure the containers receive adequate sunlight and water regularly.
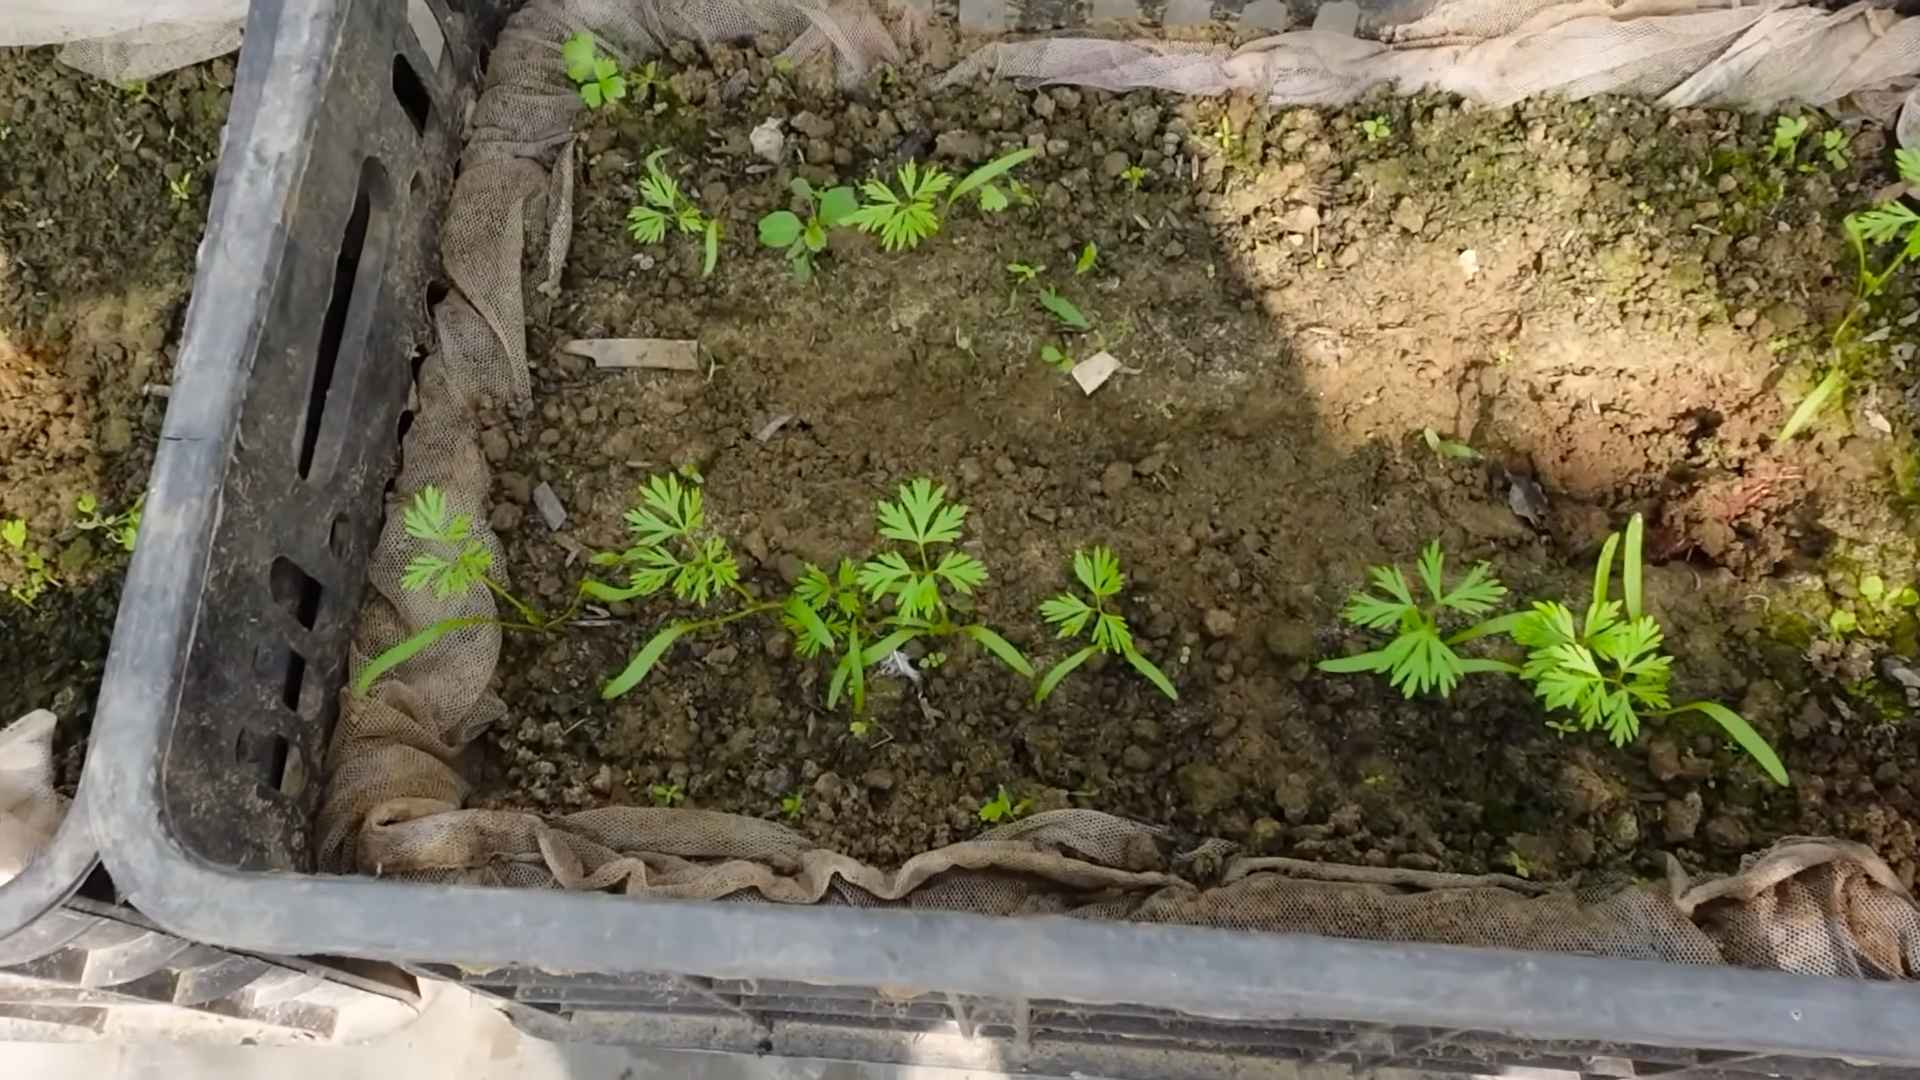
What if my carrots are small or misshapen?
Small or misshapen carrots are often a result of poor soil conditions (rocky or compacted soil), insufficient watering, or overcrowding. Ensure your soil is loose and well-drained, water consistently, and provide adequate spacing between seeds or seedlings.
Can I save seeds from my homegrown carrots for next year?
While you can try saving seeds, it’s important to note that hybrid carrots often don’t produce true-to-type seeds. If you’re aiming for the same variety, it’s best to purchase fresh seeds each year. Open-pollinated varieties are more likely to produce seeds that resemble the parent plant.
What are some other vegetables that grow well with carrots?
Carrots are excellent companion plants for many vegetables. Consider planting them alongside lettuce, onions, peas, and rosemary. These combinations can help deter pests and improve overall growth.
Is this DIY carrot growing method suitable for beginners?
Absolutely! This method is designed to be beginner-friendly. The step-by-step instructions and helpful tips make it easy for anyone to grow delicious carrots, regardless of their gardening experience. Don’t be intimidated – give it a try!
Leave a Comment