
Gourd Bag Gardening Trick: Ever dreamt of a garden overflowing with fresh produce, but feel limited by space or resources? I know I have! Well, get ready to ditch those limitations because I’m about to share a game-changing DIY trick that will revolutionize your gardening game – the gourd bag gardening trick!
For centuries, resourceful gardeners around the world have sought innovative ways to cultivate plants in challenging environments. From ancient hanging gardens to modern-day vertical farms, the spirit of ingenuity has always been at the heart of successful gardening. This simple yet effective method echoes that resourceful spirit, allowing you to grow a surprising amount of food in a small footprint.
Why is this gourd bag gardening trick so essential? In today’s world, many of us live in apartments, condos, or homes with limited yard space. Access to fresh, healthy, and affordable produce can be a challenge. This DIY project empowers you to take control of your food source, reduce your carbon footprint, and enjoy the satisfaction of growing your own delicious vegetables, herbs, or flowers. Plus, it’s a fantastic way to recycle old gourds and add a unique, rustic touch to your outdoor space. So, let’s dive in and unlock the secrets to this amazing gardening hack!
Gourd Bag Gardening: Grow Vertically with Style!
Hey there, fellow gardening enthusiasts! I’m so excited to share one of my favorite DIY gardening hacks with you: gourd bag gardening! This is a fantastic way to grow vertically, save space, and add a unique, rustic touch to your garden or balcony. Plus, it’s super budget-friendly! I’ve been doing this for years, and I’m always amazed at how well it works. Let’s dive in!
What is Gourd Bag Gardening?
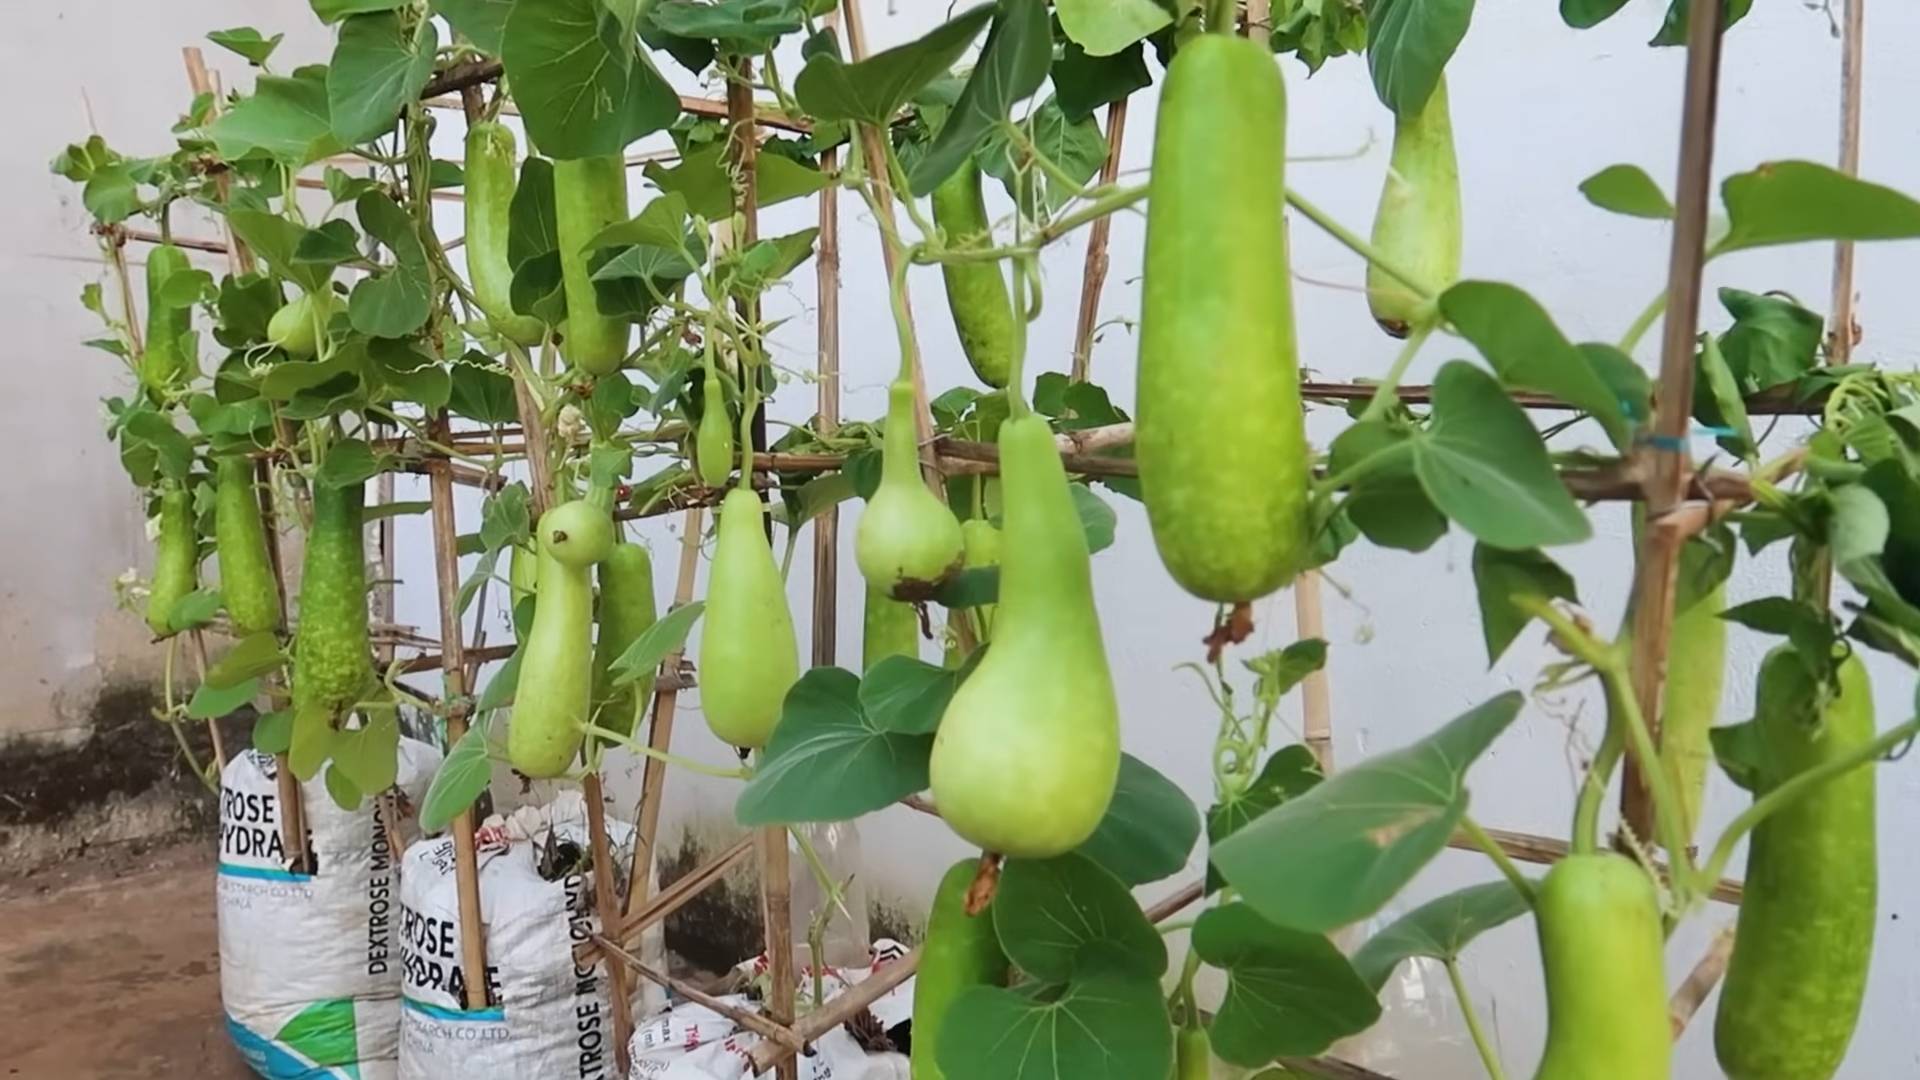
Basically, we’re using dried gourds as hanging planters. It’s a sustainable and visually appealing alternative to traditional pots. The gourds provide a natural, earthy aesthetic, and they’re surprisingly durable. I’ve had some last for several seasons!
Materials You’ll Need
Before we get started, let’s gather our supplies. Here’s what you’ll need:
* Dried Gourds: The star of the show! Look for gourds that are fully dried and hardened. You can grow your own (which is super rewarding!), purchase them online, or find them at craft stores or farmers’ markets. Bottle gourds, dipper gourds, or birdhouse gourds work well.
* Potting Soil: Choose a good quality potting mix that drains well. I usually go for a mix specifically designed for containers.
* Drill with Drill Bits: You’ll need a drill to create drainage holes and a larger hole for planting.
* Twine or Rope: For hanging your gourd bags. Jute twine or nylon rope are both good options.
* Gloves: To protect your hands.
* Measuring Tape or Ruler: For marking hole placement.
* Pencil or Marker: For marking the gourd.
* Small Plants or Seeds: Choose plants that are suitable for container gardening and vertical growth. Herbs, strawberries, succulents, and small flowering plants are all great choices.
* Optional: Sandpaper: To smooth any rough edges after drilling.
* Optional: Sealer or Varnish: To protect the gourd from the elements and prolong its lifespan.
Preparing Your Gourds
This is a crucial step, so pay close attention!
1. Cleaning the Gourds: If your gourds are dusty or dirty, gently wipe them down with a damp cloth. Make sure they are completely dry before proceeding. I sometimes use a soft brush to remove any stubborn dirt.
2. Marking Drainage Holes: Using your measuring tape and pencil, mark several small drainage holes on the bottom of the gourd. I usually aim for about 4-6 holes, spaced evenly apart. These holes are essential for preventing waterlogging and root rot.
3. Drilling Drainage Holes: Put on your gloves and carefully drill the drainage holes using a small drill bit (around 1/4 inch). Be gentle and avoid applying too much pressure, as this could crack the gourd.
4. Marking the Planting Hole: Now, decide where you want to plant your plants. On the top side of the gourd, mark a larger circle for the planting hole. The size of the circle will depend on the size of the gourd and the size of the plants you want to grow. I usually aim for a hole that’s about 3-4 inches in diameter.
5. Drilling the Planting Hole: Using a larger drill bit (or a hole saw if you have one), carefully drill out the planting hole. Again, be gentle and avoid applying too much pressure. You might need to go slowly and work your way around the circle.
6. Smoothing the Edges (Optional): If the edges of the planting hole are rough, you can use sandpaper to smooth them down. This will prevent any sharp edges from damaging your plants.
7. Sealing the Gourd (Optional): To protect the gourd from the elements and prolong its lifespan, you can apply a sealer or varnish. Choose a product that is specifically designed for outdoor use. Follow the manufacturer’s instructions carefully. I usually apply two coats, allowing each coat to dry completely before applying the next.
Creating the Hanging System
Now, let’s get our gourds ready to hang!
1. Marking Hanging Holes: Decide where you want to place the hanging holes. I usually place them on either side of the planting hole, near the top of the gourd. Mark the spots with your pencil.
2. Drilling Hanging Holes: Using a drill bit that is slightly larger than your twine or rope, carefully drill the hanging holes.
3. Attaching the Twine or Rope: Cut two lengths of twine or rope, long enough to hang your gourd bag at the desired height. Thread one end of each length through the hanging holes.
4. Securing the Twine or Rope: Tie a secure knot at the end of each length of twine or rope. Make sure the knots are large enough to prevent the twine or rope from slipping back through the holes. You can also use metal crimps for extra security.
5. Adjusting the Length: Adjust the length of the twine or rope to ensure that the gourd bag hangs evenly.
Planting Your Gourd Bags
The fun part!
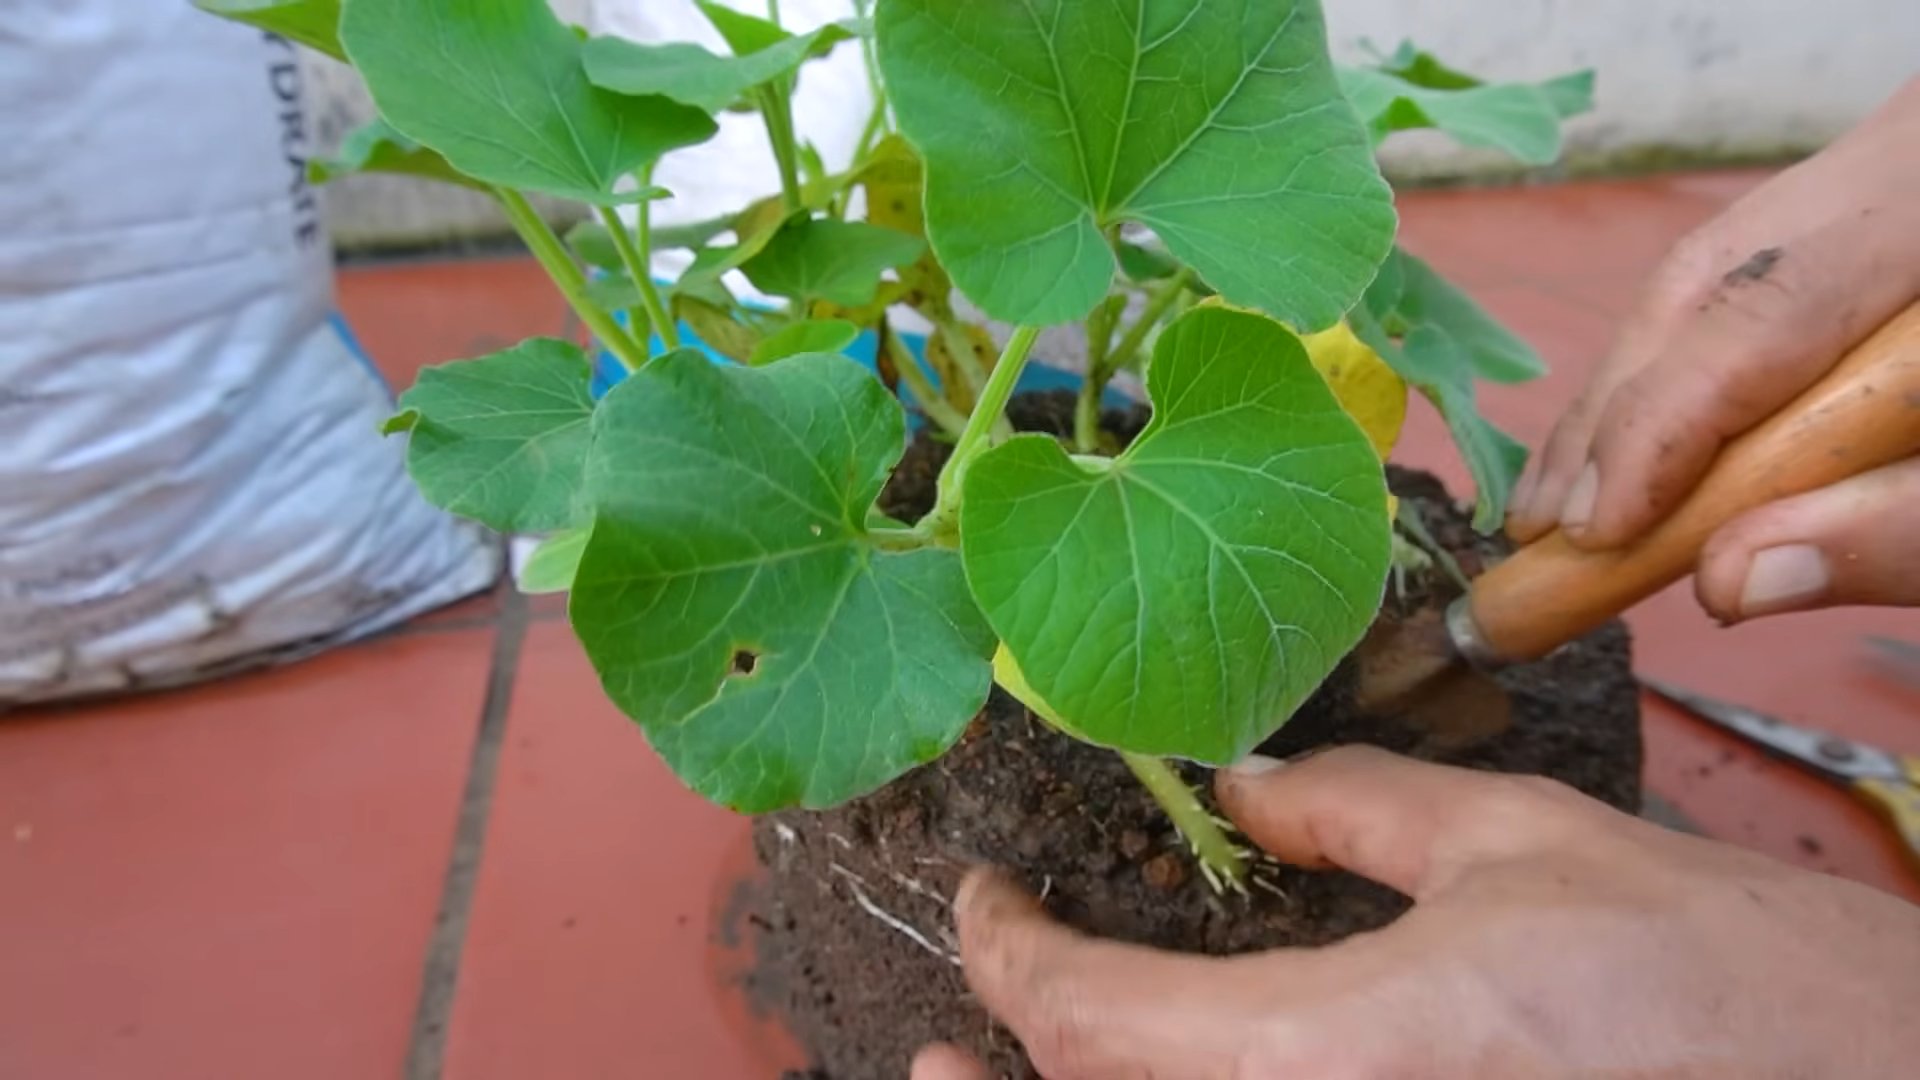
1. Adding Potting Soil: Carefully fill the gourd bag with potting soil, leaving about an inch or two of space at the top.
2. Planting Your Plants or Seeds: Gently remove your plants from their containers and plant them in the gourd bag. If you’re planting seeds, follow the instructions on the seed packet.
3. Watering: Water your plants thoroughly after planting. Make sure the water drains freely from the drainage holes.
4. Hanging Your Gourd Bags: Find a suitable location to hang your gourd bags. Make sure the location receives adequate sunlight and is protected from strong winds. I love hanging mine on my porch railing or from tree branches.
Caring for Your Gourd Bag Garden
Maintaining your gourd bag garden is easy!
1. Watering: Water your plants regularly, especially during hot, dry weather. Check the soil moisture regularly and water when the top inch of soil feels dry to the touch.
2. Fertilizing: Fertilize your plants regularly with a balanced fertilizer. Follow the instructions on the fertilizer package. I usually fertilize every two weeks during the growing season.
3. Pruning: Prune your plants as needed to encourage growth and maintain their shape.
4. Pest Control: Keep an eye out for pests and diseases. Treat any problems promptly with appropriate organic pest control methods.
5. Winterizing: In colder climates, you may need to bring your gourd bags indoors during the winter months. Alternatively, you can remove the plants and store the gourds in a dry place until spring.
Plant Suggestions for Gourd Bag Gardening
Here are some of my favorite plants to grow in gourd bags:
* Herbs: Thyme, oregano, mint, parsley, and chives all thrive in containers.
* Strawberries: Hanging strawberries are not only delicious but also visually appealing.
* Succulents: Succulents are low-maintenance and drought-tolerant, making them perfect for gourd bag gardening.
* Small Flowering Plants: Petunias, pansies, impatiens, and begonias add a splash of color to your garden.
* Trailing Plants: Creeping Jenny, ivy, and vinca vine create a cascading effect.
* Lettuce and Spinach: These leafy greens can be easily grown in gourd bags.
Troubleshooting
Here are some common problems you might encounter and how to fix them:
* Gourd Cracking: This can happen if you apply too much pressure when drilling. Be gentle and use sharp drill bits.
* Waterlogging: Make sure you have adequate drainage holes. If the soil is staying too wet, try adding some perlite or vermiculite to improve drainage.
* Plants Wilting: This could be due to underwatering, overwatering, or lack of sunlight. Adjust your watering schedule and make sure your plants are getting enough sunlight.
* Pests: Inspect your plants regularly for pests and treat any problems promptly.
Tips and Tricks
Here are a few extra tips to help you succeed with gourd bag gardening:
* Choose the Right Gourd: Select gourds that are the right size and shape for the plants you want to grow.
* Use Good Quality Potting Soil: This will provide your plants with the nutrients they need to thrive.
* Water Regularly: Don’t let your plants dry out.
* Fertilize Regularly: This will help your plants grow strong and healthy.
* Protect Your Gourds: Apply a sealer or varnish to protect your gourds from the elements.
* Get Creative: Experiment with different plants and arrangements to create a unique and beautiful gourd bag garden.
I hope you found this guide helpful! Gourd bag gardening is a fun and rewarding way to add
Conclusion
So, there you have it! The Gourd Bag Gardening Trick – a simple, yet revolutionary way to cultivate thriving gourd plants, even in limited spaces or challenging soil conditions. We’ve walked you through the process, highlighting its ease, affordability, and the incredible benefits it offers for both your garden and your gourd harvest.
Why is this a must-try? Because it’s more than just a gardening hack; it’s a pathway to unlocking the full potential of your gourd plants. Imagine larger, healthier gourds, fewer pest problems, and a more manageable growing environment. This trick addresses common gardening frustrations head-on, offering a practical solution that’s accessible to everyone, from seasoned gardeners to complete beginners.
The beauty of the Gourd Bag Gardening Trick lies in its adaptability. Feel free to experiment with different types of gourds. Luffa gourds, bottle gourds, and even smaller ornamental varieties can all benefit from this method. You can also adjust the soil mix to suit the specific needs of your chosen gourd. For example, adding more compost will create a richer, more nutrient-dense environment for gourds that are heavy feeders.
Consider adding a trellis or support system near your gourd bags. As your gourds grow larger, they’ll need something to climb on to prevent the bags from tipping over or the vines from breaking. A simple bamboo structure or even a sturdy tomato cage can work wonders.
Don’t be afraid to get creative with your bag placement. While we’ve focused on using them on patios or balconies, you can also incorporate them into your existing garden beds. Simply dig a hole large enough to accommodate the bag and bury it partially in the ground. This can help to regulate soil temperature and moisture levels, especially in hot or dry climates.
The Gourd Bag Gardening Trick is a game-changer for anyone looking to maximize their gourd harvest. It’s a testament to the power of simple solutions and a reminder that you don’t need a sprawling garden to grow beautiful, bountiful gourds.
We’re confident that you’ll be amazed by the results you achieve with this method. But don’t just take our word for it – try it out for yourself! Plant your gourds in bags, nurture them with care, and watch them flourish.
We’re eager to hear about your experiences with the Gourd Bag Gardening Trick. Share your photos, tips, and success stories in the comments section below. Let’s build a community of gourd-loving gardeners who are passionate about sharing their knowledge and inspiring others. Happy gardening!
Frequently Asked Questions (FAQ)
What kind of bag should I use for the Gourd Bag Gardening Trick?
The ideal bag is a large, sturdy grow bag made from breathable fabric, such as felt or a similar material. Aim for a bag that’s at least 15-20 gallons in size, especially for larger gourd varieties. The breathable fabric allows for proper drainage and aeration, preventing root rot and promoting healthy growth. Avoid using plastic bags, as they can trap moisture and heat, creating an unfavorable environment for your gourd plants. If you are on a budget, you can use burlap sacks, but make sure to reinforce them as they can degrade over time.
What type of soil mix is best for growing gourds in bags?
A well-draining, nutrient-rich soil mix is crucial for success. A good starting point is a combination of equal parts:
* Compost: Provides essential nutrients and improves soil structure.
* Potting Soil: Offers good drainage and aeration.
* Peat Moss (or Coco Coir): Helps retain moisture.
You can also add a slow-release fertilizer to the mix to provide a steady supply of nutrients throughout the growing season. Amend the soil with bone meal or rock phosphate to encourage strong root development and abundant flowering. Remember to adjust the mix based on the specific needs of your gourd variety.
How often should I water my gourds grown in bags?
Watering frequency depends on several factors, including the weather, the size of the bag, and the type of gourd you’re growing. Generally, you’ll need to water more frequently than you would with gourds planted directly in the ground. Check the soil moisture regularly by sticking your finger a few inches into the soil. If it feels dry, it’s time to water. Water deeply until you see water draining from the bottom of the bag. Avoid overwatering, as this can lead to root rot. During hot, dry periods, you may need to water daily or even twice a day.
How do I fertilize my gourds grown in bags?
Gourds are heavy feeders, so regular fertilization is essential for optimal growth and fruit production. Start with a slow-release fertilizer incorporated into the soil mix at planting time. Then, supplement with liquid fertilizer every 2-3 weeks throughout the growing season. Use a balanced fertilizer (e.g., 10-10-10) during the early stages of growth, and then switch to a fertilizer with a higher phosphorus content (e.g., 10-20-10) once the plants start to flower. You can also use organic fertilizers, such as compost tea or fish emulsion.
How do I prevent pests and diseases in my gourd bag garden?
Prevention is key when it comes to pests and diseases. Start by using healthy, disease-free seeds or seedlings. Choose a location that receives plenty of sunlight and has good air circulation. Regularly inspect your plants for signs of pests or diseases, such as aphids, squash bugs, or powdery mildew. If you spot any problems, take action immediately. You can use organic pest control methods, such as insecticidal soap or neem oil. For fungal diseases, try a copper-based fungicide. Proper watering and fertilization can also help to strengthen your plants and make them more resistant to pests and diseases.
Can I grow different types of gourds in the same bag?
While it’s technically possible to grow multiple gourd plants in the same bag, it’s generally not recommended, especially for larger varieties. Gourds need plenty of space to grow and develop, and overcrowding can lead to stunted growth, reduced fruit production, and increased susceptibility to pests and diseases. It’s best to give each gourd plant its own bag to ensure optimal growth. If you do decide to grow multiple plants in the same bag, choose smaller varieties and space them adequately.
How do I support the vines of my gourds grown in bags?
Gourd vines can grow quite long and heavy, so providing adequate support is essential. A trellis, fence, or other sturdy structure can help to support the vines and prevent them from breaking or tipping over the bags. You can also use twine or rope to tie the vines to the support structure. Make sure the support is strong enough to handle the weight of the mature vines and gourds.
What do I do with the gourds after they’re harvested?
The curing process is crucial for preserving gourds and preventing them from rotting. After harvesting, clean the gourds with a mild soap and water solution. Then, dry them thoroughly with a soft cloth. Place the gourds in a well-ventilated area, such as a garage or shed, and allow them to dry for several weeks or even months. Turn the gourds regularly to ensure even drying. Once the gourds are completely dry, they can be decorated, painted, or used for various crafts.
Can I reuse the soil from the gourd bags for other plants?
Yes, you can reuse the soil from the gourd bags, but it’s important to amend it before planting other crops. Gourds can deplete the soil of nutrients, so you’ll need to replenish them. Add compost, aged manure, or other organic matter to the soil to improve its fertility. You may also want to test the soil pH and adjust it as needed. Avoid using the soil for plants that are susceptible to the same diseases as gourds.
What if I live in a cold climate? Can I still use the Gourd Bag Gardening Trick?
Absolutely! The Gourd Bag Gardening Trick can be particularly beneficial in colder climates. The bags can help to warm the soil more quickly in the spring, allowing you to start your gourd plants earlier. You can also move the bags indoors or to a sheltered location during periods of frost or cold weather. Choose gourd varieties that are well-suited to shorter growing seasons.

Leave a Comment