
Grout Cleaning: Oxiclean vs Toilet Cleaner – Which Reigns Supreme? Are you tired of staring at dingy, discolored grout lines, wishing you could magically restore them to their former glory? I know I am! Let’s face it, grout can be a real pain to keep clean. It’s porous, attracts dirt like a magnet, and seems to laugh in the face of ordinary cleaning efforts. But don’t despair, because I’ve got a showdown for you that might just change your cleaning game forever.
For generations, homeowners have battled grimy grout, often resorting to harsh chemicals and endless scrubbing. From the days of lye-based concoctions to the modern era of specialized cleaners, the quest for sparkling grout has been a long and arduous one. But what if the answer was hiding in plain sight, in your laundry room or under your bathroom sink?
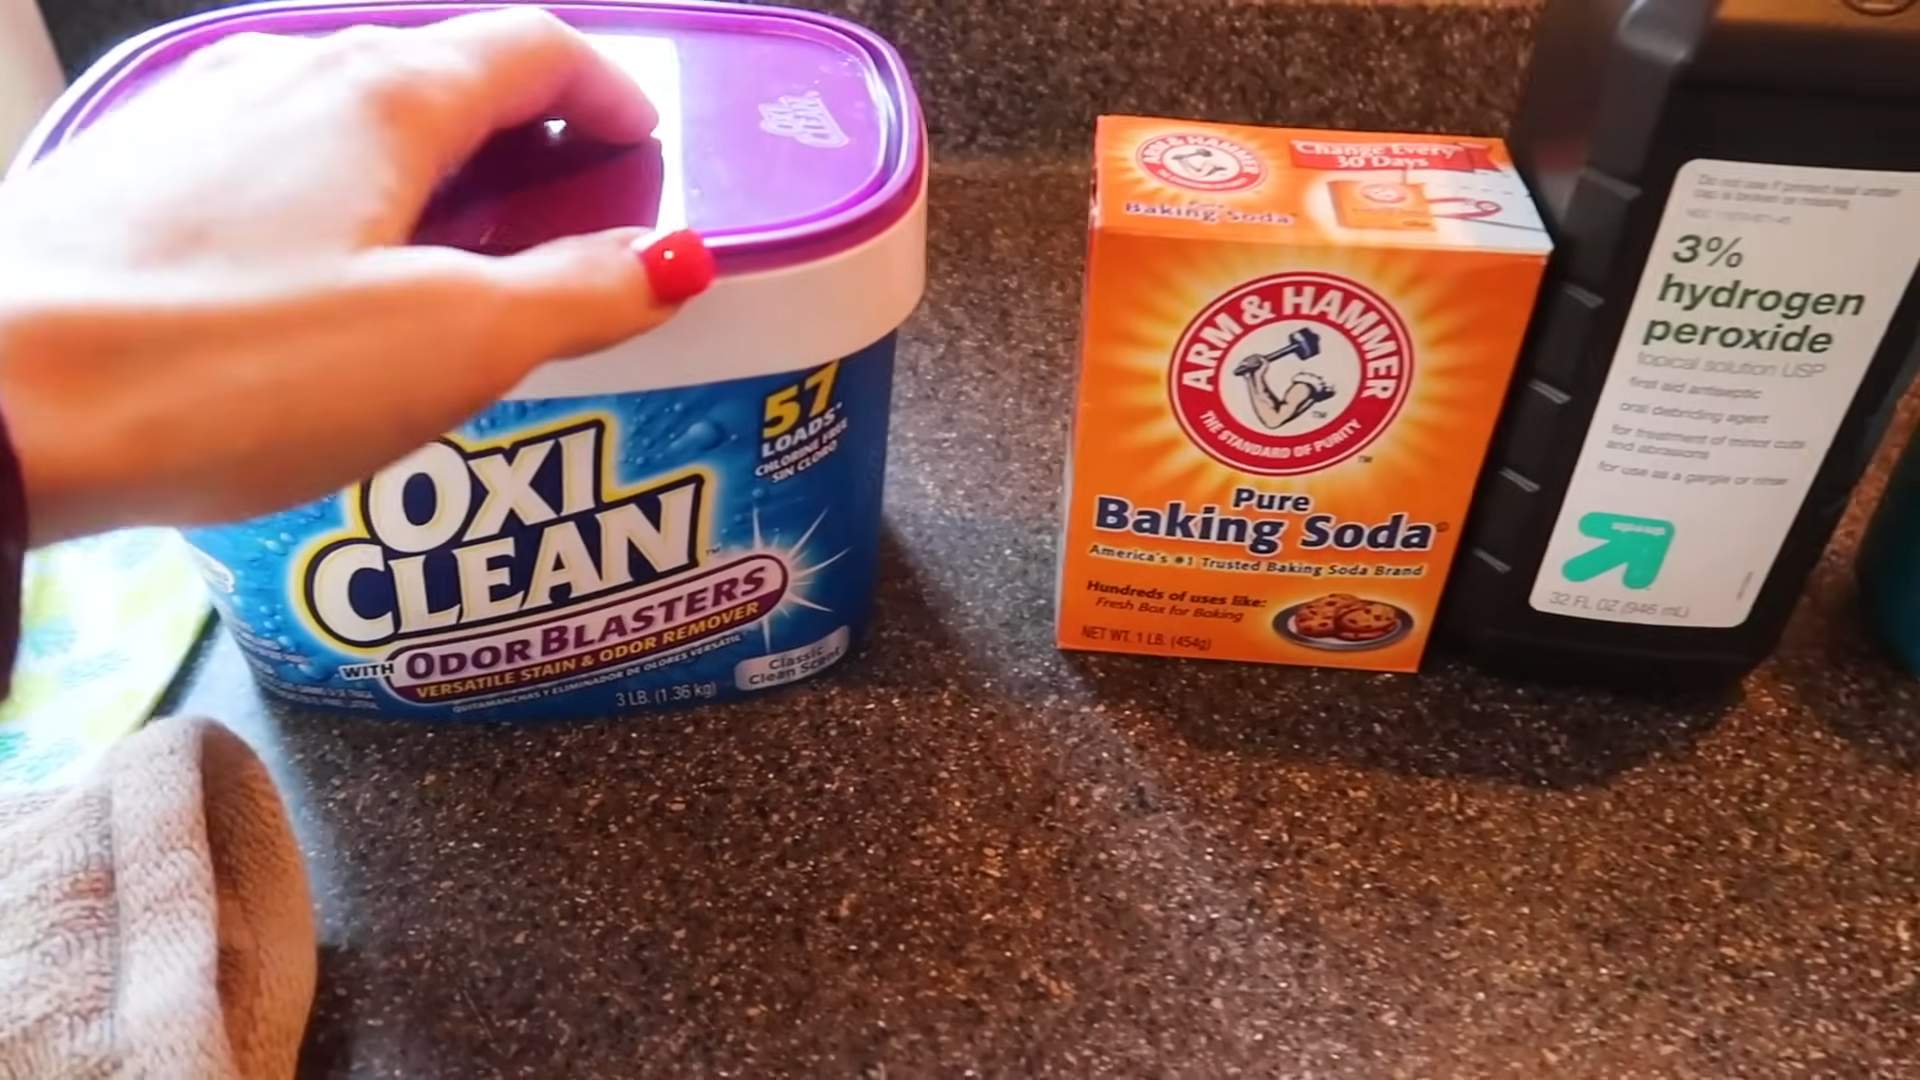
That’s right, we’re pitting two unlikely contenders against each other in the ultimate grout cleaning challenge: Oxiclean versus toilet bowl cleaner. Why these two? Well, Oxiclean is known for its powerful stain-lifting abilities, while toilet bowl cleaner is formulated to tackle tough bathroom grime. People need this DIY trick because professionally cleaning grout can be expensive and time-consuming. Plus, who doesn’t love a good DIY solution that saves money and delivers amazing results? I’m going to put both to the test and reveal which one truly conquers the grout grime. Get ready to say goodbye to dirty grout and hello to a sparkling clean home!
Grow Your Own Corn in Bags: A Beginner’s Guide
Hey there, fellow gardening enthusiasts! Ever dreamed of having fresh, sweet corn right outside your door, even if you don’t have a sprawling farm? Well, I’m here to tell you that it’s totally possible to grow corn in bags, and I’m going to walk you through the whole process. It’s a fun and rewarding project, perfect for small spaces like patios, balconies, or even just a sunny corner of your yard. Let’s get started!
What You’ll Need
Before we dive into the nitty-gritty, let’s gather our supplies. Here’s a list of everything you’ll need to successfully grow corn in bags:
* Large Grow Bags: These are essential! I recommend using bags that are at least 15-20 gallons in size. The bigger, the better, as corn plants need plenty of room for their roots to grow. Fabric grow bags are a great option because they allow for good drainage and aeration.
* High-Quality Potting Mix: Don’t skimp on this! Corn is a heavy feeder, so you’ll want a rich, well-draining potting mix. Look for a mix that contains compost, peat moss, and perlite or vermiculite.
* Corn Seeds: Choose a variety of sweet corn that’s known for its good flavor and relatively short growing season. I’ve had great success with ‘Early Sunglow’ and ‘Honey Select’.
* Slow-Release Fertilizer: This will provide your corn plants with a steady supply of nutrients throughout the growing season. Look for a fertilizer that’s specifically formulated for vegetables.
* Watering Can or Hose: You’ll need a way to water your corn plants regularly.
* Optional: Stakes or Trellis: Depending on the variety of corn you choose, you may need to provide some support to prevent the plants from falling over, especially in windy conditions.
* Optional: Bird Netting: Birds love to snack on young corn seedlings, so you may want to protect your plants with netting.
Step-by-Step Instructions: Planting Your Corn
Okay, now that we have all our supplies, let’s get our hands dirty! Here’s how to plant your corn seeds in bags:
1. Prepare the Grow Bags: First, unfold your grow bags and place them in a sunny location. Remember, corn needs at least 6-8 hours of direct sunlight per day. Fill the bags about three-quarters full with your high-quality potting mix.
2. Add Slow-Release Fertilizer: Sprinkle the slow-release fertilizer evenly over the surface of the potting mix, following the instructions on the fertilizer package. Gently mix the fertilizer into the top few inches of the soil.
3. Plant the Seeds: Now it’s time to plant the corn seeds. I usually plant 4-5 seeds per bag, spacing them evenly around the center. Plant the seeds about 1-2 inches deep.
4. Cover the Seeds: Gently cover the seeds with potting mix and lightly pat down the soil.
5. Water Thoroughly: Water the bags thoroughly until the water drains out of the bottom. This will help to settle the soil and ensure that the seeds have good contact with the moisture.
6. Protect from Birds (Optional): If you’re concerned about birds eating your seedlings, cover the bags with bird netting. Secure the netting with clothespins or rocks.
Caring for Your Corn Plants
Once your corn seeds have sprouted, it’s important to provide them with the proper care to ensure a bountiful harvest. Here’s what you need to do:
1. Water Regularly: Corn plants need consistent moisture, especially during hot, dry weather. Water deeply whenever the top inch of soil feels dry to the touch. Avoid overwatering, as this can lead to root rot.
2. Thin the Seedlings: Once the seedlings are a few inches tall, thin them to the strongest 2-3 plants per bag. This will give the remaining plants plenty of room to grow.
3. Fertilize Regularly: Corn is a heavy feeder, so you’ll need to fertilize it regularly throughout the growing season. In addition to the slow-release fertilizer you added at planting time, you can also supplement with a liquid fertilizer every 2-3 weeks. Follow the instructions on the fertilizer package.
4. Provide Support (Optional): If your corn plants start to get tall and top-heavy, you may need to provide some support to prevent them from falling over. You can use stakes or a trellis to support the plants.
5. Watch for Pests and Diseases: Keep an eye out for common corn pests, such as corn earworms and aphids. If you spot any pests, treat them with an appropriate insecticide. Also, be aware of potential diseases, such as corn smut. If you notice any signs of disease, remove the affected plants immediately.
Pollination: The Key to Sweet Corn
Corn is wind-pollinated, which means that the pollen from the tassels (the male flowers at the top of the plant) needs to be transferred to the silks (the female flowers on the ears of corn) by the wind. In a small garden or on a balcony, you may need to help with pollination to ensure that you get well-filled ears of corn. Here’s how to do it:
1. Hand-Pollination: Once the tassels start to shed pollen, gently shake the plants to release the pollen. You can also use a small paintbrush to collect pollen from the tassels and brush it onto the silks. Repeat this process every day for several days.
2. Plant in Blocks: Planting your corn in a block formation, rather than in a single row, will help to improve pollination. This will increase the chances that the pollen will reach the silks.
Harvesting Your Corn
The moment we’ve all been waiting for! Harvesting your own homegrown corn is incredibly satisfying. Here’s how to know when your corn is ready to pick:
1. Check the Silks: The silks should be dry and brown.
2. Feel the Ears: The ears should feel plump and full.
3. Test a Kernel: Gently peel back the husk and puncture a kernel with your fingernail. If the liquid that comes out is milky, the corn is ready to harvest. If the liquid is clear, the corn needs more time to mature.
4. Harvest Carefully: To harvest the corn, grasp the ear firmly and twist it downward. The ear should snap off easily from the stalk.
Troubleshooting Common Problems
Even with the best care, you may encounter some problems when growing corn in bags. Here are some common issues and how to address them:
* Poor Germination: If your corn seeds don’t germinate, it could be due to several factors, such as cold soil, poor-quality seeds, or overwatering. Make sure the soil temperature is at least 60 degrees Fahrenheit before planting. Use fresh, high-quality seeds. And avoid overwatering the soil.
* Yellow Leaves: Yellow leaves can be a sign of nutrient deficiency. Make sure you’re fertilizing your corn plants regularly with a balanced fertilizer.
* Stunted Growth: Stunted growth can be caused by a variety of factors, such as poor soil, lack of sunlight, or pests. Make sure your corn plants are getting plenty of sunlight and that the soil is well-draining. Check for pests and treat them accordingly.
* Poor Pollination: If you’re not getting well-filled ears of corn, it could be due to poor pollination. Try hand-pollinating the plants or planting them in a block formation.
Choosing the Right Corn Variety
Selecting the right corn variety is crucial for success, especially when growing in containers. Here’s what to consider:
* Days to Maturity: Look for varieties with shorter maturity times (60-80 days) as they are better suited for container growing. This ensures you can harvest before the end of the growing season.
* Plant Height: Opt for shorter, more compact varieties to prevent them from toppling over in the bags. Taller varieties may require extensive staking.
* Sweetness: Choose varieties known for their sweetness and flavor. ‘Honey Select’ and ‘Sugar Buns’ are popular choices.
* Disease Resistance: Select varieties that are resistant to common corn diseases to minimize potential problems.
Maximizing Your Yield
Want to get the most corn possible from your bag garden? Here are a few tips:
* Succession Planting: Plant new seeds every 2-3 weeks to extend your harvest season.
* Companion Planting: Plant beans or peas around the base of your corn plants. These legumes will help to fix nitrogen in the soil, which will benefit the corn.
* Mulching: Mulch around the base of your corn plants with straw or wood chips to help retain moisture and suppress weeds.
* Regular Feeding: Corn is a heavy feeder,
Conclusion
So, there you have it! We’ve explored the battle of the grout cleaners: Oxiclean versus toilet bowl cleaner. While both offer potential solutions for tackling grimy grout, the clear winner, in terms of safety, ease of use, and overall effectiveness, is Oxiclean. Its oxygen-based bleaching action gently lifts stains without the harsh chemicals found in toilet bowl cleaner, making it a far more appealing and responsible choice for your home.
Why is this DIY grout cleaning trick a must-try? Because it offers a powerful clean without the overpowering fumes and potential damage associated with harsher alternatives. It’s a cost-effective solution, especially if you already have Oxiclean on hand for laundry. Plus, it’s incredibly versatile.
Consider these variations to tailor the cleaning power to your specific needs:
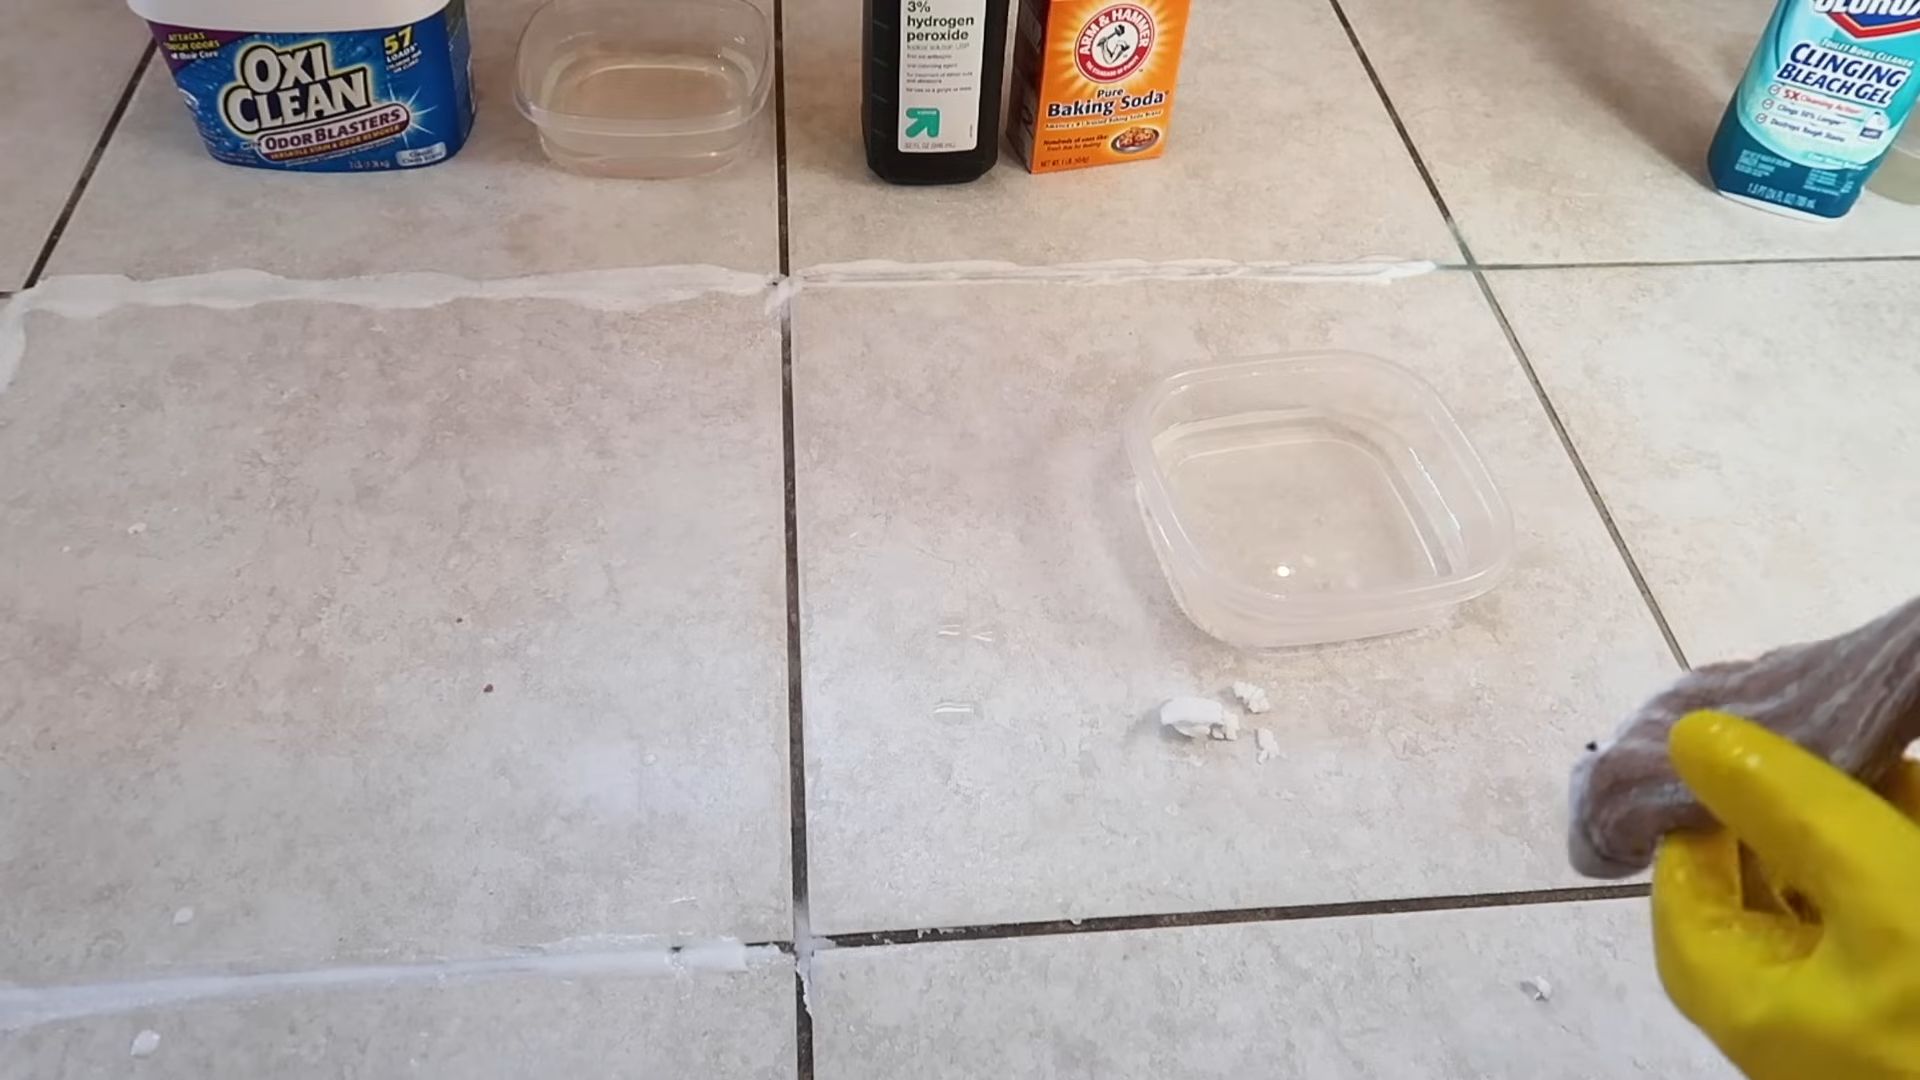
* For lightly stained grout: A simple paste of Oxiclean and water may suffice. Let it sit for a shorter period, around 15-20 minutes, before scrubbing.
* For heavily stained grout: Increase the concentration of Oxiclean in your paste or solution. You can also add a small amount of baking soda to the mixture for extra scrubbing power. Be cautious and test in an inconspicuous area first.
* For colored grout: While Oxiclean is generally color-safe, it’s always wise to test a small, hidden area first to ensure it doesn’t affect the grout’s color. You might also consider using a less concentrated solution.
* For vertical surfaces: Creating a thicker paste will help the Oxiclean adhere to vertical grout lines, preventing it from running down the wall before it has a chance to work its magic.
Beyond these variations, remember that the key to successful grout cleaning is patience and persistence. Don’t expect miracles after just one application, especially if your grout is severely stained. You may need to repeat the process several times to achieve the desired results.
We firmly believe that this DIY grout cleaning method using Oxiclean is a game-changer for anyone struggling with dingy grout. It’s a safer, more effective, and more affordable alternative to many commercial cleaners.
Now, it’s your turn! We encourage you to try this DIY grout cleaning trick using Oxiclean and see the difference for yourself. Don’t be afraid to experiment with the variations we’ve suggested to find the perfect solution for your specific grout cleaning needs.
Most importantly, we want to hear about your experience! Share your before-and-after photos, tips, and any modifications you made to the process in the comments below. Your feedback will not only help other readers but also contribute to a community of DIY enthusiasts who are passionate about finding effective and eco-friendly cleaning solutions. Let’s banish that grimy grout together!
Frequently Asked Questions (FAQ)
What exactly *is* Oxiclean, and why is it better than toilet bowl cleaner for grout?
Oxiclean is a brand name for a powdered, oxygen-based bleach. Its active ingredient is sodium percarbonate, which, when mixed with water, releases hydrogen peroxide and sodium carbonate (washing soda). This oxygen-based bleaching action is what makes it effective at lifting stains. Unlike toilet bowl cleaner, which often contains harsh chemicals like hydrochloric acid or bleach (sodium hypochlorite), Oxiclean is generally considered safer for your surfaces and your health. Toilet bowl cleaner can etch or discolor grout, release harmful fumes, and even damage surrounding tiles. Oxiclean is gentler, less likely to cause damage, and doesn’t produce the same level of noxious fumes.
Is Oxiclean safe to use on all types of grout?
While Oxiclean is generally safe for most types of grout, it’s always best to test it in an inconspicuous area first, especially if you have colored grout. Some colored grouts may be more susceptible to fading or discoloration. If you’re unsure, start with a diluted solution and monitor the area closely. If you notice any adverse effects, discontinue use immediately. For epoxy grout, which is more resistant to staining, Oxiclean is usually a safe and effective option.
How long should I let the Oxiclean solution sit on the grout before scrubbing?
The ideal dwell time depends on the severity of the staining. For lightly stained grout, 15-20 minutes may be sufficient. For heavily stained grout, you can let it sit for up to an hour. However, avoid letting the solution dry completely, as this can make it more difficult to remove. If the solution starts to dry, lightly mist it with water to keep it moist.
What type of brush should I use to scrub the grout?
A stiff-bristled brush is essential for effectively scrubbing grout. A grout brush, specifically designed for cleaning grout lines, is ideal. However, an old toothbrush or a small scrub brush can also work well. Avoid using metal brushes, as they can scratch or damage the grout and surrounding tiles.
Can I use Oxiclean on vertical grout lines, such as in a shower?
Yes, you can use Oxiclean on vertical grout lines. To prevent the solution from running down the wall, create a thicker paste by using less water. Apply the paste to the grout lines and let it sit for the recommended dwell time before scrubbing. You may need to reapply the paste if it starts to dry out.
How do I rinse the Oxiclean solution off the grout after scrubbing?
Thoroughly rinse the grout with clean water after scrubbing. You can use a sponge, a cloth, or a spray bottle to remove any remaining Oxiclean residue. Ensure that all traces of the solution are removed to prevent any potential discoloration or damage.
Will Oxiclean remove mold and mildew from grout?
Oxiclean can help to remove mold and mildew stains from grout, but it may not completely eliminate the underlying problem. For severe mold and mildew infestations, you may need to use a dedicated mold and mildew remover in addition to Oxiclean. Ensure proper ventilation when using any cleaning products, especially those designed to kill mold and mildew.
How often should I clean my grout with Oxiclean?
The frequency of grout cleaning depends on several factors, including the amount of foot traffic, the humidity levels in your home, and the color of your grout. As a general rule, you should aim to clean your grout every few months to prevent staining and discoloration. However, if you notice any signs of mold or mildew, you should clean the grout immediately.
Is there anything I can do to prevent grout from getting dirty in the first place?
Yes! Sealing your grout is a great way to prevent dirt, stains, and moisture from penetrating the grout lines. Apply a grout sealer after cleaning your grout to protect it from future damage. You can also wipe up spills and messes immediately to prevent them from setting into the grout. Regular cleaning with a mild detergent and water can also help to keep your grout looking its best.
What if Oxiclean doesn’t completely remove the stains from my grout?
If Oxiclean doesn’t completely remove the stains, you can try repeating the process several times. You can also try using a more concentrated solution or adding baking soda to the mixture for extra scrubbing power. If the stains are particularly stubborn, you may need to consider using a commercial grout cleaner specifically designed for removing tough stains. As a last resort, you can consider re-grouting the area.

Leave a Comment