
Grow Angled Luffa at Home: Imagine stepping into your backyard and harvesting your own natural sponges! It sounds like a dream, right? Well, it doesn’t have to be! Growing angled luffa, also known as Chinese okra or ridge gourd, is a surprisingly rewarding DIY project that brings a touch of the exotic right to your doorstep.
Luffa has a rich history, particularly in Asian cultures, where it’s been used for centuries not only as a scrubbing tool but also as a delicious and nutritious vegetable. From traditional medicine to culinary delights, the luffa has proven its versatility time and again. I think it’s amazing how something so practical can also be so deeply rooted in cultural heritage.
But why should you bother to grow angled luffa at home? In today’s world, we’re all looking for ways to be more sustainable and self-sufficient. Plus, let’s be honest, who wouldn’t want to ditch those synthetic sponges and embrace a natural, biodegradable alternative? This DIY guide will walk you through every step, from seed to sponge (or delicious stir-fry ingredient!), ensuring you have a thriving luffa crop. Get ready to roll up your sleeves and discover the joy of growing your own angled luffa – it’s easier than you think, and the rewards are truly fantastic!
Grow Your Own Angled Luffa Sponges: A Beginner’s Guide
Hey there, fellow gardening enthusiasts! Have you ever thought about growing your own sponges? I know, it sounds a little crazy, but it’s totally possible, and incredibly rewarding! I’m talking about angled luffa, also known as Chinese okra or ridge gourd. These amazing plants produce fruits that, when dried and processed, transform into the perfect natural sponges for your kitchen, bathroom, or even for exfoliating your skin.
This guide will walk you through every step of the process, from seed to sponge, so you can enjoy the satisfaction of growing your own sustainable cleaning tools. Let’s get started!
Choosing the Right Variety and Starting Seeds
Before we dive into the nitty-gritty, let’s talk about variety. While there are different types of luffa, angled luffa (Luffa acutangula) is generally easier to grow and produces a more textured sponge than smooth luffa (Luffa aegyptiaca). Make sure you’re getting seeds specifically for angled luffa.
Here’s how to get those seeds sprouting:
- Timing is Key: Luffa needs a long growing season (around 150-200 days), so starting seeds indoors is crucial, especially if you live in a cooler climate. I usually start mine about 6-8 weeks before the last expected frost.
- Seed Scarification (Optional but Recommended): Luffa seeds have a tough outer shell. To help them germinate faster, you can gently scarify them. This means lightly scratching the seed coat with sandpaper or nicking it with a knife. Be careful not to damage the inside of the seed!
- Soaking the Seeds: Soak the scarified seeds in warm water for 24-48 hours. This helps to soften the seed coat and further encourage germination. You’ll likely see them swell up a bit.
- Planting the Seeds: Fill small pots (about 3-4 inches in diameter) with a good quality seed-starting mix. Plant one or two seeds per pot, about ½ inch deep.
- Creating a Humid Environment: Luffa seeds love humidity. Cover the pots with plastic wrap or a humidity dome to create a mini-greenhouse effect.
- Warmth is Essential: Place the pots in a warm location, ideally around 80-85°F (27-29°C). A heat mat can be really helpful for maintaining consistent warmth.
- Patience is a Virtue: Germination can take anywhere from 7-21 days, so don’t get discouraged if you don’t see sprouts right away. Keep the soil consistently moist, but not soggy.
Transplanting Your Luffa Seedlings
Once your seedlings have developed a few sets of true leaves (the leaves that look like miniature versions of the adult leaves), it’s time to transplant them outdoors.
- Harden Off Your Seedlings: Before transplanting, you need to acclimate your seedlings to outdoor conditions. This process, called “hardening off,” involves gradually exposing them to sunlight, wind, and cooler temperatures over a period of 7-10 days. Start by placing them outdoors in a sheltered location for an hour or two each day, gradually increasing the time and exposure.
- Choose the Right Location: Luffa vines need plenty of sunlight (at least 6-8 hours per day) and well-drained soil. They are also heavy feeders, so choose a spot where you can easily amend the soil with compost or other organic matter.
- Prepare the Soil: Dig a hole that is twice as wide and as deep as the root ball of your seedling. Amend the soil with plenty of compost, well-rotted manure, or other organic matter. This will provide the nutrients your luffa vines need to thrive.
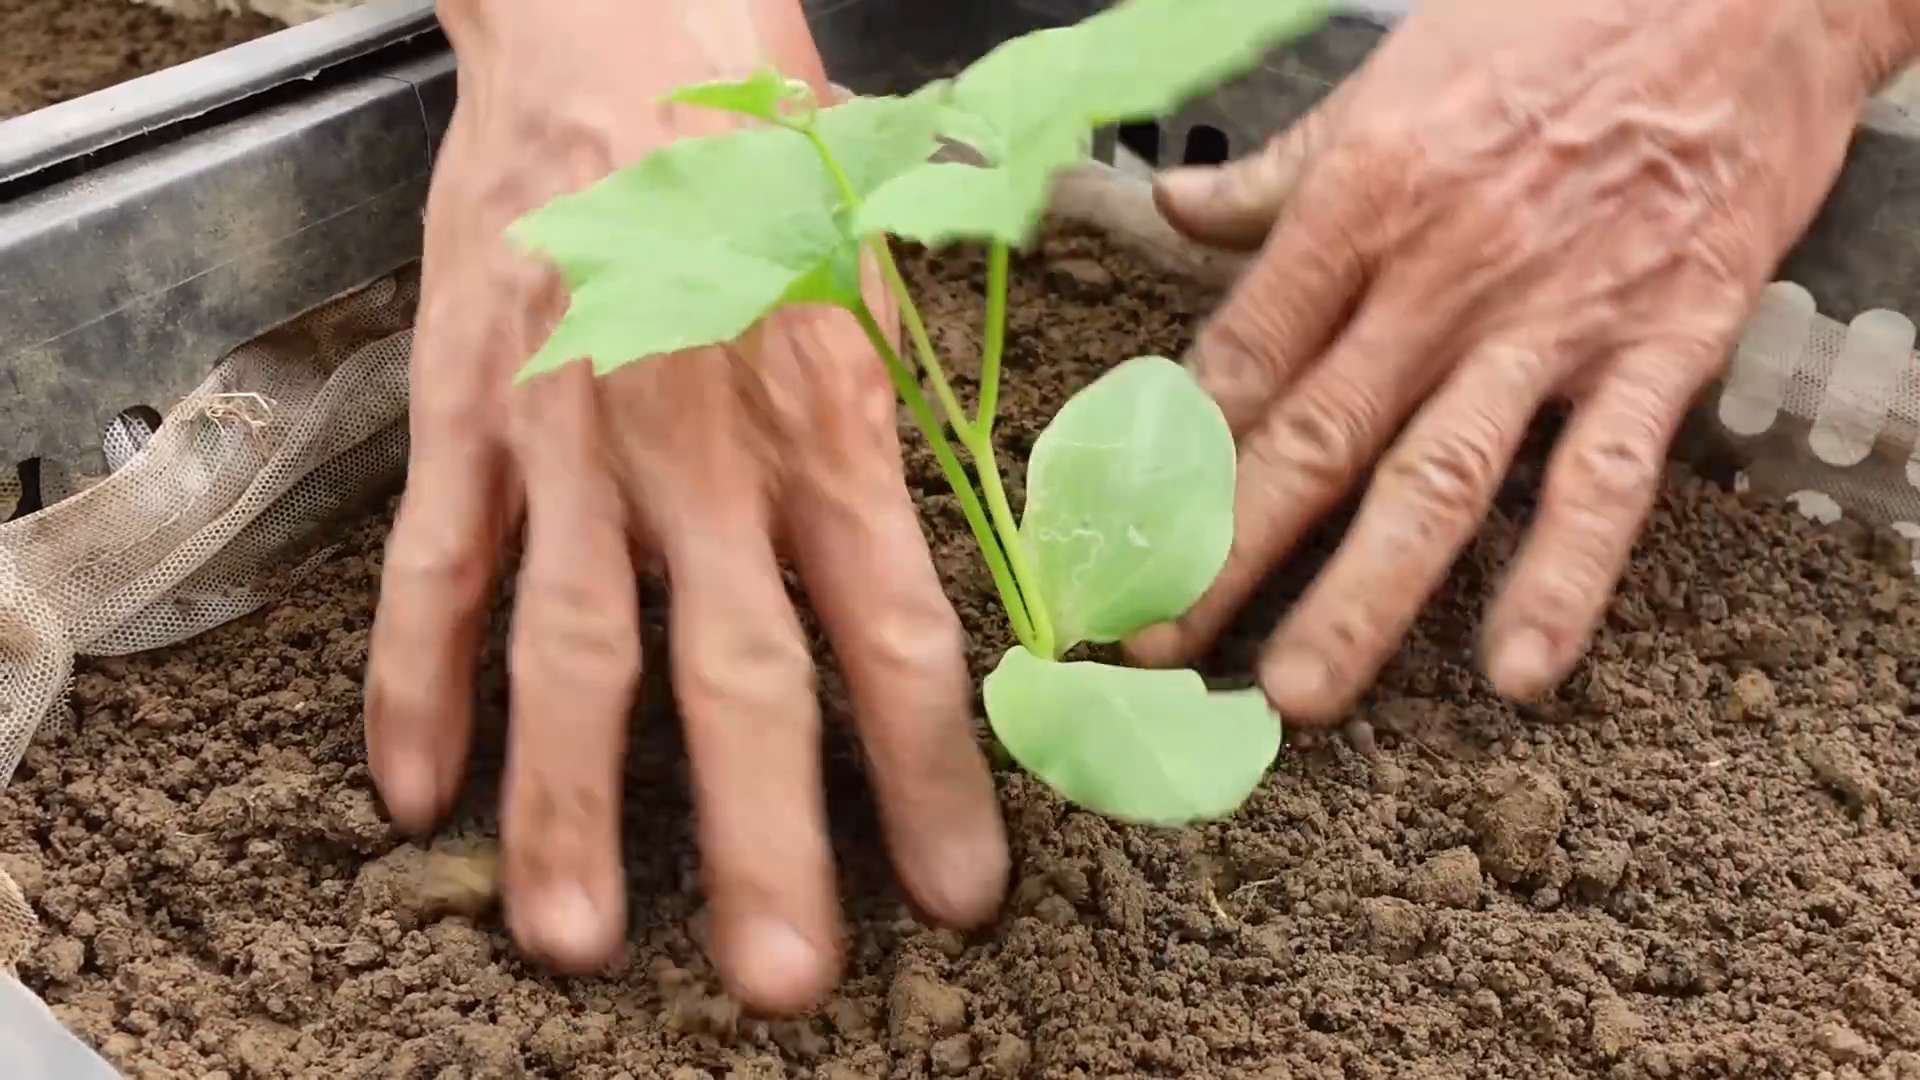
- Transplant Carefully: Gently remove the seedling from its pot, being careful not to damage the roots. Place the seedling in the hole and backfill with soil, gently firming it around the base of the plant.
- Water Thoroughly: Water the newly transplanted seedlings thoroughly to help them settle in.
- Provide Support: Luffa vines are vigorous climbers and need strong support to grow on. A sturdy trellis, fence, or arbor is essential. Make sure the support is tall enough to accommodate the mature size of the vine, which can easily reach 15-30 feet.
Caring for Your Luffa Vines
Now that your luffa vines are in the ground, it’s time to provide them with the care they need to flourish.
- Watering: Luffa vines need consistent watering, especially during hot, dry weather. Water deeply and regularly, ensuring that the soil stays moist but not waterlogged. I like to water in the morning so the foliage has time to dry before nightfall, which helps prevent fungal diseases.
- Fertilizing: Luffa vines are heavy feeders and benefit from regular fertilization. Use a balanced fertilizer or a fertilizer specifically formulated for vegetables. I like to use a liquid fertilizer every 2-3 weeks during the growing season. You can also side-dress the plants with compost or well-rotted manure.
- Pruning: While not strictly necessary, pruning can help to improve air circulation and encourage fruit production. Remove any dead or diseased leaves and stems. You can also prune back the tips of the vines to encourage branching.
- Pest and Disease Control: Luffa vines are generally resistant to pests and diseases, but they can be susceptible to problems like squash bugs, aphids, and powdery mildew. Inspect your plants regularly for signs of pests or diseases and take action promptly. Insecticidal soap or neem oil can be effective for controlling many common pests. For powdery mildew, improve air circulation and consider using a fungicide if necessary.
- Pollination: Luffa flowers are pollinated by insects, primarily bees. If you’re not seeing a lot of bee activity in your garden, you may need to hand-pollinate the flowers. To do this, use a small paintbrush to transfer pollen from the male flowers (which have a long, thin stem) to the female flowers (which have a small luffa fruit behind the flower).
Harvesting and Processing Your Luffa Sponges
This is the exciting part! Harvesting and processing your luffa fruits into sponges is a relatively simple process.
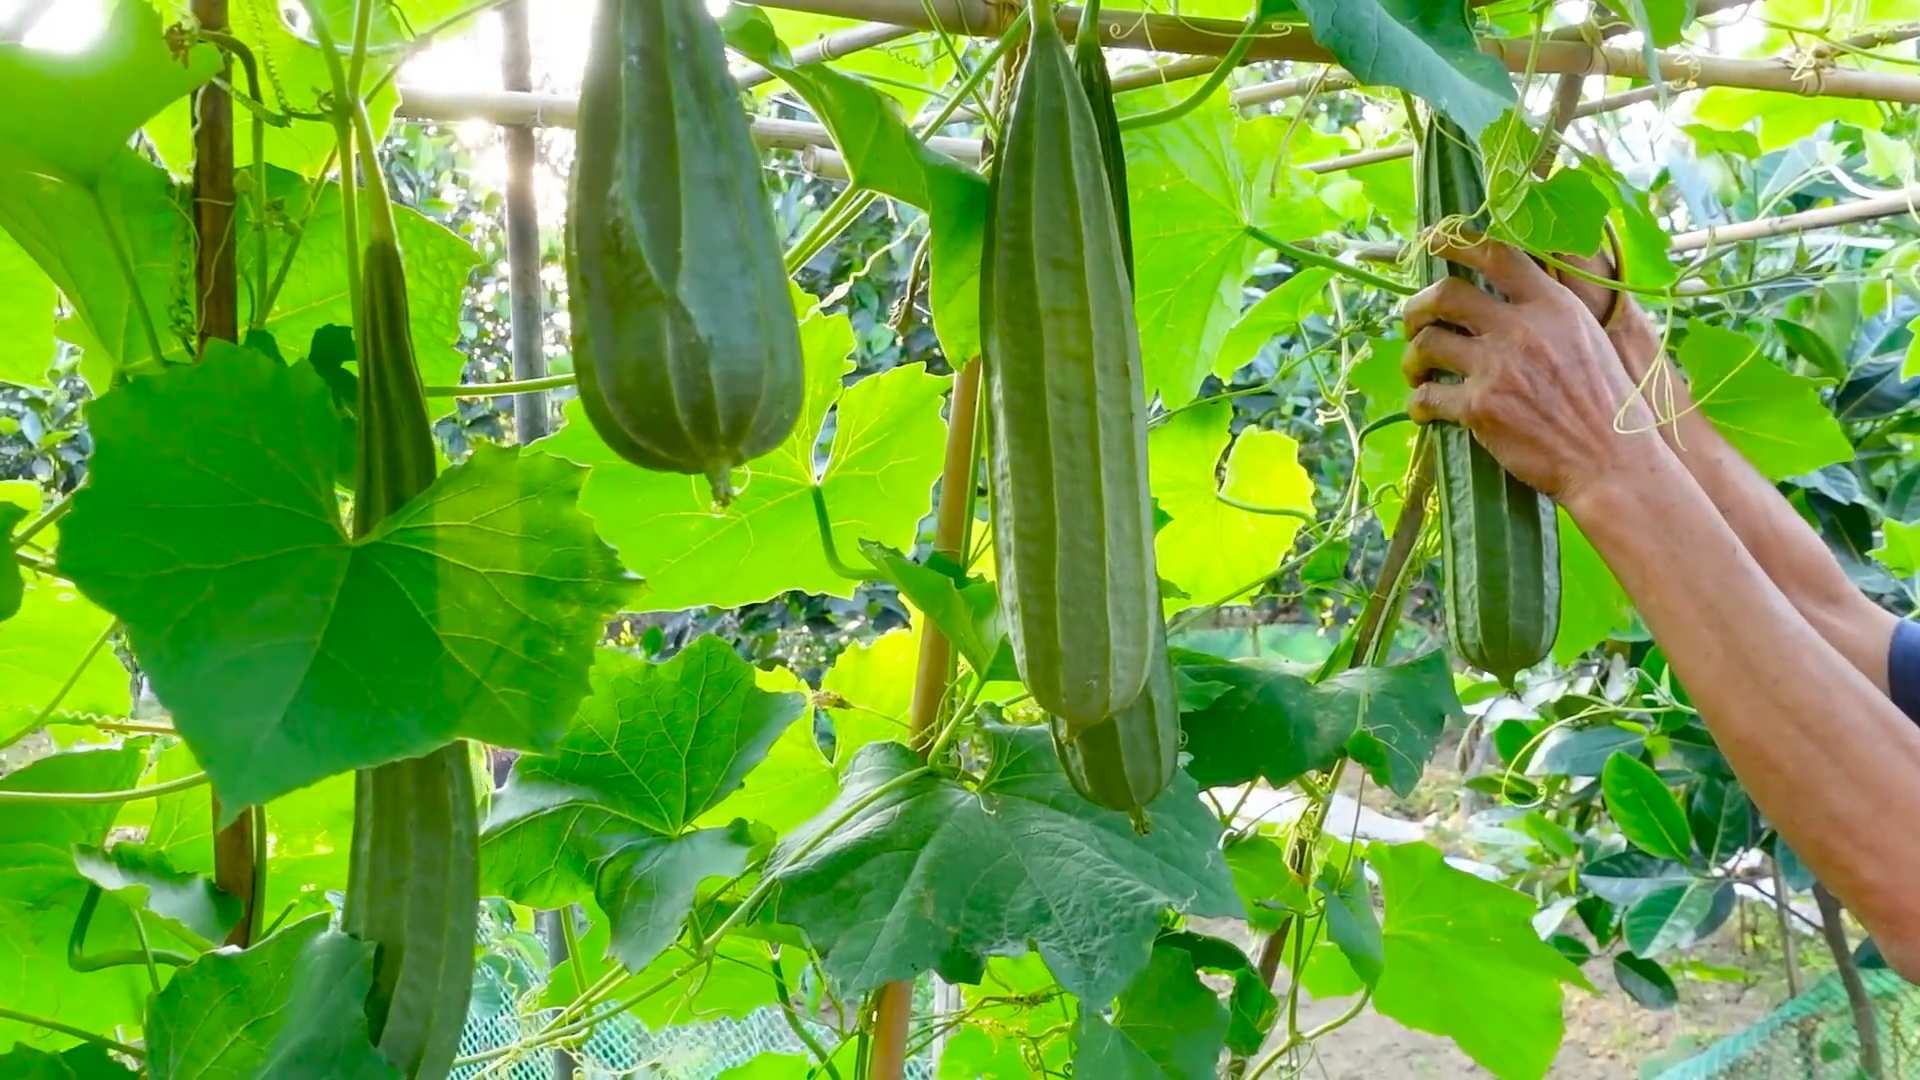
- Knowing When to Harvest: The key is to wait until the luffa fruits are fully mature and have started to turn brown and dry on the vine. The skin should be hard and brittle. You might even hear the seeds rattling inside when you shake it. Don’t harvest too early, or the sponge will be underdeveloped and mushy.
- Harvesting the Fruits: Use pruning shears or a sharp knife to cut the luffa fruits from the vine. Be careful not to damage the vine.
- Timing is Key: Luffa needs a long growing season (around 150-200 days), so starting seeds indoors is crucial, especially if you live in a cooler climate. I usually start mine about 6-8 weeks before the last expected frost.
- Seed Scarification (Optional but Recommended): Luffa seeds have a tough outer shell. To help them germinate faster, you can gently scarify them. This means lightly scratching the seed coat with sandpaper or nicking it with a knife. Be careful not to damage the inside of the seed!
- Soaking the Seeds: Soak the scarified seeds in warm water for 24-48 hours. This helps to soften the seed coat and further encourage germination. You’ll likely see them swell up a bit.
- Planting the Seeds: Fill small pots (about 3-4 inches in diameter) with a good quality seed-starting mix. Plant one or two seeds per pot, about ½ inch deep.
- Creating a Humid Environment: Luffa seeds love humidity. Cover the pots with plastic wrap or a humidity dome to create a mini-greenhouse effect.
- Warmth is Essential: Place the pots in a warm location, ideally around 80-85°F (27-29°C). A heat mat can be really helpful for maintaining consistent warmth.
- Patience is a Virtue: Germination can take anywhere from 7-21 days, so don’t get discouraged if you don’t see sprouts right away. Keep the soil consistently moist, but not soggy.
- Harden Off Your Seedlings: Before transplanting, you need to acclimate your seedlings to outdoor conditions. This process, called “hardening off,” involves gradually exposing them to sunlight, wind, and cooler temperatures over a period of 7-10 days. Start by placing them outdoors in a sheltered location for an hour or two each day, gradually increasing the time and exposure.
- Choose the Right Location: Luffa vines need plenty of sunlight (at least 6-8 hours per day) and well-drained soil. They are also heavy feeders, so choose a spot where you can easily amend the soil with compost or other organic matter.
- Prepare the Soil: Dig a hole that is twice as wide and as deep as the root ball of your seedling. Amend the soil with plenty of compost, well-rotted manure, or other organic matter. This will provide the nutrients your luffa vines need to thrive.
- Transplant Carefully: Gently remove the seedling from its pot, being careful not to damage the roots. Place the seedling in the hole and backfill with soil, gently firming it around the base of the plant.
- Water Thoroughly: Water the newly transplanted seedlings thoroughly to help them settle in.
- Provide Support: Luffa vines are vigorous climbers and need strong support to grow on. A sturdy trellis, fence, or arbor is essential. Make sure the support is tall enough to accommodate the mature size of the vine, which can easily reach 15-30 feet.
- Watering: Luffa vines need consistent watering, especially during hot, dry weather. Water deeply and regularly, ensuring that the soil stays moist but not waterlogged. I like to water in the morning so the foliage has time to dry before nightfall, which helps prevent fungal diseases.
- Fertilizing: Luffa vines are heavy feeders and benefit from regular fertilization. Use a balanced fertilizer or a fertilizer specifically formulated for vegetables. I like to use a liquid fertilizer every 2-3 weeks during the growing season. You can also side-dress the plants with compost or well-rotted manure.
- Pruning: While not strictly necessary, pruning can help to improve air circulation and encourage fruit production. Remove any dead or diseased leaves and stems. You can also prune back the tips of the vines to encourage branching.
- Pest and Disease Control: Luffa vines are generally resistant to pests and diseases, but they can be susceptible to problems like squash bugs, aphids, and powdery mildew. Inspect your plants regularly for signs of pests or diseases and take action promptly. Insecticidal soap or neem oil can be effective for controlling many common pests. For powdery mildew, improve air circulation and consider using a fungicide if necessary.
- Pollination: Luffa flowers are pollinated by insects, primarily bees. If you’re not seeing a lot of bee activity in your garden, you may need to hand-pollinate the flowers. To do this, use a small paintbrush to transfer pollen from the male flowers (which have a long, thin stem) to the female flowers (which have a small luffa fruit behind the flower).
- Knowing When to Harvest: The key is to wait until the luffa fruits are fully mature and have started to turn brown and dry on the vine. The skin should be hard and brittle. You might even hear the seeds rattling inside when you shake it. Don’t harvest too early, or the sponge will be underdeveloped and mushy.
- Harvesting the Fruits: Use pruning shears or a sharp knife to cut the luffa fruits from the vine. Be careful not to damage the vine.
- Drying the Luffa: If the luffa fruits are not completely dry when you harvest them, you’ll need to dry them further. You can do this by hanging them in a well-ventilated area or by placing them in a single layer on a screen or rack. Make sure they are protected from rain and direct sunlight.
- Peeling the Skin: Once the luffa fruits are completely dry, it’s time to remove the skin. This can be a bit messy, so I recommend doing it outdoors or in a well-ventilated area. You can crack the skin by gently squeezing the luffa or by tapping it on a hard surface. Then, peel away the skin, revealing the sponge inside. If the skin is difficult to remove, you can soak the luffa in water for a few minutes to soften it.
- Removing the Seeds: After peeling the skin, you’ll need to remove the seeds. Simply shake the luffa vigorously to dislodge the seeds. You can save the seeds for planting next year.
- Washing and Rinsing: Rinse the luffa sponge thoroughly with water to remove any remaining debris. You can also wash it with soap and water if desired.
- Bleaching (Optional): If you want a whiter sponge, you can soak it in a diluted bleach solution (1 part bleach to 10 parts water) for a few minutes. Rinse thoroughly with water after bleaching. I personally prefer to skip this step and keep my sponges natural.
- Drying the Sponge: Allow the luffa sponge to dry completely before using it. You can hang it up to dry or place it in a well-ventilated area.
- Cutting and Shaping: Once the sponge is dry, you can cut it into smaller pieces or shape it as desired. I like to cut mine into different sizes for different uses.
Hey there, fellow gardening enthusiasts! Have you ever thought about growing your own sponges? I know, it sounds a little crazy, but it’s totally possible, and incredibly rewarding! I’m talking about angled luffa, also known as Chinese okra or ridge gourd. These amazing plants produce fruits that, when dried and processed, transform into the perfect natural sponges for your kitchen, bathroom, or even for exfoliating your skin.
This guide will walk you through every step of the process, from seed to sponge, so you can enjoy the satisfaction of growing your own sustainable cleaning tools. Let’s get started!
Choosing the Right Variety and Starting Seeds
Before we dive into the nitty-gritty, let’s talk about variety. While there are different types of luffa, angled luffa (Luffa acutangula) is generally easier to grow and produces a more textured sponge than smooth luffa (Luffa aegyptiaca). Make sure you’re getting seeds specifically for angled luffa.
Here’s how to get those seeds sprouting:
Transplanting Your Luffa Seedlings
Once your seedlings have developed a few sets of true leaves (the leaves that look like miniature versions of the adult leaves), it’s time to transplant them outdoors.
Caring for Your Luffa Vines
Now that your luffa vines are in the ground, it’s time to provide them with the care they need to flourish.
Harvesting and Processing Your Luffa Sponges
This is the exciting part! Harvesting and processing your luffa fruits into sponges is a relatively simple process.
Tips and Tricks for Success
Here are a few extra tips
Conclusion
So, there you have it! Growing your own angled luffa at home is not just a gardening project; it’s an investment in sustainable living, a journey of discovery, and a pathway to incredibly useful and satisfying results. Forget those mass-produced, often chemically treated sponges from the store. With a little patience and effort, you can cultivate your own supply of all-natural, biodegradable, and wonderfully textured luffa sponges right in your backyard.
Why is this DIY trick a must-try? Because it empowers you to control the entire process, from seed to sponge. You know exactly what goes into your luffa – sunshine, water, and your loving care. No harsh chemicals, no questionable sourcing, just pure, natural goodness. Plus, the satisfaction of using a sponge you grew yourself is unparalleled. It’s a conversation starter, a source of pride, and a testament to your green thumb.
Beyond the practical benefits, growing angled luffa offers a unique connection to nature. Watching the vines climb, the flowers bloom, and the gourds swell is a truly rewarding experience. It’s a reminder of the abundance that nature provides and the simple joys of cultivating your own resources.
Ready to take your luffa growing to the next level? Consider these variations and suggestions:
* Vertical Gardening: If you’re short on space, train your luffa vines to grow vertically on a trellis or fence. This maximizes your yield and adds a beautiful green screen to your garden.
* Companion Planting: Plant basil, marigolds, or nasturtiums near your luffa vines to deter pests and attract beneficial insects.
* Seed Saving: Once your luffa gourds are fully mature, save some of the seeds for next year’s planting. This ensures a continuous supply of luffa and allows you to adapt your crop to your specific climate and growing conditions.
* Luffa Crafts: Don’t limit yourself to just sponges! Use your homegrown luffa to create bath mats, soap dishes, or even exfoliating scrubs. The possibilities are endless.
* Experiment with Varieties: While this article focuses on angled luffa, there are other luffa varieties to explore. Experiment with different types to find the ones that thrive best in your region.
We wholeheartedly encourage you to embark on this exciting DIY adventure. Growing angled luffa at home is a rewarding experience that will benefit you, your family, and the environment. So, grab some seeds, prepare your garden, and get ready to harvest your own all-natural sponges.
But don’t just take our word for it! We want to hear about your experiences. Share your tips, tricks, and photos in the comments below. Let’s create a community of luffa growers and learn from each other. What challenges did you face? What successes did you celebrate? Your insights will help other aspiring luffa farmers and contribute to a wealth of knowledge about this amazing plant.
So, what are you waiting for? Get growing and discover the joy of homegrown luffa!
Frequently Asked Questions (FAQ)
What exactly is angled luffa, and how is it different from regular luffa?
Angled luffa ( *Luffa acutangula*) is a type of gourd that, when dried, becomes a natural sponge. It’s characterized by its distinct ridges or angles running along the length of the fruit, hence the name “angled” luffa. Regular luffa ( *Luffa aegyptiaca*) is smoother and more cylindrical. Both types can be used as sponges, but some people prefer the texture of angled luffa for its slightly coarser feel. Angled luffa also tends to mature a bit faster than smooth luffa.
How long does it take to grow angled luffa from seed to harvest?
The time it takes to grow angled luffa can vary depending on your climate and growing conditions. Generally, it takes about 120 to 150 days from planting the seeds to harvesting mature gourds. In warmer climates with longer growing seasons, you may be able to harvest sooner. In cooler climates, you may need to start the seeds indoors to give them a head start.
What are the ideal growing conditions for angled luffa?
Angled luffa thrives in warm, sunny locations with well-drained soil. It needs at least 6-8 hours of direct sunlight per day. The soil should be rich in organic matter and have a pH between 6.0 and 7.0. Luffa vines are heavy feeders, so it’s important to amend the soil with compost or other organic fertilizers before planting. They also need a sturdy trellis or support structure to climb on.
How do I start angled luffa seeds?
You can start angled luffa seeds indoors or directly in the garden. To start them indoors, sow the seeds in small pots or trays about 6-8 weeks before the last expected frost. Keep the soil moist and warm (around 70-80°F). Once the seedlings have developed a few true leaves, you can transplant them into the garden after the danger of frost has passed. To direct sow the seeds, wait until the soil has warmed up to at least 65°F. Sow the seeds about 1 inch deep and 12-18 inches apart.
How often should I water angled luffa plants?
Angled luffa plants need consistent moisture, especially during hot, dry weather. Water deeply and regularly, ensuring that the soil stays moist but not waterlogged. Avoid overhead watering, as this can promote fungal diseases. A good rule of thumb is to water when the top inch of soil feels dry to the touch. Mulching around the plants can help retain moisture and suppress weeds.
What are some common pests and diseases that affect angled luffa?
Some common pests that can affect angled luffa include squash bugs, aphids, and cucumber beetles. Diseases that can affect luffa include powdery mildew, downy mildew, and fungal leaf spots. To prevent pest and disease problems, practice good garden hygiene, such as removing plant debris and weeds. You can also use organic pest control methods, such as insecticidal soap or neem oil. Ensure good air circulation around the plants to minimize fungal issues.
How do I know when my angled luffa is ready to harvest?
The best time to harvest angled luffa is when the gourd is fully mature and the skin has started to turn brown and dry. The gourd should feel lightweight and the seeds should rattle inside. If you harvest too early, the luffa will be soft and mushy. If you wait too long, the luffa will become too hard and difficult to process.
How do I process angled luffa into a sponge?
To process angled luffa into a sponge, first, cut the gourd from the vine. Then, soak it in water for a few days to soften the skin. Once the skin is soft, you can peel it off by hand. Remove the seeds and any remaining pulp. Rinse the luffa thoroughly and allow it to dry completely in the sun. Once it’s dry, you can cut it into the desired size and shape.
Can I eat angled luffa?
Yes, young, immature angled luffa gourds can be eaten. They have a mild, slightly sweet flavor and can be used in stir-fries, soups, and stews. However, as the gourd matures, it becomes too fibrous and bitter to eat. Only harvest young gourds for consumption.
How can I store my harvested angled luffa sponges?
Store your harvested angled luffa sponges in a cool, dry place. Make sure they are completely dry before storing them to prevent mold growth. You can store them in a mesh bag or a well-ventilated container. With proper storage, your luffa sponges can last for several years.


Leave a Comment