
Growing Asparagus at Home might seem like a challenge reserved for seasoned gardeners, but I’m here to tell you it’s totally achievable, even if you’re just starting out! Imagine stepping into your backyard and harvesting your own fresh, tender asparagus spears – the taste is simply unmatched by anything you can buy in the store.
Asparagus has a rich history, dating back to ancient Greece and Rome, where it was prized for its medicinal properties and delicate flavor. It was even considered a delicacy fit for emperors! Today, while we may not be emperors, we can certainly enjoy the regal taste of homegrown asparagus.
Why should you bother with growing asparagus at home? Well, for starters, store-bought asparagus can be expensive and often lacks the freshness and flavor of homegrown. Plus, knowing exactly where your food comes from and how it’s grown is incredibly rewarding. This DIY guide will walk you through everything you need to know, from selecting the right variety to planting, caring for, and harvesting your own delicious asparagus. Get ready to impress your friends and family with your green thumb and enjoy the unparalleled taste of fresh, homegrown asparagus!
Growing Artichokes: A Beginner’s Guide to Bountiful Harvests
So, you want to grow artichokes? Awesome! These architectural beauties aren’t just delicious; they’re also stunning additions to any garden. I’m going to walk you through everything you need to know to successfully cultivate these thistles, from choosing the right variety to harvesting your very own edible treasures. Don’t worry if you’re a beginner; I’ll break it down into easy-to-follow steps.
Choosing Your Artichoke Variety
First things first, let’s talk varieties. Not all artichokes are created equal, and some are better suited for certain climates than others. Here are a few popular choices:
* Green Globe: This is the classic artichoke, known for its large, round buds and excellent flavor. It’s a reliable choice for many regions.
* Violetta: If you’re looking for something a little different, Violetta artichokes have a beautiful purple hue and a slightly sweeter taste.
* Imperial Star: This variety is known for its early maturity, making it a great option if you have a shorter growing season.
* Big Heart: As the name suggests, Big Heart artichokes produce large, meaty hearts with fewer prickly chokes.
Consider your local climate and growing season when making your selection. Check with your local nursery or agricultural extension office for recommendations specific to your area.
Getting Started: Planting Your Artichokes
Artichokes can be grown from seed, but it’s generally easier and faster to start with transplants (also called “starts”). Here’s how to get them in the ground:
1. Choose the Right Location: Artichokes need plenty of sunshine – at least 6-8 hours a day. They also prefer well-drained soil that’s rich in organic matter. Avoid areas where water tends to pool after rain.
2. Prepare the Soil: Before planting, amend your soil with plenty of compost or well-rotted manure. This will improve drainage, add nutrients, and create a healthy environment for your artichokes to thrive. I usually dig in about a wheelbarrow’s worth per planting area.
3. Planting Time: The best time to plant artichoke transplants is in the spring, after the last frost. If you live in a warmer climate, you can also plant them in the fall.
4. Planting Procedure: Dig a hole that’s slightly larger than the root ball of your transplant. Gently remove the artichoke from its container and loosen the roots a bit. Place the plant in the hole, making sure the top of the root ball is level with the surrounding soil. Backfill the hole with soil and gently firm it around the plant.
5. Spacing: Give your artichokes plenty of room to grow. Space them at least 4 feet apart, and allow 6 feet between rows. They can get quite large!
6. Watering: Water your newly planted artichokes thoroughly. Keep the soil consistently moist, but not soggy, especially during the first few weeks.
Caring for Your Artichokes: The Growing Season
Once your artichokes are planted, it’s time to focus on providing them with the care they need to flourish.
1. Watering: Artichokes need consistent moisture, especially during hot, dry weather. Water deeply and regularly, aiming for about 1-2 inches of water per week. I like to use a soaker hose to deliver water directly to the roots.
2. Fertilizing: Artichokes are heavy feeders, so they benefit from regular fertilization. Apply a balanced fertilizer (like a 10-10-10) every 4-6 weeks during the growing season. You can also side-dress with compost or well-rotted manure.
3. Mulching: Apply a layer of mulch around your artichoke plants to help retain moisture, suppress weeds, and regulate soil temperature. Straw, wood chips, or shredded leaves work well.
4. Weeding: Keep the area around your artichokes free of weeds. Weeds compete for nutrients and water, which can stunt the growth of your plants.
5. Pest Control: Artichokes can be susceptible to certain pests, such as aphids, snails, and slugs. Inspect your plants regularly and take action if you notice any problems. Hand-picking pests, using insecticidal soap, or setting out snail bait are all effective options.
6. Pruning: In the fall, after your artichokes have finished producing, cut back the plants to about 12 inches above the ground. This will help them conserve energy and prepare for winter.
Overwintering Artichokes: Protecting Them from the Cold
Artichokes are perennials in warmer climates (zones 7-10), meaning they can live for several years. However, in colder climates, they need protection from freezing temperatures.
1. Cutting Back: As mentioned above, cut back the plants to about 12 inches above the ground in the fall.
2. Mulching Heavily: Apply a thick layer of mulch (at least 6-8 inches) around the base of the plants. This will help insulate the roots and protect them from freezing.
3. Covering: In very cold climates, you may need to provide additional protection by covering the plants with a tarp or blanket. Make sure to secure the covering so it doesn’t blow away.
4. Container Growing: If you’re growing artichokes in containers, you can move them to a sheltered location, such as a garage or shed, during the winter.
5. Checking for Rot: Throughout the winter, check your artichokes periodically for signs of rot or disease. Remove any dead or decaying foliage.
Harvesting Your Artichokes: The Moment You’ve Been Waiting For!
Harvesting artichokes is the most rewarding part of the process. Here’s how to know when they’re ready:
1. Timing: Artichokes are typically ready to harvest in the spring or early summer, depending on your climate and the variety you’re growing.
2. Appearance: Look for buds that are firm, plump, and tightly closed. The bracts (the outer leaves) should be a deep green or purple color, depending on the variety.
3. Size: The size of the artichoke will vary depending on the variety, but generally, you want to harvest them when they’re about 3-4 inches in diameter.
4. Harvesting Technique: Use a sharp knife to cut the artichoke stem about 2-3 inches below the bud.
5. Multiple Harvests: Artichoke plants will produce multiple buds throughout the season. Harvest the main bud first, and then the smaller side buds will follow.
Enjoying Your Harvest: Cooking and Eating Artichokes
Now that you’ve harvested your artichokes, it’s time to enjoy them! There are many ways to cook and eat artichokes, but here are a few popular methods:
* Steaming: Steaming is a classic way to cook artichokes. Simply steam them for about 20-30 minutes, or until the bracts are tender and easily pulled off. Serve with melted butter or a dipping sauce.
* Boiling: Boiling is another simple way to cook artichokes. Boil them in salted water for about 20-30 minutes, or until tender.
* Grilling: Grilled artichokes have a smoky, delicious flavor. Cut the artichokes in half, brush them with olive oil, and grill them over medium heat for about 10-15 minutes per side.
* Roasting: Roasted artichokes are tender and flavorful. Cut the artichokes in half, brush them with olive oil, and roast them in a preheated oven at 400°F (200°C) for about 30-40 minutes.
To eat an artichoke, pull off the bracts one at a time and dip them in your favorite sauce. Scrape the fleshy part of the bract off with your teeth. Once you’ve removed all the bracts, you’ll be left with the heart, which is the most delicious part of the artichoke. Use a spoon to remove the fuzzy choke (the inedible part) and enjoy!
Troubleshooting: Common Artichoke Problems
Even with the best care, you may encounter some problems when growing artichokes. Here are a few common issues and how to address them:
* Aphids: These tiny pests can suck the sap from your artichoke plants, causing them to weaken and become distorted. Spray with insecticidal soap or release beneficial insects like ladybugs.
* Snails and Slugs: These pests can chew holes in the leaves of your artichoke plants. Hand-pick them off the plants or set out snail bait.
* Powdery Mildew: This fungal disease can cause a white, powdery coating on the leaves of your artichoke plants. Improve air circulation and spray with a fungicide.
*
Conclusion
So, there you have it – a comprehensive guide to growing asparagus at home! We’ve covered everything from selecting the right crowns to nurturing your plants for a bountiful harvest. But why should you embark on this green-thumb adventure? Because growing your own asparagus isn’t just about saving money (though that’s a definite perk!). It’s about experiencing the unparalleled flavor of freshly picked spears, knowing exactly where your food comes from, and connecting with nature in a deeply satisfying way.
Imagine this: It’s springtime, the sun is warming your garden, and you’re strolling through your asparagus patch, carefully selecting the plumpest, most vibrant spears. You bring them inside, lightly grill them with a drizzle of olive oil and a sprinkle of sea salt, and savor the sweet, earthy taste that only homegrown asparagus can deliver. That’s the reward waiting for you.
This DIY trick for cultivating your own asparagus patch is a must-try for several reasons. Firstly, the taste difference between store-bought and homegrown asparagus is remarkable. Store-bought asparagus often travels long distances, losing its freshness and flavor along the way. Homegrown asparagus, on the other hand, is harvested at its peak ripeness, resulting in a sweeter, more tender, and intensely flavorful vegetable. Secondly, growing your own asparagus allows you to control the growing conditions and avoid the use of harmful pesticides or herbicides. You can be confident that your asparagus is healthy, organic, and safe for your family. Finally, growing asparagus is a long-term investment that will provide you with a delicious and nutritious harvest for years to come. With proper care, an asparagus patch can last for 15 to 20 years or even longer.
But don’t stop there! Feel free to experiment with different varieties of asparagus to find your favorite flavor profile. ‘Jersey Knight’ is a popular choice for its high yields and disease resistance, while ‘Purple Passion’ offers a unique color and slightly sweeter taste. You can also try companion planting with herbs like basil and parsley, which can help deter pests and improve the overall health of your asparagus plants. Consider adding a layer of mulch around your plants to help retain moisture and suppress weeds.
Ready to take the plunge and start your own asparagus patch? We encourage you to give it a try! It may seem daunting at first, but with a little patience and effort, you’ll be rewarded with a lifetime of delicious, homegrown asparagus. And don’t forget to share your experiences with us! We’d love to hear about your successes, challenges, and any tips or tricks you’ve discovered along the way. Share your photos and stories on our social media pages using #HomegrownAsparagus. Let’s build a community of asparagus enthusiasts and inspire others to embrace the joys of gardening!
Variations and Enhancements
Consider adding a soaker hose to your asparagus bed for efficient watering. This will deliver water directly to the roots, minimizing water waste and reducing the risk of fungal diseases. You can also amend your soil with compost or aged manure to improve its fertility and drainage. Remember to test your soil pH regularly and adjust it as needed to ensure optimal growing conditions for your asparagus plants.
Beyond the Basics
Once your asparagus patch is established, you can explore different ways to preserve your harvest. Pickling asparagus is a great way to enjoy its flavor year-round. You can also blanch and freeze asparagus for later use in soups, stir-fries, or omelets. Get creative in the kitchen and experiment with different asparagus recipes. From simple grilled asparagus to elegant asparagus risotto, the possibilities are endless.
Frequently Asked Questions (FAQ)
Q: How long does it take to harvest asparagus after planting?
A: Patience is key when growing asparagus! It typically takes 2-3 years after planting crowns before you can begin harvesting. This allows the plants to establish a strong root system. In the first year, resist the urge to harvest any spears. In the second year, you can harvest sparingly for a few weeks. By the third year, you can enjoy a more substantial harvest for 6-8 weeks. Remember, over-harvesting young plants can weaken them and reduce future yields.
Q: What is the best time of year to plant asparagus crowns?
A: The best time to plant asparagus crowns is in early spring, as soon as the soil can be worked. This allows the plants to establish themselves before the heat of summer arrives. In colder climates, you may need to wait until after the last frost. Make sure the soil is well-drained and amended with compost or aged manure before planting.
Q: How deep should I plant asparagus crowns?
A: Dig a trench that is 6-8 inches deep and 12 inches wide. Create a small mound of soil in the center of the trench and place the asparagus crown on top of the mound, spreading the roots out around it. Cover the crown with 2 inches of soil. As the asparagus spears grow, gradually fill in the trench with soil until it is level with the surrounding ground.
Q: How much sun does asparagus need?
A: Asparagus needs at least 6-8 hours of direct sunlight per day to thrive. Choose a location in your garden that receives plenty of sunlight throughout the growing season. If you live in a hot climate, some afternoon shade may be beneficial to prevent the plants from overheating.
Q: What kind of soil is best for growing asparagus?
A: Asparagus prefers well-drained, sandy loam soil with a pH of 6.5 to 7.5. Amend heavy clay soil with compost or other organic matter to improve drainage. You can also add lime to raise the pH of acidic soil. Before planting, it’s a good idea to have your soil tested to determine its pH and nutrient levels.
Q: How often should I water asparagus?
A: Asparagus needs consistent moisture, especially during the growing season. Water deeply and regularly, especially during dry spells. Avoid overwatering, as this can lead to root rot. A good rule of thumb is to water when the top inch of soil feels dry to the touch. Consider using a soaker hose or drip irrigation to deliver water directly to the roots.
Q: How do I fertilize asparagus?
A: Fertilize asparagus in early spring, before the spears emerge, with a balanced fertilizer such as 10-10-10. You can also side-dress the plants with compost or aged manure. Avoid over-fertilizing, as this can lead to excessive foliage growth at the expense of spear production.
Q: How do I control weeds in my asparagus patch?
A: Weeds can compete with asparagus for nutrients and water, so it’s important to keep your asparagus patch weed-free. Hand-pull weeds regularly, or use a hoe to cultivate the soil around the plants. Mulching with straw, wood chips, or other organic materials can also help suppress weeds. Avoid using herbicides, as they can damage the asparagus plants.
Q: What are some common pests and diseases that affect asparagus?
A: Common pests of asparagus include asparagus beetles, aphids, and cutworms. Diseases that can affect asparagus include rust, crown rot, and fusarium wilt. Inspect your plants regularly for signs of pests or diseases and take appropriate action. You can use insecticidal soap or neem oil to control pests, and fungicides to control diseases. Choose disease-resistant varieties of asparagus to minimize the risk of disease problems.
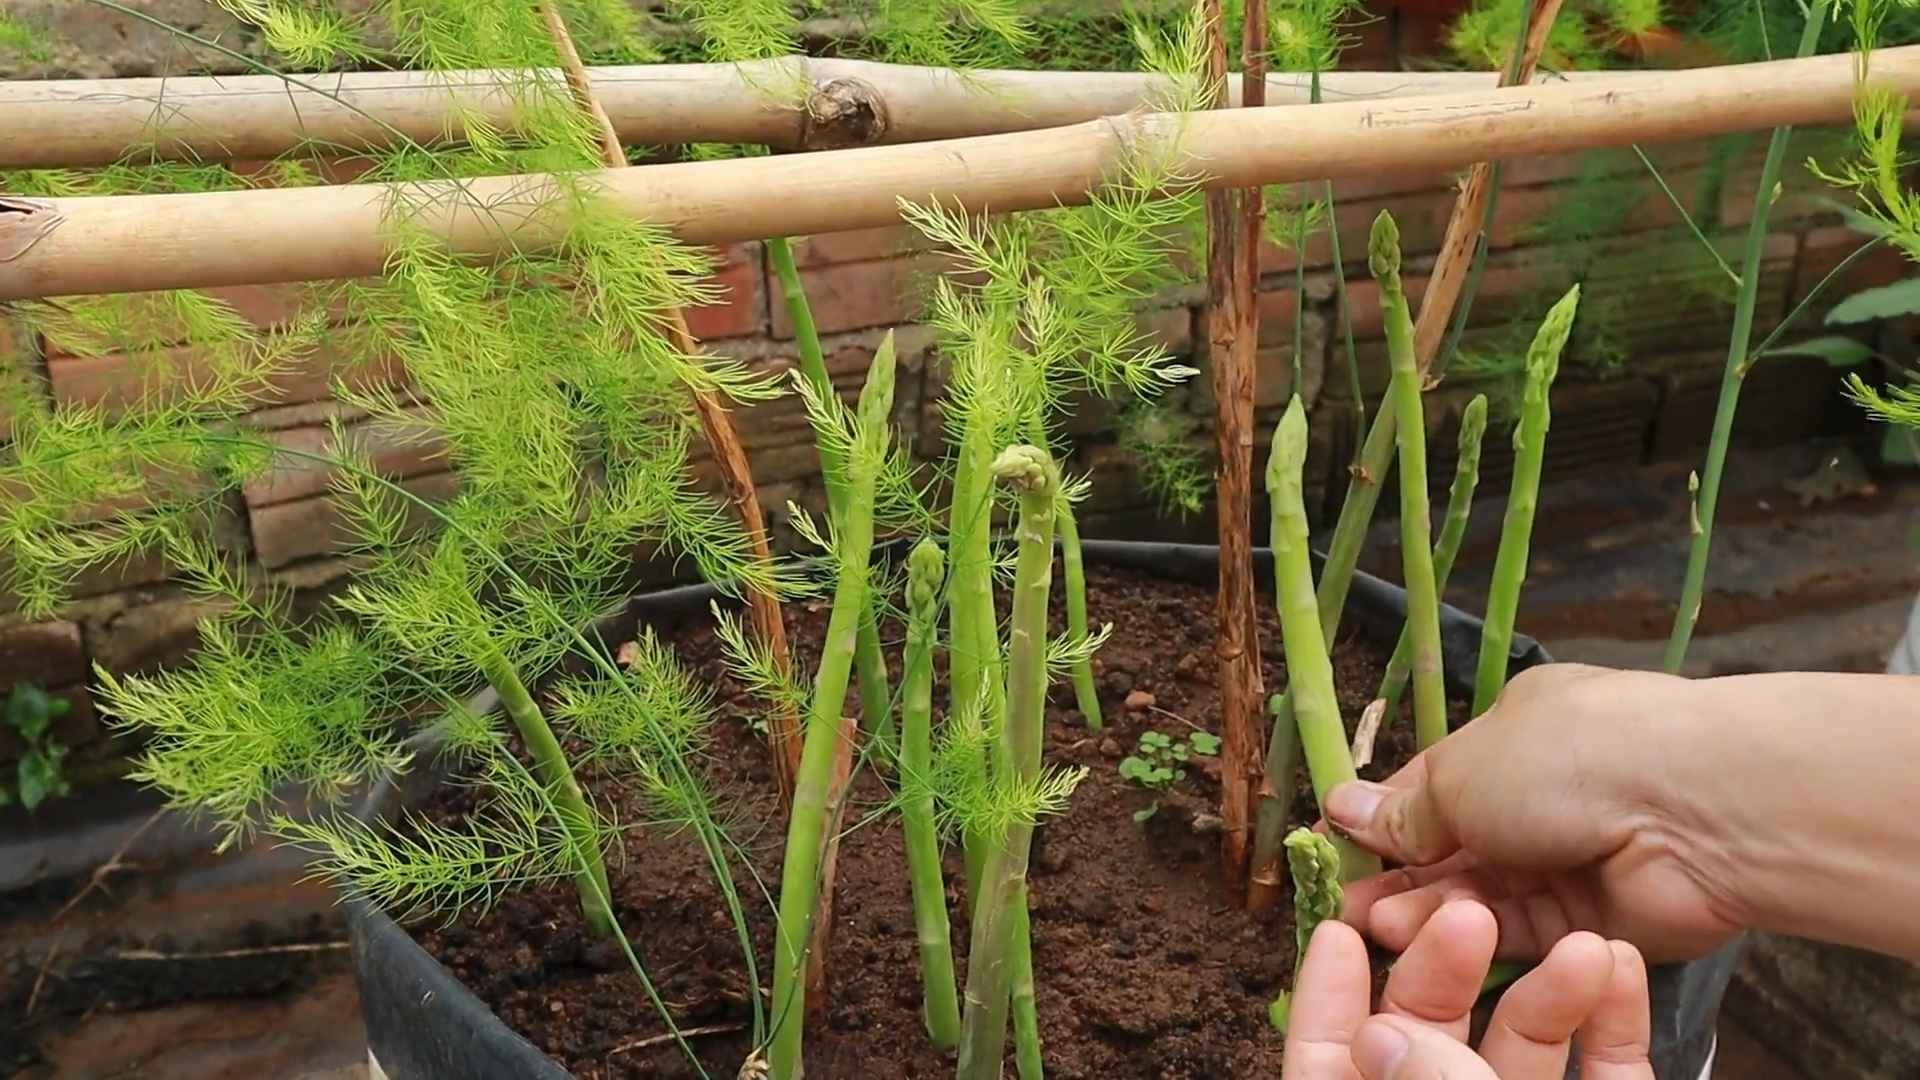
Q: How do I harvest asparagus?
A: Harvest asparagus spears when they are 6-8 inches tall and about as thick as your finger. Use a sharp knife to cut the spears at ground level. Avoid damaging the crown or surrounding spears. Harvest spears every day or two during the peak of the season. Stop harvesting when the spears become thin and spindly, as this indicates that the plants are starting to store energy for the following year.
Q: What do I do with asparagus ferns after the harvest season?
A: After the harvest season, allow the asparagus ferns to grow and mature. These ferns will provide the plants with the energy they need to produce spears the following year. In late fall or early winter, after the ferns have turned brown, cut them back to ground level. This will help prevent diseases from overwintering in the garden.
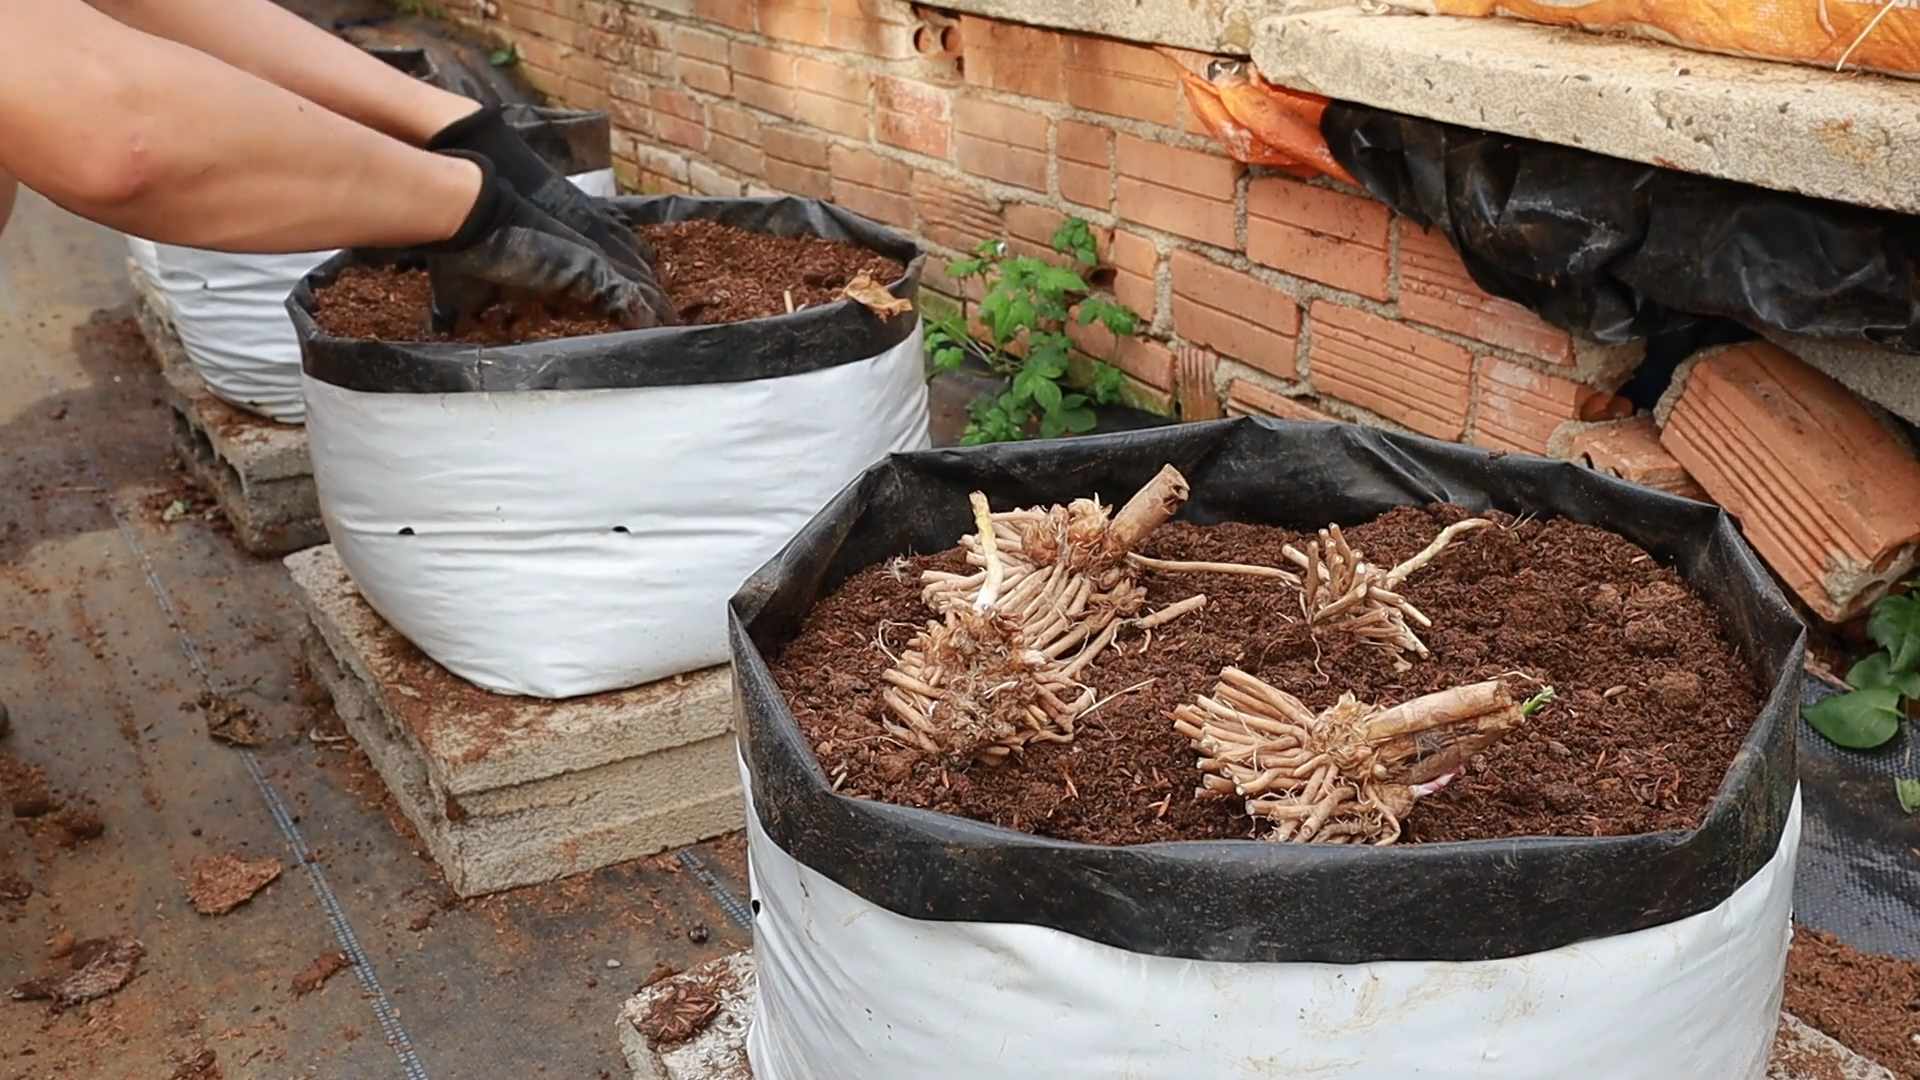
Q: Can I grow asparagus in containers?
A: Yes, you can grow asparagus in containers, but it requires a large container (at least 18 inches in diameter and 24 inches deep) and well-drained potting mix. Choose a sunny location for your container asparagus and water regularly. Container-grown asparagus may not produce as many spears as asparagus grown in the ground, but it can still be a rewarding experience.
Q: How long will my asparagus patch last?
A: With proper care, an asparagus patch can last for 15 to 20 years or even longer. The key is to provide the plants with the right growing conditions, protect them from pests and diseases, and avoid over-harvesting. By following the tips in this guide, you can enjoy a bountiful harvest of homegrown asparagus for many years to come.
Leave a Comment