
Grow Cabbage at Home? Absolutely! Imagine stepping into your backyard and harvesting crisp, vibrant cabbage heads, ready to be transformed into delicious coleslaw, hearty soups, or tangy sauerkraut. It’s not just a dream; it’s an achievable reality with a few simple tricks and DIY techniques. For centuries, cabbage has been a staple in diets across the globe, from the humble peasant’s fare to the refined dishes of royalty. Its cultivation dates back to ancient times, with evidence suggesting its presence in Europe as early as 2500 BC.
But why should you bother to grow cabbage at home? Well, store-bought cabbage can often lack the freshness and flavor of homegrown varieties. Plus, let’s be honest, who doesn’t love the satisfaction of nurturing a plant from seed to table? In this article, I’m going to share some easy-to-follow DIY hacks that will help you cultivate thriving cabbage plants, even if you’re a complete beginner. We’ll cover everything from seed starting and soil preparation to pest control and harvesting, ensuring you have a bountiful cabbage crop to enjoy. Get ready to roll up your sleeves and discover the joys of homegrown cabbage!
Growing Cabbage at Home: A Complete DIY Guide
Hey there, fellow gardening enthusiasts! Ever dreamt of harvesting your own crisp, delicious cabbage right from your backyard? Well, dream no more! Growing cabbage at home is totally achievable, even if you’re a beginner. I’m going to walk you through every step, from seed to harvest, so you can enjoy fresh, homegrown cabbage in your favorite recipes.
Choosing Your Cabbage Variety
First things first, let’s talk cabbage varieties. There are tons to choose from, each with its own unique characteristics. Consider your climate, growing season, and personal preferences when making your selection. Here are a few popular options:
* Early Cabbage: These mature quickly (around 60-70 days) and are great for short growing seasons. Examples include ‘Golden Acre’ and ‘Early Jersey Wakefield’.
* Mid-Season Cabbage: These take a bit longer (70-85 days) but often produce larger heads. ‘Copenhagen Market’ is a classic choice.
* Late Cabbage: These are your long-term commitment cabbages (85+ days). They’re perfect for fall harvests and storage. ‘Danish Ballhead’ is a reliable option.
* Savoy Cabbage: Known for their crinkled leaves and mild flavor. ‘Savoy Ace’ is a popular variety.
* Red Cabbage: Adds a pop of color to your garden and is packed with antioxidants. ‘Red Acre’ is a good choice.
Once you’ve picked your variety, it’s time to get started!
Starting Your Cabbage Seeds
Cabbage is a cool-season crop, so timing is crucial. You can either start your seeds indoors or direct sow them in your garden, depending on your climate. I usually prefer starting them indoors to get a head start.
Starting Seeds Indoors:
1. Gather Your Supplies: You’ll need seed starting trays or small pots, seed starting mix (a light, well-draining mix is best), cabbage seeds, a spray bottle, and a grow light (optional, but highly recommended).
2. Sow the Seeds: Fill your trays or pots with seed starting mix. Moisten the mix with the spray bottle – you want it damp, not soggy. Sow 2-3 seeds per cell or pot, about ¼ inch deep.
3. Cover and Water: Gently cover the seeds with more seed starting mix and lightly water again with the spray bottle.
4. Provide Warmth and Light: Place the trays or pots in a warm location (around 70-75°F) until the seeds germinate. A heat mat can be helpful. Once the seedlings emerge (usually within 5-10 days), move them under a grow light or to a sunny windowsill. If using a windowsill, rotate the trays regularly to prevent the seedlings from leaning towards the light.
5. Thin the Seedlings: Once the seedlings have their first true leaves (the second set of leaves), thin them to one seedling per cell or pot. Snip off the weaker seedlings at the soil line with scissors.
6. Harden Off the Seedlings: Before transplanting your seedlings outdoors, you need to “harden them off.” This gradually acclimates them to the outdoor conditions. Start by placing the seedlings outdoors in a sheltered location for an hour or two each day, gradually increasing the time over a week or two. Protect them from direct sunlight and strong winds.
Direct Sowing Seeds:
If you live in a climate with mild winters or a long growing season, you can direct sow your cabbage seeds in the garden.
1. Prepare the Soil: Choose a sunny location with well-drained soil. Amend the soil with compost or well-rotted manure to improve its fertility and drainage.
2. Sow the Seeds: Sow the seeds about ½ inch deep and 1-2 inches apart in rows.
3. Water Gently: Water the soil gently to keep it moist.
4. Thin the Seedlings: Once the seedlings emerge, thin them to the desired spacing (see below).
Transplanting Your Cabbage Seedlings
Once your seedlings are hardened off (or have emerged and grown a bit if direct sowing), it’s time to transplant them into your garden.
1. Prepare the Garden Bed: Choose a sunny location that receives at least 6 hours of sunlight per day. Cabbage prefers well-drained soil that is rich in organic matter. Amend the soil with compost or well-rotted manure before planting.
2. Space the Plants: Space your cabbage plants according to the variety you’re growing. Early varieties can be spaced 12-18 inches apart, while larger varieties need 18-24 inches of space. Rows should be spaced 24-36 inches apart.
3. Dig the Holes: Dig holes that are slightly larger than the root balls of your seedlings.
4. Transplant Carefully: Gently remove the seedlings from their trays or pots and place them in the holes. Make sure the top of the root ball is level with the surrounding soil.
5. Fill and Water: Fill the holes with soil and gently firm the soil around the plants. Water thoroughly.
Caring for Your Cabbage Plants
Now that your cabbage plants are in the ground, it’s time to provide them with the care they need to thrive.
1. Watering: Cabbage needs consistent moisture, especially during head formation. Water deeply and regularly, especially during dry spells. Aim for about 1-1.5 inches of water per week.
2. Fertilizing: Cabbage is a heavy feeder, so regular fertilization is important. Apply a balanced fertilizer (like 10-10-10) according to the package directions. You can also side-dress with compost or well-rotted manure every few weeks.
3. Weeding: Keep the garden bed free of weeds, as they can compete with your cabbage plants for nutrients and water. Hand-pull weeds regularly or use a hoe to cultivate the soil.
4. Mulching: Apply a layer of mulch around your cabbage plants to help retain moisture, suppress weeds, and regulate soil temperature. Straw, wood chips, or shredded leaves are good options.
5. Pest and Disease Control: Cabbage can be susceptible to various pests and diseases. Keep an eye out for common problems like cabbage worms, aphids, and clubroot.
* Cabbage Worms: These green caterpillars can quickly devour your cabbage leaves. Handpick them off the plants or use Bacillus thuringiensis (Bt), a natural insecticide.
* Aphids: These small, sap-sucking insects can weaken your plants. Spray them off with a strong stream of water or use insecticidal soap.
* Clubroot: This soilborne disease causes swollen, distorted roots and can stunt plant growth. Prevent clubroot by practicing crop rotation and ensuring good soil drainage. If you have clubroot in your soil, consider growing cabbage in raised beds or containers.
6. Sun Protection: In very hot climates, cabbage heads can sometimes get sunburned. If you notice this happening, provide some shade during the hottest part of the day.
Harvesting Your Cabbage
The moment you’ve been waiting for! Harvesting your cabbage is the most rewarding part of the process.
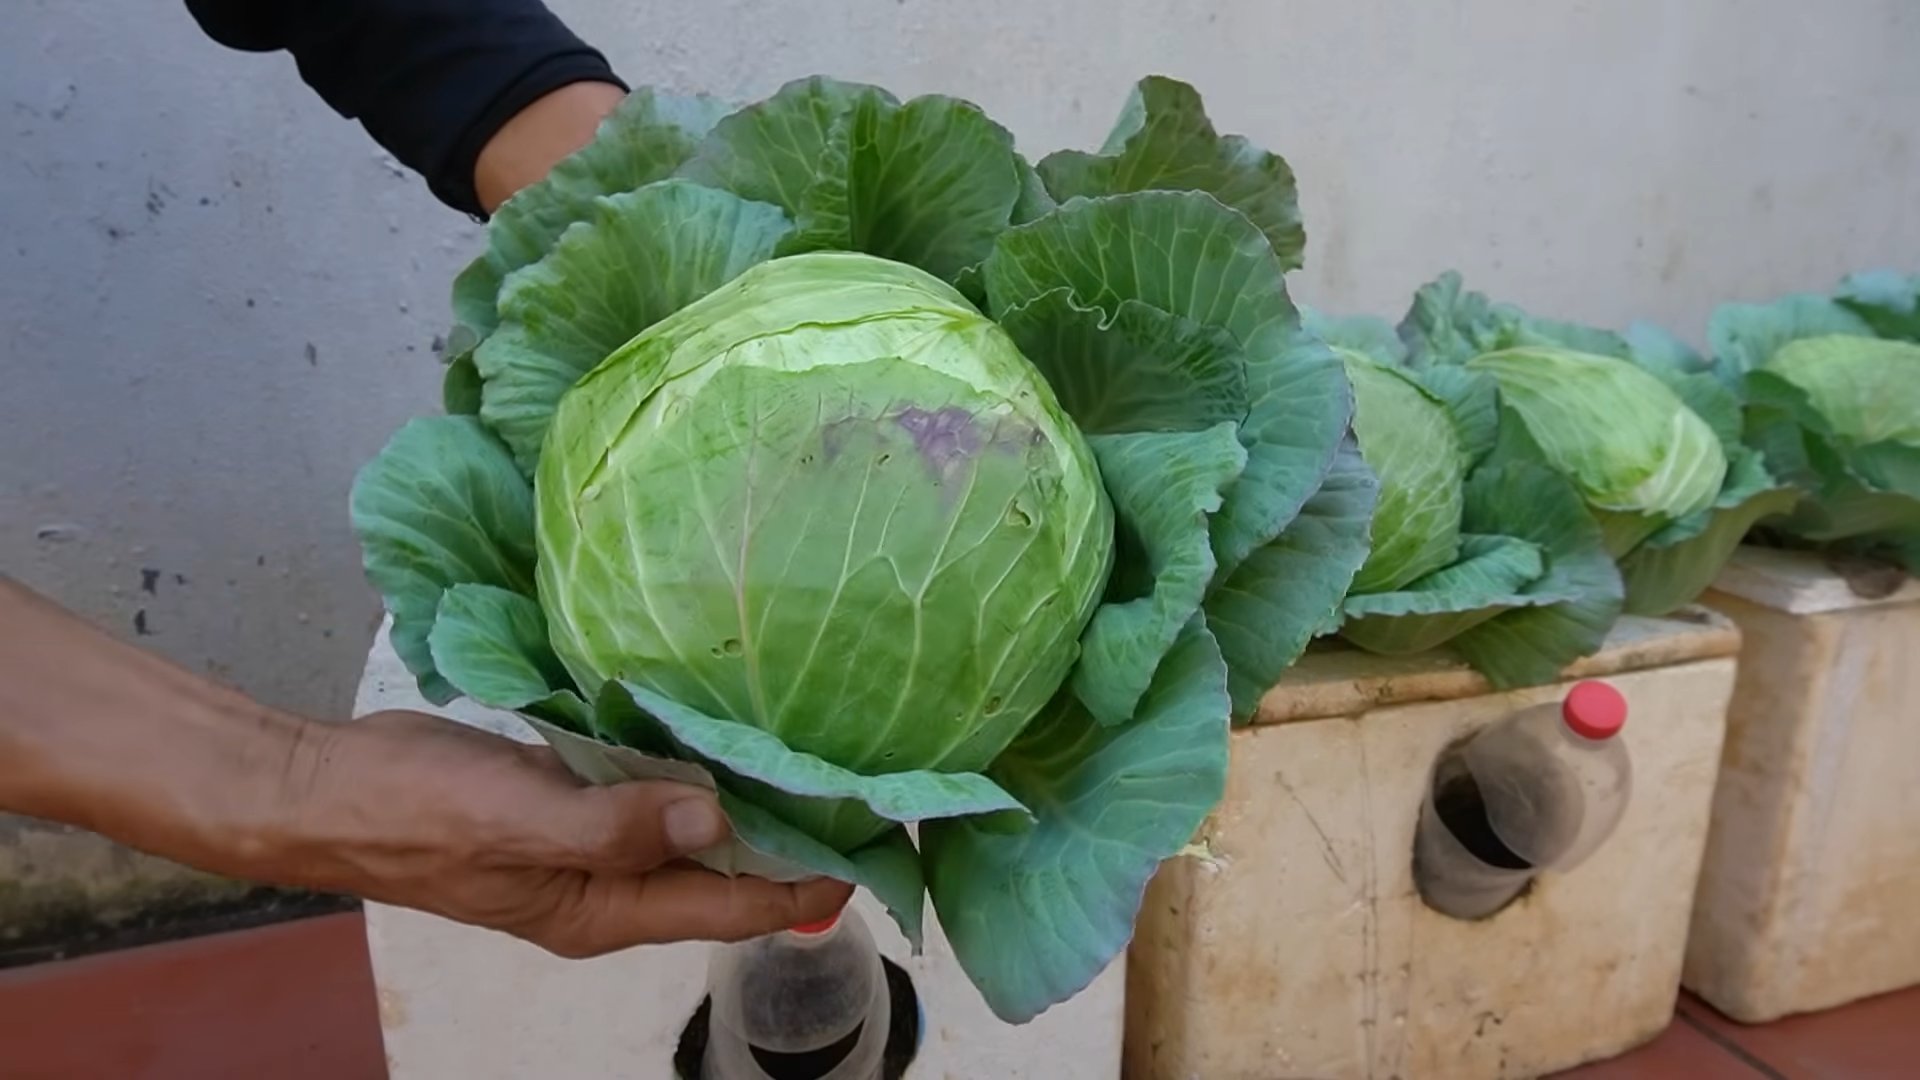
1. Check for Maturity: Cabbage is ready to harvest when the head is firm and solid. The size of the head will vary depending on the variety.
2. Cut the Head: Use a sharp knife to cut the head from the stem, leaving a few outer leaves attached.
3. Store Properly: Store your harvested cabbage in a cool, dry place. It can last for several weeks in the refrigerator.
Troubleshooting Common Cabbage Problems
Even with the best care, you might encounter some challenges along the way. Here are a few common problems and how to address them:
* Heads Not Forming: This can be caused by insufficient sunlight, poor soil fertility, or inconsistent watering. Make sure your plants are getting enough sunlight, fertilize regularly, and water deeply and consistently.
* Splitting Heads: This can happen when cabbage heads mature during periods of heavy rain. To prevent splitting, twist the head slightly to break some of the roots. This will slow down water uptake.
* Yellowing Leaves: This can be a sign of nutrient deficiency, disease, or pest infestation. Check your plants carefully for pests and diseases, and amend the soil with compost or fertilizer if needed.
Enjoying Your Homegrown Cabbage
Congratulations! You’ve successfully grown your own cabbage. Now it’s time to enjoy the fruits (or vegetables!) of your labor. Cabbage is incredibly versatile and can be used in a variety of dishes, from coleslaw and sauerkraut to stir-fries and soups.
Here are a few of my favorite ways to use homegrown cabbage:
* Coleslaw: A classic summer side dish. Shred your cabbage and toss it with mayonnaise
Conclusion
So, there you have it! Growing cabbage at home is not only achievable, but it’s also incredibly rewarding. From the satisfaction of nurturing a tiny seedling to the joy of harvesting a crisp, flavorful head of cabbage, the entire process is a testament to the magic of gardening. We’ve walked you through the essential steps, from selecting the right variety for your climate to protecting your precious plants from pests and diseases.
But why is this DIY trick a must-try? Beyond the obvious benefit of having fresh, organic cabbage readily available, growing your own offers a unique connection to your food. You control exactly what goes into your cabbage, avoiding harmful pesticides and herbicides often used in commercial farming. Plus, the flavor of homegrown cabbage is simply unmatched – sweeter, more tender, and bursting with freshness.
Think of the possibilities! Imagine adding freshly harvested cabbage to your favorite coleslaw recipe, using it to make hearty cabbage rolls, or simply sautéing it with butter and garlic for a simple yet delicious side dish. The options are endless!
And don’t feel limited to just one type of cabbage. Experiment with different varieties like red cabbage for vibrant salads, Savoy cabbage for its delicate texture, or Napa cabbage for Asian-inspired dishes. You can even try succession planting, staggering your planting dates to ensure a continuous harvest throughout the growing season. Consider companion planting too! Marigolds can deter nematodes, and dill can attract beneficial insects that prey on cabbage worms.
We understand that gardening can sometimes feel daunting, especially for beginners. But with a little patience, dedication, and the knowledge you’ve gained from this guide, you’ll be well on your way to enjoying a bountiful cabbage harvest. Remember to observe your plants regularly, paying attention to their needs and adjusting your care accordingly.
Don’t be afraid to get your hands dirty! Gardening is a learning process, and every mistake is an opportunity to grow (pun intended!). The key is to start small, stay consistent, and most importantly, have fun.
We are confident that you can successfully grow cabbage at home. So, grab your gardening gloves, prepare your soil, and get ready to embark on this exciting journey. We encourage you to try this DIY trick and experience the joy of growing your own food.
And finally, we want to hear from you! Share your experiences, successes, and challenges in the comments below. What varieties of cabbage did you grow? What tips and tricks did you discover along the way? Your feedback will not only help other readers but also contribute to a thriving community of home gardeners. Let’s learn and grow together!
Frequently Asked Questions (FAQ)
What is the best time of year to plant cabbage?
The best time to plant cabbage depends on your climate and the specific variety you’re growing. Generally, cabbage is a cool-season crop, meaning it thrives in temperatures between 60°F and 70°F (15°C and 21°C). For spring crops, start seeds indoors 6-8 weeks before the last expected frost. Transplant seedlings outdoors 2-3 weeks before the last frost. For fall crops, start seeds indoors in mid-summer and transplant seedlings outdoors in late summer or early fall. Check your local frost dates and the specific recommendations for your chosen cabbage variety for the most accurate timing.
How much sunlight does cabbage need?
Cabbage requires at least 6 hours of direct sunlight per day to thrive. Choose a planting location that receives full sun for optimal growth and head development. If you live in a particularly hot climate, some afternoon shade may be beneficial to prevent the leaves from scorching.
What type of soil is best for growing cabbage?
Cabbage prefers well-drained, fertile soil that is rich in organic matter. The ideal soil pH is between 6.0 and 7.0. Before planting, amend your soil with compost, aged manure, or other organic materials to improve drainage, fertility, and water retention. A soil test can help you determine if your soil is deficient in any essential nutrients.
How often should I water my cabbage plants?
Cabbage plants need consistent moisture, especially during head formation. Water deeply and regularly, aiming to keep the soil consistently moist but not waterlogged. Check the soil moisture regularly by sticking your finger about an inch into the soil. If it feels dry, it’s time to water. Mulching around your cabbage plants can help retain moisture and suppress weeds.
What are some common pests and diseases that affect cabbage?
Cabbage is susceptible to several pests and diseases, including cabbage worms, cabbage loopers, aphids, flea beetles, clubroot, and black rot. Regularly inspect your plants for signs of infestation or disease. Use organic pest control methods such as handpicking pests, using insecticidal soap, or applying Bacillus thuringiensis (Bt) to control cabbage worms. To prevent diseases, practice crop rotation, ensure good drainage, and avoid overhead watering.
How do I know when my cabbage is ready to harvest?
Cabbage is ready to harvest when the head is firm and solid to the touch. The size of the head will vary depending on the variety, but generally, heads are ready to harvest when they reach their mature size as indicated on the seed packet or plant label. To harvest, use a sharp knife to cut the head from the stem, leaving a few outer leaves attached.
Can I grow cabbage in containers?
Yes, you can grow cabbage in containers, but you’ll need to choose a large container (at least 12 inches in diameter) to accommodate the plant’s root system. Use a well-draining potting mix and provide regular watering and fertilization. Container-grown cabbage may require more frequent watering than cabbage grown in the ground.
What are some good companion plants for cabbage?
Good companion plants for cabbage include dill, thyme, rosemary, sage, chamomile, marigolds, and nasturtiums. These plants can help deter pests, attract beneficial insects, and improve the overall health of your cabbage plants. Avoid planting cabbage near strawberries, tomatoes, or other members of the nightshade family, as they can compete for nutrients or attract similar pests and diseases.
How do I store harvested cabbage?
To store harvested cabbage, remove any damaged or yellowing outer leaves. Wrap the cabbage head in plastic wrap or place it in a plastic bag and store it in the refrigerator. Cabbage can typically be stored for several weeks in the refrigerator. You can also freeze cabbage, but it’s best to blanch it first to preserve its quality.
Can I grow cabbage from scraps?
While you can’t grow a full head of cabbage from scraps, you can regrow the root end to produce cabbage greens. Place the root end in a shallow dish of water, ensuring that the cut end is submerged. Place the dish in a sunny location and change the water regularly. After a few days, you should see new leaves sprouting from the root end. You can then transplant the root end into a pot of soil and continue to grow it for a supply of fresh cabbage greens. This is a fun and easy way to reduce food waste and enjoy a small harvest from your kitchen scraps.

Leave a Comment