
Grow Chayote Squash Easily and unlock a world of culinary possibilities right in your own backyard! Have you ever dreamt of harvesting your own unique and delicious vegetables? Well, get ready to turn that dream into reality. This DIY guide is your passport to cultivating this intriguing and versatile squash with surprising ease.
Chayote squash, also known as mirliton or vegetable pear, boasts a fascinating history, deeply rooted in Mesoamerican cultures. For centuries, it has been a staple ingredient, cherished for its mild flavor and nutritional benefits. Beyond its culinary appeal, growing your own chayote offers a sustainable and rewarding experience.
Why should you learn to grow chayote squash easily? In today’s world, where access to fresh, locally sourced produce is increasingly valued, cultivating your own food provides a sense of self-sufficiency and connection to nature. Plus, chayote is incredibly adaptable and relatively low-maintenance, making it perfect for both seasoned gardeners and beginners alike. Imagine the satisfaction of serving a dish featuring chayote you nurtured from a tiny seed! This guide will equip you with the knowledge and simple tricks to successfully grow this amazing vegetable, even if you have limited space or experience. Let’s get started and transform your garden into a chayote haven!
Grow Chayote Squash Like a Pro: A DIY Guide
Hey there, fellow gardening enthusiasts! Ever wanted to grow something a little different, something that’s both delicious and incredibly prolific? Then let me introduce you to chayote squash! This vining veggie, also known as mirliton or vegetable pear, is surprisingly easy to grow, and I’m going to walk you through the whole process, from prepping the seed to harvesting your bounty. Trust me, once you get the hang of it, you’ll be swimming in chayote!
Understanding Chayote Squash
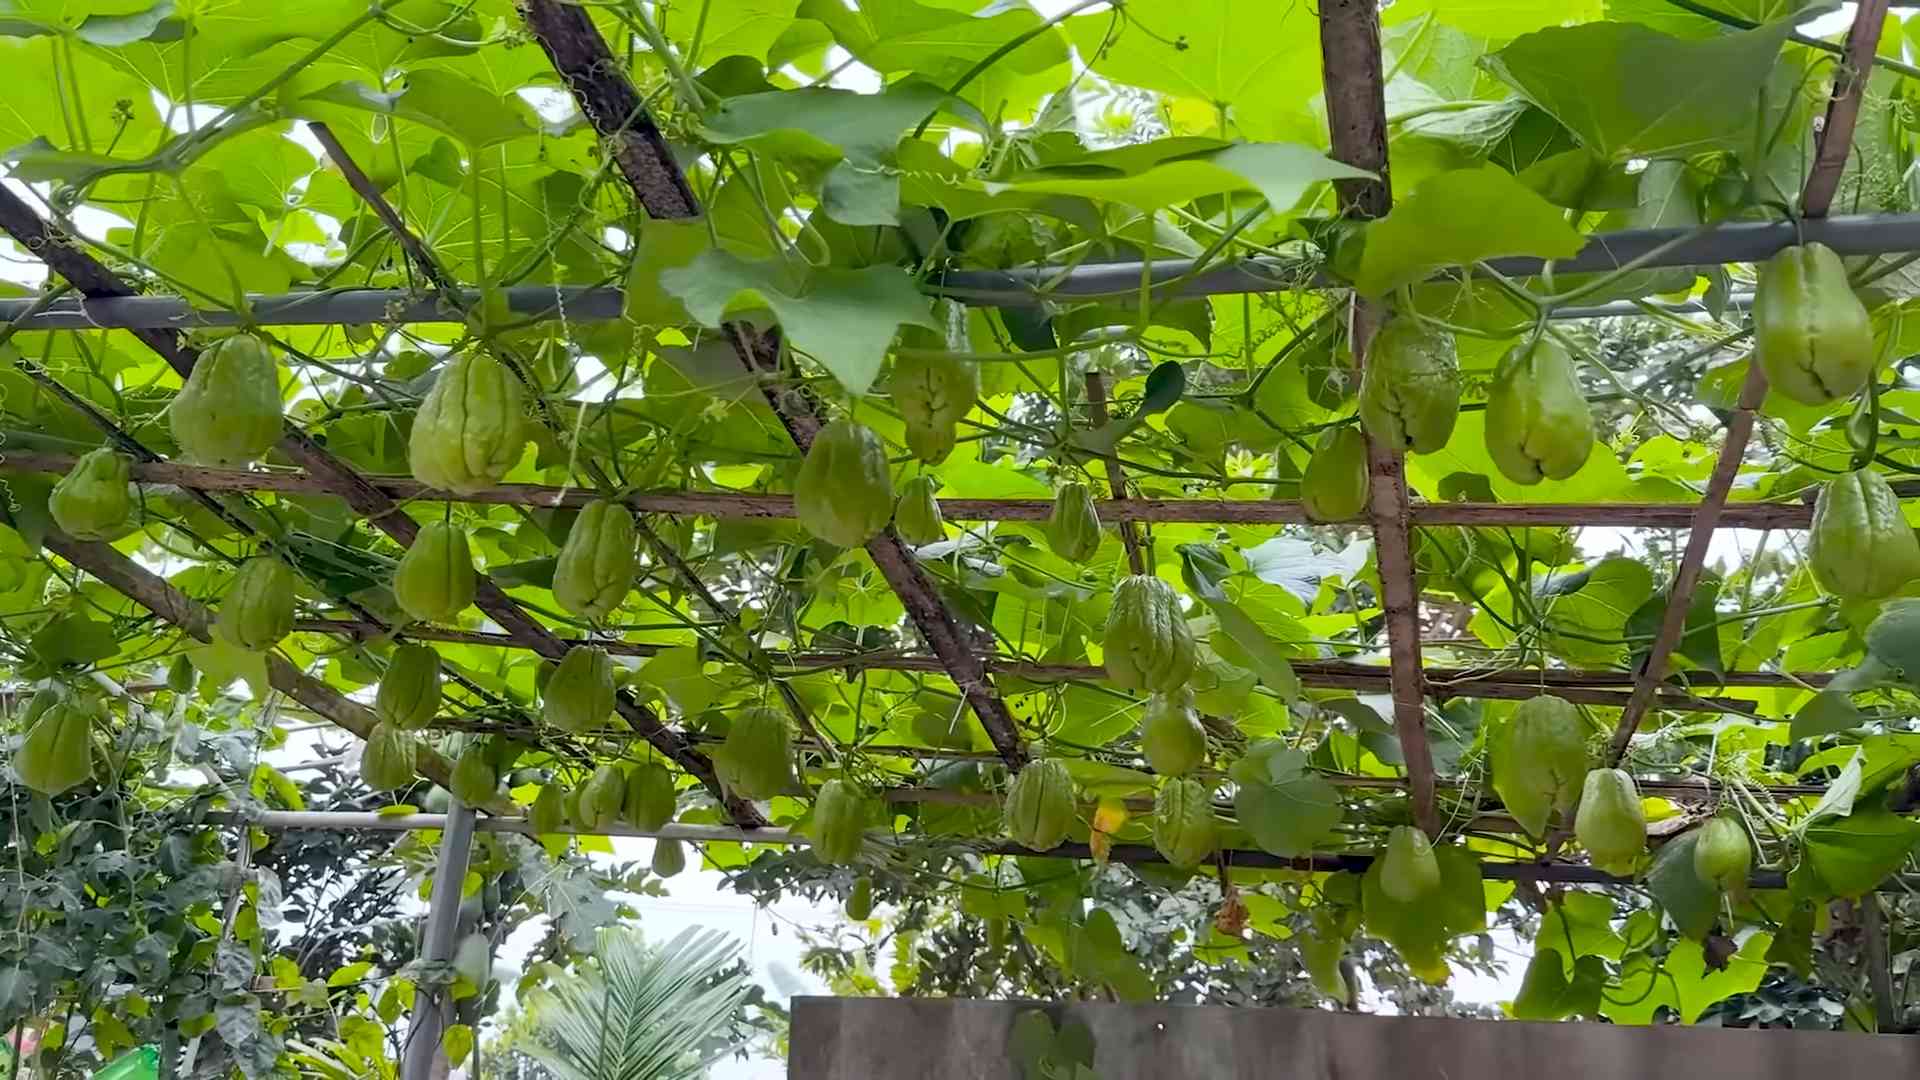
Before we dive into the nitty-gritty, let’s talk a little about what makes chayote so special. It’s a single-seeded fruit, meaning the entire squash is essentially the seed. This is key to how we’ll start the growing process. Chayote loves warm weather and needs a long growing season, so keep that in mind depending on where you live. It’s also a vigorous vine, so you’ll need a sturdy trellis or support system.
Getting Started: Sprouting Your Chayote
This is probably the most unique part of growing chayote. Instead of planting seeds, we’re going to sprout the entire fruit!
What you’ll need:
* A mature chayote squash (look for one that’s starting to sprout or has a few small roots emerging)
* A pot large enough to accommodate the squash (at least 8-10 inches in diameter)
* Well-draining potting mix
* Water
* A warm, bright location
Step-by-step instructions:
1. Choose your chayote wisely: The key to success is starting with a mature chayote squash. Look for one that’s firm, unblemished, and ideally already showing signs of sprouting. You might see small roots emerging from the blossom end (the wider end). If you can’t find one already sprouting, don’t worry! You can encourage it to sprout by storing it in a warm, humid place for a few weeks. I’ve even had success just leaving one on my kitchen counter!
2. Prepare the pot: Fill your pot with well-draining potting mix, leaving a couple of inches of space at the top. Make sure the pot has drainage holes! Soggy soil is a chayote’s worst enemy.
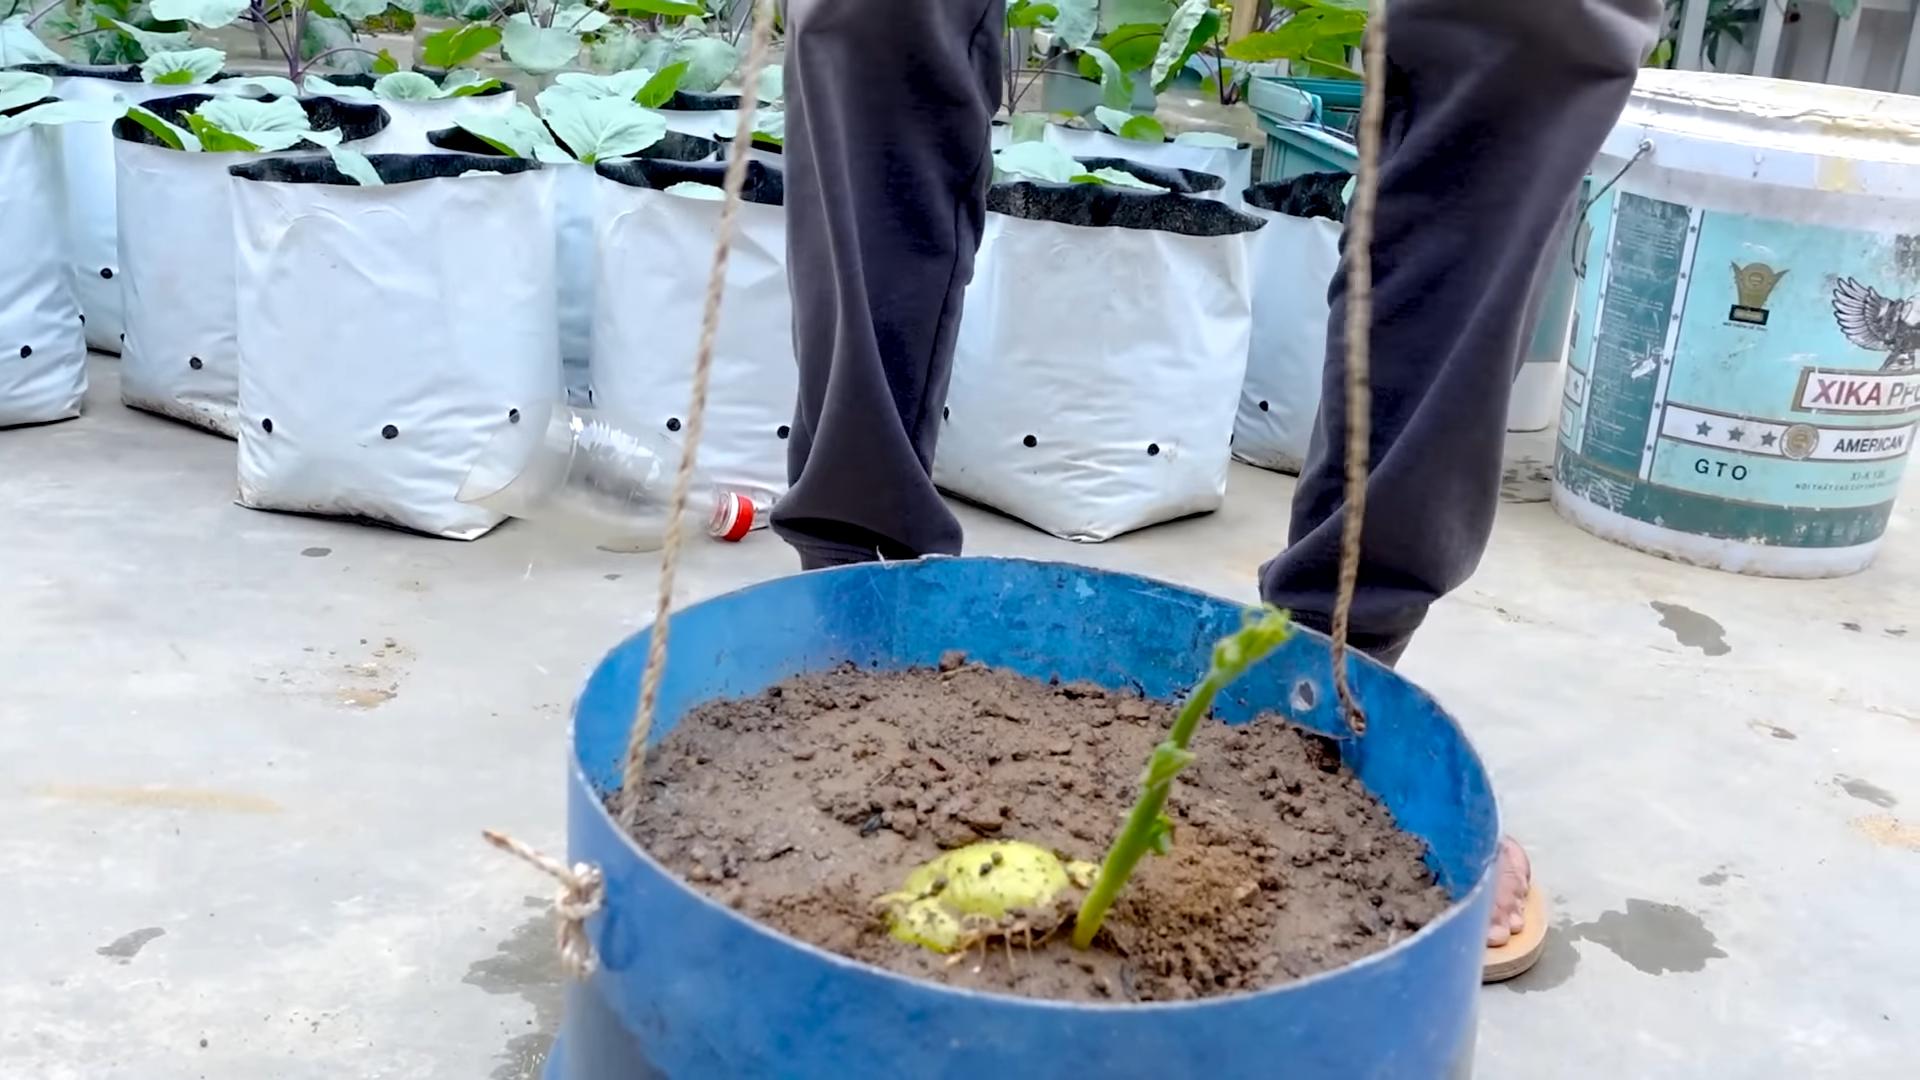
3. Plant the chayote: This is where it gets interesting. We’re not going to bury the entire squash. Instead, we’re going to partially bury it, with the blossom end (the wider end where the roots will emerge) pointing downwards. Leave about one-third to one-half of the squash exposed above the soil line. This allows the sprout to emerge easily.
4. Water gently: Water the potting mix thoroughly, but be careful not to overwater. You want the soil to be moist, not soggy.
5. Find a warm, bright spot: Place the pot in a warm, bright location. A sunny windowsill or a greenhouse is ideal. Chayote loves warmth, so aim for temperatures between 70-80°F (21-27°C).
6. Be patient: It can take several weeks for the sprout to emerge. Keep the soil consistently moist, but avoid overwatering. You’ll know it’s working when you see a green shoot emerging from the top of the squash.
Transplanting Your Chayote Seedling
Once your chayote seedling has developed a few leaves and a strong root system, it’s time to transplant it to its permanent home in the garden.
What you’ll need:
* Your sprouted chayote seedling
* A sunny location with well-draining soil
* A sturdy trellis or support system (at least 6-8 feet tall)
* Compost or other organic matter
* Gardening gloves
* A shovel or trowel
Step-by-step instructions:
1. Choose the right location: Chayote needs plenty of sunshine (at least 6-8 hours per day) and well-draining soil. Amend the soil with compost or other organic matter to improve its fertility and drainage. Remember, this vine gets BIG, so give it plenty of room to spread out.
2. Prepare the trellis: Before you transplant your seedling, make sure your trellis or support system is in place. Chayote vines can grow 20-30 feet long, so you’ll need something sturdy to support their weight. A strong fence, an arbor, or a custom-built trellis will work well. I’ve even seen people train them over garages!
3. Dig the planting hole: Dig a hole that’s slightly larger than the root ball of your chayote seedling.
4. Carefully remove the seedling: Gently remove the seedling from its pot, being careful not to damage the roots. If the roots are tightly bound, gently loosen them with your fingers.
5. Plant the seedling: Place the seedling in the planting hole and backfill with soil, gently firming it around the base of the plant. Make sure the top of the root ball is level with the surrounding soil.
6. Water thoroughly: Water the newly transplanted seedling thoroughly to help it settle in.
7. Train the vine: As the vine grows, gently train it to climb the trellis or support system. You may need to tie it to the trellis initially to get it started.
Caring for Your Chayote Plant
Now that your
Hey there, fellow gardening enthusiasts! Ever wanted to grow something a little different, something that’s both delicious and incredibly prolific? Then let me introduce you to chayote squash! This vining veggie, also known as mirliton or vegetable pear, is surprisingly easy to grow, and I’m going to walk you through the whole process, from prepping the seed to harvesting your bounty. Trust me, once you get the hang of it, you’ll be swimming in chayote!
Understanding Chayote Squash
Before we dive into the nitty-gritty, let’s talk a little about what makes chayote so special. It’s a single-seeded fruit, meaning the entire squash is essentially the seed. This is key to how we’ll start the growing process. Chayote loves warm weather and needs a long growing season, so keep that in mind depending on where you live. It’s also a vigorous vine, so you’ll need a sturdy trellis or support system.
Getting Started: Sprouting Your Chayote
This is probably the most unique part of growing chayote. Instead of planting seeds, we’re going to sprout the entire fruit!
What you’ll need:
* A mature chayote squash (look for one that’s starting to sprout or has a few small roots emerging)
* A pot large enough to accommodate the squash (at least 8-10 inches in diameter)
* Well-draining potting mix
* Water
* A warm, bright location
Step-by-step instructions:
1. Choose your chayote wisely: The key to success is starting with a mature chayote squash. Look for one that’s firm, unblemished, and ideally already showing signs of sprouting. You might see small roots emerging from the blossom end (the wider end). If you can’t find one already sprouting, don’t worry! You can encourage it to sprout by storing it in a warm, humid place for a few weeks. I’ve even had success just leaving one on my kitchen counter!
2. Prepare the pot: Fill your pot with well-draining potting mix, leaving a couple of inches of space at the top. Make sure the pot has drainage holes! Soggy soil is a chayote’s worst enemy.
3. Plant the chayote: This is where it gets interesting. We’re not going to bury the entire squash. Instead, we’re going to partially bury it, with the blossom end (the wider end where the roots will emerge) pointing downwards. Leave about one-third to one-half of the squash exposed above the soil line. This allows the sprout to emerge easily.
4. Water gently: Water the potting mix thoroughly, but be careful not to overwater. You want the soil to be moist, not soggy.
5. Find a warm, bright spot: Place the pot in a warm, bright location. A sunny windowsill or a greenhouse is ideal. Chayote loves warmth, so aim for temperatures between 70-80°F (21-27°C).
6. Be patient: It can take several weeks for the sprout to emerge. Keep the soil consistently moist, but avoid overwatering. You’ll know it’s working when you see a green shoot emerging from the top of the squash.
Transplanting Your Chayote Seedling
Once your chayote seedling has developed a few leaves and a strong root system, it’s time to transplant it to its permanent home in the garden.
What you’ll need:
* Your sprouted chayote seedling
* A sunny location with well-draining soil
* A sturdy trellis or support system (at least 6-8 feet tall)
* Compost or other organic matter
* Gardening gloves
* A shovel or trowel
Step-by-step instructions:
1. Choose the right location: Chayote needs plenty of sunshine (at least 6-8 hours per day) and well-draining soil. Amend the soil with compost or other organic matter to improve its fertility and drainage. Remember, this vine gets BIG, so give it plenty of room to spread out.
2. Prepare the trellis: Before you transplant your seedling, make sure your trellis or support system is in place. Chayote vines can grow 20-30 feet long, so you’ll need something sturdy to support their weight. A strong fence, an arbor, or a custom-built trellis will work well. I’ve even seen people train them over garages!
3. Dig the planting hole: Dig a hole that’s slightly larger than the root ball of your chayote seedling.
4. Carefully remove the seedling: Gently remove the seedling from its pot, being careful not to damage the roots. If the roots are tightly bound, gently loosen them with your fingers.
5. Plant the seedling: Place the seedling in the planting hole and backfill with soil, gently firming it around the base of the plant. Make sure the top of the root ball is level with the surrounding soil.
6. Water thoroughly: Water the newly transplanted seedling thoroughly to help it settle in.
7. Train the vine: As the vine grows, gently train it to climb the trellis or support system. You may need to tie it to the trellis initially to get it started.
Caring for Your Chayote Plant
Now that your chayote plant is in the ground, it’s time to provide it with the care it needs to thrive.
What you’ll need:
* Water
* Fertilizer (optional)
* Mulch
* Gardening gloves
* Pruning shears (optional)
Step-by-step instructions:
1. Water regularly: Chayote needs consistent moisture, especially during hot, dry weather. Water deeply whenever the soil feels dry to the touch. Avoid overwatering, as this can lead to root rot.
2. Fertilize (optional): If your soil is poor, you can fertilize your chayote plant with a balanced fertilizer every few weeks. However, chayote is a relatively low-maintenance plant and doesn’t necessarily need fertilizer. I often just amend the soil with compost and let it do its thing.
3. Mulch: Apply a layer of mulch around the base of the plant to help retain moisture, suppress weeds, and regulate soil temperature.
4. Prune (optional): Chayote vines can become quite dense, so you may need to prune them occasionally to improve air circulation and sunlight penetration. Prune away any dead or diseased growth. I usually just prune to keep it from completely taking over my garden!
5. Watch for pests and diseases: Chayote is generally pest and disease resistant, but keep an eye out for common garden pests like aphids and squash bugs. If you notice any problems, treat them promptly with an appropriate insecticide or fungicide.
Harvesting Your Chayote Squash
The best part of growing chayote is, of course, harvesting the fruits of your labor!
What you’ll need:
* Gardening gloves
* Pruning shears or a sharp knife
Step-by-step instructions:
1. Know when to harvest: Chayote squash is typically ready to harvest about 4-6 weeks after flowering. The fruits should be firm, smooth, and light green in color. They should also be relatively small, about 4-6 inches long. Larger fruits tend to be tougher and less flavorful.
2. Harvest carefully: Use pruning shears or a sharp knife to cut the chayote squash from the vine, leaving a short stem attached. Be careful not to damage the vine.
3. Harvest regularly: Chayote plants are incredibly prolific, so you’ll likely be harvesting fruits throughout the growing season. Harvest regularly to encourage continued production.
4. Store properly: Chayote squash can be stored in the refrigerator for several weeks.
Enjoying Your Chayote Harvest
Now that you’ve harvested your chayote squash, it’s time to enjoy it! Chayote is a versatile vegetable that can be used in a variety of dishes. It has a mild, slightly sweet flavor that’s similar to zucchini or summer squash.
Here are a few ideas for using your chayote squash:
* Sautéed or stir-fried: Chayote can be sautéed or stir-fried with other vegetables and seasonings.
* Roasted: Roasted chayote is a delicious and healthy side dish.
* In soups and stews: Chayote can be added to soups and stews for added flavor and texture.
* Pickled: Pickled chayote is a popular condiment in some cultures.
* Raw in salads: Thinly sliced chayote can be added to salads for a refreshing crunch.
* Chayote Fries: Cut into strips, toss with oil and spices
Conclusion
So, there you have it! Growing chayote squash doesn’t have to be a daunting task reserved for seasoned gardeners. With a little patience and this simple DIY trick, you can unlock the potential of this versatile vegetable and enjoy a bountiful harvest right from your own backyard. We’ve shown you how to coax those stubborn seeds into sprouting, giving you a significant head start in the growing season.
Why is this DIY method a must-try? Because it addresses the most common hurdle faced by chayote enthusiasts: seed germination. Chayote seeds are notoriously difficult to sprout directly in the ground. This method bypasses that challenge, providing a controlled environment where you can nurture the seedling until it’s strong enough to thrive outdoors. Think of it as giving your chayote a VIP pass to success!
But the fun doesn’t stop there! Feel free to experiment with variations. Try using different types of potting mix to see which yields the best results. Some gardeners swear by a mix of compost, perlite, and vermiculite for optimal drainage and nutrient availability. You could also experiment with different light sources during the initial sprouting phase. While a sunny windowsill works well, a grow light can provide consistent and intense illumination, potentially accelerating the process.
Consider the climate you live in. If you’re in a colder region, you might want to start the sprouting process even earlier indoors to ensure a longer growing season. Conversely, if you’re in a warmer climate, you might be able to skip the indoor sprouting altogether, but be prepared for a potentially lower germination rate.
Don’t be afraid to get creative with your support system for the growing vine. Chayote vines are vigorous climbers and need a sturdy trellis or fence to support their weight. Think beyond the typical garden trellis. An old ladder, a repurposed swing set frame, or even a creatively arranged set of branches can all serve as excellent supports. The key is to provide ample space for the vine to climb and spread.
And remember, growing chayote squash is not just about the fruit. The leaves, shoots, and even the roots are edible! Once your plant is established, you can harvest these parts for use in salads, stir-fries, and soups. It’s a truly versatile plant that offers a wide range of culinary possibilities.
We are confident that this DIY trick will significantly improve your chances of successfully growing chayote squash. But the real magic happens when you put it into practice. So, grab a chayote fruit, follow these steps, and embark on your own chayote-growing adventure.
We are eager to hear about your experiences! Did this method work for you? Did you try any variations? What challenges did you encounter, and how did you overcome them? Share your stories, tips, and photos in the comments below. Let’s create a community of chayote enthusiasts and learn from each other’s successes and failures. Together, we can unlock the full potential of this amazing vegetable and enjoy a bountiful harvest year after year. Happy growing!
Frequently Asked Questions (FAQ)
What exactly is chayote squash?
Chayote squash (Sechium edule) is a type of gourd that belongs to the Cucurbitaceae family, which also includes pumpkins, cucumbers, and melons. It’s native to Mesoamerica but is now cultivated in many parts of the world. The fruit is typically pear-shaped, light green, and has a mild, slightly sweet flavor. It’s incredibly versatile and can be used in a variety of dishes, both savory and sweet. The entire plant, including the fruit, leaves, shoots, and roots, is edible.
Why is it so difficult to germinate chayote seeds directly in the ground?
Chayote seeds are unique in that they don’t have a typical seed coat. The entire fruit is essentially the seed. This makes them prone to rotting in the ground, especially in cool or damp conditions. The seed also requires a period of dormancy before it will germinate, and directly planting the fruit doesn’t always provide the ideal conditions for breaking that dormancy. This DIY method provides a controlled environment that increases the chances of successful germination.
How long does it take for a chayote fruit to sprout using this method?
The sprouting time can vary depending on several factors, including the temperature, humidity, and the freshness of the fruit. Generally, you can expect to see sprouts emerge within 2-6 weeks. Be patient and maintain consistent moisture levels. Don’t give up if you don’t see results immediately.
What kind of potting mix should I use?
A well-draining potting mix is essential. A mix of equal parts compost, perlite, and vermiculite is a good option. You can also use a commercially available seed-starting mix. Avoid using garden soil, as it can be too heavy and may contain pathogens that can harm the developing seedling.
How often should I water the chayote fruit during the sprouting process?
Keep the potting mix consistently moist, but not waterlogged. Water when the top inch of soil feels dry to the touch. Overwatering can lead to rot, so be careful not to saturate the soil. Good drainage is crucial.
When should I transplant the sprouted chayote to the garden?
Transplant the seedling when it has developed a strong root system and several leaves. This usually takes about 4-6 weeks after sprouting. Choose a sunny location with well-drained soil. Be sure to harden off the seedling by gradually exposing it to outdoor conditions for a week before transplanting.
What kind of support does a chayote vine need?
Chayote vines are vigorous climbers and need a sturdy trellis, fence, or other support system. The vine can grow up to 30 feet long, so choose a support that is strong enough to handle the weight of the mature plant and its fruit.
How much sunlight does chayote squash need?
Chayote squash thrives in full sun, which means at least 6-8 hours of direct sunlight per day. However, it can tolerate some partial shade, especially in hotter climates.
How often should I fertilize my chayote plant?
Fertilize your chayote plant every 2-3 weeks with a balanced fertilizer. You can also amend the soil with compost or other organic matter to provide essential nutrients.
Are there any common pests or diseases that affect chayote squash?
Chayote squash is generally resistant to pests and diseases, but it can be susceptible to aphids, spider mites, and squash bugs. Regularly inspect your plants for signs of infestation and take appropriate action if necessary. Good air circulation and proper watering can help prevent fungal diseases.
Can I grow chayote squash in a container?
Yes, you can grow chayote squash in a large container, but it will require a lot of space and a sturdy support system. Choose a container that is at least 20 gallons in size and fill it with a well-draining potting mix. Be sure to provide adequate water and fertilizer.
How long does it take for a chayote plant to produce fruit?
Chayote plants typically start producing fruit within 4-6 months of planting. The exact timing will depend on the climate and growing conditions.
How do I know when a chayote fruit is ripe?
Chayote fruits are typically harvested when they are young and tender, about 4-6 inches long. The skin should be smooth and light green. Overripe fruits will be larger, darker green, and have a tougher skin.
Can I save seeds from my chayote fruit to grow more plants?
Yes, you can save seeds from your chayote fruit. Simply allow the fruit to mature on the vine until it is fully ripe. Then, cut open the fruit and remove the seed. You can then use the seed to start a new plant using the method described in this article.
What are some ways to use chayote squash in cooking?
Chayote squash is incredibly versatile and can be used in a variety of dishes. It can be eaten raw in salads, cooked in stir-fries, soups, and stews, or even baked or grilled. It has a mild flavor that pairs well with a variety of seasonings and sauces. You can also use the leaves, shoots, and roots of the plant in cooking.
Leave a Comment