
Grow Leeks at Home? Absolutely! Imagine stepping into your backyard and harvesting fresh, flavorful leeks for your favorite soup or quiche. No more trips to the grocery store, no more questionable produce – just pure, homegrown goodness. I’m excited to share some simple, effective DIY tricks that will have you cultivating these delicious alliums in no time.
Leeks have a rich history, dating back to ancient Egypt, where they were revered and even depicted in hieroglyphics. The Romans, known for their culinary prowess, also embraced leeks, spreading their cultivation throughout Europe. Today, they remain a staple in cuisines worldwide, adding a delicate onion-like flavor to countless dishes.
But why should you bother to grow leeks at home? Well, for starters, homegrown leeks taste infinitely better than store-bought ones. Plus, you have complete control over the growing process, ensuring they’re free from harmful pesticides and chemicals. In this article, I’ll walk you through easy-to-follow DIY methods, from starting seeds to transplanting seedlings, and even some clever hacks to maximize your yield. Get ready to transform your garden into a leek-lover’s paradise!

Grow Your Own Delicious Leeks: A Beginner’s Guide
Hey there, fellow gardening enthusiasts! I’m so excited to share my experience growing leeks at home. Leeks are such a versatile and flavorful vegetable, and honestly, growing them yourself is surprisingly easy and rewarding. Plus, nothing beats the taste of freshly harvested, homegrown leeks! This guide will walk you through every step, from starting seeds to harvesting your bounty. Let’s get started!
Choosing Your Leek Variety
Before we dive into the nitty-gritty, let’s talk about leek varieties. There are a few different types, and the best one for you will depend on your climate and when you want to harvest.
* Early Season Varieties: These mature quickly and are great for shorter growing seasons. ‘Bandit’ and ‘King Richard’ are popular choices.
* Mid-Season Varieties: These offer a good balance of growth time and flavor. ‘Giant Musselburgh’ is a classic.
* Late Season Varieties: These take longer to mature but are incredibly hardy and can withstand colder temperatures. ‘Autumn Giant’ is a reliable option.
I personally love ‘Giant Musselburgh’ because it’s reliable and produces large, flavorful leeks. But feel free to experiment and find what works best for you!
Starting Leek Seeds Indoors
Leeks need a long growing season, so starting them indoors is essential, especially if you live in a colder climate. I usually start my seeds about 8-10 weeks before the last expected frost.
What You’ll Need:
* Leek seeds (of course!)
* Seed starting trays or small pots
* Seed starting mix (a fine, well-draining mix is best)
* Watering can or spray bottle
* Grow lights (optional, but highly recommended)
* A warm, sunny spot
Step-by-Step Instructions:
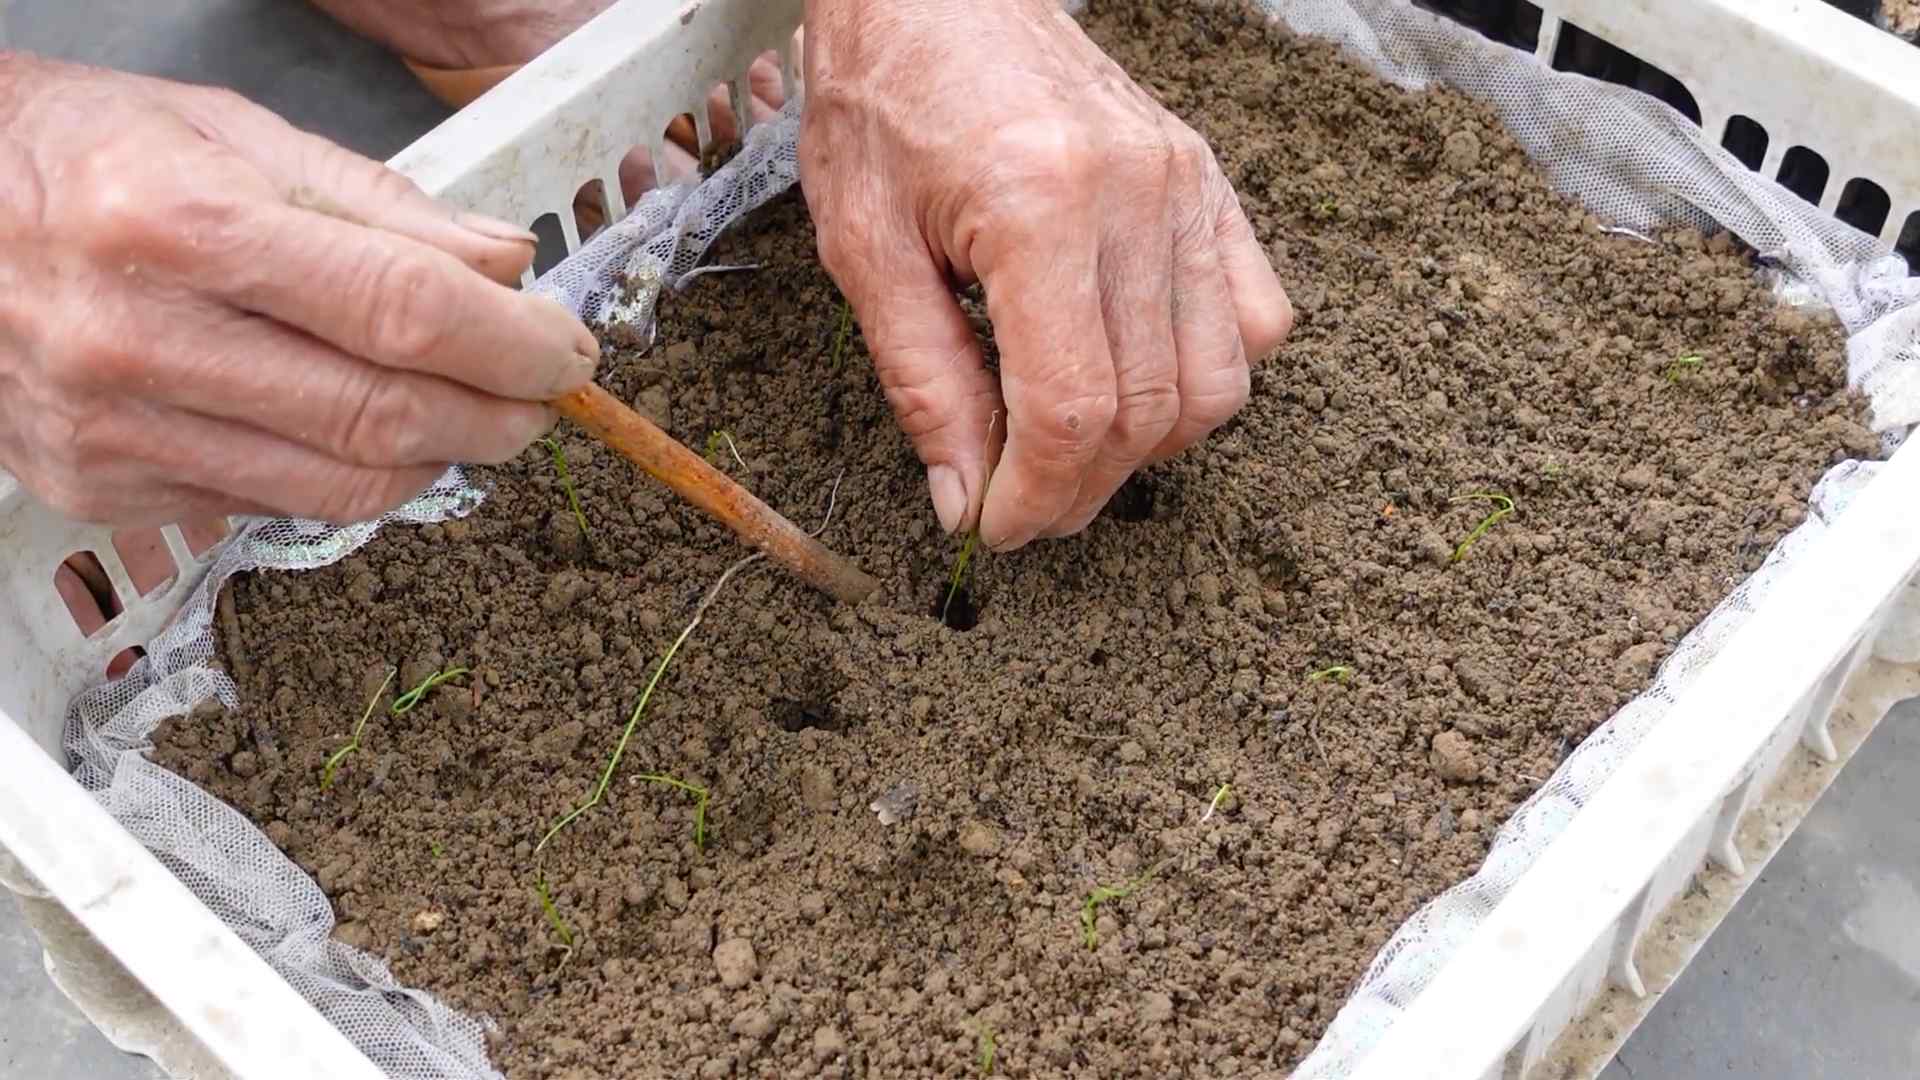
1. Prepare Your Seed Starting Trays: Fill your seed starting trays or pots with seed starting mix. Gently press down the soil to remove any air pockets.
2. Sow the Seeds: Sprinkle a few leek seeds into each cell or pot. Leek seeds are small, so don’t worry about being too precise. Aim for about 3-4 seeds per cell.
3. Cover the Seeds: Lightly cover the seeds with a thin layer of seed starting mix.
4. Water Gently: Use a watering can or spray bottle to gently water the soil. You want to moisten the soil without disturbing the seeds.
5. Provide Warmth and Light: Place the trays in a warm, sunny spot or under grow lights. Leek seeds need warmth to germinate, ideally around 65-70°F (18-21°C). If you’re using grow lights, keep them on for about 14-16 hours a day.
6. Keep the Soil Moist: Check the soil regularly and water as needed to keep it consistently moist but not soggy.
7. Thin the Seedlings: Once the seedlings emerge and have a few true leaves (the second set of leaves), thin them out, leaving only the strongest seedling in each cell or pot. I know it’s hard to do, but it’s necessary for healthy growth!
Transplanting Leek Seedlings Outdoors
Once the danger of frost has passed and your leek seedlings are about 6-8 inches tall, it’s time to transplant them outdoors. This is a crucial step, so pay close attention!
What You’ll Need:
* Your leek seedlings
* A garden trowel
* Well-draining soil amended with compost
* Watering can
* Mulch (optional)
Step-by-Step Instructions:
1. Prepare the Soil: Choose a sunny spot in your garden with well-draining soil. Leeks prefer soil that is rich in organic matter, so amend the soil with compost before planting. I usually dig in a generous amount of compost a week or two before transplanting.
2. Create Trenches: This is the secret to long, white leek shanks! Dig trenches that are about 6-8 inches deep and 6 inches wide. Space the trenches about 12 inches apart.
3. Carefully Remove Seedlings: Gently remove the leek seedlings from their trays or pots. Be careful not to damage the roots. If the roots are tightly bound, gently loosen them with your fingers.
4. Plant the Seedlings: Place the seedlings in the trenches, spacing them about 6 inches apart.
5. Backfill with Soil: Gently backfill the trenches with soil, leaving about 2-3 inches of the seedlings exposed.
6. Water Thoroughly: Water the seedlings thoroughly after planting.
7. Mulch (Optional): Apply a layer of mulch around the leeks to help retain moisture and suppress weeds.
Hilling Your Leeks
Hilling is the process of gradually mounding soil around the leek stems as they grow. This encourages the development of long, white shanks, which are the most desirable part of the leek.
Step-by-Step Instructions:
1. Wait Until Seedlings are Established: Wait until the leek seedlings are about 12 inches tall before you start hilling.
2. Gently Mound Soil: Using a garden trowel, gently mound soil around the base of the leek stems, covering about 2-3 inches of the stem.
3. Repeat Regularly: Repeat this process every few weeks as the leeks grow, gradually mounding more soil around the stems. Be careful not to bury the leaves.
4. Alternative Method: Some gardeners use cardboard tubes or plastic pipes to blanch their leeks. Place a tube around each leek seedling after transplanting and gradually add soil inside the tube as the leek grows.
Caring for Your Leeks
Leeks are relatively low-maintenance, but they do need some basic care to thrive.
* Watering: Water your leeks regularly, especially during dry periods. Leeks need consistent moisture to grow well.
* Weeding: Keep the area around your leeks free of weeds. Weeds can compete with leeks for nutrients and water.
* Fertilizing: Fertilize your leeks every few weeks with a balanced fertilizer. I like to use a liquid fertilizer diluted to half strength.
* Pest Control: Leeks are generally pest-resistant, but they can be susceptible to onion thrips and leek moths. Inspect your leeks regularly for signs of pests and take action if necessary. Insecticidal soap is a good option for controlling these pests.
Harvesting Your Leeks
The best part! You can harvest your leeks whenever they reach the desired size. I usually start harvesting when they are about 1 inch in diameter.
Step-by-Step Instructions:
1. Loosen the Soil: Use a garden fork to loosen the soil around the leek.
2. Gently Pull: Gently pull the leek from the ground.
3. Clean the Leeks: Remove any excess soil from the leeks.
4. Trim the Roots and Leaves: Trim the roots and the top of the leaves.
5. Wash Thoroughly: Wash the leeks thoroughly to remove any remaining soil.
Storing Your Leeks
Freshly harvested leeks can be stored in the refrigerator for up to two weeks. To store them, wrap them loosely in plastic wrap or place them in a plastic bag. You can also freeze leeks for longer storage. To freeze them, blanch them in boiling water for a few minutes, then cool them in ice water. Drain them well and then freeze them in freezer bags.
Troubleshooting
Even with the best care, you might encounter some problems while growing leeks. Here are a few common issues and how to address them:
* Yellowing Leaves: This could be a sign of nutrient deficiency or overwatering. Check the soil drainage and fertilize your leeks if necessary.
* Stunted Growth: This could be caused by poor soil, lack of sunlight, or pest infestation. Amend the soil with compost, ensure your leeks are getting enough sunlight, and inspect them for pests.
* Leek Moth Damage: Leek moth larvae can tunnel into the leaves and stems of leeks, causing damage. Use row covers to protect your leeks from leek moths, or apply an insecticide if necessary.
Enjoying Your Homegrown Leeks
Now that you’ve harvested your delicious homegrown leeks, it’s time to enjoy them! Leeks are incredibly versatile and can be used in a variety of dishes. Here are a few of my favorite ways to use leeks:
* Leek and Potato Soup: A classic comfort food.
* Leek Quiche: A delicious and elegant dish.
* Grilled Leeks: A simple and
Conclusion
So, there you have it! Growing leeks at home is not only achievable, but it’s a rewarding experience that brings fresh, flavorful ingredients right to your kitchen. Forget those limp, overpriced leeks at the grocery store – imagine the satisfaction of harvesting your own, knowing exactly where they came from and how they were grown. This DIY trick is a must-try for any home cook or gardening enthusiast looking to elevate their culinary creations and connect with nature.
Why is this method so compelling? Because it’s accessible, even for those with limited space. You don’t need acres of land to enjoy the taste of homegrown leeks. A few containers on a balcony, a small raised bed, or even a sunny windowsill can be enough to get you started. Plus, the process itself is incredibly therapeutic. There’s something deeply satisfying about nurturing a plant from seed to harvest, watching it grow and thrive under your care.
But the benefits extend beyond the emotional and practical. Homegrown leeks boast a flavor that’s simply unmatched by their commercially grown counterparts. They’re sweeter, more tender, and bursting with a freshness that will transform your soups, stews, and sauces. And let’s not forget the cost savings! Once you’ve established your leek-growing routine, you’ll be able to enjoy a steady supply of this versatile vegetable without breaking the bank.
Ready to take your leek game to the next level? Consider these variations:
* Experiment with different varieties: From the mild ‘American Flag’ to the robust ‘Giant Musselburgh,’ there’s a leek variety to suit every taste. Try growing a few different types to discover your favorites.
* Succession planting: Plant new leek seeds every few weeks to ensure a continuous harvest throughout the growing season. This way, you’ll always have fresh leeks on hand when you need them.
* Companion planting: Leeks thrive when planted alongside certain other vegetables, such as carrots and onions. These companion plants can help deter pests and improve the overall health of your leek crop.
* Blanching for milder flavor: For a milder, sweeter flavor, blanch your leeks by mounding soil around the stems as they grow. This will block sunlight and prevent the development of chlorophyll, resulting in a more delicate taste.
Don’t be intimidated if you’re new to gardening. Growing leeks at home is a forgiving process, and even beginners can achieve success with a little patience and attention. The key is to start small, follow the basic guidelines, and don’t be afraid to experiment.
We’re confident that you’ll love the experience of growing your own leeks. So, grab some seeds, prepare your soil, and get ready to embark on a delicious and rewarding gardening adventure. And most importantly, we want to hear about your experience! Share your tips, tricks, and triumphs in the comments below. Let’s build a community of home leek growers and inspire others to discover the joys of homegrown produce. What are you waiting for? Start growing leeks at home today!
Frequently Asked Questions (FAQs)
What is the best time of year to start growing leeks from seed?
The ideal time to start growing leeks from seed depends on your climate. In general, you should start seeds indoors 8-10 weeks before the last expected frost. This typically means starting seeds in late winter or early spring. If you live in a warmer climate with mild winters, you can start seeds outdoors in the fall for a winter harvest. Check your local gardening resources for specific planting dates in your area.
How much sunlight do leeks need to grow?
Leeks require at least 6 hours of direct sunlight per day to thrive. Choose a sunny location in your garden or on your balcony to ensure that your leeks receive adequate sunlight. If you’re growing leeks indoors, supplement with grow lights if necessary. Insufficient sunlight can result in leggy, weak plants.
What type of soil is best for growing leeks?
Leeks prefer well-drained, fertile soil that is rich in organic matter. Amend your soil with compost or well-rotted manure before planting to improve its fertility and drainage. Leeks also prefer a slightly acidic to neutral soil pH (around 6.0 to 7.0). You can test your soil pH with a soil testing kit and adjust it accordingly.
How often should I water my leeks?
Leeks need consistent moisture to grow properly. Water your leeks regularly, especially during dry periods. Aim to keep the soil consistently moist but not waterlogged. Overwatering can lead to root rot, so be sure to provide adequate drainage. A good rule of thumb is to water deeply whenever the top inch of soil feels dry to the touch.
How do I prevent pests and diseases from affecting my leeks?
Several pests and diseases can affect leeks, including onion thrips, leek moths, and white rot. To prevent these problems, practice good garden hygiene. Remove any weeds or debris that can harbor pests and diseases. Rotate your crops each year to prevent the buildup of soilborne pathogens. You can also use organic pest control methods, such as insecticidal soap or neem oil, to control pests. For diseases, ensure good air circulation around your plants and avoid overhead watering.
When are leeks ready to harvest?
Leeks are typically ready to harvest 100-120 days after planting. You can harvest them at any size, depending on your preference. For smaller, more tender leeks, harvest them when they are about 1 inch in diameter. For larger leeks, wait until they are 2-3 inches in diameter. To harvest, simply loosen the soil around the base of the leek and gently pull it out of the ground.
Can I grow leeks in containers?
Yes, leeks can be successfully grown in containers. Choose a container that is at least 8-10 inches deep and wide to provide enough room for the roots to grow. Use a well-draining potting mix and water regularly. Be sure to fertilize your container-grown leeks regularly, as nutrients can leach out of the soil more quickly in containers.
How do I blanch leeks for a milder flavor?
Blanching leeks involves excluding sunlight from the lower portion of the stem, which results in a milder, sweeter flavor. There are several ways to blanch leeks. One method is to gradually mound soil around the stems as they grow. Another method is to wrap the stems with cardboard or newspaper. Be sure to leave the top portion of the leaves exposed to sunlight. Blanching typically takes 2-3 weeks.
Can I save seeds from my leeks to grow next year?
Yes, you can save seeds from your leeks, but it’s a two-year process. Leeks are biennials, meaning they complete their life cycle in two years. In the first year, they produce vegetative growth (the leek itself). In the second year, they flower and produce seeds. To save seeds, allow a few leeks to overwinter in the ground. In the spring, they will send up flower stalks. Allow the flowers to dry on the plant, then harvest the seeds. Store the seeds in a cool, dry place.
What are some creative ways to use homegrown leeks in cooking?
Homegrown leeks are incredibly versatile and can be used in a wide variety of dishes. Try adding them to soups, stews, and sauces for a subtle oniony flavor. They’re also delicious sautéed with butter and served as a side dish. Leeks can be grilled, roasted, or even used in quiches and tarts. Get creative and experiment with different ways to incorporate your homegrown leeks into your favorite recipes. Leek and potato soup is a classic for a reason!
Leave a Comment