
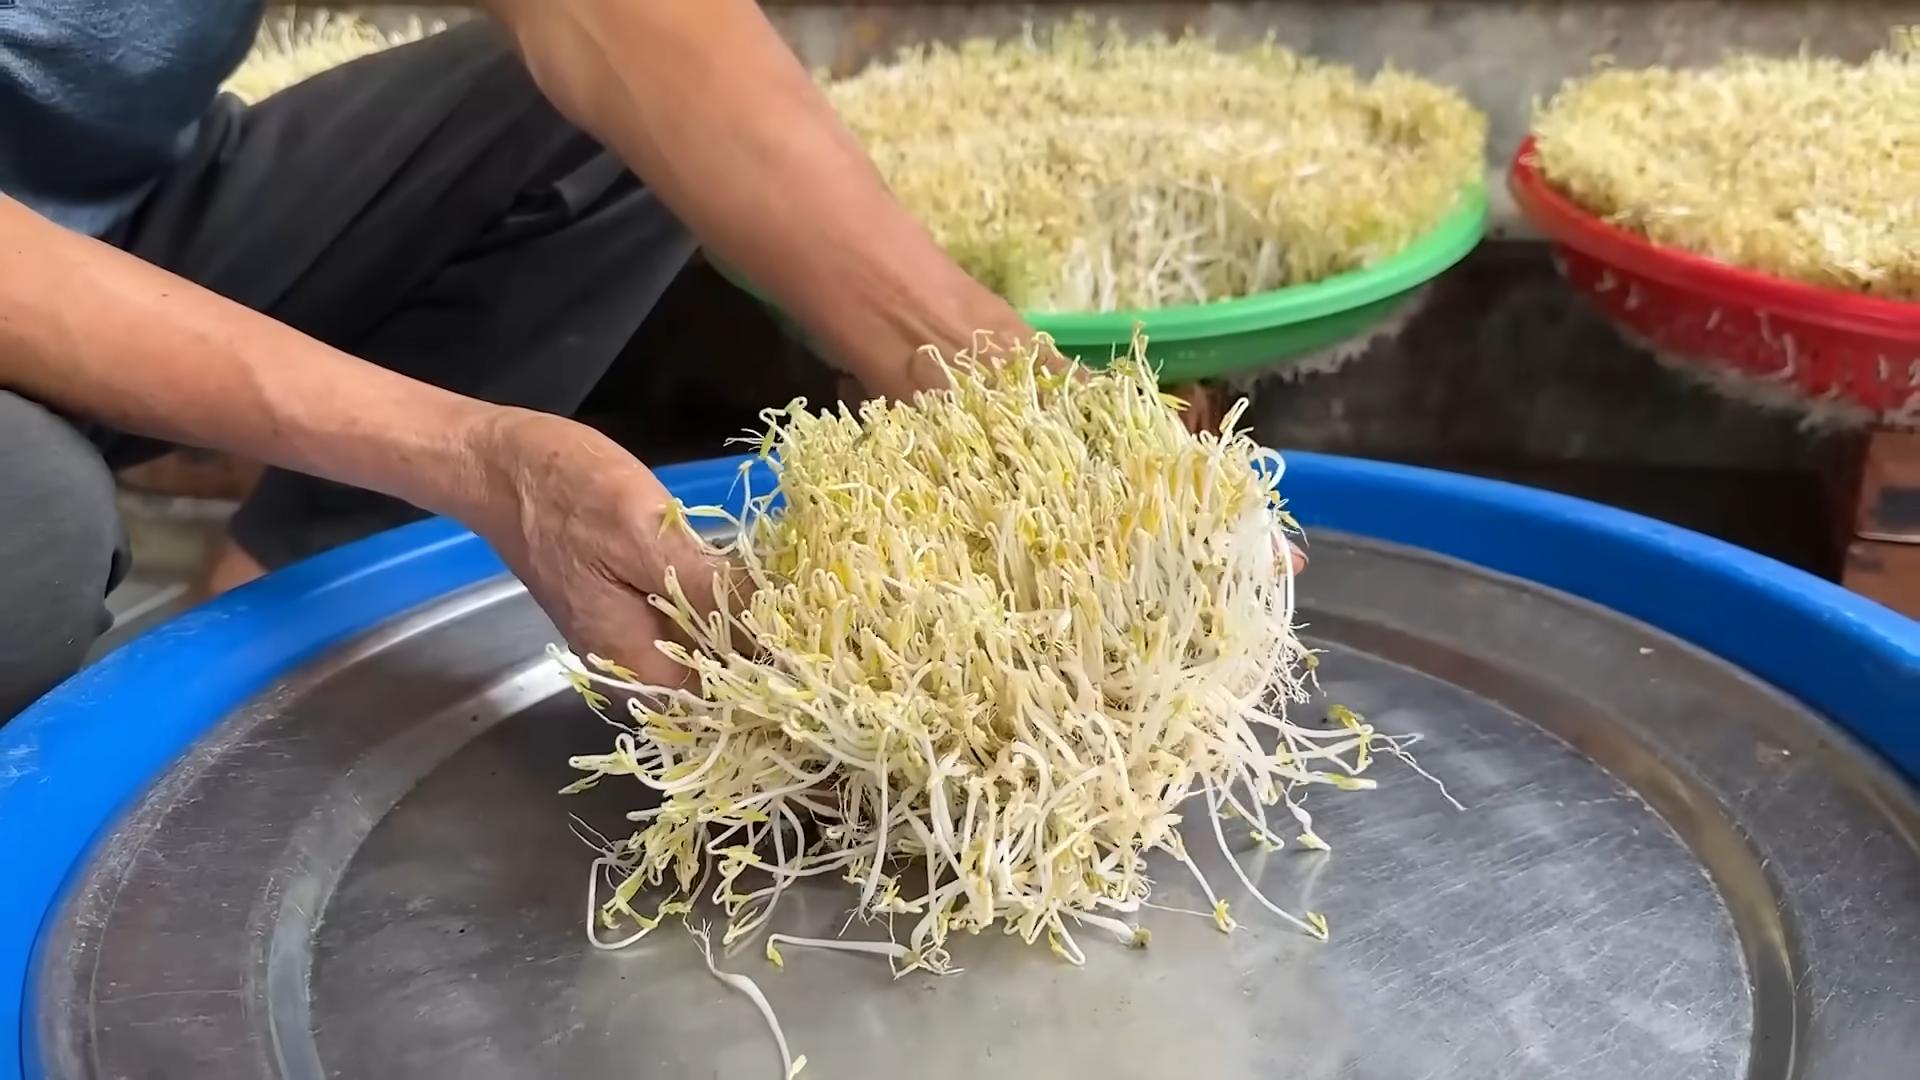
Grow Bean Sprouts at Home – and unlock a world of fresh, crunchy goodness right on your kitchen counter! Forget those limp, flavorless sprouts from the grocery store. I’m going to show you how incredibly easy and rewarding it is to cultivate your own vibrant bean sprouts, bursting with nutrients and ready to add a delightful crunch to your salads, sandwiches, and stir-fries.
Sprouting, in general, isn’t a new fad. It’s a practice with roots stretching back centuries, particularly in Asian cultures where sprouts have long been valued for their nutritional benefits and culinary versatility. Think of the vibrant flavors of Vietnamese pho or the satisfying crunch in a Korean bibimbap – often, bean sprouts are the unsung heroes!
But why should *you* bother to grow bean sprouts at home? Well, for starters, it’s incredibly cost-effective. A small bag of dried beans can yield a mountain of sprouts, saving you money compared to buying them pre-packaged. More importantly, you control the entire process, ensuring they’re grown in a clean and healthy environment, free from unwanted additives. Plus, let’s be honest, there’s something deeply satisfying about nurturing life from a tiny seed and watching it transform into a delicious and nutritious snack. So, are you ready to ditch the store-bought sprouts and embark on this simple, yet rewarding, home gardening adventure with me? Let’s get sprouting!
Growing Celery at Home: From Kitchen Scraps to Crunchy Stalks!
Hey there, fellow gardening enthusiasts! Ever wondered if you could actually grow celery from that leftover base you usually toss in the compost? Well, guess what? You absolutely can! It’s a fun, easy, and surprisingly rewarding DIY project that’ll give you fresh celery right from your own kitchen. I’m going to walk you through the whole process, step-by-step, so you can enjoy the satisfaction of regrowing your own veggies.
What You’ll Need
Before we dive in, let’s gather our supplies. This is a pretty low-cost project, which is always a win!
* Celery Base: The bottom part of a celery bunch, about 2 inches from the root end. Make sure it’s firm and healthy-looking, not mushy or brown.
* Shallow Dish or Bowl: Something to hold water and the celery base.
* Water: Tap water is fine.
* Potting Soil: A good quality potting mix will give your celery the nutrients it needs.
* Pot: Choose a pot that’s at least 6-8 inches in diameter to give the celery roots plenty of room to grow.
* Sunny Spot: Celery loves sunshine!
* Spray Bottle (Optional): For misting the celery.
Regrowing Celery from the Base: The Water Propagation Phase
This is where the magic begins! We’re going to coax those roots back to life.
1. Prepare the Celery Base: Carefully trim the top of the celery base, leaving about 2 inches from the bottom. You might see tiny yellow leaves starting to sprout – that’s a good sign! Don’t remove them.
2. Place in Water: Put the celery base in your shallow dish or bowl. Add enough water to cover the bottom inch or so of the base. Be careful not to submerge the entire base, as this can cause it to rot.
3. Find a Sunny Spot: Place the dish in a bright, sunny location, like a windowsill. Celery needs plenty of light to thrive.
4. Change the Water Regularly: Every 1-2 days, change the water to keep it fresh and prevent bacteria from growing. This is crucial for healthy root development.
5. Observe and Wait: Over the next few days, you should start to see small roots emerging from the bottom of the celery base. You’ll also notice new green leaves sprouting from the top. This is so exciting!
6. Patience is Key: It usually takes about 5-7 days for the roots to develop enough to transplant. You want them to be at least an inch or two long.
Transplanting to Soil: Giving Your Celery a Home
Now that your celery has roots, it’s time to give it a more permanent home in a pot with soil.
1. Prepare the Pot: Fill your pot with potting soil, leaving about an inch of space at the top. Gently pat the soil down to remove any air pockets.
2. Make a Hole: Create a hole in the center of the pot that’s large enough to accommodate the celery base and its roots.
3. Carefully Remove from Water: Gently lift the celery base out of the water, being careful not to damage the delicate roots.
4. Plant the Celery: Place the celery base in the hole, making sure the roots are spread out. Cover the roots with soil, leaving the top of the celery base exposed.
5. Water Thoroughly: Water the soil well until it’s evenly moist.
6. Return to Sunny Spot: Place the pot back in your sunny location.
Caring for Your Growing Celery: Keeping it Happy and Healthy
Now that your celery is planted, it’s important to provide it with the right care to ensure it grows into a healthy, crunchy stalk.
1. Watering: Celery needs consistent moisture. Water the plant whenever the top inch of soil feels dry to the touch. Avoid overwatering, as this can lead to root rot.
2. Sunlight: Celery thrives in full sun, so make sure it gets at least 6 hours of direct sunlight each day. If you don’t have a sunny spot indoors, you can use a grow light.
3. Fertilizing: To give your celery a boost, you can fertilize it every 2-3 weeks with a balanced liquid fertilizer. Follow the instructions on the fertilizer label.
4. Misting (Optional): Celery also appreciates humidity. You can mist the leaves with water every few days to keep them hydrated.
5. Pest Control: Keep an eye out for pests like aphids or spider mites. If you spot any, you can treat them with insecticidal soap or neem oil.
6. Support (Optional): As your celery grows taller, it may need some support. You can use a stake or tomato cage to keep it from falling over.
Harvesting Your Celery: Time to Enjoy the Fruits (or Vegetables!) of Your Labor
After a few months of care, your celery should be ready to harvest!
1. When to Harvest: You can start harvesting individual stalks when they are at least 6-8 inches long.
2. How to Harvest: To harvest, simply cut the outer stalks near the base of the plant with a sharp knife. Leave the inner stalks to continue growing.
3. Enjoy Your Celery: Now you can enjoy your homegrown celery in salads, soups, smoothies, or as a healthy snack!
Troubleshooting: Common Issues and Solutions
Even with the best care, you might encounter some challenges along the way. Here are a few common issues and how to address them:
* Yellowing Leaves: This could be a sign of overwatering, underwatering, or nutrient deficiency. Adjust your watering schedule and fertilize the plant if needed.
* Slow Growth: Make sure your celery is getting enough sunlight and nutrients. You can also try transplanting it to a larger pot.
* Root Rot: This is caused by overwatering. Make sure the soil is well-draining and avoid letting the plant sit in standing water.
* Pests: Inspect your plant regularly for pests and treat them promptly with insecticidal soap or neem oil.
Tips for Success: Making Your Celery Thrive
Here are a few extra tips to help you grow the best celery possible:
* Choose the Right Celery: Start with a healthy, firm celery base from a bunch that looks fresh.
* Use Good Quality Potting Soil: This will provide your celery with the nutrients it needs to grow.
* Provide Plenty of Sunlight: Celery loves sunshine, so make sure it gets at least 6 hours of direct sunlight each day.
* Water Regularly: Keep the soil consistently moist, but avoid overwatering.
* Be Patient: Growing celery takes time, so don’t get discouraged if you don’t see results immediately.
Why Grow Celery at Home?
Besides the sheer fun of it, there are so many reasons to grow your own celery!
* Freshness: You can’t beat the taste of freshly harvested celery.
* Cost Savings: Growing your own celery can save you money on groceries.
* Sustainability: You’re reducing food waste and your carbon footprint.
* Educational: It’s a great way to learn about gardening and where your food comes from.
* Satisfaction: There’s nothing quite like the feeling of growing your own food!
So, what are you waiting for? Grab that celery base and get growing! I promise, it’s a rewarding experience that you’ll absolutely love. Happy gardening!

Conclusion
So, there you have it! Growing your own bean sprouts at home is not only incredibly easy and cost-effective, but it also provides you with a constant supply of fresh, nutritious ingredients right at your fingertips. Forget those limp, pre-packaged sprouts from the grocery store – with this simple DIY trick, you can enjoy crisp, flavorful bean sprouts whenever you want.
The beauty of this method lies in its simplicity. You don’t need any fancy equipment or specialized knowledge. Just a jar, some beans, water, and a little patience. The process is also incredibly rewarding, watching those tiny sprouts emerge and grow day by day. It’s a mini-science experiment that yields delicious results!
But the benefits extend beyond convenience and cost. Homegrown bean sprouts are significantly fresher and more nutritious than store-bought varieties. You control the growing environment, ensuring they are free from harmful chemicals and pesticides. Plus, the act of growing your own food can be incredibly therapeutic and grounding.
Why is this DIY trick a must-try? Because it empowers you to take control of your food supply, reduce waste, and enjoy a healthier, more sustainable lifestyle. It’s a small change that can make a big difference.
Looking for variations? Experiment with different types of beans! Mung beans are the most common, but you can also try adzuki beans, lentils, or even chickpeas. Each variety will offer a slightly different flavor and texture. You can also adjust the sprouting time to achieve your desired sprout length. Some people prefer shorter, crunchier sprouts, while others like them longer and more developed.
Consider adding a touch of flavor during the rinsing process. A splash of lemon juice or a pinch of sea salt can enhance the taste of your sprouts. You can also experiment with adding a small amount of seaweed or other nutrient-rich ingredients to the sprouting jar.
Don’t be afraid to get creative and personalize your bean sprouting experience! The possibilities are endless.
We wholeheartedly encourage you to try this DIY trick for growing bean sprouts at home. It’s a fun, easy, and rewarding project that will transform the way you think about fresh produce. Once you’ve experienced the satisfaction of harvesting your own homegrown sprouts, you’ll never go back to store-bought again.
And most importantly, we want to hear about your experience! Share your photos, tips, and variations in the comments below. Let’s build a community of home sprout growers and inspire others to embrace this simple, sustainable practice. What kind of beans did you use? What challenges did you face? What tips do you have for beginners? Your feedback is invaluable and will help us improve this guide for future sprout enthusiasts. So, grab a jar, some beans, and get sprouting! Happy growing!
Frequently Asked Questions (FAQ)
What kind of beans can I use to grow bean sprouts?
The most common and readily available bean for sprouting is the mung bean. However, you can also successfully sprout adzuki beans, lentils, chickpeas, and even some types of peas. Keep in mind that different beans will have different sprouting times and flavor profiles. Avoid using kidney beans or other beans that are known to be toxic when raw. Always use beans specifically intended for sprouting, as they are more likely to germinate successfully and are less likely to have been treated with chemicals.
How long does it take to grow bean sprouts?
Generally, it takes between 3 to 5 days to grow bean sprouts to a usable length. The exact time will depend on the type of bean, the temperature, and the humidity. Mung beans typically sprout within 3 to 4 days, while other beans may take a day or two longer. Keep an eye on your sprouts and harvest them when they reach your desired length and texture.
What if my bean sprouts start to smell bad?
A foul odor is a sign that your bean sprouts are contaminated with bacteria or mold. This can happen if the sprouts are not rinsed frequently enough or if the growing environment is too warm and humid. If you notice a bad smell, discard the sprouts immediately and thoroughly clean your sprouting jar before starting a new batch. To prevent this, ensure you rinse your sprouts at least twice a day with fresh, cool water.
How do I store bean sprouts?
Once your bean sprouts have reached your desired length, rinse them thoroughly and drain them well. Store them in an airtight container lined with a paper towel in the refrigerator. The paper towel will help absorb excess moisture and keep the sprouts fresh for longer. Properly stored bean sprouts can last for up to a week in the refrigerator.
Can I eat the bean sprout roots?
Yes, the roots of bean sprouts are perfectly edible and contain nutrients. Some people prefer to trim the roots before eating, but this is purely a matter of personal preference. The roots are generally safe to consume as long as the sprouts have been grown in a clean environment and have not been contaminated.
Why are my bean sprouts not sprouting?
There are several reasons why your bean sprouts might not be sprouting. First, ensure that you are using fresh, viable beans specifically intended for sprouting. Old or damaged beans may not germinate. Second, make sure the beans are properly soaked before sprouting. Soaking helps to activate the germination process. Third, the temperature may be too cold or too hot. Bean sprouts thrive in a moderately warm environment. Finally, ensure that the beans are kept moist but not waterlogged. Overwatering can lead to rot, while underwatering can prevent germination.
How do I prevent mold from growing on my bean sprouts?
Preventing mold growth is crucial for successful bean sprouting. The key is to maintain a clean growing environment and ensure proper ventilation. Rinse your sprouting jar thoroughly with soap and water before each use. Rinse the bean sprouts at least twice a day with fresh, cool water to remove any bacteria or mold spores. Avoid overcrowding the jar, as this can restrict airflow and create a breeding ground for mold. If you live in a humid climate, consider using a fan to improve ventilation around the sprouting jar.
Are there any health benefits to eating bean sprouts?
Yes, bean sprouts are a nutritious addition to your diet. They are a good source of vitamins, minerals, and fiber. They are also low in calories and fat. Bean sprouts contain antioxidants that can help protect your body against damage from free radicals. They are also a good source of enzymes, which can aid in digestion. Incorporating bean sprouts into your diet can contribute to overall health and well-being.
Can I grow bean sprouts without a sprouting jar?
While a sprouting jar is the most common and convenient method, you can also grow bean sprouts using other containers. A colander lined with cheesecloth or a clean plastic container with drainage holes can also be used. The key is to ensure that the beans are kept moist, well-drained, and properly ventilated. Regardless of the container you use, be sure to rinse the sprouts regularly to prevent mold growth.
What are some ways to use bean sprouts in my cooking?
Bean sprouts are a versatile ingredient that can be used in a variety of dishes. They can be added to salads, sandwiches, and wraps for a crunchy texture and fresh flavor. They are also commonly used in stir-fries, soups, and noodle dishes. Bean sprouts can be eaten raw or cooked, depending on your preference. When cooking bean sprouts, be careful not to overcook them, as they can become mushy. Add them towards the end of the cooking process to retain their crispness.

Leave a Comment