
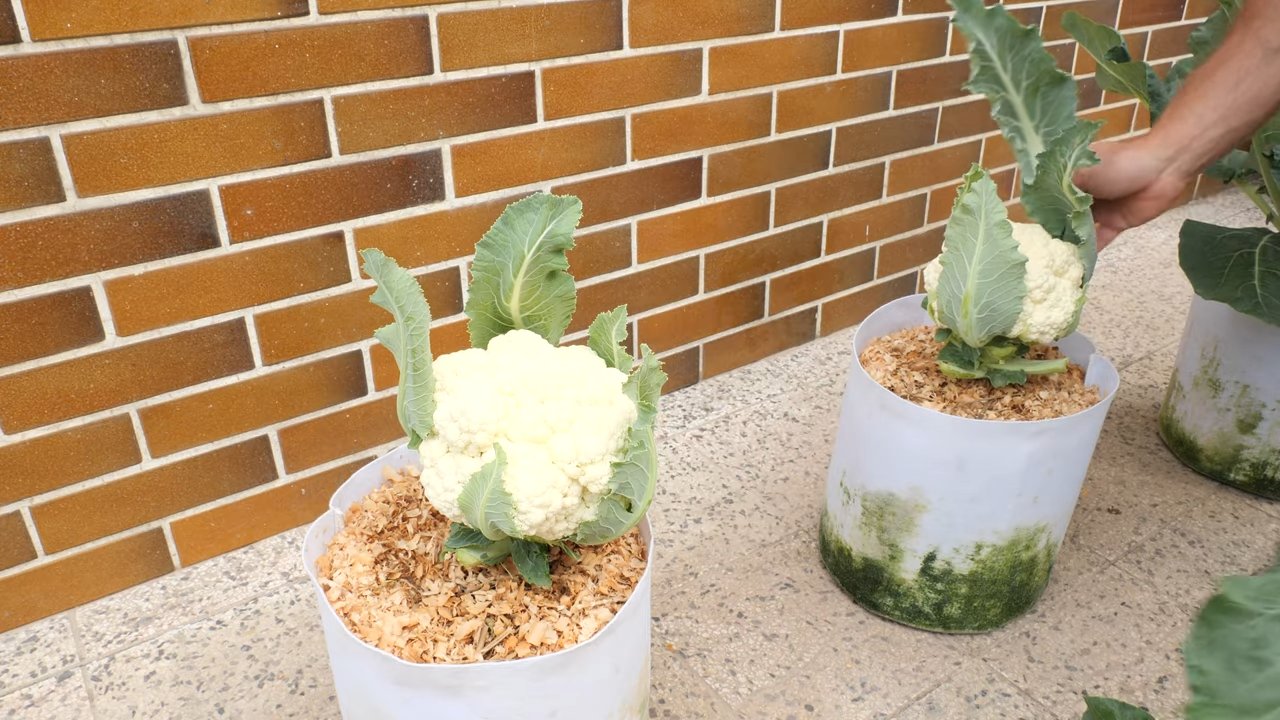
Growing Cauliflower in Pots might seem like a challenge reserved for seasoned gardeners with sprawling acres, but I’m here to tell you it’s absolutely achievable, even if your “garden” is a sunny balcony or a small patio! Forget the image of vast fields; we’re bringing the farm-to-table experience right to your doorstep, one pot at a time.
Cauliflower, a member of the Brassica family, has a rich history dating back to ancient times. Originating in the Mediterranean, it was a prized vegetable in Roman cuisine and has since become a staple in diets worldwide. But let’s be honest, buying cauliflower from the store can be a gamble. Sometimes it’s perfect, other times it’s bruised, discolored, or just plain bland. That’s where the magic of DIY comes in!
Imagine harvesting your own, perfectly formed, creamy white cauliflower head, knowing exactly where it came from and how it was grown. No more disappointing grocery store finds! This article is your ultimate guide to successfully growing cauliflower in pots, offering simple, step-by-step instructions and insider tips to ensure a bountiful harvest. We’ll cover everything from choosing the right pot and soil to protecting your precious plants from pests and diseases. So, grab your gardening gloves, and let’s get started on this rewarding and delicious adventure!
Growing Cauliflower in Pots: A Beginner’s Guide
Hey there, fellow gardening enthusiasts! So, you’re thinking about growing cauliflower, but you’re short on space? No problem! You absolutely can grow cauliflower in pots, and I’m here to walk you through the whole process. It’s easier than you might think, and the reward of harvesting your own homegrown cauliflower is totally worth it. Let’s get started!
Choosing the Right Cauliflower Variety
First things first, not all cauliflower varieties are created equal when it comes to container gardening. Some grow much larger than others, which isn’t ideal for pots. Here’s what I recommend:
* Consider size: Look for compact or dwarf varieties. These are bred to stay smaller, making them perfect for containers.
* Popular choices: ‘Snow Crown,’ ‘Early White Hybrid,’ and ‘Cheddar’ (for a fun orange cauliflower!) are all great options.
* Read the seed packet: Pay close attention to the plant’s mature size listed on the seed packet or plant label. Aim for varieties that stay under 18 inches in diameter.
Gathering Your Supplies
Okay, now let’s gather everything we need. This is my favorite part – getting organized!
* Pot: You’ll need a pot that’s at least 12 inches in diameter and 12 inches deep. Bigger is generally better, as cauliflower needs room for its roots to spread. A 5-gallon pot is a good starting point. Make sure it has drainage holes!
* Potting Mix: Don’t use garden soil! It’s too heavy and doesn’t drain well in containers. Use a high-quality potting mix that’s light and airy. I like to use a mix specifically formulated for vegetables.
* Cauliflower Seeds or Seedlings: Choose your variety and either start from seed or buy seedlings from a local nursery.
* Fertilizer: Cauliflower are heavy feeders, so you’ll need a balanced fertilizer (like 10-10-10) or a fertilizer specifically formulated for vegetables.
* Watering Can or Hose: For, well, watering!
* Optional: Mulch (like straw or wood chips) to help retain moisture and suppress weeds.
Planting Your Cauliflower
Now for the fun part – getting our hands dirty!
1. Prepare the Pot: Fill your pot with potting mix, leaving about an inch or two of space at the top.
2. Starting from Seed: If you’re starting from seed, sow the seeds about ½ inch deep and water gently. Keep the soil consistently moist but not soggy. You’ll need to thin the seedlings later, keeping only the strongest one per pot.
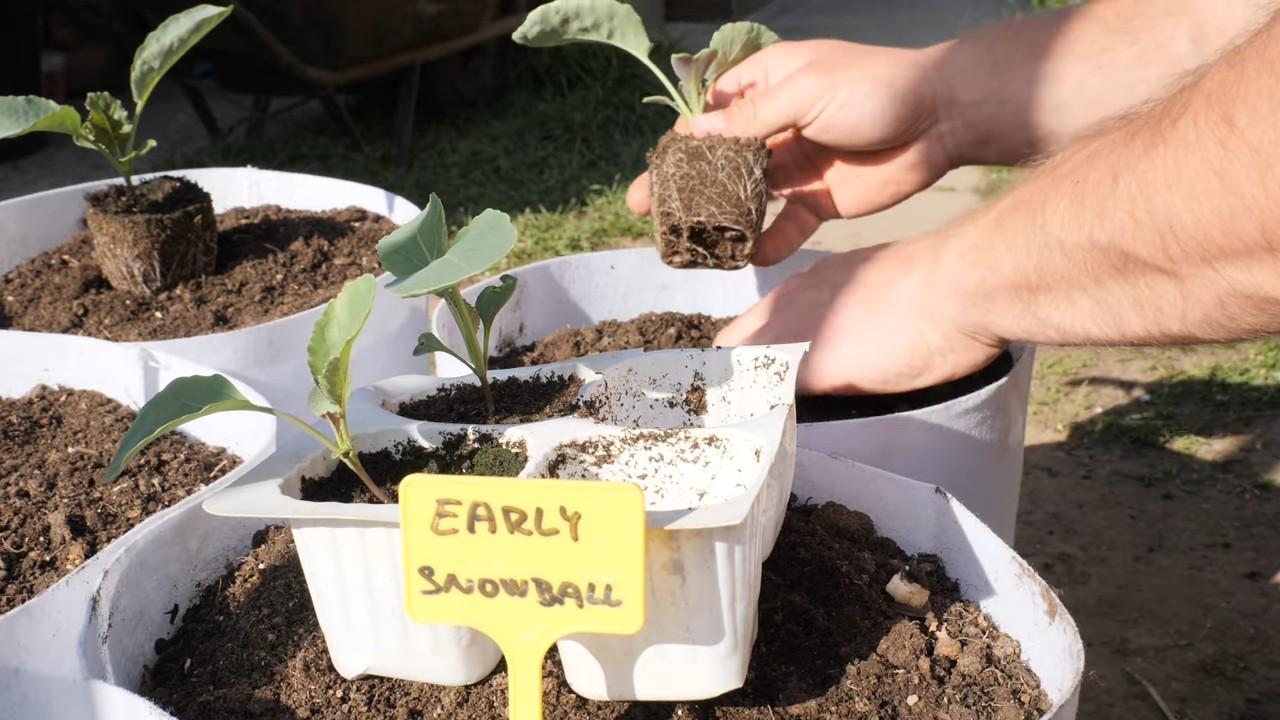
3. Planting Seedlings: If you’re using seedlings, gently remove them from their containers. Loosen the roots a bit with your fingers.
4. Dig a Hole: Dig a hole in the potting mix that’s large enough to accommodate the seedling’s root ball.
5. Plant the Seedling: Place the seedling in the hole and gently backfill with potting mix. Make sure the top of the root ball is level with the soil surface.
6. Water Thoroughly: Water the newly planted cauliflower thoroughly until water drains out of the bottom of the pot.
7. Mulch (Optional): Add a layer of mulch around the base of the plant to help retain moisture and suppress weeds.
Caring for Your Cauliflower
This is where the real work begins, but don’t worry, it’s manageable!
* Sunlight: Cauliflower needs at least 6 hours of sunlight per day. Place your pot in a sunny location. If you don’t have enough sunlight, you might consider using a grow light.
* Watering: Water regularly, especially during hot, dry weather. The soil should be consistently moist but not soggy. Check the soil moisture by sticking your finger about an inch into the soil. If it feels dry, it’s time to water.
* Fertilizing: Fertilize your cauliflower every 2-3 weeks with a balanced fertilizer. Follow the instructions on the fertilizer package. You can also use a liquid fertilizer diluted to half strength for more frequent feeding.
* Pest Control: Keep an eye out for pests like cabbage worms, aphids, and flea beetles. You can handpick them off the plants, use insecticidal soap, or apply Bacillus thuringiensis (Bt), a natural bacteria that kills caterpillars.
* Weed Control: Remove any weeds that pop up in the pot. Weeds compete with the cauliflower for nutrients and water.
* Blanching (Optional): Some varieties of cauliflower need to be blanched to keep the head white. When the head is about 2-3 inches in diameter, tie the outer leaves together over the head to protect it from the sun. This will prevent it from turning yellow or brown.
Troubleshooting Common Problems
Even with the best care, you might encounter some problems. Here’s how to deal with them:
* Buttoning: This is when the cauliflower head forms prematurely and stays small. It’s often caused by stress, such as lack of water or nutrients. Make sure you’re watering and fertilizing regularly.
* Yellowing Leaves: This can be a sign of nutrient deficiency, especially nitrogen. Fertilize with a balanced fertilizer.
* Pest Infestations: As mentioned earlier, keep an eye out for pests and take action promptly.
* Root Rot: This is caused by overwatering. Make sure your pot has good drainage and don’t let the soil stay soggy.
Harvesting Your Cauliflower
The moment you’ve been waiting for!
1. Timing: Cauliflower is typically ready to harvest 50-80 days after planting, depending on the variety.
2. Check the Head: The head should be firm, compact, and white (or whatever color your variety is supposed to be). The curds (the little bumps that make up the head) should be tightly packed together.
3. Cut the Head: Use a sharp knife to cut the head from the plant, leaving a few leaves attached to protect the head.
4. Enjoy! Now you can enjoy your homegrown cauliflower! You can eat it raw, steamed, roasted, or in any of your favorite cauliflower recipes.
Tips for Success
Here are a few extra tips to help you succeed:
* Start Early: Start your seeds indoors 6-8 weeks before the last frost. This will give you a head start on the growing season.
* Choose the Right Potting Mix: A good potting mix is essential for healthy cauliflower growth.
* Water Consistently: Cauliflower needs consistent moisture to thrive.
* Fertilize Regularly: Cauliflower are heavy feeders and need regular fertilization.
* Protect from Pests: Keep an eye out for pests and take action promptly.
* Don’t Overcrowd: Give your cauliflower enough space to grow. One plant per pot is usually best.
* Rotate Crops: If you’re growing cauliflower in the same pot year after year, rotate it with other crops to prevent soilborne diseases.
Extending the Harvest
Want to keep that cauliflower coming? Here’s how:
* Succession Planting: Plant new cauliflower seedlings every few weeks to extend the harvest season.
* Choose Different Varieties: Select varieties with different maturity dates to spread out the harvest.
Hey there, fellow gardening enthusiasts! So, you’re thinking about growing cauliflower, but you’re short on space? No problem! You absolutely can grow cauliflower in pots, and I’m here to walk you through the whole process. It’s easier than you might think, and the reward of harvesting your own homegrown cauliflower is totally worth it. Let’s get started!
Choosing the Right Cauliflower Variety
First things first, not all cauliflower varieties are created equal when it comes to container gardening. Some grow much larger than others, which isn’t ideal for pots. Here’s what I recommend:
* Consider size: Look for compact or dwarf varieties. These are bred to stay smaller, making them perfect for containers.
* Popular choices: ‘Snow Crown,’ ‘Early White Hybrid,’ and ‘Cheddar’ (for a fun orange cauliflower!) are all great options.
* Read the seed packet: Pay close attention to the plant’s mature size listed on the seed packet or plant label. Aim for varieties that stay under 18 inches in diameter.
Gathering Your Supplies
Okay, now let’s gather everything we need. This is my favorite part – getting organized!
* Pot: You’ll need a pot that’s at least 12 inches in diameter and 12 inches deep. Bigger is generally better, as cauliflower needs room for its roots to spread. A 5-gallon pot is a good starting point. Make sure it has drainage holes!
* Potting Mix: Don’t use garden soil! It’s too heavy and doesn’t drain well in containers. Use a high-quality potting mix that’s light and airy. I like to use a mix specifically formulated for vegetables.
* Cauliflower Seeds or Seedlings: Choose your variety and either start from seed or buy seedlings from a local nursery.
* Fertilizer: Cauliflower are heavy feeders, so you’ll need a balanced fertilizer (like 10-10-10) or a fertilizer specifically formulated for vegetables.
* Watering Can or Hose: For, well, watering!
* Optional: Mulch (like straw or wood chips) to help retain moisture and suppress weeds.
Planting Your Cauliflower
Now for the fun part – getting our hands dirty!
1. Prepare the Pot: Fill your pot with potting mix, leaving about an inch or two of space at the top.
2. Starting from Seed: If you’re starting from seed, sow the seeds about ½ inch deep and water gently. Keep the soil consistently moist but not soggy. You’ll need to thin the seedlings later, keeping only the strongest one per pot.
3. Planting Seedlings: If you’re using seedlings, gently remove them from their containers. Loosen the roots a bit with your fingers.
4. Dig a Hole: Dig a hole in the potting mix that’s large enough to accommodate the seedling’s root ball.
5. Plant the Seedling: Place the seedling in the hole and gently backfill with potting mix. Make sure the top of the root ball is level with the soil surface.
6. Water Thoroughly: Water the newly planted cauliflower thoroughly until water drains out of the bottom of the pot.
7. Mulch (Optional): Add a layer of mulch around the base of the plant to help retain moisture and suppress weeds.
Caring for Your Cauliflower
This is where the real work begins, but don’t worry, it’s manageable!
* Sunlight: Cauliflower needs at least 6 hours of sunlight per day. Place your pot in a sunny location. If you don’t have enough sunlight, you might consider using a grow light.
* Watering: Water regularly, especially during hot, dry weather. The soil should be consistently moist but not soggy. Check the soil moisture by sticking your finger about an inch into the soil. If it feels dry, it’s time to water.
* Fertilizing: Fertilize your cauliflower every 2-3 weeks with a balanced fertilizer. Follow the instructions on the fertilizer package. You can also use a liquid fertilizer diluted to half strength for more frequent feeding.
* Pest Control: Keep an eye out for pests like cabbage worms, aphids, and flea beetles. You can handpick them off the plants, use insecticidal soap, or apply Bacillus thuringiensis (Bt), a natural bacteria that kills caterpillars.
* Weed Control: Remove any weeds that pop up in the pot. Weeds compete with the cauliflower for nutrients and water.
* Blanching (Optional): Some varieties of cauliflower need to be blanched to keep the head white. When the head is about 2-3 inches in diameter, tie the outer leaves together over the head to protect it from the sun. This will prevent it from turning yellow or brown.
Troubleshooting Common Problems
Even with the best care, you might encounter some problems. Here’s how to deal with them:
* Buttoning: This is when the cauliflower head forms prematurely and stays small. It’s often caused by stress, such as lack of water or nutrients. Make sure you’re watering and fertilizing regularly.
* Yellowing Leaves: This can be a sign of nutrient deficiency, especially nitrogen. Fertilize with a balanced fertilizer.
* Pest Infestations: As mentioned earlier, keep an eye out for pests and take action promptly.
* Root Rot: This is caused by overwatering. Make sure your pot has good drainage and don’t let the soil stay soggy.
Harvesting Your Cauliflower
The moment you’ve been waiting for!
1. Timing: Cauliflower is typically ready to harvest 50-80 days after planting, depending on the variety.
2. Check the Head: The head should be firm, compact, and white (or whatever color your variety is supposed to be). The curds (the little bumps that make up the head) should be tightly packed together.
3. Cut the Head: Use a sharp knife to cut the head from the plant, leaving a few leaves attached to protect the head.
4. Enjoy! Now you can enjoy your homegrown cauliflower! You can eat it raw, steamed, roasted, or in any of your favorite cauliflower recipes.
Tips for Success
Here are a few extra tips to help you succeed:
* Start Early: Start your seeds indoors 6-8 weeks before the last frost. This will give you a head start on the growing season.
* Choose the Right Potting Mix: A good potting mix is essential for healthy cauliflower growth.
* Water Consistently: Cauliflower needs consistent moisture to thrive.
* Fertilize Regularly: Cauliflower are heavy feeders and need regular fertilization.
* Protect from Pests: Keep an eye out for pests and take action promptly.
* Don’t Overcrowd: Give your cauliflower enough space to grow. One plant per pot is usually best.
* Rotate Crops: If you’re growing cauliflower in the same pot year after year, rotate it with other crops to prevent soilborne diseases.
Extending the Harvest
Want to keep that cauliflower coming? Here’s how:
* Succession Planting: Plant new cauliflower seedlings every few weeks to extend the harvest season.
* Choose Different Varieties: Select varieties with different maturity dates to spread out the harvest.
* Fall Planting: In mild climates, you can plant cauliflower in the fall for a winter harvest.
Specific Considerations for Different Climates
* Hot Climates: In hot climates, provide afternoon shade to protect the cauliflower from the intense sun. Choose heat-tolerant varieties.
* Cold Climates: In cold climates, start your seeds indoors early and protect the plants from frost.
* Humid Climates: In humid climates, ensure good air circulation to prevent fungal diseases.
Why Grow Cauliflower in Pots?
You might be wondering, why bother growing cauliflower in pots at all? Here’s why I think it’s a great idea:
* Space Saving: Perfect for small gardens, balconies, or patios.
* Control: You have more control over the growing environment, such as soil quality and watering.
* Mobility: You can move the pots to follow the sun or protect them from extreme weather.
* Pest Control: It’s easier to monitor and control pests in containers.
* Aesthetics: Cauliflower plants can be quite attractive in pots.
My Personal Experience
I’ve been growing cauliflower in pots for several years now, and I’ve learned a lot along the way. One of my biggest mistakes was not providing enough water. Cauliflower are thirsty plants! I also learned the importance of fertilizing regularly. Once I got
Conclusion
So, there you have it! Growing cauliflower in pots might seem daunting at first, but with a little planning and the right approach, you can absolutely enjoy fresh, homegrown cauliflower even without a sprawling garden. The benefits are undeniable: greater control over soil conditions, protection from soilborne pests and diseases, and the sheer satisfaction of nurturing a plant from seedling to harvest.
This DIY trick is a must-try for several reasons. Firstly, it democratizes gardening. Apartment dwellers, balcony enthusiasts, and anyone with limited space can now participate in the joy of growing their own food. Secondly, it allows for a more personalized gardening experience. You can tailor the soil mix, watering schedule, and fertilization to the specific needs of your chosen cauliflower variety. Finally, it’s a fantastic learning opportunity. You’ll gain a deeper understanding of plant life cycles, nutrient requirements, and the delicate balance of the ecosystem within a pot.
But don’t stop there! Experiment with different cauliflower varieties. Purple cauliflower adds a vibrant splash of color to your garden and plate. Romanesco cauliflower, with its fractal florets, is a conversation starter. Consider companion planting in your pots. Marigolds can deter pests, while herbs like thyme and rosemary can improve the overall health of your cauliflower plants.
For those looking to maximize their yield, try succession planting. Start a new batch of seedlings every few weeks to ensure a continuous harvest throughout the growing season. You can also explore different fertilization methods. Compost tea is a natural and effective way to provide your cauliflower plants with the nutrients they need.
Don’t be afraid to get your hands dirty and embrace the challenges that come with growing cauliflower in pots. The rewards are well worth the effort. Imagine the pride you’ll feel when you harvest your first head of homegrown cauliflower, knowing that you nurtured it from a tiny seed to a culinary masterpiece.
We wholeheartedly encourage you to try this DIY trick and share your experience with us. Post photos of your potted cauliflower on social media using #PottedCauliflower or #HomegrownCauliflower. Tell us about your successes, your challenges, and any tips you’ve learned along the way. Let’s build a community of potted cauliflower enthusiasts and inspire others to embrace the joy of homegrown food. Your insights could be invaluable to someone just starting out. So, grab a pot, some soil, and a cauliflower seedling, and embark on this rewarding gardening adventure. Happy growing!
Frequently Asked Questions (FAQ)
What is the best size pot for growing cauliflower?
A pot that is at least 12 inches in diameter and 12 inches deep is recommended for growing cauliflower. However, a 5-gallon pot or larger is even better, as it provides ample space for the roots to develop and allows for better water retention. The larger the pot, the less frequently you’ll need to water, which is especially important during hot weather. Remember, cauliflower needs room to grow, and a cramped pot can stunt its growth and reduce the size of the head.
What type of soil should I use for growing cauliflower in pots?
A well-draining potting mix is essential for growing cauliflower in pots. Avoid using garden soil, as it can become compacted and doesn’t drain well, which can lead to root rot. A good potting mix should contain a blend of peat moss, perlite, and vermiculite. You can also add compost to the mix to provide extra nutrients. Aim for a slightly acidic to neutral pH level (around 6.0 to 7.0). You can test the pH of your soil using a soil testing kit.
How often should I water my potted cauliflower?
Water your potted cauliflower regularly, especially during hot and dry weather. The soil should be consistently moist but not waterlogged. Check the soil moisture by sticking your finger about an inch into the soil. If it feels dry, it’s time to water. Water deeply, until water drains out of the bottom of the pot. Avoid overhead watering, as this can promote fungal diseases. Consider using a soaker hose or drip irrigation to deliver water directly to the roots.
How much sunlight does potted cauliflower need?
Cauliflower needs at least 6 hours of direct sunlight per day to thrive. Choose a sunny location for your potted cauliflower. If you live in a hot climate, provide some afternoon shade to prevent the plants from overheating. If you don’t have a sunny spot, you can supplement with grow lights.
What kind of fertilizer should I use for potted cauliflower?
Cauliflower is a heavy feeder, so it needs regular fertilization. Use a balanced fertilizer (e.g., 10-10-10) or a fertilizer specifically formulated for vegetables. Follow the instructions on the fertilizer package. You can also use organic fertilizers, such as compost tea or fish emulsion. Fertilize your cauliflower every 2-3 weeks, starting when the plants are about 4 weeks old.
How do I protect my potted cauliflower from pests and diseases?
Monitor your cauliflower plants regularly for pests and diseases. Common pests include aphids, cabbage worms, and flea beetles. You can control these pests with insecticidal soap, neem oil, or by handpicking them off the plants. Common diseases include black rot and clubroot. Prevent these diseases by using disease-free seeds, providing good air circulation, and avoiding overhead watering. If you notice any signs of disease, remove the affected leaves immediately.
When is the best time to plant cauliflower in pots?
The best time to plant cauliflower in pots depends on your climate. In cool climates, start seeds indoors 6-8 weeks before the last frost. Transplant the seedlings outdoors when the weather has warmed up and the risk of frost has passed. In warm climates, you can plant cauliflower in the fall for a winter harvest.
How long does it take for cauliflower to mature in pots?
Cauliflower typically takes 2-3 months to mature, depending on the variety and growing conditions. The head is ready to harvest when it is firm and compact. Cut the head off the plant with a sharp knife, leaving a few leaves attached.
Can I grow cauliflower in pots indoors?
Yes, you can grow cauliflower in pots indoors, but it requires a lot of light. You’ll need to provide at least 12 hours of light per day, either from a sunny window or from grow lights. You’ll also need to ensure good air circulation and maintain a consistent temperature.
What are some common problems when growing cauliflower in pots and how can I fix them?
Some common problems include stunted growth, yellowing leaves, and small heads. Stunted growth can be caused by insufficient sunlight, poor soil, or lack of nutrients. Yellowing leaves can be caused by overwatering, underwatering, or nutrient deficiencies. Small heads can be caused by insufficient sunlight, lack of nutrients, or hot weather. To fix these problems, ensure your cauliflower plants are getting enough sunlight, water, and nutrients. Amend the soil with compost or fertilizer. Provide shade during hot weather.

Leave a Comment