
Growing Chili Peppers Secret: Unlock the fiery potential of your garden! Have you ever dreamed of harvesting baskets overflowing with vibrant, flavorful chili peppers, ready to spice up your culinary creations? I know I have! But sometimes, despite our best efforts, those little peppers just don’t seem to thrive. That’s where this DIY guide comes in – I’m going to share a secret that will transform your chili pepper growing game.
Chili peppers have a rich history, dating back thousands of years to South America, where they were not only a food source but also held significant cultural and medicinal value. From ancient Aztec rituals to modern-day culinary traditions, these fiery fruits have captivated palates and cultures worldwide.
But why do you need this particular growing chili peppers secret? Because let’s face it, growing chili peppers can be tricky! Factors like soil composition, sunlight exposure, and even watering techniques can dramatically impact your yield. This DIY trick bypasses common pitfalls and provides a simple, effective method to boost your pepper production. Imagine the satisfaction of harvesting a bumper crop of chilies, knowing you unlocked their full potential with a simple, yet powerful technique. Get ready to turn up the heat in your garden and your kitchen!
Das Geheimnis für eine reiche Chili-Ernte: Mein DIY-Leitfaden
Ich liebe Chili! Und nichts ist befriedigender, als meine eigenen, feurigen Schoten anzubauen. Über die Jahre habe ich einige Tricks und Kniffe gelernt, die ich gerne mit euch teilen möchte, damit auch ihr eine reiche Chili-Ernte einfahren könnt. Dieser DIY-Leitfaden ist vollgepackt mit meinen persönlichen Erfahrungen und bewährten Methoden. Los geht’s!
Die Grundlagen: Was Chili-Pflanzen wirklich wollen
Bevor wir ins Detail gehen, ist es wichtig, die grundlegenden Bedürfnisse von Chili-Pflanzen zu verstehen. Sie sind Sonnenanbeter, lieben Wärme und brauchen einen gut durchlässigen Boden. Hier eine kurze Zusammenfassung:
* Sonne: Mindestens 6-8 Stunden direkte Sonneneinstrahlung pro Tag.
* Wärme: Optimale Temperaturen liegen zwischen 20°C und 30°C.
* Boden: Gut durchlässig, nährstoffreich und leicht sauer (pH-Wert zwischen 6,0 und 6,8).
* Wasser: Regelmäßige Bewässerung, aber Staunässe vermeiden.
* Nährstoffe: Regelmäßige Düngung während der Wachstums- und Fruchtbildungsphase.
Phase 1: Die Anzucht – Der Grundstein für eine erfolgreiche Ernte
Die Anzucht ist ein entscheidender Schritt. Ich beginne meistens im Februar oder März, um meinen Pflanzen einen Vorsprung zu verschaffen.
1. Samen vorbereiten: Ich weiche die Chili-Samen für 24 Stunden in lauwarmem Kamillentee ein. Das soll die Keimung beschleunigen und die Samen vor Pilzbefall schützen.
2. Anzuchterde vorbereiten: Ich verwende eine spezielle Anzuchterde, die locker und nährstoffarm ist. Du kannst sie im Gartencenter kaufen oder selbst mischen (z.B. aus Kokosfasern, Sand und etwas Kompost).
3. Aussaat: Ich fülle kleine Anzuchttöpfe oder eine Anzuchtschale mit der Erde und drücke sie leicht an. Dann lege ich die Samen mit einem Abstand von ca. 2-3 cm auf die Erde und bedecke sie mit einer dünnen Schicht Erde (ca. 0,5 cm).
4. Bewässerung: Ich befeuchte die Erde vorsichtig mit einer Sprühflasche. Die Erde sollte feucht, aber nicht nass sein.
5. Wärme und Licht: Ich stelle die Anzuchttöpfe an einen warmen und hellen Ort. Ideal ist eine Temperatur zwischen 22°C und 25°C. Wenn du keinen hellen Standort hast, kannst du eine Pflanzenlampe verwenden.
6. Abdeckung: Ich decke die Anzuchttöpfe mit einer transparenten Folie oder einem Mini-Gewächshaus ab, um die Luftfeuchtigkeit zu erhöhen. Achte darauf, die Folie regelmäßig zu lüften, um Schimmelbildung zu vermeiden.
7. Geduld: Die Keimung kann je nach Chili-Sorte und Temperatur 1-3 Wochen dauern.
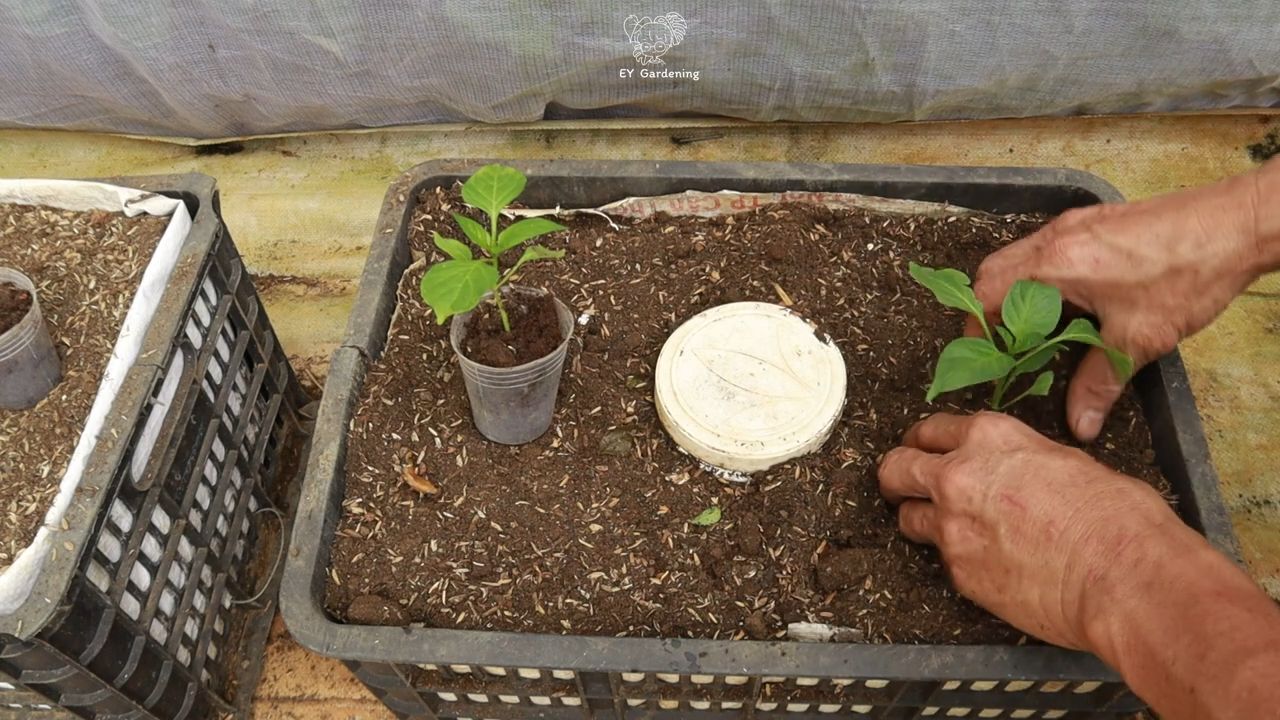
Phase 2: Pikieren – Den kleinen Pflanzen mehr Raum geben
Sobald die Chili-Pflänzchen ihre ersten richtigen Blätter (nach den Keimblättern) entwickelt haben, ist es Zeit zum Pikieren.
1. Vorbereitung: Ich bereite größere Töpfe (ca. 8-10 cm Durchmesser) mit einer hochwertigen Blumenerde vor.
2. Pikieren: Ich lockere die Erde um die kleinen Chili-Pflanzen vorsichtig mit einem Pikierstab oder einem Löffel. Dann hebe ich die Pflänzchen vorsichtig aus der Anzuchtschale und achte darauf, die Wurzeln nicht zu beschädigen.
3. Einpflanzen: Ich setze die Chili-Pflänzchen in die vorbereiteten Töpfe und fülle die Töpfe mit Erde auf. Die Pflänzchen sollten etwas tiefer sitzen als zuvor.
4. Bewässerung: Ich gieße die Pflanzen vorsichtig an.
5. Standort: Ich stelle die pikierten Pflanzen an einen hellen und warmen Ort.
Phase 3: Abhärten – Vorbereitung auf das Leben im Freien
Bevor ich meine Chili-Pflanzen ins Freie pflanze, härte ich sie ab. Das bedeutet, dass ich sie langsam an die Bedingungen im Freien gewöhne (Sonne, Wind, Temperatur).
1. Beginn: Ich beginne ca. 1-2 Wochen vor dem geplanten Auspflanztermin.
2. Vorgehensweise: Ich stelle die Chili-Pflanzen tagsüber für ein paar Stunden ins Freie (an einen geschützten Ort im Halbschatten). Ich verlängere die Zeit im Freien jeden Tag um ein paar Stunden.
3. Achtung: Achte darauf, dass die Temperaturen nachts nicht unter 10°C fallen. Wenn es zu kalt ist, hole die Pflanzen wieder ins Haus.
Phase 4: Auspflanzen – Endlich raus in die Freiheit!
Nach den Eisheiligen (Mitte Mai) ist es endlich soweit: Die Chili-Pflanzen dürfen ins Freie!
1. Standortwahl: Ich wähle einen sonnigen und windgeschützten Standort.
2. Bodenvorbereitung: Ich lockere den Boden gründlich auf und mische Kompost oder organischen Dünger unter.
3. Pflanzabstand: Ich halte einen Pflanzabstand von ca. 40-50 cm ein.
4. Einpflanzen: Ich grabe ein Loch, das etwas größer ist als der Wurzelballen der Chili-Pflanze. Dann setze ich die Pflanze vorsichtig in das Loch und fülle es mit Erde auf.
5. Bewässerung: Ich gieße die Pflanzen gründlich an.
6. Stütze: Bei hochwachsenden Chili-Sorten verwende ich eine Stütze, um die Pflanzen vor Windbruch zu schützen.
Phase 5: Pflege – Damit die Chili-Pflanzen sich wohlfühlen
Die richtige Pflege ist entscheidend für eine reiche Chili-Ernte.
1. Bewässerung: Ich gieße die Chili-Pflanzen regelmäßig, besonders während der heißen Sommermonate. Die Erde sollte immer leicht feucht sein, aber Staunässe vermeiden.
2. Düngung: Ich dünge die Chili-Pflanzen regelmäßig mit einem speziellen Chili-Dünger oder einem organischen Dünger. Ich beginne mit der Düngung ca. 2-3 Wochen nach dem Auspflanzen und wiederhole sie alle 2-3 Wochen.
3. Ausgeizen: Ich entferne regelmäßig die Seitentriebe (Geiztriebe) in den Blattachseln. Das fördert die Bildung von Früchten.
4. Schädlinge und Krankheiten: Ich kontrolliere die Chili-Pflanzen regelmäßig auf Schädlinge und Krankheiten. Bei Bedarf bekämpfe ich sie mit biologischen Mitteln.
5. Mulchen: Ich mulche den Boden um die Chili-Pflanzen mit Stroh oder Rasenschnitt. Das hält den Boden feucht, unterdrückt Unkraut und schützt die Pflanzen vor Spritzwasser.
Spezialtipps für eine extra scharfe Ernte
Hier sind noch ein paar meiner Geheimtipps, die ich über die Jahre gelernt habe:
* Stress erzeugt Schärfe: Weniger Wasser und etwas weniger Dünger können die Schärfe der Chilis erhöhen. Aber Vorsicht, nicht übertreiben!
* Epsom-Salz: Eine Gabe Epsom-Salz (Bittersalz) kann den Pflanzen helfen, Magnesium aufzunehmen, was sich positiv auf die Fruchtbildung auswirken kann. Ich gebe ca. 1 Esslöffel pro Pflanze, aufgelöst in Wasser.
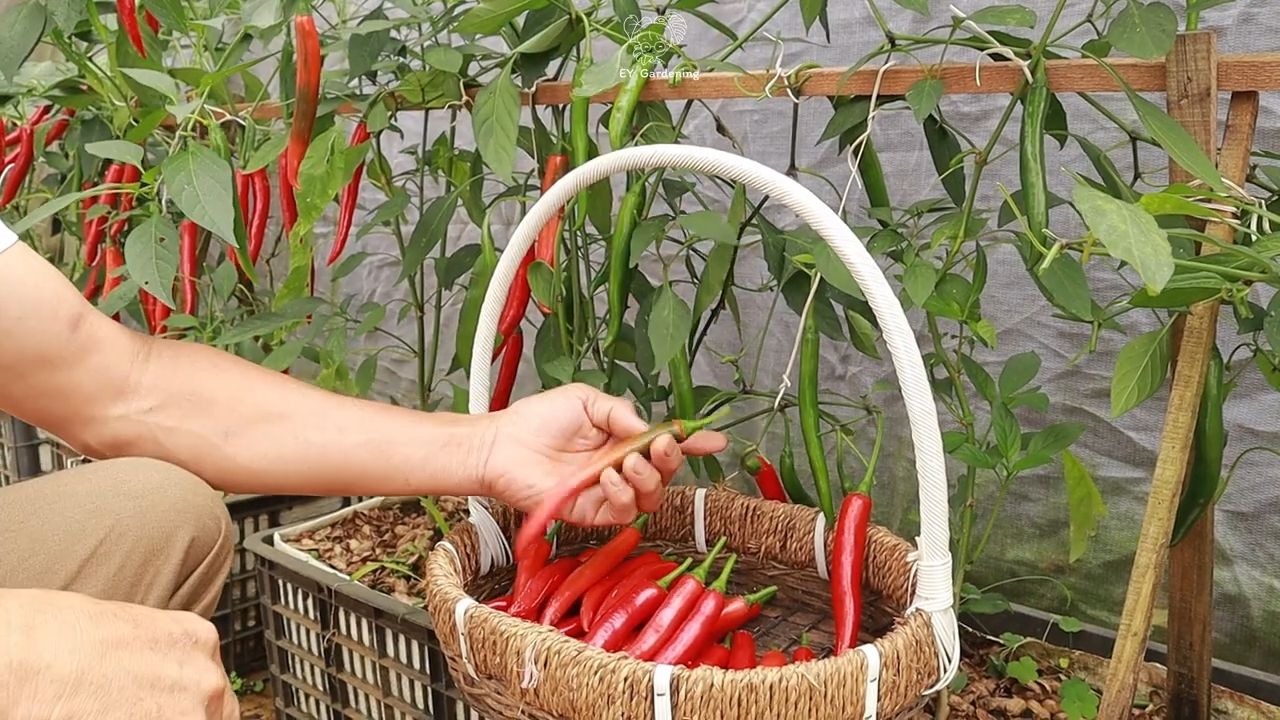
* Regelmäßiges Ernten: Durch das regelmäßige Ernten der reifen Chilis wird die Pflanze angeregt, neue Früchte zu bilden.
* Bestäubung: Chili-Pflanzen sind selbstbestäubend, aber eine leichte Vibration der Blüten (z.B. durch Wind oder durch leichtes Schütteln der Pflanze) kann die Bestäubung fördern.
* Überwinterung: Wenn du deine Chili-Pflanzen überwintern möchtest, schneide sie im Herbst stark zurück und stelle sie an einen hellen und kühlen Ort (ca. 10-15°C). Gieße sie nur sparsam. Im Frühjahr kannst du
Conclusion
So, there you have it! Unlocking the secrets to successfully growing chili peppers doesn’t require a green thumb blessed by the gardening gods. It simply requires a little know-how, a dash of patience, and the willingness to embrace this simple yet incredibly effective DIY trick. We’ve shown you how to nurture your chili pepper plants from tiny seedlings to fiery fruit-bearing powerhouses, all by understanding and implementing this key technique.
Why is this a must-try? Because it addresses the fundamental needs of chili pepper plants: consistent warmth, optimal drainage, and nutrient-rich soil. By providing these conditions, you’re not just growing chili peppers; you’re creating an environment where they can thrive. You’ll witness faster growth, more abundant yields, and peppers with a richer, more intense flavor. Forget struggling with stunted plants and disappointing harvests. This DIY method is your shortcut to chili pepper success.
But don’t stop there! Experimentation is the spice of life, and the same holds true for gardening. Consider these variations to further personalize your chili pepper growing experience:
* Compost Tea Boost: Supplement your watering routine with a weekly dose of diluted compost tea. This will provide an extra boost of beneficial microbes and nutrients, further enhancing growth and flavor.
* Companion Planting: Surround your chili pepper plants with beneficial companion plants like basil, marigolds, or carrots. These plants can help deter pests, attract pollinators, and even improve soil health.
* Hydroponic Adaptation: While this guide focuses on soil-based growing, the principles can be adapted to hydroponic systems. Ensure your hydroponic solution provides the necessary nutrients and maintain a consistent temperature.
* Different Container Sizes: Experiment with different container sizes to see what works best for your specific chili pepper variety. Larger containers generally allow for more root growth and larger plants.
* Sunlight Optimization: While chili peppers love sunlight, intense afternoon sun in hotter climates can sometimes scorch the leaves. Observe your plants and provide shade during the hottest part of the day if needed.
Ultimately, the best way to master the art of growing chili peppers is to get your hands dirty and learn from experience. Don’t be afraid to make mistakes – they’re valuable learning opportunities. The most important thing is to start, observe, and adapt.
We are confident that this DIY trick will revolutionize your chili pepper growing endeavors. Now, it’s your turn to put it to the test! We encourage you to try this method and share your results with us. Post pictures of your thriving chili pepper plants, share your tips and tricks, and let us know what variations you’ve discovered. Together, we can create a community of passionate chili pepper growers, sharing knowledge and celebrating the joys of homegrown heat. Happy growing! Let’s unlock the full potential of your garden and enjoy a bountiful harvest of delicious, fiery chili peppers. Remember, the secret to **growing chili peppers** successfully is now in your hands.
Frequently Asked Questions (FAQ)
Q: What type of soil is best for growing chili peppers using this DIY trick?
A: Chili peppers thrive in well-draining, nutrient-rich soil. A good starting point is a mix of equal parts potting soil, compost, and perlite or vermiculite. The potting soil provides a base, the compost adds essential nutrients and improves soil structure, and the perlite or vermiculite enhances drainage and aeration. Avoid using garden soil directly, as it can be too heavy and may contain pests or diseases. You can also amend your soil with slow-release fertilizer specifically formulated for vegetables to provide a steady supply of nutrients throughout the growing season. Consider testing your soil pH; chili peppers prefer a slightly acidic to neutral pH of around 6.0 to 7.0.
Q: How often should I water my chili pepper plants when using this method?
A: Watering frequency depends on several factors, including the climate, the size of the container, and the stage of growth of the plant. As a general rule, water deeply when the top inch of soil feels dry to the touch. Avoid overwatering, as this can lead to root rot. During hot, dry weather, you may need to water daily, while during cooler, wetter periods, you may only need to water every few days. A good way to check is to stick your finger into the soil to feel for moisture. Also, observe your plants for signs of underwatering (wilting leaves) or overwatering (yellowing leaves). Adjust your watering schedule accordingly. Using a moisture meter can also be helpful in determining when to water.
Q: What kind of fertilizer should I use for my chili pepper plants?
A: Chili peppers benefit from a balanced fertilizer during their early growth stages, followed by a fertilizer higher in phosphorus and potassium once they start to flower and fruit. A fertilizer with an NPK ratio of 5-10-10 or similar is a good choice for promoting flowering and fruit production. Avoid fertilizers that are too high in nitrogen, as this can lead to excessive foliage growth at the expense of fruit production. You can use either liquid or granular fertilizers, following the instructions on the product label. Organic options like bone meal and kelp meal are also excellent sources of phosphorus and potassium. Fertilize every 2-4 weeks during the growing season, adjusting the frequency based on the plant’s needs and the fertilizer’s instructions.
Q: How much sunlight do chili pepper plants need?
A: Chili peppers are sun-loving plants and require at least 6-8 hours of direct sunlight per day to thrive. Insufficient sunlight can lead to stunted growth, reduced flowering, and smaller, less flavorful peppers. Choose a location in your garden that receives full sun throughout the day. If you are growing chili peppers indoors, use grow lights to supplement natural sunlight. Rotate your plants regularly to ensure that all sides receive adequate light. In extremely hot climates, providing some afternoon shade can help prevent leaf scorch.
Q: What are some common pests and diseases that affect chili pepper plants, and how can I prevent them?
A: Common pests that affect chili pepper plants include aphids, spider mites, whiteflies, and pepper weevils. Diseases include fungal infections like powdery mildew, blossom end rot, and verticillium wilt. To prevent pests and diseases, start with healthy, disease-free seedlings. Practice good sanitation by removing any dead or decaying leaves from around the plants. Water at the base of the plants to avoid wetting the foliage, which can promote fungal growth. Use organic pest control methods like insecticidal soap or neem oil to control pests. Ensure proper air circulation around the plants to prevent fungal diseases. Blossom end rot is often caused by calcium deficiency, so amend your soil with calcium or use a calcium-rich fertilizer. If you suspect a disease, remove the affected leaves or plants immediately to prevent it from spreading.
Q: Can I grow chili peppers in containers using this DIY trick?
A: Absolutely! Growing chili peppers in containers is a great option, especially if you have limited space or want to move your plants indoors during colder months. Choose a container that is at least 5 gallons in size to allow for adequate root growth. Ensure the container has drainage holes to prevent waterlogging. Use a well-draining potting mix and follow the same watering and fertilizing guidelines as you would for plants grown in the ground. Container-grown chili peppers may dry out more quickly than those grown in the ground, so monitor the soil moisture regularly.
Q: How long does it take for chili peppers to mature and be ready for harvest?
A: The time it takes for chili peppers to mature depends on the variety, but generally, it takes anywhere from 60 to 150 days from transplanting seedlings to harvesting ripe peppers. Some varieties mature faster than others. The color of the pepper is a good indicator of ripeness, but it can vary depending on the variety. Generally, peppers will turn from green to red, yellow, orange, or brown when they are ripe. You can also gently squeeze the pepper; if it feels firm and slightly yields, it is likely ripe. Use pruning shears or scissors to harvest the peppers, cutting the stem just above the pepper.
Q: What should I do if my chili pepper plant is not producing any peppers?
A: There are several reasons why your chili pepper plant might not be producing peppers. Common causes include insufficient sunlight, improper watering, lack of pollination, or nutrient deficiencies. Ensure your plant is receiving at least 6-8 hours of direct sunlight per day. Water deeply when the top inch of soil feels dry to the touch. Chili peppers are self-pollinating, but sometimes they need a little help. Gently shake the plant or use a small brush to transfer pollen from one flower to another. Fertilize with a fertilizer higher in phosphorus and potassium to promote flowering and fruit production. Check for pests or diseases that may be affecting the plant’s ability to produce peppers. If you’ve addressed all of these factors and your plant is still not producing peppers, it may simply need more time. Be patient and continue to provide proper care, and eventually, your plant should start to produce peppers.

Leave a Comment