
Growing Parsley Indoors can feel like a secret superpower for any home cook! Imagine having fresh, vibrant parsley ready to snip and sprinkle on your dishes, no matter the season. Forget those sad, wilted bunches from the grocery store – we’re talking about a constant supply of flavorful goodness right at your fingertips.
Parsley, with its bright green leaves and distinctive taste, has been a culinary staple for centuries. The ancient Greeks and Romans revered it, not only for its flavor but also for its medicinal properties and symbolic significance. They even used it to crown victors in athletic competitions! Today, parsley remains a beloved herb worldwide, adding a fresh, herbaceous note to countless dishes.
But let’s be honest, sometimes life gets in the way, and a trip to the store for a sprig of parsley just isn’t feasible. That’s where the magic of growing parsley indoors comes in. This DIY guide will equip you with simple, effective tricks and hacks to cultivate your own thriving parsley patch inside your home. Whether you’re a seasoned gardener or a complete beginner, I’ll show you how to create the perfect environment for your parsley to flourish, ensuring you always have a fresh supply of this versatile herb. Get ready to elevate your cooking and impress your friends with your homegrown parsley – it’s easier than you think!
Growing Parsley Indoors: A Beginner’s Guide
Hey there, fellow plant enthusiasts! Ever dreamt of having fresh, vibrant parsley right at your fingertips, no matter the season? Well, you’re in the right place! I’m going to walk you through the surprisingly simple process of growing parsley indoors. Trust me, even if you think you have a black thumb, you can totally do this. Let’s get started!
What You’ll Need
Before we dive in, let’s gather our supplies. Having everything ready beforehand will make the whole process smoother and more enjoyable. Here’s what you’ll need:
- Parsley Seeds: You can find these at any garden center or online. Choose between curly or flat-leaf parsley – it’s all about personal preference!
- Potting Mix: Use a high-quality, well-draining potting mix. Avoid using garden soil, as it can compact and hinder drainage.
- Plant Pot: Select a pot that’s at least 6 inches in diameter and has drainage holes. Parsley needs room to grow!
- Grow Lights (Optional but Recommended): Parsley needs a good amount of light, especially indoors. A grow light can make a huge difference, especially during the darker months.
- Watering Can or Spray Bottle: For gentle watering.
- Small Shovel or Trowel: For handling the potting mix.
- Seed Starting Tray (Optional): If you prefer to start your seeds in a tray before transplanting.
Getting Started: Planting Your Parsley Seeds
Okay, now for the fun part – planting! We’re going to get those little seeds nestled in and ready to sprout.
- Soaking the Seeds (Optional but Recommended): Parsley seeds can be a bit slow to germinate. To speed things up, soak them in warm water for 12-24 hours before planting. This helps soften the seed coat and encourages sprouting. I usually put them in a small bowl of water and leave them on the counter overnight.
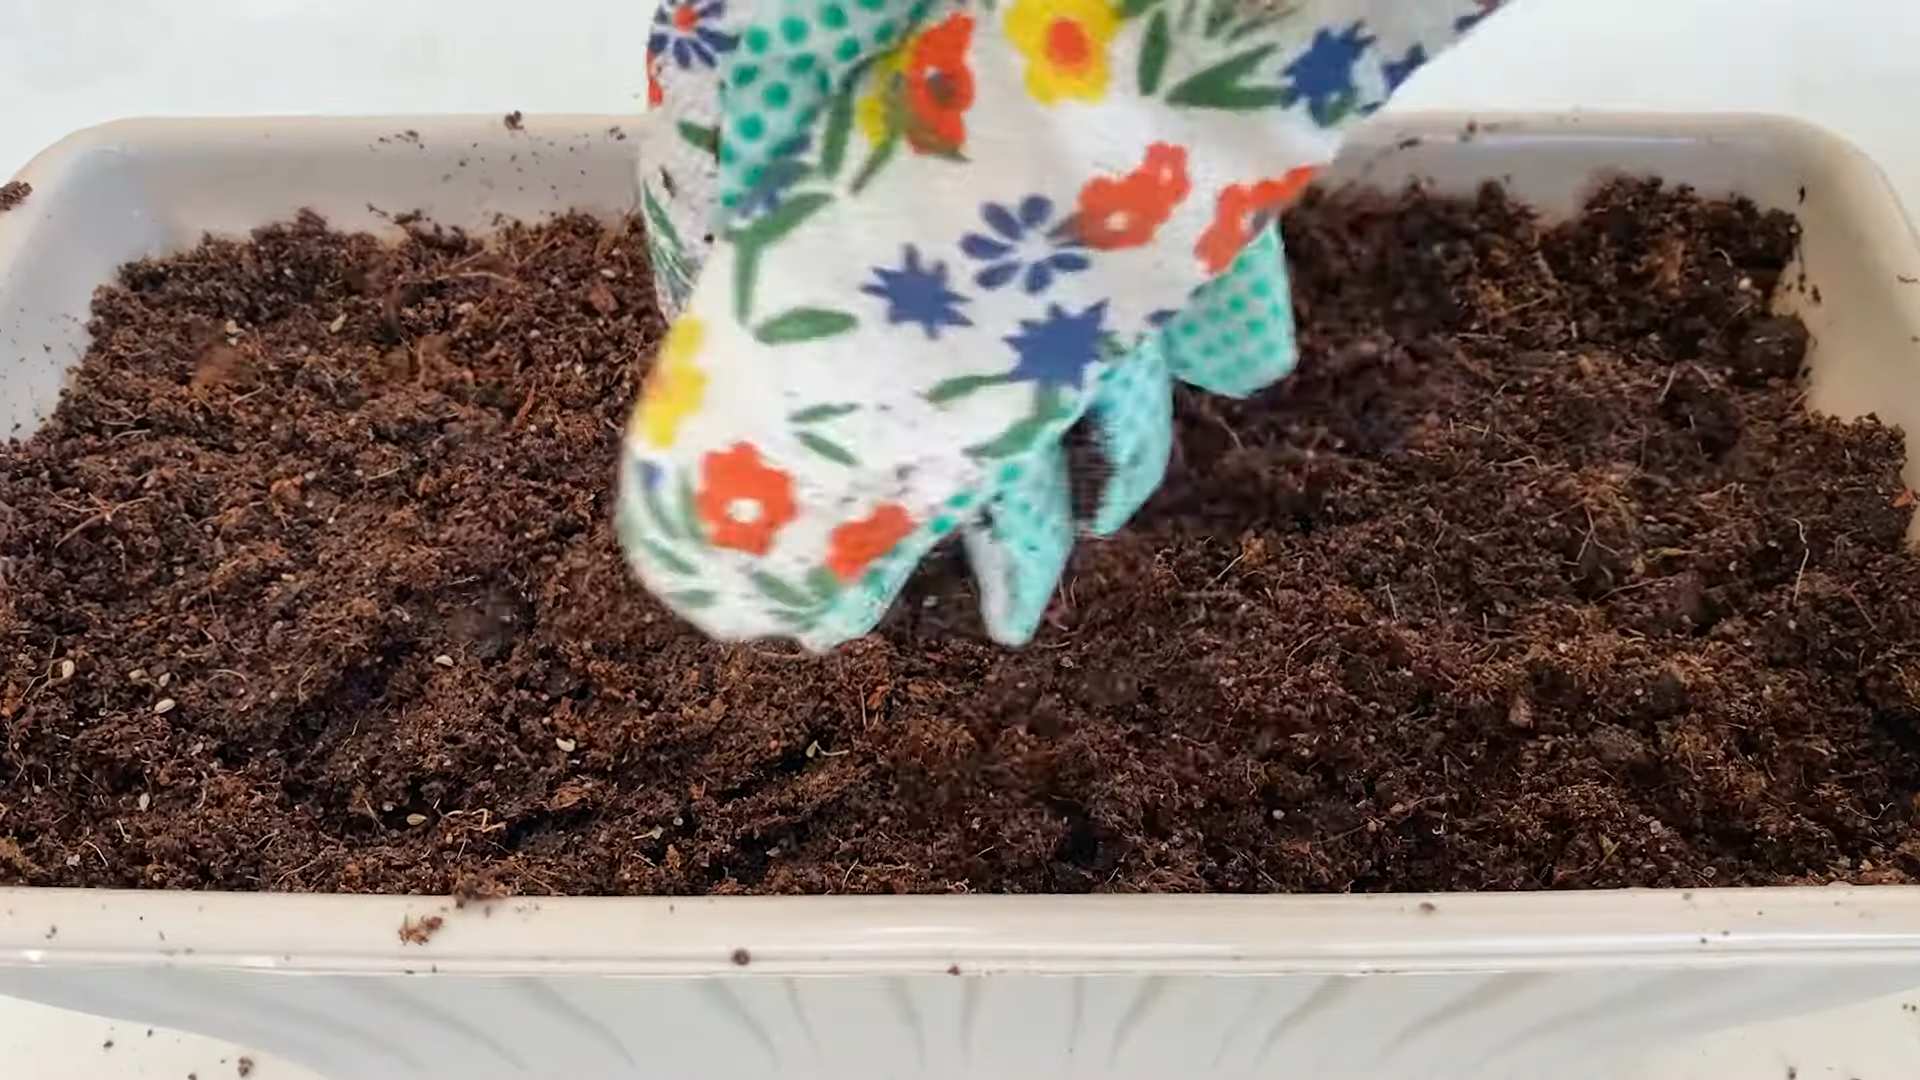
- Preparing the Pot: Fill your chosen pot with the potting mix, leaving about an inch of space at the top. Gently pat down the soil to remove any large air pockets.
- Sowing the Seeds: Sprinkle the parsley seeds evenly over the surface of the soil. Don’t overcrowd them! A good rule of thumb is to space them about half an inch apart.
- Covering the Seeds: Lightly cover the seeds with a thin layer (about ¼ inch) of potting mix. Parsley seeds need light to germinate, so don’t bury them too deep.
- Watering: Gently water the soil using a watering can or spray bottle. You want to moisten the soil without disturbing the seeds. The soil should be damp but not soggy.
- Creating a Humid Environment (Optional): To help with germination, you can create a humid environment by covering the pot with plastic wrap or a clear plastic bag. This will trap moisture and keep the soil consistently damp. Just make sure to poke a few holes in the plastic for ventilation.
- Finding the Right Spot: Place the pot in a warm location with indirect sunlight. A windowsill that receives morning sun is ideal. If you’re using a grow light, position it a few inches above the pot.
Germination and Early Care
Now comes the waiting game! Germination can take anywhere from 14 to 28 days, so be patient. Don’t give up on those little seeds!
- Maintaining Moisture: Keep the soil consistently moist during the germination period. Check the soil daily and water as needed. If you’re using plastic wrap, remove it once the seedlings start to emerge.
- Providing Light: Once the seedlings sprout, they’ll need plenty of light. If you’re using a windowsill, rotate the pot regularly to ensure even growth. If you’re using a grow light, keep it on for about 12-16 hours per day.
- Thinning the Seedlings: Once the seedlings have developed a few sets of true leaves (the leaves that look like miniature parsley leaves), you’ll need to thin them out. This means removing some of the seedlings to give the remaining ones more space to grow. Choose the strongest-looking seedlings and snip off the weaker ones at the soil level. Aim for a spacing of about 2-3 inches between plants.
Ongoing Care: Keeping Your Parsley Happy
Congratulations! You’ve successfully germinated your parsley seeds and have little seedlings growing. Now, let’s talk about how to keep them thriving.
- Watering: Parsley likes consistently moist soil, but it doesn’t like to be waterlogged. Water when the top inch of soil feels dry to the touch. Avoid overwatering, as this can lead to root rot.
- Fertilizing: Feed your parsley every 2-3 weeks with a diluted liquid fertilizer. A balanced fertilizer (e.g., 10-10-10) works well. Follow the instructions on the fertilizer label.
- Light: Parsley needs at least 6 hours of sunlight per day. If you’re growing it indoors, a grow light is highly recommended, especially during the winter months.
- Temperature: Parsley prefers temperatures between 60-70°F (15-21°C). Avoid placing it near drafts or extreme temperature fluctuations.
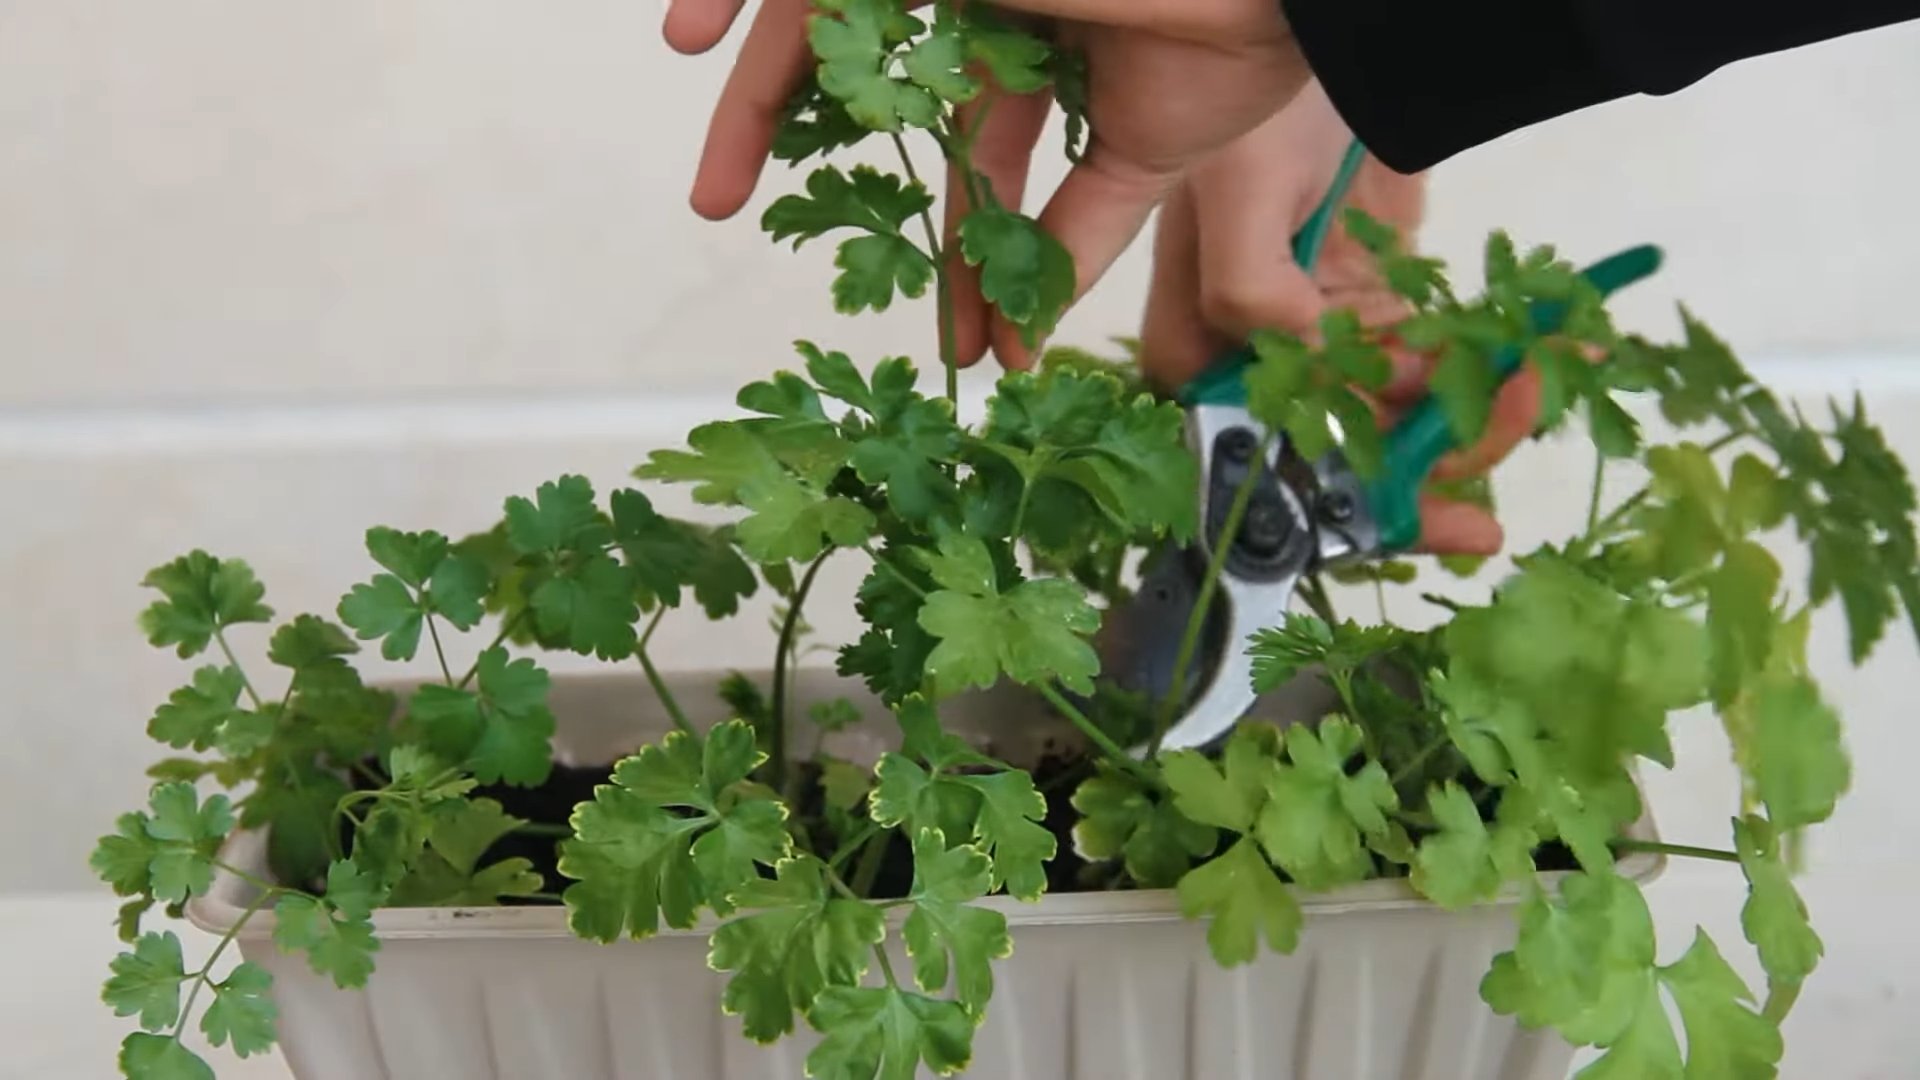
- Pruning: Regular pruning is essential for keeping your parsley plant healthy and productive. Pinch off the top leaves of the stems to encourage bushier growth. Remove any yellowing or dead leaves.
- Pest Control: Keep an eye out for pests like aphids or spider mites. If you spot any, you can try washing them off with a strong stream of water or using an insecticidal soap.
Harvesting Your Parsley
The best part! You can start harvesting your parsley once the stems have at least three segments.
- Harvesting Technique: Use scissors or pruning shears to cut the outer stems near the base of the plant. This will encourage new growth from the center.
- Harvesting Frequency: Harvest regularly to keep your parsley plant productive. The more you harvest, the more it will grow!
- Storing Parsley: Freshly harvested parsley can be stored in the refrigerator for up to a week. Wrap it in a damp paper towel and place it in a plastic bag. You can also freeze parsley for longer storage. Chop it up and freeze it in ice cube trays with water or olive oil.
Troubleshooting
Even with the best care, you might encounter some challenges along the way. Here are a few common problems and how to address them:
- Yellowing Leaves: This could be a sign of overwatering, underwatering, or nutrient deficiency. Check the soil moisture and adjust your watering accordingly. If the soil is consistently moist, reduce watering. If the soil is dry, water more frequently. You may also need to fertilize your plant.
- Leggy Growth: This is usually caused by insufficient light. Move your plant to a brighter location or use a grow light.
- Slow Growth: This could be due to a variety of factors, including poor soil, insufficient light, or lack of nutrients. Make sure you’re using a high-quality potting mix, providing adequate light, and fertilizing regularly.
- Pests: Inspect your plant regularly for pests. If you find any, treat them promptly with insecticidal soap or other appropriate methods.
Choosing the Right Parsley Variety
There are two main types of parsley: curly and flat-leaf (also known as Italian parsley). Both are easy to grow indoors, but they have slightly different characteristics.
- Curly Parsley: This is the most common type of parsley. It has a mild flavor and is often used as a garnish.
- Flat-Leaf Parsley: This type of parsley has a stronger, more robust flavor than curly parsley. It’s often used in cooking.
Ultimately, the best type of parsley to grow is the one you prefer the taste of! I personally like to grow both so I have options.
Repotting Your Parsley
As your parsley plant grows, it may eventually outgrow its pot. If you notice that the roots are circling the bottom of the pot or that the plant is drying out quickly, it’s time to repot.
- Choosing a New Pot: Select a pot that’s 1-2 inches larger in diameter than the current pot.
- Preparing the New Pot: Fill the new pot with fresh potting mix.
- Removing the Plant: Gently remove the parsley plant from its current pot. You may need to
Conclusion
So, there you have it! Growing parsley indoors is not only achievable, but it’s a game-changer for any home cook or gardening enthusiast. Imagine having fresh, vibrant parsley readily available, regardless of the season, to elevate your culinary creations. No more last-minute trips to the grocery store or settling for dried herbs that lack the punch of fresh flavor. This DIY trick empowers you to cultivate your own little green oasis right in your kitchen.
The benefits extend beyond mere convenience. You’re gaining control over the quality of your parsley, ensuring it’s free from pesticides and grown with love. Plus, the simple act of nurturing a plant can be incredibly therapeutic, adding a touch of tranquility to your daily routine.
But the real magic lies in the versatility. While we’ve focused on the core method, feel free to experiment! Try different varieties of parsley, such as flat-leaf (Italian) or curly parsley, to discover your preferred flavor profile. Consider using different types of containers, from charming terracotta pots to sleek, modern planters, to complement your home décor. You can even explore hydroponic systems for an even more efficient and space-saving approach to growing parsley indoors.
Don’t be afraid to get creative with your lighting setup. While a sunny windowsill is ideal, supplemental grow lights can be a lifesaver during the darker months. Experiment with different light intensities and durations to find what works best for your parsley.
And remember, growing parsley indoors is a journey, not a destination. There will be triumphs and challenges along the way. Don’t be discouraged if your first attempt isn’t perfect. Learn from your mistakes, adjust your approach, and keep experimenting. The reward of fresh, homegrown parsley is well worth the effort.
We wholeheartedly encourage you to give this DIY trick a try. It’s a simple, rewarding, and sustainable way to enhance your culinary experience and connect with nature. Once you’ve harvested your first batch of homegrown parsley, we’d love to hear about your experience! Share your tips, tricks, and photos in the comments below. Let’s build a community of indoor parsley growers and inspire others to embrace the joy of homegrown herbs. Let us know what worked for you, what challenges you faced, and any creative variations you discovered. Your insights could be invaluable to fellow gardeners. So, grab your seeds, pots, and soil, and embark on your indoor parsley-growing adventure today! You’ll be amazed at how easy and rewarding it is to have a constant supply of fresh, flavorful parsley right at your fingertips.
Frequently Asked Questions (FAQ)
What is the best type of parsley to grow indoors?
Both flat-leaf (Italian) and curly parsley can be successfully grown indoors. Flat-leaf parsley is known for its stronger, more robust flavor, making it a favorite for cooking. Curly parsley has a milder flavor and is often used as a garnish. The best type for you depends on your personal preference and how you plan to use it. Consider trying both to see which you prefer!
How much sunlight does indoor parsley need?
Parsley thrives in bright, indirect sunlight. Aim for at least 6-8 hours of sunlight per day. A south-facing windowsill is often ideal. If you don’t have access to sufficient natural light, consider using grow lights. Position the grow lights about 6-12 inches above the plants and keep them on for 12-16 hours per day.
What type of soil is best for growing parsley indoors?
Parsley prefers well-draining soil that is rich in organic matter. A good potting mix specifically formulated for herbs or vegetables is a great choice. You can also amend regular potting soil with compost or other organic materials to improve its drainage and nutrient content. Avoid using garden soil, as it can be too heavy and may contain pests or diseases.
How often should I water my indoor parsley?
Water your parsley regularly, keeping the soil consistently moist but not waterlogged. Check the soil moisture by sticking your finger about an inch deep. If the soil feels dry, it’s time to water. Avoid overwatering, as this can lead to root rot. Ensure your pot has drainage holes to allow excess water to escape.
How do I harvest parsley from my indoor plant?
Harvest parsley by snipping off the outer stems near the base of the plant. Avoid cutting more than one-third of the plant at a time, as this can stunt its growth. Regular harvesting encourages the plant to produce more leaves. You can use scissors or pruning shears to make clean cuts.
Why is my indoor parsley turning yellow?
Yellowing leaves can be a sign of several issues, including overwatering, underwatering, nutrient deficiencies, or pests. Check the soil moisture to ensure you’re not overwatering or underwatering. If the soil is consistently moist, it could be a sign of root rot. If the leaves are uniformly yellow, it could indicate a nutrient deficiency. Try fertilizing with a balanced liquid fertilizer. Inspect the plant for pests, such as aphids or spider mites.
How do I fertilize my indoor parsley?
Fertilize your parsley every 2-4 weeks with a balanced liquid fertilizer diluted to half strength. Look for a fertilizer that is specifically formulated for herbs or vegetables. Avoid over-fertilizing, as this can burn the roots.
How long does it take for parsley to grow indoors?
Parsley can take several weeks to germinate, so be patient. Once the seedlings emerge, they will grow relatively slowly. You can typically start harvesting parsley about 70-90 days after planting.
Can I grow parsley from cuttings?
While it’s more common to grow parsley from seeds, you can try propagating it from cuttings. Take a 4-6 inch cutting from a healthy parsley plant, remove the lower leaves, and place the cutting in a glass of water. Change the water every few days. Once roots develop, you can transplant the cutting into a pot with well-draining soil.
How do I prevent pests and diseases on my indoor parsley?
To prevent pests and diseases, start with healthy seeds or cuttings and use a clean potting mix. Inspect your plants regularly for signs of pests or diseases. If you find any pests, try washing them off with a strong stream of water or using insecticidal soap. Avoid overwatering, as this can create a favorable environment for fungal diseases. Ensure good air circulation around your plants.
My parsley is bolting (going to seed). What should I do?
Bolting occurs when parsley is exposed to high temperatures or stress. Once parsley bolts, the leaves become bitter. To prevent bolting, keep your parsley in a cool, shaded location and water it regularly. If your parsley bolts, you can still harvest the seeds for future planting.
Can I grow parsley indoors year-round?
Yes, with proper care, you can grow parsley indoors year-round. Provide adequate light, water, and nutrients, and protect your plants from extreme temperatures.
Is growing parsley indoors worth it?
Absolutely! Growing parsley indoors provides you with a constant supply of fresh, flavorful herbs, regardless of the season. It’s a rewarding and sustainable way to enhance your culinary creations and connect with nature. Plus, it’s a great way to add a touch of greenery to your home.

Leave a Comment