
Growing Peanuts at Home might sound like a whimsical dream, something reserved for sprawling farms and cartoon characters, but I’m here to tell you it’s absolutely achievable, even in your own backyard! Forget trekking to the store for that salty snack; imagine the satisfaction of harvesting your very own homegrown peanuts.
Peanuts, surprisingly, have a rich history, dating back thousands of years in South America. They weren’t just a tasty treat; they were a vital source of protein and oil. Over time, their cultivation spread across the globe, becoming a staple in various cuisines and cultures. Now, you can be a part of that history, right in your own garden!
Why should you try growing peanuts at home? Well, for starters, it’s incredibly rewarding to nurture a plant from seed to harvest. Plus, homegrown peanuts taste amazing – fresher and more flavorful than anything you’ll find on the shelves. But more importantly, in a world where we’re increasingly conscious of where our food comes from, growing your own peanuts gives you complete control over the process, ensuring they’re free from unwanted chemicals and pesticides. This DIY project is not only fun but also a step towards sustainable living. So, let’s dive into the simple tricks and hacks that will have you enjoying a peanut harvest in no time!

Growing Peanuts at Home: From Seed to Snack!
Hey there, fellow gardening enthusiasts! Ever thought about growing your own peanuts? It’s surprisingly easy and incredibly rewarding. Imagine the satisfaction of harvesting your own homegrown snacks! I’m going to walk you through the entire process, from choosing the right peanuts to enjoying your delicious harvest. Let’s get started!
Choosing Your Peanut Variety
Before we dive into the nitty-gritty, let’s talk about peanut varieties. Not all peanuts are created equal, and some are better suited for home gardens than others. Here’s a quick rundown:
* Virginia Peanuts: These are the large, often roasted-in-the-shell peanuts you see at ballgames. They need a longer growing season (120-130 days), so they’re best for warmer climates.
* Spanish Peanuts: These are smaller, reddish-brown peanuts with a higher oil content. They mature a bit faster (110-120 days) and have a distinctive nutty flavor.
* Runner Peanuts: These are the most commonly grown peanuts in the US, often used for peanut butter. They have a good yield and mature in about 120-135 days.
* Valencia Peanuts: These are sweet peanuts, usually with three or more kernels per shell. They mature quickly (90-110 days) and are a great choice for shorter growing seasons.
For most home gardeners, I recommend starting with Spanish or Valencia peanuts because of their shorter growing season. Check your local climate and choose a variety that will thrive in your area.
Preparing Your Peanut Planting Site
Peanuts need a sunny spot with well-drained, sandy loam soil. They don’t like heavy clay soil, as it can hinder the development of the “pegs” (the stems that grow down into the soil and produce the peanuts).
* Sunlight: Peanuts need at least 6-8 hours of direct sunlight per day.
* Soil: The ideal soil pH is between 6.0 and 6.5. Amend your soil with compost or well-rotted manure to improve drainage and fertility. Avoid using too much nitrogen fertilizer, as it can promote leafy growth at the expense of peanut production.
* Drainage: Good drainage is crucial. If your soil is heavy clay, consider planting in raised beds.
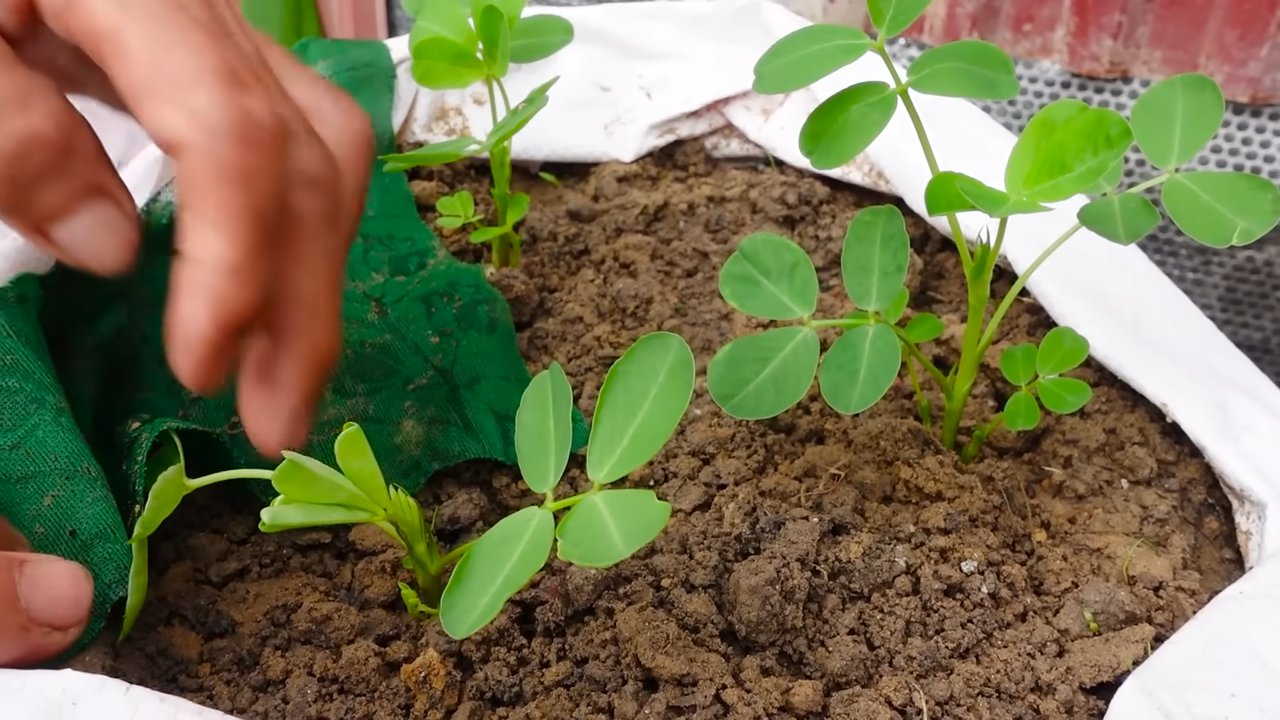
Planting Your Peanuts
Now for the fun part – planting! You can start peanuts directly in the ground after the last frost, when the soil temperature reaches at least 65°F (18°C).
1. Prepare the Soil: Rake the soil smooth and remove any rocks or debris.
2. Soak the Seeds (Optional): Soaking the peanut seeds in water for a few hours before planting can help speed up germination. I usually soak mine overnight.
3. Planting Depth: Plant the peanuts about 1-2 inches deep and 6-8 inches apart in rows that are 2-3 feet apart.
4. Water Thoroughly: After planting, water the area thoroughly to help the seeds settle in.
Caring for Your Peanut Plants
Peanuts are relatively low-maintenance plants, but they do need some attention to thrive.
* Watering: Water regularly, especially during dry periods. Peanuts need consistent moisture, but avoid overwatering, which can lead to fungal diseases.
* Weeding: Keep the area around your peanut plants free of weeds. Weeds compete for nutrients and water, which can reduce your peanut yield.
* Hilling: About a month after the plants emerge, hill the soil around the base of the plants. This helps support the pegs as they grow down into the soil. You can repeat this process every few weeks.
* Fertilizing: Peanuts don’t need a lot of fertilizer, but you can side-dress them with a small amount of phosphorus and potassium fertilizer about a month after planting. Avoid using nitrogen fertilizer, as it can promote leafy growth at the expense of peanut production.
* Pest Control: Peanuts are generally pest-resistant, but watch out for aphids, spider mites, and leafhoppers. You can control these pests with insecticidal soap or neem oil.
Harvesting Your Peanuts
The moment you’ve been waiting for! Harvesting peanuts is a bit of an art, but it’s also incredibly satisfying.
1. Timing: The best time to harvest peanuts is when the leaves start to turn yellow and the plants begin to die back. This usually happens about 120-150 days after planting, depending on the variety.
2. Digging: Use a garden fork or shovel to carefully dig up the entire plant, being careful not to damage the peanuts.
3. Shaking: Gently shake off the excess soil from the roots and peanuts.
4. Curing: Hang the plants upside down in a well-ventilated area for 2-4 weeks to cure. This allows the peanuts to dry out and develop their flavor. I usually hang them in my garage.
5. Picking: Once the plants are cured, you can pick the peanuts off the vines.
Storing Your Peanuts
Proper storage is essential to keep your peanuts fresh and delicious.
* In-Shell Peanuts: Store in-shell peanuts in a cool, dry place, such as a pantry or garage. They can last for several months.
* Shelled Peanuts: Store shelled peanuts in an airtight container in the refrigerator or freezer. They can last for several weeks in the refrigerator and several months in the freezer.
Roasting Your Peanuts
Now for the best part – enjoying your homegrown peanuts! Roasting them is easy and brings out their delicious flavor.
1. Preheat Oven: Preheat your oven to 350°F (175°C).
2. Prepare Peanuts: Spread the peanuts in a single layer on a baking sheet.
3. Roast: Roast for 15-20 minutes, or until the peanuts are golden brown and fragrant. Stir them occasionally to ensure even roasting.
4. Cool: Let the peanuts cool completely before eating.
Troubleshooting Peanut Growing
Even with the best care, you might encounter some challenges when growing peanuts. Here are a few common problems and how to address them:
* Poor Germination: If your peanut seeds aren’t germinating, make sure the soil temperature is warm enough (at least 65°F or 18°C). Also, ensure the soil is moist but not waterlogged.
* Yellowing Leaves: Yellowing leaves can be a sign of nutrient deficiency. Side-dress your plants with a small amount of phosphorus and potassium fertilizer.
* Small Peanuts: Small peanuts can be caused by poor soil, insufficient water, or a short growing season. Amend your soil with compost, water regularly, and choose a peanut variety that is well-suited to your climate.
* Fungal Diseases: Fungal diseases can be a problem in humid climates. Ensure good air circulation around your plants and avoid overwatering. You can also use a fungicide if necessary.
Peanut Butter Time!
Once you have a good harvest, why not try making your own peanut butter? It’s surprisingly easy and tastes so much better than store-bought.
1. Roast Peanuts: Roast your peanuts as described above.
2. Remove Skins: Rub the roasted peanuts between your hands to remove the skins.
3. Process: Place the peanuts in a food processor and process until smooth. This may take several minutes, and you may need to scrape down the sides of the bowl occasionally.
4. Add Salt (Optional): Add a pinch of salt to taste.
5. Store: Store your homemade peanut butter in an airtight container in the refrigerator.
Additional Tips for Peanut Success
Here are a few extra tips to help you grow the best peanuts possible:
* Rotate Crops: Avoid planting peanuts in the same spot year after year. Crop rotation helps prevent soilborne diseases and pests.
* Use Inoculant: Consider using a peanut inoculant when planting. This is a beneficial bacteria that helps peanuts fix nitrogen from the air, which can improve their growth.
* Protect from Animals: Squirrels and other animals love peanuts! If you have problems with animals eating your peanuts, you may need to protect your plants with netting or fencing.
Growing peanuts at home is a fun and rewarding experience. With a little bit of care and attention, you can enjoy a delicious harvest of homegrown snacks. So, get out there and start planting! I hope this guide helps you on your peanut-growing journey. Happy gardening!
Conclusion
So, there you have it! Growing peanuts at home is not only achievable, but it’s also a deeply rewarding experience that connects you to the origins of this beloved snack. From the initial planting to the satisfying harvest, every step is a testament to the wonders of nature and the joy of self-sufficiency.
Why is this DIY trick a must-try? Because it offers a unique opportunity to witness the fascinating life cycle of the peanut plant firsthand. Unlike many other crops, peanuts develop underground, a quirky characteristic that makes the entire process feel like uncovering buried treasure. Imagine the delight of digging into the soil and discovering a cluster of freshly formed peanuts, a tangible reward for your patience and care. Beyond the novelty, growing your own peanuts guarantees a fresher, more flavorful product than anything you can find in a store. You control the growing conditions, ensuring that your peanuts are free from unwanted chemicals and bursting with natural goodness.
But the benefits don’t stop there. Growing peanuts at home is also an excellent educational activity for children, teaching them about plant biology, the importance of sustainable agriculture, and the value of hard work. It’s a hands-on learning experience that fosters curiosity and appreciation for the natural world. Plus, it’s a fantastic conversation starter!
Looking for variations? Consider experimenting with different peanut varieties. Virginia peanuts are known for their large size and are ideal for roasting, while Spanish peanuts are smaller and sweeter, perfect for snacking or making peanut butter. Runner peanuts are commonly used in commercial peanut butter production and are a reliable choice for home gardens. You can also try growing peanuts in containers if you have limited space. Just make sure to choose a large pot with good drainage and provide adequate support for the sprawling vines.
Another fun variation is to infuse your peanut patch with companion plants. Marigolds, for example, can help deter nematodes, while basil can repel aphids. These natural pest control methods can help keep your peanut plants healthy and thriving without the need for harsh chemicals.
And don’t forget about the post-harvest possibilities! Once you’ve harvested your peanuts, you can roast them, boil them, or even make your own homemade peanut butter. The possibilities are endless! Experiment with different roasting times and temperatures to find your perfect flavor profile. Add a pinch of salt, a drizzle of honey, or a sprinkle of spices to create your own signature peanut snack.
We wholeheartedly encourage you to embark on this peanut-growing adventure. It’s a simple, yet profound way to connect with nature, learn new skills, and enjoy the fruits (or rather, the nuts) of your labor. So, grab some peanut seeds, prepare your soil, and get ready to experience the magic of growing peanuts at home.
We’re confident that you’ll find this DIY project both enjoyable and rewarding. And we can’t wait to hear about your experiences! Share your photos, tips, and stories with us in the comments below. Let’s create a community of peanut-growing enthusiasts and inspire others to discover the joy of homegrown peanuts. Let us know what variety you chose, what challenges you faced, and what delicious creations you made with your harvest. Your insights will be invaluable to other aspiring peanut growers. Happy growing!
Frequently Asked Questions (FAQ)
What is the best time to plant peanuts?
The ideal time to plant peanuts is after the last frost, when the soil temperature has consistently reached at least 65 degrees Fahrenheit (around 18 degrees Celsius). This typically falls in late spring or early summer, depending on your geographic location. Planting too early can result in poor germination and stunted growth, as peanuts are sensitive to cold temperatures. Check your local weather forecast and soil temperature before planting to ensure optimal conditions.
How much space do peanut plants need?
Peanut plants require ample space to spread their vines and develop their underground peanuts. As a general rule, provide at least 12-18 inches (30-45 cm) of space between plants in rows that are 2-3 feet (60-90 cm) apart. This spacing allows for adequate sunlight penetration, air circulation, and room for the plants to grow without overcrowding. If you’re growing peanuts in containers, choose a large pot that is at least 18 inches (45 cm) in diameter and depth to accommodate the root system.
What type of soil is best for growing peanuts?
Peanuts thrive in well-drained, sandy loam soil that is rich in organic matter. The soil should be loose and friable to allow the developing peanuts to easily penetrate the ground. Avoid heavy clay soils, as they can become compacted and hinder peanut development. Before planting, amend the soil with compost or other organic matter to improve drainage and fertility. A slightly acidic to neutral pH (around 6.0-7.0) is ideal for peanut growth.
How often should I water my peanut plants?
Peanut plants require consistent moisture, especially during the flowering and pegging stages. Water deeply and regularly, ensuring that the soil remains consistently moist but not waterlogged. Avoid overhead watering, as it can promote fungal diseases. Instead, use a soaker hose or drip irrigation system to deliver water directly to the roots. During periods of drought, increase the frequency of watering to prevent the plants from drying out.
How do I know when my peanuts are ready to harvest?
Determining the optimal harvest time for peanuts can be tricky, but there are a few key indicators to look for. The most reliable method is to dig up a few plants and examine the peanut pods. The pods should be fully mature, with a well-defined shell and plump kernels. The inside of the shell should be dark in color, and the kernels should be easily detached from the shell. Another sign is the yellowing and browning of the foliage. Typically, peanuts are ready to harvest about 120-150 days after planting, depending on the variety and growing conditions.
What are common pests and diseases that affect peanut plants?
Peanut plants are susceptible to various pests and diseases, including aphids, spider mites, nematodes, leaf spot, and white mold. Regularly inspect your plants for signs of infestation or disease. Use organic pest control methods, such as insecticidal soap or neem oil, to control aphids and spider mites. Companion planting with marigolds can help deter nematodes. To prevent fungal diseases, ensure good air circulation, avoid overhead watering, and apply a fungicide if necessary. Crop rotation can also help reduce the incidence of soilborne diseases.
Can I grow peanuts in containers?
Yes, you can successfully grow peanuts in containers, provided that you choose a large enough pot and provide adequate drainage. Select a container that is at least 18 inches (45 cm) in diameter and depth to accommodate the root system. Use a well-draining potting mix and ensure that the container has drainage holes to prevent waterlogging. Water regularly and fertilize with a balanced fertilizer every few weeks. Provide support for the sprawling vines, such as a trellis or stake.
How do I cure and store my harvested peanuts?
After harvesting your peanuts, it’s essential to cure them properly to prevent mold and spoilage. Gently shake off any excess soil and allow the peanuts to air dry in a well-ventilated area for several weeks. Spread them out in a single layer on a screen or rack to ensure even drying. Once the peanuts are completely dry, store them in a cool, dry place in airtight containers. Properly cured and stored peanuts can last for several months. You can also freeze peanuts for longer-term storage.
Can I make peanut butter from my homegrown peanuts?
Absolutely! Making peanut butter from your homegrown peanuts is a delicious and rewarding way to enjoy your harvest. Simply roast the peanuts in the oven until they are lightly browned and fragrant. Allow them to cool slightly, then remove the skins by rubbing them between your hands. Place the roasted peanuts in a food processor or blender and process until smooth, adding a pinch of salt and a drizzle of honey or maple syrup to taste. Store your homemade peanut butter in the refrigerator for up to two weeks.
Leave a Comment