
Growing Potatoes Indoors might sound like something only seasoned gardeners can achieve, but trust me, it’s easier than you think! Forget battling unpredictable weather and pesky garden pests – imagine harvesting your own homegrown potatoes right from the comfort of your kitchen. For centuries, cultures around the globe have relied on potatoes as a staple food source, and now, you can bring that tradition indoors, regardless of your outdoor space.
Have you ever dreamt of enjoying freshly dug potatoes in the middle of winter? Or perhaps you live in an apartment with no garden to speak of? That’s where this DIY guide comes in! I’m going to show you simple, step-by-step tricks and hacks to successfully growing potatoes indoors. This isn’t just about convenience; it’s about having control over your food source, reducing your carbon footprint, and experiencing the sheer joy of nurturing life from a tiny seed (or, in this case, a potato!).
This article is your ultimate resource for mastering the art of indoor potato cultivation. We’ll cover everything from choosing the right potato variety to providing optimal lighting and watering. So, grab your gardening gloves (or not – it’s indoors, after all!), and let’s embark on this exciting journey together. Get ready to impress your friends and family with your green thumb and enjoy the delicious rewards of your indoor potato harvest!
Growing Potatoes Indoors: A Spud-tacular DIY Guide!
Hey there, fellow gardening enthusiasts! Ever dreamt of having fresh, homegrown potatoes even when the weather outside is frightful? Well, dream no more! I’m going to walk you through the surprisingly simple process of growing potatoes indoors. It’s a fun, rewarding project that’ll bring a little bit of the garden inside, and you’ll be enjoying delicious, homegrown potatoes in no time.
What You’ll Need: Your Potato-Growing Arsenal
Before we dive in, let’s gather our supplies. Here’s a list of everything you’ll need to become an indoor potato pro:
* Seed Potatoes: These aren’t your regular grocery store potatoes. Seed potatoes are specifically grown for planting and are certified disease-free. You can find them at most garden centers or online. Choose varieties that are known to do well in containers, like Yukon Gold, Red Pontiac, or fingerling potatoes. I personally love Yukon Golds for their creamy texture!
* Large Containers: Think big! You’ll need containers that are at least 10-15 gallons in size. The bigger, the better, as potatoes need room to grow. Buckets, large pots, or even repurposed storage bins will work. Just make sure they have drainage holes.
* Potting Mix: Don’t use garden soil! It’s too heavy and compacts easily. Opt for a well-draining potting mix specifically formulated for containers. A mix of peat moss, perlite, and vermiculite is ideal.
* Grow Lights (Optional but Recommended): While potatoes can grow indoors with natural light, they’ll thrive with supplemental grow lights, especially during the shorter days of winter.
* Watering Can or Hose: For keeping your potato plants hydrated.
* Fertilizer: A balanced, slow-release fertilizer will provide your potatoes with the nutrients they need.
* Sharp Knife: For cutting the seed potatoes (if needed).
* Spray Bottle: For misting the foliage.
Preparing Your Seed Potatoes: Getting Ready to Grow
This is a crucial step, so pay close attention!
1. Chitting (Sprouting) Your Seed Potatoes: This process encourages the seed potatoes to sprout before planting, giving them a head start. Place your seed potatoes in a cool, bright location (but not direct sunlight) for a week or two. You’ll start to see small “eyes” or sprouts forming.
2. Cutting the Seed Potatoes (If Necessary): If your seed potatoes are large (bigger than an egg), you can cut them into smaller pieces, ensuring each piece has at least one or two “eyes.” Let the cut pieces air dry for a day or two to callous over. This helps prevent rot. I usually cut mine into pieces about the size of a golf ball.
3. Choosing the Right Pieces: Select the pieces with the most prominent and healthy-looking eyes. These will be the most vigorous growers.
Planting Your Potatoes: Let’s Get Growing!
Now for the fun part!
1. Fill the Container: Start by filling your container with about 4-6 inches of potting mix.
2. Plant the Seed Potatoes: Place the seed potato pieces, sprout-side up, on top of the soil. Space them evenly if you’re planting multiple pieces in one container. I usually plant 2-3 pieces in a 10-gallon container.
3. Cover with Soil: Cover the seed potatoes with another 4-6 inches of potting mix.
4. Water Thoroughly: Water the soil until it’s evenly moist but not soggy.
5. Placement: Place the container in a location that receives at least 6-8 hours of sunlight per day. If you’re using grow lights, position them about 6-12 inches above the soil surface.
Hilling Your Potatoes: The Secret to a Bountiful Harvest
This is where the magic happens! Hilling encourages the potato plants to produce more potatoes along their stems.
1. Wait for Growth: As the potato plants grow, they’ll start to emerge from the soil. Wait until the stems are about 6-8 inches tall.
2. Add More Soil: Add more potting mix to the container, covering the stems up to the bottom set of leaves. This encourages the plant to produce more potatoes along the buried stem.
3. Repeat the Process: Continue hilling the potatoes every few weeks as they grow, until the container is almost full. I usually hill them every 2-3 weeks.
4. Water Regularly: Keep the soil consistently moist, but avoid overwatering.
Caring for Your Indoor Potato Plants: Keeping Them Happy and Healthy
A little TLC goes a long way!
1. Watering: Water your potato plants regularly, especially during hot weather. Check the soil moisture by sticking your finger into the soil. If the top inch feels dry, it’s time to water.
2. Fertilizing: Feed your potato plants with a balanced, slow-release fertilizer every few weeks. Follow the instructions on the fertilizer package.
3. Light: Ensure your potato plants receive adequate light. If you’re using grow lights, adjust their height as the plants grow.
4. Pest Control: Keep an eye out for pests like aphids or spider mites. If you spot any, treat them with an insecticidal soap or neem oil.
5. Humidity: Potatoes prefer moderate humidity. If the air in your home is dry, mist the foliage with a spray bottle occasionally.
Harvesting Your Potatoes: The Moment of Truth!
This is the most exciting part!
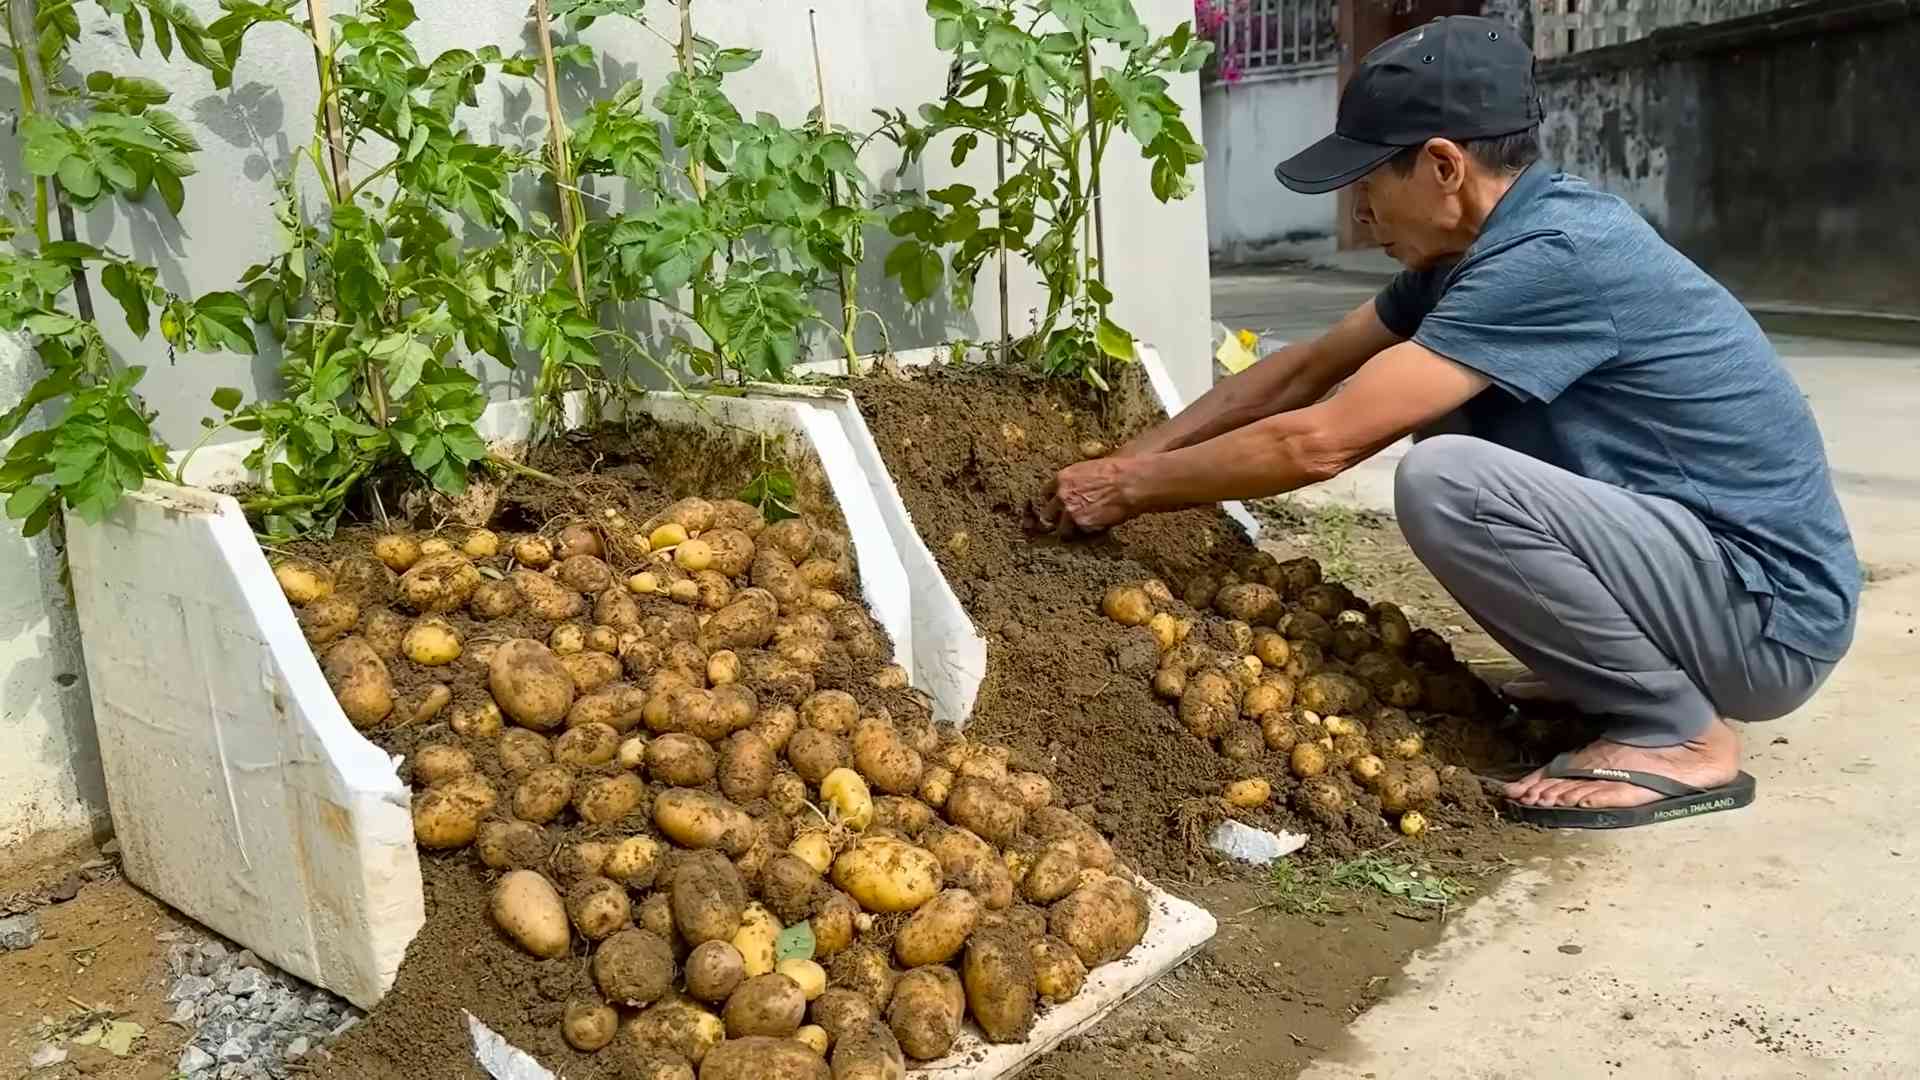
1. Signs of Maturity: Your potatoes are ready to harvest when the foliage starts to turn yellow and die back. This usually takes about 80-100 days from planting.
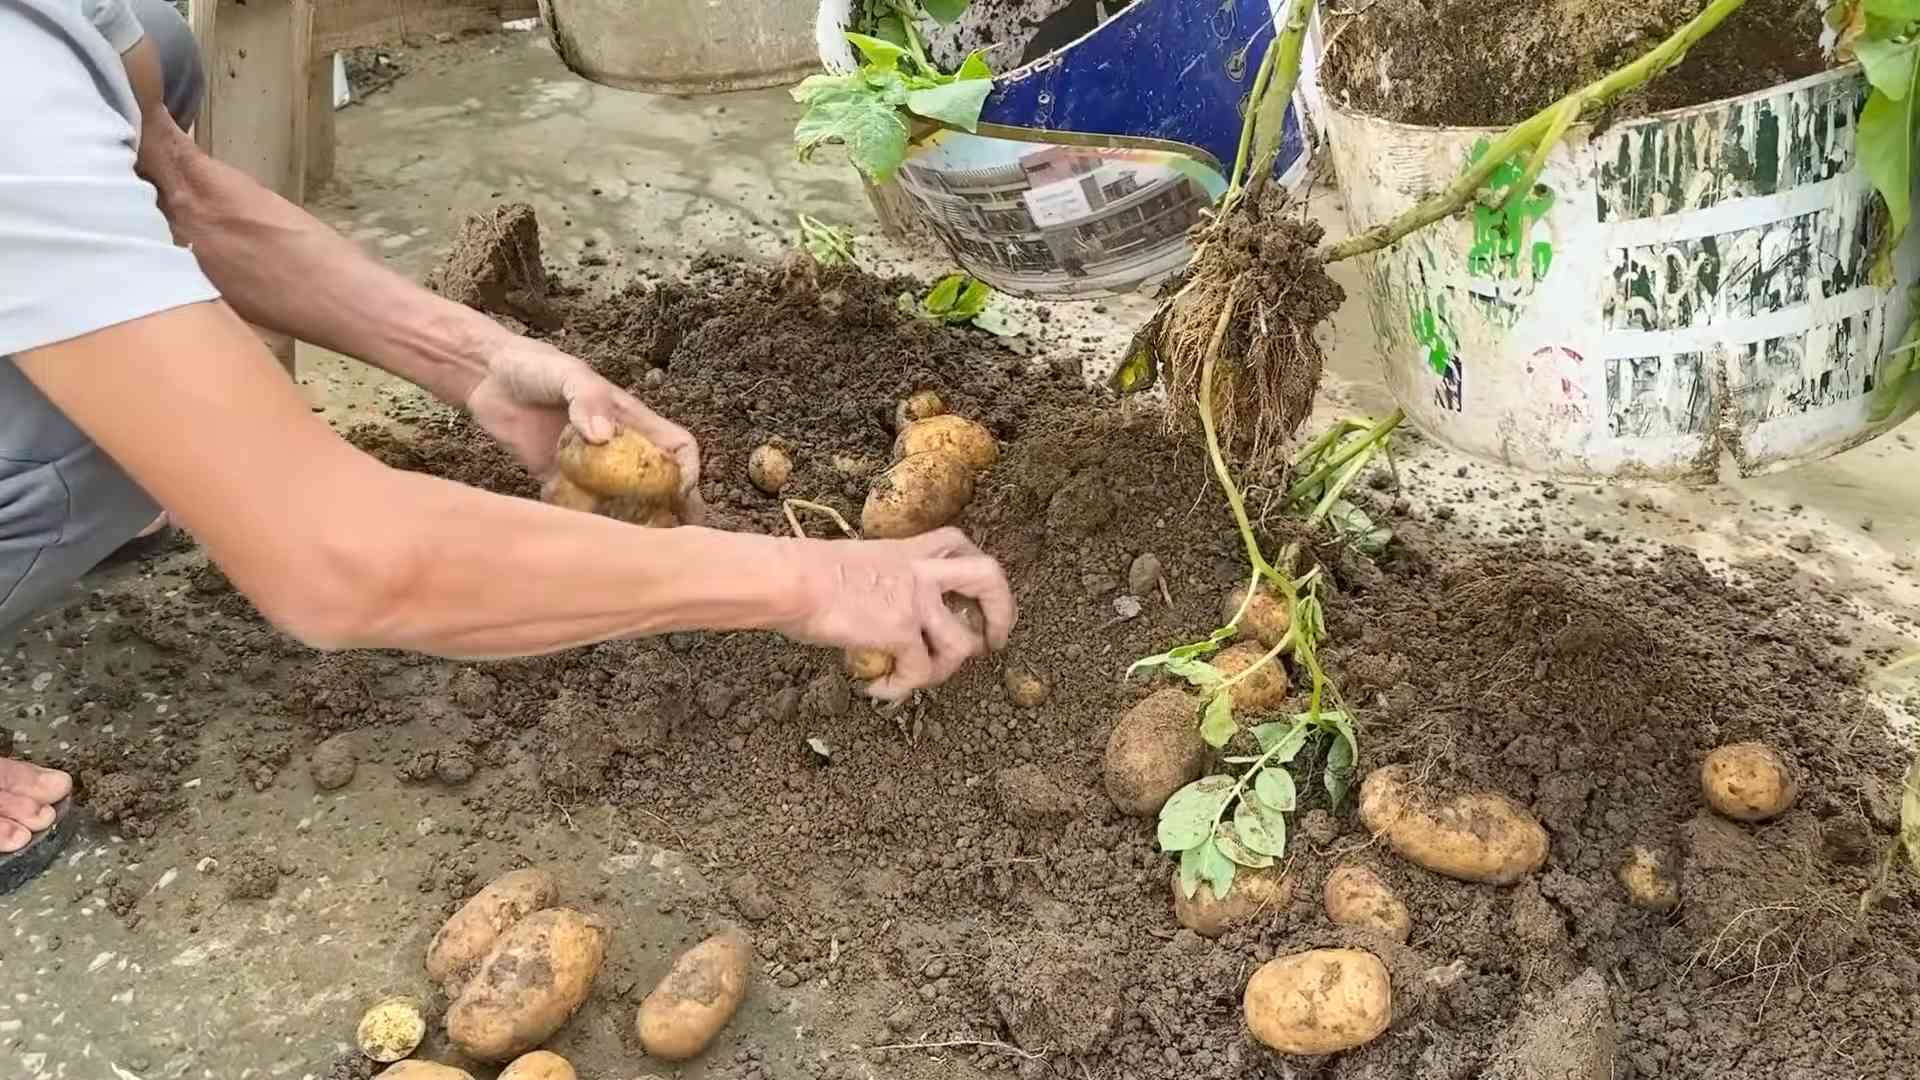
2. Gentle Digging: Carefully dig around the base of the plant, using your hands or a small trowel to loosen the soil.
3. Harvesting the Potatoes: Gently lift the plant from the container and harvest the potatoes. Be careful not to damage them.
4. Curing the Potatoes: After harvesting, cure the potatoes by placing them in a cool, dark, and well-ventilated place for a week or two. This helps them develop a thicker skin and prevents spoilage.
Troubleshooting: Common Issues and Solutions
Even with the best care, you might encounter a few challenges. Here are some common issues and how to address them:
* Yellowing Leaves: This could be a sign of overwatering, underwatering, or nutrient deficiency. Adjust your watering schedule and fertilize as needed.
* Leggy Growth: This indicates insufficient light. Provide more light, either through natural sunlight or grow lights.
* Small Potatoes: This could be due to insufficient hilling, lack of nutrients, or overcrowding. Hill your potatoes regularly, fertilize them properly, and ensure they have enough space to grow.
* Rotting Potatoes: This is usually caused by overwatering or poor drainage. Make sure your containers have drainage holes and avoid overwatering.
Choosing the Right Potato Variety: A Matter of Taste
Selecting the right potato variety is key to a successful and satisfying indoor growing experience. Here’s a breakdown of some popular choices and why they might be perfect for your indoor garden:
* Yukon Gold: As I mentioned earlier, these are a personal favorite. They are known for their creamy texture and buttery flavor. They are also relatively early maturing, which is a bonus for indoor growing. They are great for boiling, mashing, or roasting.
* Red Pontiac: These potatoes have a beautiful red skin and white flesh. They are known for their waxy texture, which makes them ideal for salads and boiling. They are also relatively easy to grow and store well.
* Fingerling Potatoes: These long, slender potatoes come in a variety of colors and flavors. They are known for their firm texture and nutty flavor. They are great for roasting, grilling, or adding to salads. They also tend to mature relatively quickly.
* Irish Cobbler: This is an early-maturing variety with a slightly floury texture. They are a good all-purpose potato, suitable for boiling, mashing, or baking.
* All Blue: For a truly unique experience, try growing All Blue potatoes. These potatoes have blue skin and blue flesh, adding a pop of color to your meals. They have a slightly nutty flavor and are great for roasting or making colorful potato chips.
When choosing a variety, consider your personal preferences, the size of your containers, and the amount of light you can provide. Some varieties are more tolerant of low light conditions than others.
Optimizing Your Indoor Potato Garden: Tips and Tricks
Want to take your indoor potato growing to the next level? Here are a few extra tips and tricks:
* Rotate Your Containers: If you’re relying on natural sunlight, rotate your containers regularly to ensure
Conclusion
So, there you have it! Growing potatoes indoors is not only possible, but it’s also a surprisingly rewarding experience. Forget the limitations of your outdoor space or the unpredictability of the weather. With this simple DIY trick, you can enjoy fresh, homegrown potatoes year-round, right from the comfort of your home.
Why is this a must-try? Because it puts you in control. You dictate the growing conditions, ensuring optimal results. You get to witness the entire life cycle of the potato plant, from sprouting to harvest, a fascinating process that connects you to your food in a profound way. And, let’s be honest, there’s something incredibly satisfying about digging up your own potatoes, knowing you nurtured them from start to finish.
But the benefits don’t stop there. Growing potatoes indoors is also a fantastic way to reduce your carbon footprint. By sourcing your own produce, you’re minimizing the environmental impact associated with transportation and commercial farming. Plus, you’ll have access to potatoes that are fresher and more flavorful than anything you can buy at the store.
Ready to take your indoor potato growing to the next level? Consider experimenting with different potato varieties. Russets, Yukon Golds, and fingerling potatoes all thrive indoors, each offering a unique flavor and texture. You can also try using different growing mediums, such as coco coir or a mix of perlite and vermiculite, to see which yields the best results.
Another variation to explore is vertical gardening. If you’re short on space, try growing your potatoes in stacked containers or hanging baskets. This not only maximizes your growing area but also adds a touch of greenery to your home.
Don’t be afraid to get creative with your setup. Use grow lights to supplement natural sunlight, especially during the winter months. Add organic fertilizers to boost growth and yield. And most importantly, don’t be discouraged if you encounter challenges along the way. Growing potatoes indoors is a learning process, and every mistake is an opportunity to improve your technique.
Ultimately, the key to success is patience and observation. Pay close attention to your plants, monitor their growth, and adjust your care as needed. With a little bit of effort and attention, you’ll be rewarded with a bountiful harvest of delicious, homegrown potatoes.
We are confident that this DIY guide to growing potatoes indoors will empower you to cultivate your own spuds, regardless of your gardening experience. So, grab your supplies, follow our simple steps, and get ready to enjoy the taste of homegrown goodness.
We can’t wait to hear about your experiences! Share your photos, tips, and tricks in the comments below. Let’s create a community of indoor potato growers and inspire others to embrace the joy of homegrown food. Happy growing!
Frequently Asked Questions (FAQs)
Q: What kind of potatoes are best for growing indoors?
A: While you can technically grow any type of potato indoors, some varieties are better suited for container gardening than others. Smaller, early-maturing varieties like Yukon Gold, fingerling potatoes, and red potatoes tend to perform well in pots. These varieties typically produce smaller plants and mature more quickly, making them ideal for indoor growing. Avoid larger, late-maturing varieties like Russets, as they require more space and a longer growing season. Seed potatoes are recommended, but you can also use potatoes from the grocery store that have started to sprout. Just make sure they are organic to avoid any growth inhibitors.
Q: What size container do I need for growing potatoes indoors?
A: The size of the container is crucial for successful potato growth. A general rule of thumb is to use a container that is at least 10-12 inches in diameter and 12-15 inches deep per plant. This provides enough space for the roots to develop and the tubers to form. You can also use larger containers, such as grow bags or plastic bins, especially if you plan to grow multiple plants in the same container. Make sure the container has drainage holes to prevent waterlogging, which can lead to root rot.
Q: What kind of soil should I use for growing potatoes indoors?
A: Potatoes prefer well-draining, slightly acidic soil. A good potting mix is essential for providing the necessary nutrients and drainage. You can use a commercially available potting mix or create your own by combining equal parts of peat moss, perlite, and vermiculite. Avoid using garden soil, as it can be too heavy and compact, hindering root growth. Adding compost to the potting mix can also improve its fertility and drainage.
Q: How much sunlight do potatoes need when grown indoors?
A: Potatoes need at least 6-8 hours of sunlight per day to thrive. If you don’t have a sunny window, you can supplement with grow lights. LED grow lights are a great option, as they are energy-efficient and provide the full spectrum of light that plants need. Place the grow lights about 6-12 inches above the plants and adjust as needed to prevent burning. Rotate the plants regularly to ensure even light exposure.
Q: How often should I water my indoor potato plants?
A: Water your potato plants regularly, keeping the soil consistently moist but not waterlogged. Check the soil moisture by sticking your finger about an inch into the soil. If it feels dry, it’s time to water. Avoid overwatering, as this can lead to root rot. Water deeply, allowing the excess water to drain out of the drainage holes. Reduce watering frequency during the dormant period after harvesting.
Q: How do I fertilize my indoor potato plants?
A: Potatoes are heavy feeders and require regular fertilization. Start fertilizing your plants about 2-3 weeks after they emerge from the soil. Use a balanced fertilizer with an NPK ratio of 10-10-10 or 14-14-14. Follow the instructions on the fertilizer package for application rates. You can also use organic fertilizers, such as compost tea or fish emulsion. Fertilize every 2-3 weeks during the growing season.
Q: How do I know when my potatoes are ready to harvest?
A: The time it takes for potatoes to mature depends on the variety and growing conditions. Generally, potatoes are ready to harvest about 70-90 days after planting. You can start harvesting “new potatoes” when the plants begin to flower. These are small, tender potatoes with thin skins. For larger, more mature potatoes, wait until the foliage starts to yellow and die back. Stop watering the plants a week or two before harvesting to allow the skins to harden. To harvest, gently dig around the base of the plant and lift the potatoes out of the soil.
Q: Can I grow potatoes indoors from store-bought potatoes?
A: Yes, you can grow potatoes indoors from store-bought potatoes, but it’s best to use organic potatoes to avoid any growth inhibitors. Look for potatoes that have already started to sprout “eyes.” Cut the potato into pieces, making sure each piece has at least one eye. Allow the cut pieces to dry for a day or two to prevent rotting. Plant the pieces with the eyes facing up in your prepared container.
Q: What are some common problems when growing potatoes indoors and how can I prevent them?
A: Some common problems when growing potatoes indoors include pests, diseases, and nutrient deficiencies. To prevent pests, inspect your plants regularly for signs of aphids, spider mites, or whiteflies. Treat infestations with insecticidal soap or neem oil. To prevent diseases, ensure good air circulation and avoid overwatering. If you notice any signs of disease, such as leaf spots or wilting, remove the affected leaves immediately. To prevent nutrient deficiencies, fertilize your plants regularly with a balanced fertilizer.
Q: Can I grow potatoes indoors year-round?
A: Yes, you can grow potatoes indoors year-round, provided you have adequate light and temperature control. Use grow lights to supplement natural sunlight during the winter months. Maintain a consistent temperature of 60-70°F (15-21°C). You may need to adjust your watering and fertilizing schedule depending on the season.
Leave a Comment