
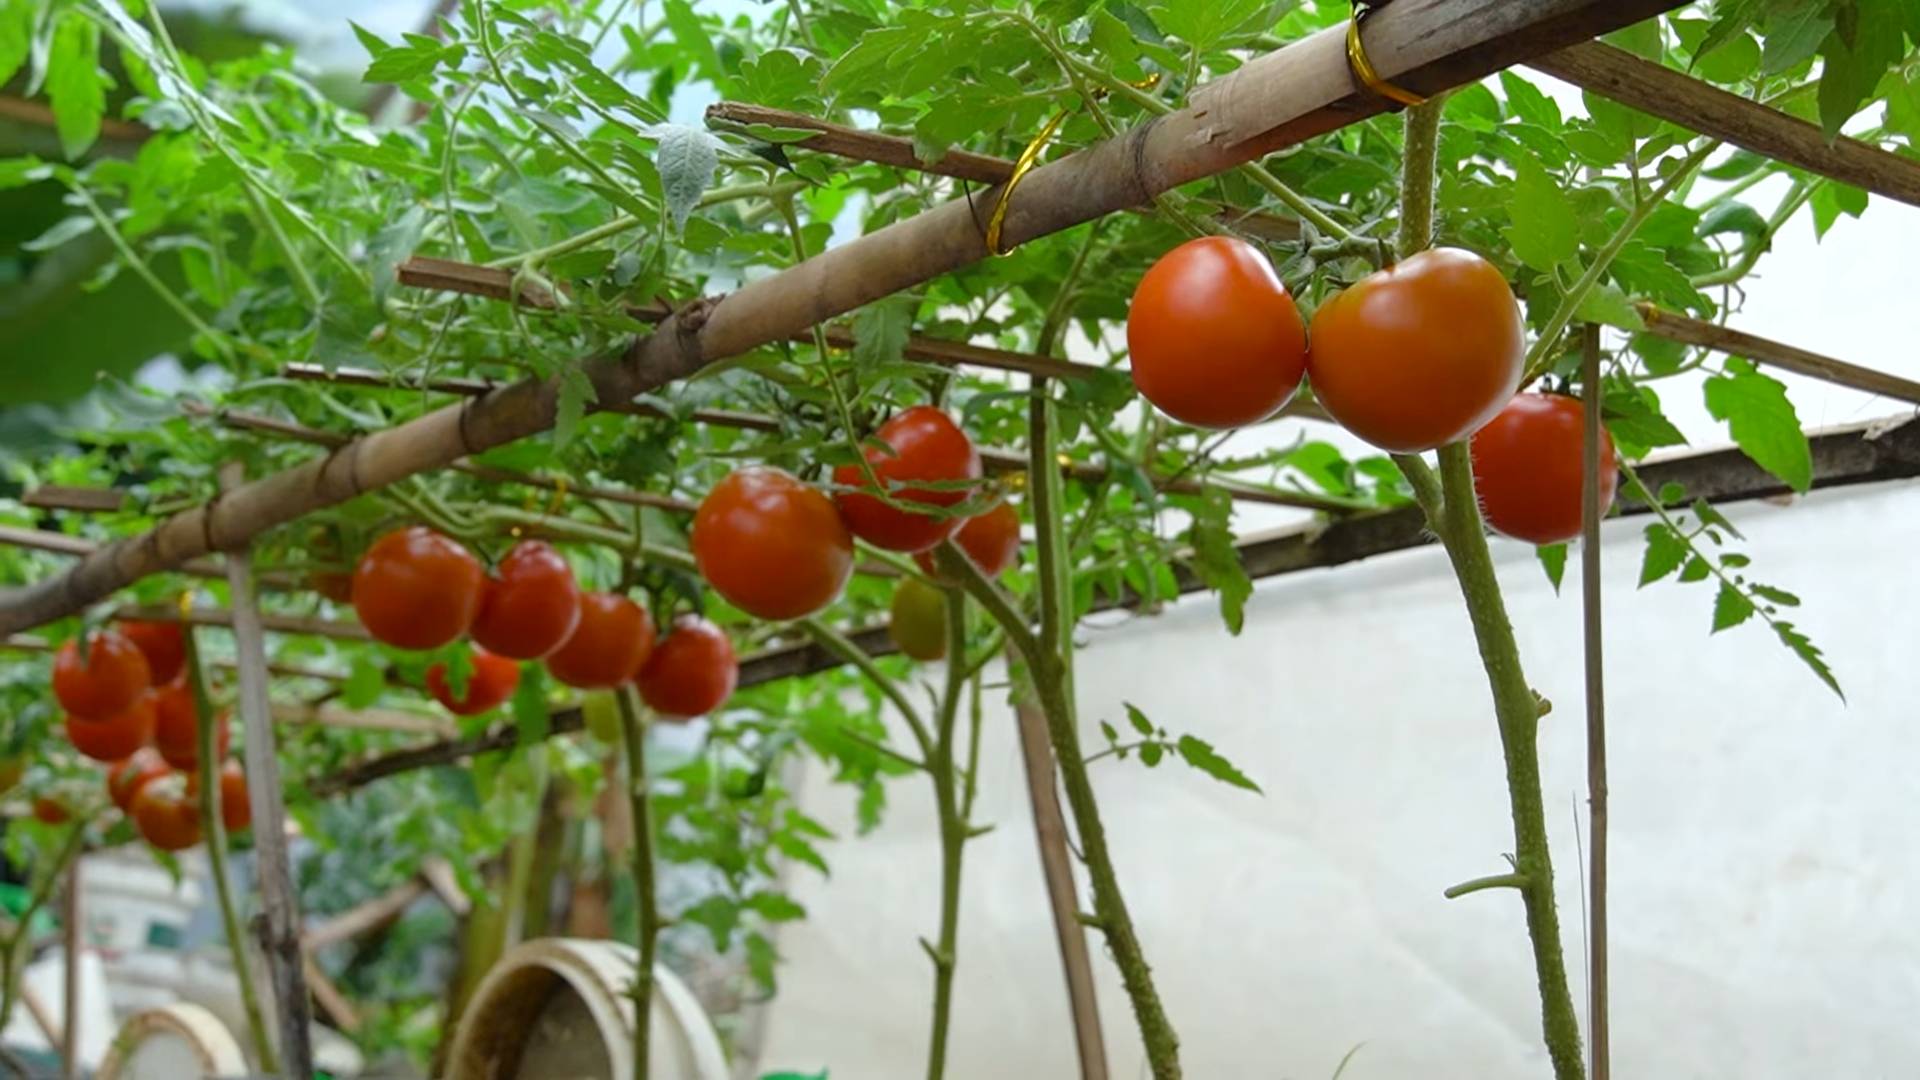
Grow Tomatoes at Home, even if you think you don’t have a green thumb! Let’s be honest, who doesn’t love the taste of a sun-ripened, juicy tomato fresh from the garden? For centuries, cultivating tomatoes has been a cherished tradition, from the ancient Aztecs who first domesticated them to Italian grandmothers guarding their secret sauce recipes. But the truth is, store-bought tomatoes often lack that vibrant flavor and satisfying texture. That’s where this DIY guide comes in!
I’m going to share some simple yet effective tricks and hacks that will empower you to grow tomatoes at home, regardless of your space or experience. Imagine biting into a delicious tomato you nurtured from seed to fruit – the pride and flavor are simply unmatched. Whether you have a sprawling backyard or just a sunny balcony, these tips will help you unlock the secrets to a bountiful tomato harvest. Say goodbye to bland supermarket tomatoes and hello to homegrown goodness!
This article is packed with practical advice, from choosing the right varieties for your climate to troubleshooting common problems. You’ll learn how to create the perfect growing environment, optimize watering and feeding, and even protect your precious plants from pests and diseases. So, grab your gardening gloves, and let’s get started on your journey to becoming a tomato-growing pro!
DIY Plastic Bottle Vertical Garden: A Step-by-Step Guide
Hey there, fellow garden enthusiasts! I’m so excited to share this awesome DIY project with you: creating a vertical garden using recycled plastic bottles. It’s a fantastic way to add some greenery to small spaces, recycle those plastic bottles piling up, and grow your own herbs, flowers, or even veggies! Trust me, it’s easier than you think, and the results are incredibly rewarding. Let’s get started!
Materials You’ll Need
Before we dive in, let’s gather all the necessary materials. This will make the process smoother and more enjoyable.
* Plastic Bottles: The star of the show! Aim for bottles of similar size and shape (2-liter soda bottles or water bottles work great). The number of bottles depends on how big you want your vertical garden to be. I usually start with at least 10-12.
* Scissors or Utility Knife: For cutting the plastic bottles. Be careful!
* Rope or Strong Twine: To hang the bottles vertically. Make sure it’s durable enough to hold the weight of the soil and plants.
* Soil: Use a good quality potting mix that drains well.
* Seedlings or Seeds: Choose plants that are suitable for vertical gardening and the amount of sunlight your garden will receive. Herbs like mint, basil, and thyme are excellent choices, as are strawberries, lettuce, and small flowering plants like petunias.
* Drill or Awl: To create drainage holes in the bottles.
* Measuring Tape or Ruler: To ensure even spacing between the bottles.
* Gloves: To protect your hands while working with soil and plastic.
* Watering Can or Spray Bottle: For watering your plants.
* Optional: Spray Paint: If you want to add some color and personality to your garden, grab some spray paint suitable for plastic.
Preparing the Plastic Bottles
This is where we transform those ordinary plastic bottles into mini-planters!
1. Clean the Bottles: Thoroughly wash and dry all the plastic bottles. Remove any labels and sticky residue. This will ensure that the soil and plants have a clean environment.
2. Cut the Bottles: Decide how you want to cut the bottles. There are a couple of options:
* Option 1 (Horizontal Cut): Cut a rectangular opening on one side of the bottle, leaving the bottom intact to hold the soil. This is a good option for larger plants. I usually cut about halfway down the bottle’s length.
* Option 2 (Partial Cut): Cut the bottle in half horizontally, but leave a small section (about 1-2 inches) uncut to create a hinge. This allows you to open and close the bottle for planting and maintenance. This is my preferred method, as it’s easier to water and check the soil.
Important Safety Tip: Use a sharp pair of scissors or a utility knife. Be extremely careful when cutting the plastic. I recommend wearing gloves to protect your hands.
3. Create Drainage Holes: Using a drill or awl, create several small drainage holes in the bottom of each bottle. This is crucial to prevent waterlogging and root rot. I usually make about 4-5 holes.
4. (Optional) Paint the Bottles: If you want to add some color to your garden, now’s the time to spray paint the bottles. Choose colors that complement your plants and your outdoor space. Let the paint dry completely before moving on to the next step. I love using bright, cheerful colors like yellow, blue, and green.
Assembling the Vertical Garden
Now comes the fun part – putting everything together!
1. Measure and Mark: Decide where you want to hang your vertical garden. Measure the desired length and mark the spots where you’ll attach the rope or twine. I usually hang mine on a fence or a sturdy wall.
2. Attach the Rope/Twine: Cut the rope or twine into the desired length, leaving some extra length at the top for hanging. Securely attach the rope to the hanging point. Make sure the rope is strong enough to support the weight of the filled bottles. I like to use a strong knot like a bowline.
3. Create Hanging Holes: On each bottle, near the top, create two small holes on opposite sides. These holes will be used to thread the rope through and hang the bottles. Make sure the holes are large enough for the rope to pass through easily.
4. Thread the Bottles: Thread the rope through the holes in each bottle, one at a time. Space the bottles evenly along the rope. I usually leave about 6-8 inches between each bottle. You can adjust the spacing to your liking.
5. Secure the Bottles: To prevent the bottles from sliding down the rope, you can tie knots below each bottle. This will keep them in place and ensure that your vertical garden looks neat and tidy. Alternatively, you can use small cable ties to secure the bottles to the rope.
Planting Your Garden
Time to get your hands dirty and bring your garden to life!
1. Fill the Bottles with Soil: Carefully fill each bottle with potting mix, leaving about an inch of space at the top. Gently pat down the soil to remove any air pockets.
2. Plant Your Seedlings or Seeds: If you’re using seedlings, carefully remove them from their containers and plant them in the bottles. If you’re using seeds, follow the instructions on the seed packet for planting depth and spacing.
3. Water Thoroughly: Water the plants thoroughly after planting. Make sure the water drains out of the drainage holes.
4. Position Your Garden: Hang your vertical garden in a location that receives the appropriate amount of sunlight for your chosen plants. Most herbs and vegetables need at least 6 hours of sunlight per day.
Maintaining Your Vertical Garden
A little bit of care goes a long way in keeping your vertical garden thriving!
1. Water Regularly: Check the soil moisture regularly and water when the top inch of soil feels dry. Water more frequently during hot, dry weather. Be careful not to overwater, as this can lead to root rot.
2. Fertilize: Feed your plants with a balanced liquid fertilizer every 2-3 weeks. This will provide them with the nutrients they need to grow and flourish.
3. Prune and Trim: Regularly prune and trim your plants to encourage bushier growth and prevent them from becoming leggy. Remove any dead or yellowing leaves.
4. Pest Control: Keep an eye out for pests and diseases. If you notice any problems, take action immediately. You can use organic pest control methods like insecticidal soap or neem oil.
5. Rotate Plants (Optional): If you notice that some plants are not getting enough sunlight, you can rotate them periodically to ensure that all plants receive adequate light.
Tips and Tricks for Success
Here are a few extra tips to help you create a stunning and successful vertical garden:
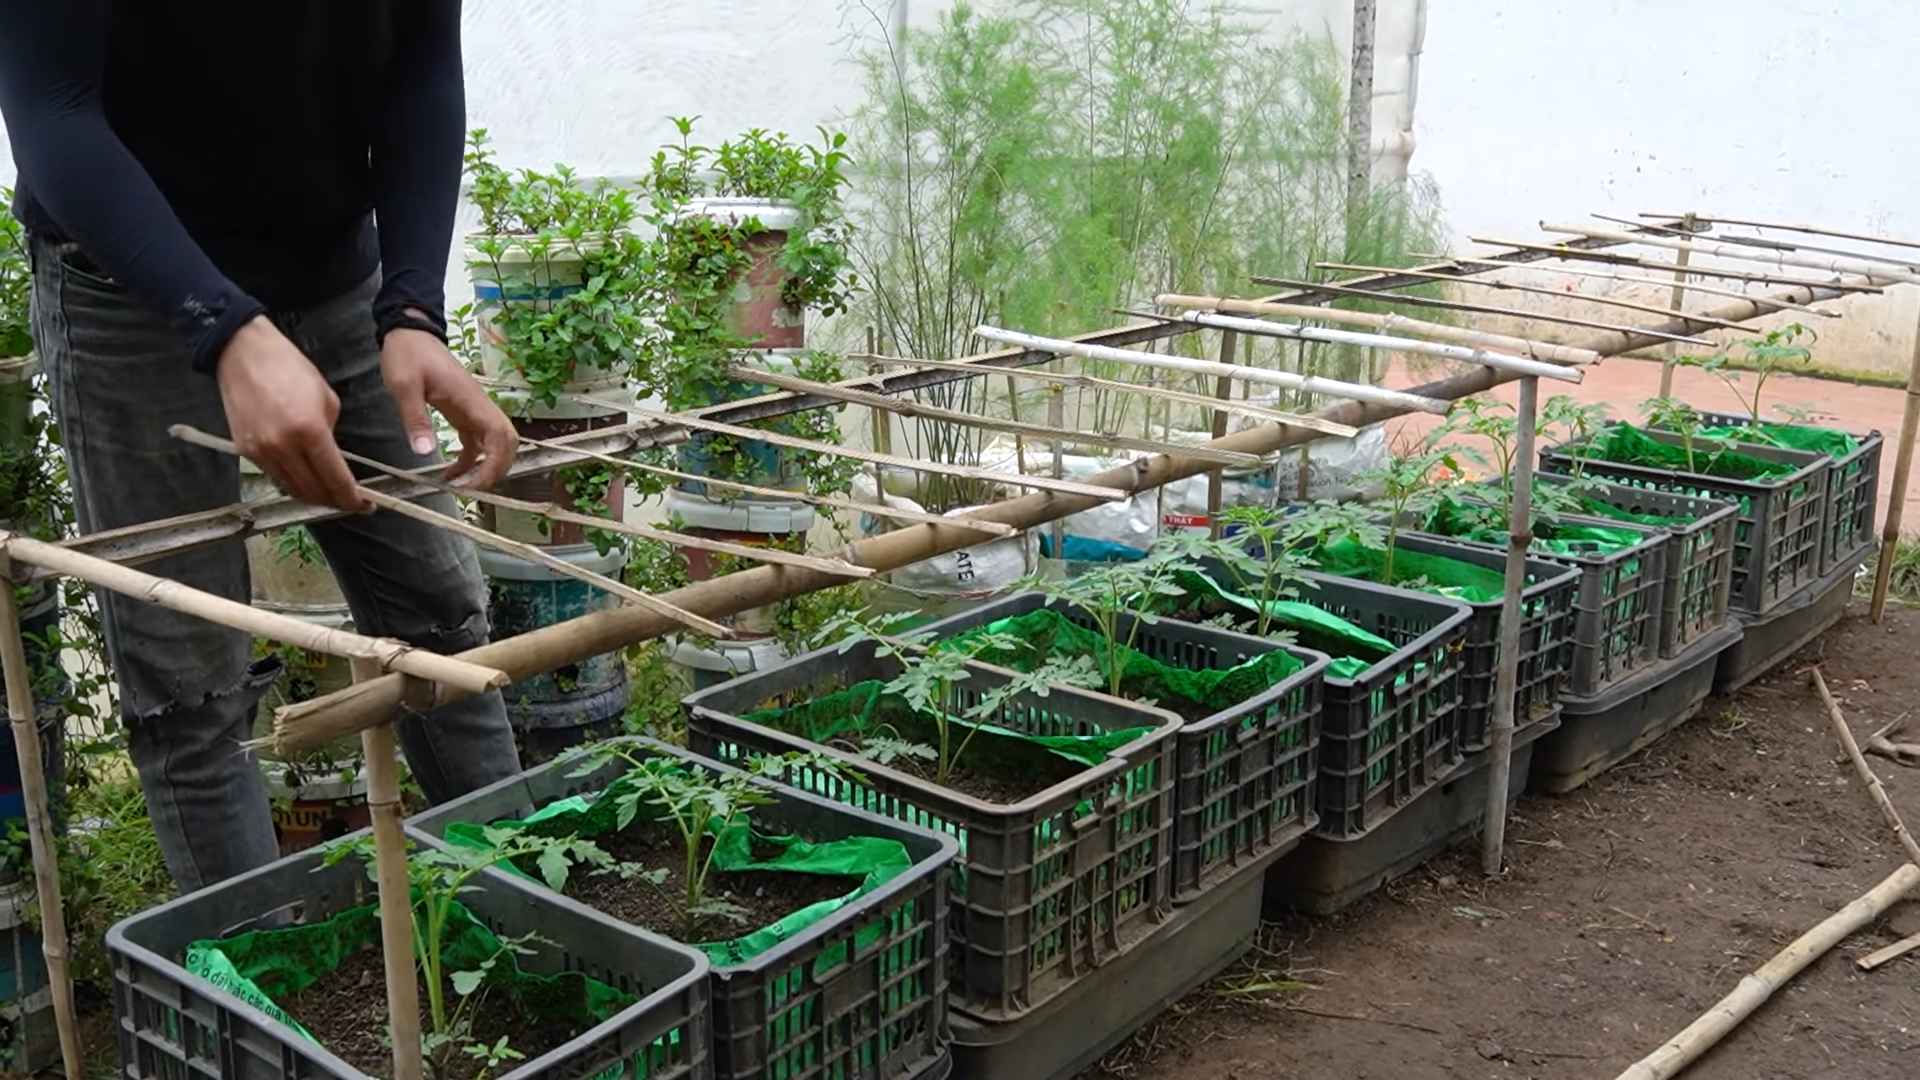
* Choose the Right Plants: Select plants that are well-suited for vertical gardening and the amount of sunlight your garden will receive. Consider the mature size of the plants and choose varieties that won’t outgrow their containers too quickly.
* Use High-Quality Soil: Invest in a good quality potting mix that drains well. This will provide your plants with the nutrients they need and prevent waterlogging.
* Consider the Weight: Remember that the filled bottles can be quite heavy, so make sure your hanging structure is strong enough to support the weight.
* Get Creative with Design: Don’t be afraid to experiment with different bottle sizes, shapes, and colors. You can create a truly unique and eye-catching vertical garden.
* Enjoy the Process: Creating a vertical garden is a fun and rewarding project. Take your time, enjoy the process, and don’t be afraid to make mistakes.
I hope you found this guide helpful! I’m confident that you can create a beautiful and thriving vertical garden using recycled plastic bottles. Happy gardening!
Conclusion
So, there you have it! Growing tomatoes at home isn’t just a gardening project; it’s an investment in flavor, freshness, and a deeper connection to your food. We’ve explored a simple yet effective DIY trick that can significantly boost your tomato yield and overall plant health. This method, focusing on [mention the specific DIY trick discussed in the main article, e.g., “proper pruning techniques” or “creating a DIY self-watering system”], is a game-changer for both novice and experienced gardeners alike.
Why is this a must-try? Because it addresses some of the most common challenges faced when growing tomatoes: inconsistent watering, lack of proper support, and susceptibility to diseases. By implementing this [DIY trick], you’re proactively creating an environment where your tomato plants can thrive. Imagine biting into a sun-ripened tomato, bursting with flavor, knowing that you nurtured it from seedling to harvest with your own hands. That’s the reward waiting for you.
But don’t stop there! Experiment with different variations to tailor the technique to your specific needs and environment. For example, if you live in a particularly hot climate, consider adding shade cloth to your DIY setup to protect your plants from scorching. Or, if you’re short on space, explore vertical gardening options to maximize your tomato yield in a limited area. You could even try different types of tomato varieties to see which ones perform best with your chosen DIY method. Cherry tomatoes, Roma tomatoes, beefsteak tomatoes – the possibilities are endless!
We encourage you to embrace this DIY adventure and discover the joy of growing your own delicious tomatoes. It’s a rewarding experience that will not only enhance your meals but also connect you with nature in a meaningful way. Remember, gardening is a journey of learning and experimentation. Don’t be afraid to make mistakes and adapt your approach as needed.
And most importantly, we want to hear about your experiences! Share your successes, challenges, and any modifications you make to the DIY trick in the comments section below. Let’s create a community of tomato-growing enthusiasts who can learn from each other and inspire others to embark on this rewarding journey. So, grab your gardening gloves, gather your supplies, and get ready to grow some amazing tomatoes at home! Your taste buds (and your garden) will thank you. This DIY approach to growing tomatoes at home is more than just a trend; it’s a sustainable and fulfilling way to enjoy the fruits (or vegetables!) of your labor.
Frequently Asked Questions (FAQ)
Q: What are the best tomato varieties to grow using this DIY trick?
A: The best tomato varieties depend on your climate, space, and personal preferences. However, some varieties tend to perform well with most DIY growing methods. Determinate varieties like Roma and Celebrity are good choices for smaller spaces and container gardening, as they have a bushier growth habit and don’t require as much pruning. Indeterminate varieties like Beefsteak, Cherry, and Heirloom tomatoes are known for their continuous fruit production and often benefit from the support and pruning provided by DIY systems. Experiment with different varieties to find what works best for you. Consider factors like disease resistance, days to maturity, and flavor profile when making your selection.
Q: How often should I water my tomato plants when using a DIY self-watering system?
A: The frequency of watering depends on several factors, including the size of your container, the type of soil you’re using, the climate, and the stage of growth of your tomato plants. Generally, you should check the soil moisture level regularly. If the top inch of soil feels dry to the touch, it’s time to water. With a DIY self-watering system, the reservoir should be checked and refilled as needed. During hot and dry periods, you may need to refill the reservoir more frequently. Avoid overwatering, as this can lead to root rot and other problems. A good rule of thumb is to water deeply and less frequently, allowing the soil to dry out slightly between waterings.
Q: What type of soil is best for growing tomatoes in containers?
A: A well-draining potting mix is essential for growing tomatoes in containers. Avoid using garden soil, as it can become compacted and doesn’t provide adequate drainage. A good potting mix should contain a blend of peat moss, perlite, and vermiculite. You can also add compost or other organic matter to improve soil fertility and drainage. Look for a potting mix specifically formulated for vegetables or tomatoes. The ideal soil pH for tomatoes is between 6.0 and 6.8. You can test your soil pH using a soil testing kit and amend it as needed.
Q: How much sunlight do tomato plants need?
A: Tomato plants need at least 6-8 hours of direct sunlight per day to thrive. Choose a location for your DIY tomato garden that receives plenty of sunlight. If you live in a particularly hot climate, you may need to provide some afternoon shade to protect your plants from scorching. If you’re growing tomatoes indoors, you’ll need to supplement with grow lights to provide adequate light.
Q: How do I prevent common tomato diseases like blight and blossom end rot?
A: Preventing tomato diseases requires a multi-pronged approach. Start by choosing disease-resistant tomato varieties. Ensure good air circulation around your plants by pruning them properly and spacing them adequately. Avoid overhead watering, as this can create a humid environment that promotes disease. Water at the base of the plants instead. Mulch around your plants to prevent soil from splashing onto the leaves. Monitor your plants regularly for signs of disease and take action promptly if you notice any problems. For blossom end rot, ensure consistent watering and add calcium to the soil if necessary.
Q: How do I deal with pests like aphids and tomato hornworms?
A: There are several ways to deal with pests on tomato plants. You can handpick larger pests like tomato hornworms. For smaller pests like aphids, you can spray your plants with a strong stream of water or use insecticidal soap. Introduce beneficial insects like ladybugs and lacewings to your garden to help control pest populations. You can also use row covers to protect your plants from pests. Regularly inspect your plants for signs of pests and take action promptly to prevent infestations from becoming severe.
Q: Can I grow tomatoes indoors using this DIY trick?
A: Yes, you can grow tomatoes indoors using this DIY trick, but you’ll need to provide adequate light and ventilation. Use grow lights to supplement natural sunlight and ensure that your plants receive at least 6-8 hours of light per day. Provide good air circulation by using a fan or opening windows. Choose a compact tomato variety that is well-suited for container gardening. Be sure to pollinate the flowers manually, as there will be no bees or other pollinators indoors.
Q: How do I know when my tomatoes are ripe?
A: The color of the tomato will change from green to its mature color, which could be red, yellow, orange, or even purple, depending on the variety. The tomato should also feel slightly soft to the touch. Gently squeeze the tomato; if it gives slightly, it’s ripe. The aroma of the tomato will also become more pronounced as it ripens. The stem of the tomato should easily detach from the plant when the tomato is ripe.
Q: What if my tomato plants aren’t producing fruit?
A: There are several reasons why your tomato plants might not be producing fruit. Ensure that your plants are receiving enough sunlight, water, and nutrients. Check the soil pH and amend it if necessary. Make sure that the flowers are being pollinated. If you’re growing tomatoes indoors, you’ll need to pollinate the flowers manually. High temperatures can also inhibit fruit set. If the temperature is consistently above 90 degrees Fahrenheit, you may need to provide some shade to your plants.

Leave a Comment