
Hanging kohlrabi bottle gardening: sounds a bit out there, right? But trust me, it’s a game-changer! I know, I know, you’re probably picturing some crazy contraption, but stick with me. Imagine fresh, crisp kohlrabi, grown right outside your kitchen window, without taking up any precious garden space. That’s the magic we’re unlocking today!
The concept of vertical gardening, which hanging kohlrabi bottle gardening falls under, has roots stretching back centuries. Think of the Hanging Gardens of Babylon, one of the Seven Wonders of the Ancient World! While we’re not quite building a wonder of the world, we are bringing that same ingenuity and space-saving brilliance to our own homes. For centuries, people have sought creative ways to cultivate plants in limited spaces, and this DIY project is a modern twist on that timeless pursuit.
Let’s face it, not everyone has a sprawling backyard. Many of us are working with balconies, patios, or even just a sunny windowsill. That’s where this DIY trick comes in. It’s perfect for urban dwellers, apartment residents, or anyone looking to maximize their gardening yield. Plus, it’s a fantastic way to recycle those plastic bottles that seem to multiply in our recycling bins. So, are you ready to ditch the store-bought veggies and grow your own delicious kohlrabi with a fun, eco-friendly project? Let’s get started!
DIY Hanging Kohlrabi Bottle Garden: A Step-by-Step Guide
Hey there, fellow gardening enthusiasts! I’m super excited to share this fun and eco-friendly project with you: creating a hanging kohlrabi garden using recycled plastic bottles. It’s a fantastic way to grow fresh veggies in a small space, add a unique touch to your balcony or patio, and, most importantly, reduce plastic waste. Trust me, it’s easier than you think!
What You’ll Need
Before we dive in, let’s gather all the necessary materials. This will make the process smooth and enjoyable.
* **Plastic Bottles:** You’ll need several plastic bottles (2-liter soda bottles or similar work great). The number depends on how many kohlrabi plants you want to grow. I usually aim for one plant per bottle. Make sure they are clean and dry.
* **Kohlrabi Seeds or Seedlings:** You can start from seeds or buy small seedlings from your local garden center. Starting from seeds gives you more control, but seedlings are quicker.
* **Potting Soil:** Use a good quality potting mix that drains well. Kohlrabi needs well-drained soil to thrive.
* **Scissors or Utility Knife:** For cutting the plastic bottles. Be careful!
* **Drill or Awl:** To create drainage holes and holes for hanging.
* **Rope or Twine:** Strong rope or twine for hanging the bottles. I prefer natural twine for a rustic look.
* **Measuring Tape or Ruler:** To ensure consistent cuts and spacing.
* **Permanent Marker:** For marking cutting lines.
* **Watering Can or Hose:** For watering your kohlrabi plants.
* **Gloves (Optional):** To protect your hands.
* **Small Pebbles or Gravel:** To improve drainage at the bottom of the bottles.
Preparing the Bottles
Okay, let’s get our hands dirty! This is where we transform those plastic bottles into cozy homes for our kohlrabi.
1. **Cleaning the Bottles:** Thoroughly wash and dry the plastic bottles. Remove any labels and sticky residue. This ensures a clean environment for your plants.
2. **Cutting the Bottles:** This is a crucial step. We’ll be creating a “pocket” for the soil and plant.
* Using your measuring tape and marker, draw a horizontal line around the bottle, about 4-5 inches from the top. This will be your cutting line.
* Carefully cut along the marked line using your scissors or utility knife. You’ll essentially be separating the top portion of the bottle.
* Repeat this process for all the bottles you plan to use.
3. **Creating Drainage Holes:** Kohlrabi hates soggy roots, so drainage is essential.
* Using your drill or awl, create several small drainage holes in the bottom of each bottle. I usually make about 5-6 holes.
* Make sure the holes are large enough to allow water to drain freely but not so large that the soil will fall out.
4. **Creating Hanging Holes:** Now, let’s make these bottles hangable!
* On the top portion of the bottle (the part you cut off), drill or poke two holes on opposite sides, near the cut edge. These holes will be used to thread the rope or twine for hanging.
* Make sure the holes are large enough to accommodate your rope or twine.
Planting the Kohlrabi
Time to get those kohlrabi plants settled into their new homes!
1. **Adding Drainage Layer:** Place a layer of small pebbles or gravel at the bottom of each bottle. This will further improve drainage and prevent the soil from becoming waterlogged.
2. **Filling with Potting Soil:** Fill the bottles with potting soil, leaving about an inch of space at the top. Gently pat down the soil to remove any air pockets.
3. **Planting Seeds or Seedlings:**
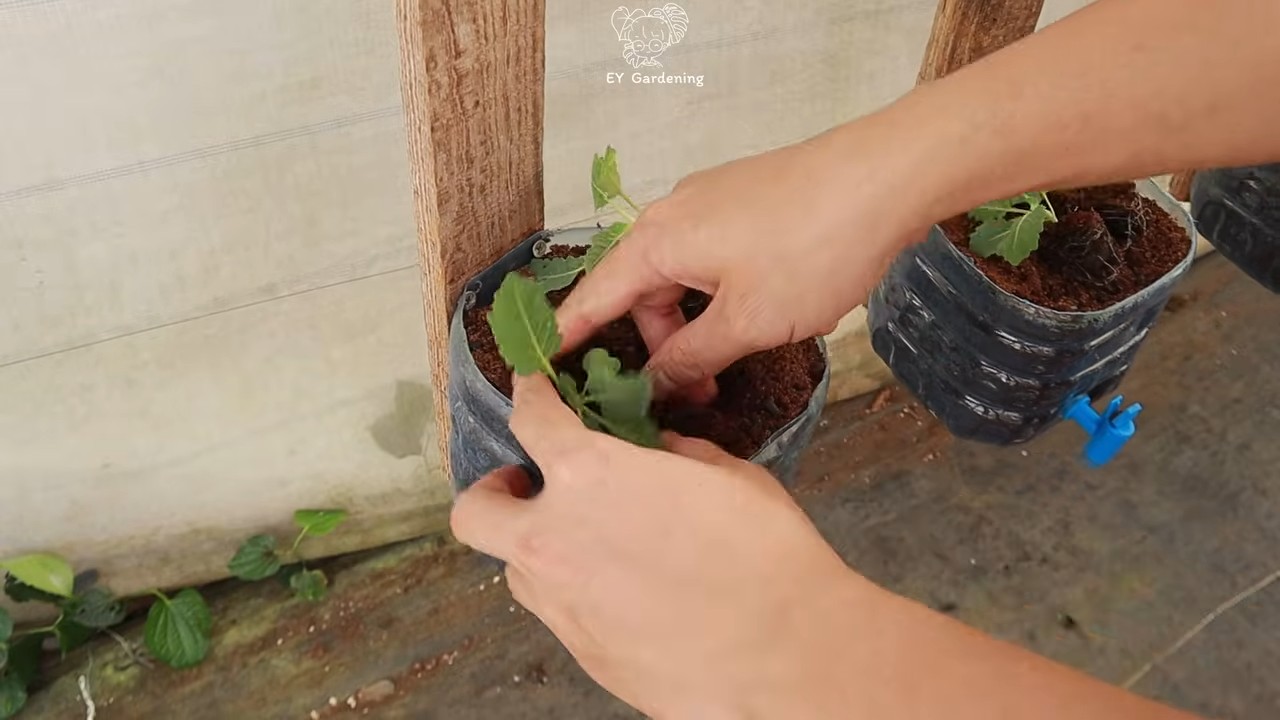
* **From Seeds:** Sow 2-3 kohlrabi seeds in the center of each bottle, about half an inch deep. Cover the seeds with soil and gently water.
* **From Seedlings:** Carefully remove the kohlrabi seedlings from their containers. Create a small hole in the center of the soil in each bottle and gently place the seedling inside. Backfill with soil and gently water.
4. **Watering:** Water the newly planted kohlrabi thoroughly, ensuring the soil is evenly moist. Avoid overwatering, as this can lead to root rot.
Hanging Your Garden
Let’s get these kohlrabi bottles hanging and looking beautiful!
1. **Threading the Rope or Twine:** Cut a length of rope or twine long enough to hang the bottle from your desired location. Thread the rope through the holes you created in the top portion of the bottle.
2. **Securing the Knot:** Tie a secure knot at the end of the rope or twine, creating a loop for hanging. Make sure the knot is strong enough to support the weight of the bottle and the plant.
3. **Hanging the Bottles:** Hang the bottles from a sturdy support, such as a balcony railing, fence, or hanging basket bracket. Ensure the bottles are spaced adequately to allow for air circulation and sunlight exposure.
Caring for Your Hanging Kohlrabi Garden
Hey there, fellow gardening enthusiasts! I’m super excited to share this fun and eco-friendly project with you: creating a hanging kohlrabi garden using recycled plastic bottles. It’s a fantastic way to grow fresh veggies in a small space, add a unique touch to your balcony or patio, and, most importantly, reduce plastic waste. Trust me, it’s easier than you think!
What You’ll Need
Before we dive in, let’s gather all the necessary materials. This will make the process smooth and enjoyable.
* **Plastic Bottles:** You’ll need several plastic bottles (2-liter soda bottles or similar work great). The number depends on how many kohlrabi plants you want to grow. I usually aim for one plant per bottle. Make sure they are clean and dry.
* **Kohlrabi Seeds or Seedlings:** You can start from seeds or buy small seedlings from your local garden center. Starting from seeds gives you more control, but seedlings are quicker.
* **Potting Soil:** Use a good quality potting mix that drains well. Kohlrabi needs well-drained soil to thrive.
* **Scissors or Utility Knife:** For cutting the plastic bottles. Be careful!
* **Drill or Awl:** To create drainage holes and holes for hanging.
* **Rope or Twine:** Strong rope or twine for hanging the bottles. I prefer natural twine for a rustic look.
* **Measuring Tape or Ruler:** To ensure consistent cuts and spacing.
* **Permanent Marker:** For marking cutting lines.
* **Watering Can or Hose:** For watering your kohlrabi plants.
* **Gloves (Optional):** To protect your hands.
* **Small Pebbles or Gravel:** To improve drainage at the bottom of the bottles.
Preparing the Bottles
Okay, let’s get our hands dirty! This is where we transform those plastic bottles into cozy homes for our kohlrabi.
1. **Cleaning the Bottles:** Thoroughly wash and dry the plastic bottles. Remove any labels and sticky residue. This ensures a clean environment for your plants.
2. **Cutting the Bottles:** This is a crucial step. We’ll be creating a “pocket” for the soil and plant.
* Using your measuring tape and marker, draw a horizontal line around the bottle, about 4-5 inches from the top. This will be your cutting line.
* Carefully cut along the marked line using your scissors or utility knife. You’ll essentially be separating the top portion of the bottle.
* Repeat this process for all the bottles you plan to use.
3. **Creating Drainage Holes:** Kohlrabi hates soggy roots, so drainage is essential.
* Using your drill or awl, create several small drainage holes in the bottom of each bottle. I usually make about 5-6 holes.
* Make sure the holes are large enough to allow water to drain freely but not so large that the soil will fall out.
4. **Creating Hanging Holes:** Now, let’s make these bottles hangable!
* On the top portion of the bottle (the part you cut off), drill or poke two holes on opposite sides, near the cut edge. These holes will be used to thread the rope or twine for hanging.
* Make sure the holes are large enough to accommodate your rope or twine.
Planting the Kohlrabi
Time to get those kohlrabi plants settled into their new homes!
1. **Adding Drainage Layer:** Place a layer of small pebbles or gravel at the bottom of each bottle. This will further improve drainage and prevent the soil from becoming waterlogged.
2. **Filling with Potting Soil:** Fill the bottles with potting soil, leaving about an inch of space at the top. Gently pat down the soil to remove any air pockets.
3. **Planting Seeds or Seedlings:**
* **From Seeds:** Sow 2-3 kohlrabi seeds in the center of each bottle, about half an inch deep. Cover the seeds with soil and gently water.
* **From Seedlings:** Carefully remove the kohlrabi seedlings from their containers. Create a small hole in the center of the soil in each bottle and gently place the seedling inside. Backfill with soil and gently water.
4. **Watering:** Water the newly planted kohlrabi thoroughly, ensuring the soil is evenly moist. Avoid overwatering, as this can lead to root rot.
Hanging Your Garden
Let’s get these kohlrabi bottles hanging and looking beautiful!
1. **Threading the Rope or Twine:** Cut a length of rope or twine long enough to hang the bottle from your desired location. Thread the rope through the holes you created in the top portion of the bottle.
2. **Securing the Knot:** Tie a secure knot at the end of the rope or twine, creating a loop for hanging. Make sure the knot is strong enough to support the weight of the bottle and the plant.
3. **Hanging the Bottles:** Hang the bottles from a sturdy support, such as a balcony railing, fence, or hanging basket bracket. Ensure the bottles are spaced adequately to allow for air circulation and sunlight exposure.
Caring for Your Hanging Kohlrabi Garden
Now that your hanging kohlrabi garden is set up, it’s important to provide proper care to ensure healthy growth and a bountiful harvest.
1. **Sunlight:** Kohlrabi needs at least 6 hours of sunlight per day. Choose a location that receives plenty of sunlight. If you live in a hot climate, provide some afternoon shade to prevent the plants from overheating.
2. **Watering:** Water your kohlrabi plants regularly, especially during dry periods. Check the soil moisture by sticking your finger into the soil. If the top inch of soil feels dry, it’s time to water. Avoid overwatering, as this can lead to root rot.
3. **Fertilizing:** Kohlrabi benefits from regular fertilization. Use a balanced liquid fertilizer every 2-3 weeks. Follow the instructions on the fertilizer packaging.
4. **Pest Control:** Keep an eye out for pests such as aphids, cabbage worms, and flea beetles. If you notice any pests, treat them with an appropriate organic insecticide or insecticidal soap.
5. **Weeding:** Remove any weeds that may grow in the bottles. Weeds can compete with your kohlrabi plants for nutrients and water.
6. **Rotating the Bottles:** To ensure even sunlight exposure, rotate the bottles regularly. This will prevent the plants from leaning towards the sun.
Harvesting Your Kohlrabi
The best part! Harvesting your homegrown kohlrabi is incredibly rewarding.
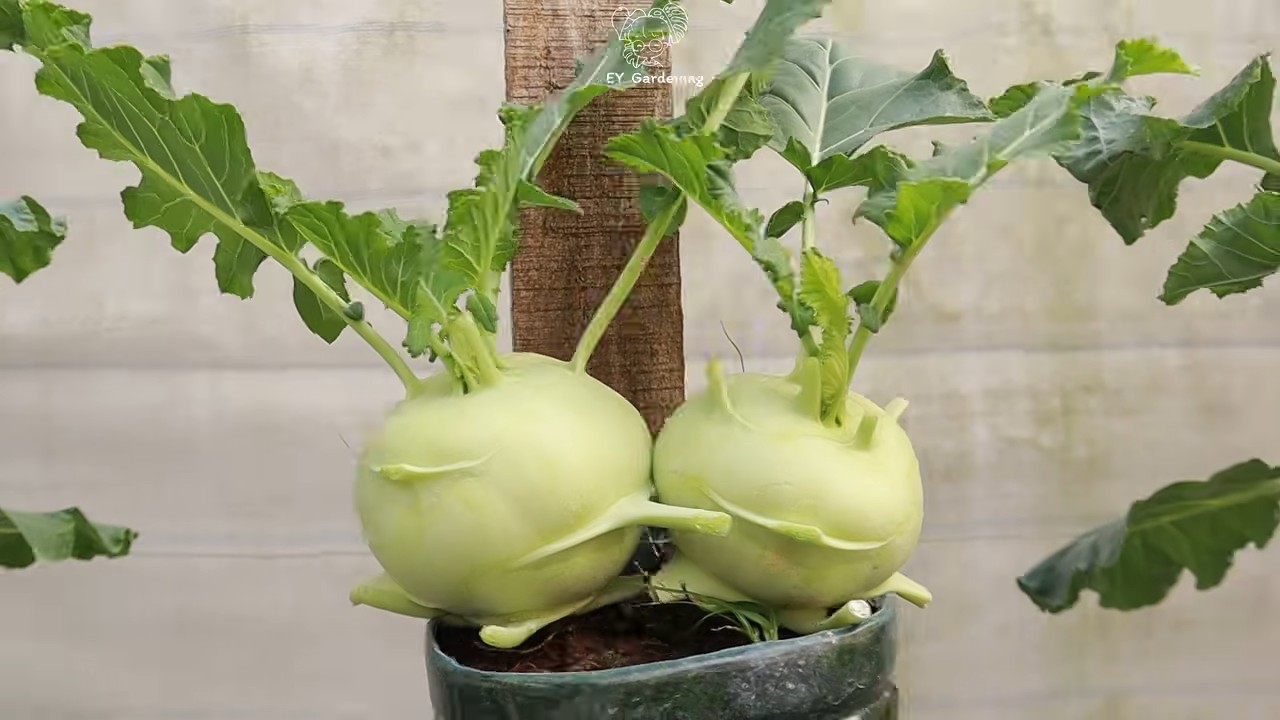
1. **Timing:** Kohlrabi is typically ready to harvest about 50-60 days after planting. The bulb should be about 2-3 inches in diameter.
2. **Harvesting:** To harvest, gently pull the entire plant from the bottle. You can also use a knife to cut the bulb from the roots.
3. **Enjoying Your Harvest:** Kohlrabi can be eaten raw or cooked. It has a mild, slightly sweet flavor. You can slice it and add it to salads, stir-fries, or soups. The leaves are also edible and can be used like spinach.
Troubleshooting
Even with the best care, you might encounter some challenges. Here are a few common issues and how to address them:
* **Yellowing Leaves:** This could indicate overwatering, underwatering, or nutrient deficiency. Check the soil moisture and adjust your watering schedule accordingly. Fertilize the plants with a balanced fertilizer.
* **Slow Growth:** This could be due to insufficient sunlight, poor soil, or pest infestation. Ensure the plants are receiving enough sunlight and fertilize them regularly. Check for pests and treat them accordingly.
* **Root Rot:** This is caused by overwatering. Ensure the soil is well-draining and avoid overwatering. If root rot is severe, you may need to replant the kohlrabi in fresh soil.
* **Pest Infestation:** Regularly inspect your plants for pests. Treat any infestations promptly with an appropriate organic insecticide or insecticidal soap.
Tips for Success
Here are a few extra tips to help you succeed with your hanging kohlrabi garden:
* Choose the Right Variety: Select a kohlrabi variety that is well-suited to your climate and growing conditions.
* Start with Healthy Seedlings: If you’re using seedlings, choose healthy, vigorous plants from a reputable nursery.
* Use High-Quality Potting Soil: Invest in a good quality potting mix that drains well and provides essential nutrients.
* Water Regularly: Kohlrabi needs consistent moisture to thrive. Water regularly, especially during dry periods.
* Fertilize Regularly: Kohlrabi benefits from regular fertilization. Use a balanced liquid fertilizer every 2-3 weeks.
* Monitor for Pests: Regularly inspect your plants for pests and treat them promptly.
* Enjoy the
Conclusion
So, there you have it! Transforming discarded plastic bottles into thriving vertical gardens for your kohlrabi is not just a clever upcycling project; it’s a revolutionary way to maximize space, minimize waste, and enjoy fresh, homegrown produce right at your fingertips. This method of hanging kohlrabi bottle gardening offers a multitude of benefits, from its eco-friendly nature to its space-saving design, making it a must-try for any gardening enthusiast, regardless of experience level.
Imagine the satisfaction of harvesting crisp, delicious kohlrabi grown in a garden you created from repurposed materials. Think of the conversations it will spark, the beauty it will add to your balcony, patio, or even indoor space, and the positive impact you’ll be making on the environment. This isn’t just about growing vegetables; it’s about embracing a sustainable lifestyle and connecting with nature in a creative and rewarding way.
But the beauty of this DIY project lies in its adaptability. Feel free to experiment with different bottle sizes and shapes to create unique vertical arrangements. Consider painting the bottles to add a splash of color and personality to your garden. You can also explore different growing mediums, such as coco coir or a mix of perlite and vermiculite, to find what works best for your climate and kohlrabi variety.
For those looking to enhance the aesthetic appeal, try incorporating trailing plants like herbs or flowers alongside your kohlrabi. This not only adds visual interest but can also attract beneficial insects to your garden. You could even create a tiered system, with larger bottles at the bottom and smaller ones at the top, to maximize space and create a stunning visual display.
Don’t be afraid to get creative and personalize your hanging kohlrabi bottle garden to reflect your own unique style and preferences. The possibilities are endless!
We wholeheartedly encourage you to give this DIY trick a try. It’s a fun, rewarding, and environmentally friendly way to grow your own food and beautify your living space. Once you’ve set up your hanging kohlrabi bottle garden and started seeing those little seedlings sprout, we’d love to hear about your experience! Share your photos, tips, and challenges with us in the comments below or on our social media channels. Let’s inspire each other to create a more sustainable and beautiful world, one bottle garden at a time. Your insights could help others discover the joy of growing their own food and contribute to a thriving community of eco-conscious gardeners. So, grab those bottles, gather your supplies, and get ready to embark on a rewarding gardening adventure!
Frequently Asked Questions (FAQ)
What type of plastic bottles are best for hanging kohlrabi bottle gardening?
Ideally, you should use food-grade plastic bottles, such as those used for water, juice, or soda. Avoid using bottles that have contained harsh chemicals or cleaning products, as these could contaminate your soil and affect the growth of your kohlrabi. PET (polyethylene terephthalate) bottles are a common and safe choice. Make sure to thoroughly clean the bottles with soap and water before using them. Inspect the bottles for any cracks or damage that could compromise their structural integrity. Thicker bottles will generally be more durable and last longer.
How do I ensure proper drainage in my hanging kohlrabi bottle garden?
Proper drainage is crucial for preventing root rot and ensuring healthy kohlrabi growth. Before planting, drill several drainage holes in the bottom of each bottle. The size and number of holes will depend on the size of the bottle, but aim for at least four to five holes that are about ¼ inch in diameter. You can also add a layer of gravel or small stones to the bottom of the bottle to further improve drainage. When watering, be careful not to overwater, and allow excess water to drain freely.
What type of soil should I use for growing kohlrabi in bottles?
Kohlrabi thrives in well-draining, nutrient-rich soil. A good option is a mix of potting soil, compost, and perlite or vermiculite. The potting soil provides a base for the plants to grow, the compost adds essential nutrients, and the perlite or vermiculite improves drainage and aeration. Avoid using garden soil, as it can be too heavy and compact, hindering root growth. You can also add a slow-release fertilizer to the soil mix to provide a steady supply of nutrients throughout the growing season.
How much sunlight does kohlrabi need when grown in bottles?
Kohlrabi requires at least six hours of direct
So, there you have it! Transforming discarded plastic bottles into thriving vertical gardens for your kohlrabi is not just a clever upcycling project; it’s a revolutionary way to maximize space, minimize waste, and enjoy fresh, homegrown produce right at your fingertips. This method of hanging kohlrabi bottle gardening offers a multitude of benefits, from its eco-friendly nature to its space-saving design, making it a must-try for any gardening enthusiast, regardless of experience level.
Imagine the satisfaction of harvesting crisp, delicious kohlrabi grown in a garden you created from repurposed materials. Think of the conversations it will spark, the beauty it will add to your balcony, patio, or even indoor space, and the positive impact you’ll be making on the environment. This isn’t just about growing vegetables; it’s about embracing a sustainable lifestyle and connecting with nature in a creative and rewarding way.
But the beauty of this DIY project lies in its adaptability. Feel free to experiment with different bottle sizes and shapes to create unique vertical arrangements. Consider painting the bottles to add a splash of color and personality to your garden. You can also explore different growing mediums, such as coco coir or a mix of perlite and vermiculite, to find what works best for your climate and kohlrabi variety.
For those looking to enhance the aesthetic appeal, try incorporating trailing plants like herbs or flowers alongside your kohlrabi. This not only adds visual interest but can also attract beneficial insects to your garden. You could even create a tiered system, with larger bottles at the bottom and smaller ones at the top, to maximize space and create a stunning visual display.
Don’t be afraid to get creative and personalize your hanging kohlrabi bottle garden to reflect your own unique style and preferences. The possibilities are endless!
We wholeheartedly encourage you to give this DIY trick a try. It’s a fun, rewarding, and environmentally friendly way to grow your own food and beautify your living space. Once you’ve set up your hanging kohlrabi bottle garden and started seeing those little seedlings sprout, we’d love to hear about your experience! Share your photos, tips, and challenges with us in the comments below or on our social media channels. Let’s inspire each other to create a more sustainable and beautiful world, one bottle garden at a time. Your insights could help others discover the joy of growing their own food and contribute to a thriving community of eco-conscious gardeners. So, grab those bottles, gather your supplies, and get ready to embark on a rewarding gardening adventure!
Frequently Asked Questions (FAQ)
What type of plastic bottles are best for hanging kohlrabi bottle gardening?
Ideally, you should use food-grade plastic bottles, such as those used for water, juice, or soda. Avoid using bottles that have contained harsh chemicals or cleaning products, as these could contaminate your soil and affect the growth of your kohlrabi. PET (polyethylene terephthalate) bottles are a common and safe choice. Make sure to thoroughly clean the bottles with soap and water before using them. Inspect the bottles for any cracks or damage that could compromise their structural integrity. Thicker bottles will generally be more durable and last longer.
How do I ensure proper drainage in my hanging kohlrabi bottle garden?
Proper drainage is crucial for preventing root rot and ensuring healthy kohlrabi growth. Before planting, drill several drainage holes in the bottom of each bottle. The size and number of holes will depend on the size of the bottle, but aim for at least four to five holes that are about ¼ inch in diameter. You can also add a layer of gravel or small stones to the bottom of the bottle to further improve drainage. When watering, be careful not to overwater, and allow excess water to drain freely.
What type of soil should I use for growing kohlrabi in bottles?
Kohlrabi thrives in well-draining, nutrient-rich soil. A good option is a mix of potting soil, compost, and perlite or vermiculite. The potting soil provides a base for the plants to grow, the compost adds essential nutrients, and the perlite or vermiculite improves drainage and aeration. Avoid using garden soil, as it can be too heavy and compact, hindering root growth. You can also add a slow-release fertilizer to the soil mix to provide a steady supply of nutrients throughout the growing season.
How much sunlight does kohlrabi need when grown in bottles?
Kohlrabi requires at least six hours of direct sunlight per day to thrive. Choose a location for your hanging bottle garden that receives ample sunlight. If you are growing kohlrabi indoors, you may need to supplement with grow lights to ensure adequate light exposure. Rotate the bottles regularly to ensure that all sides of the plants receive sunlight evenly. Insufficient sunlight can result in leggy growth and reduced yields.
How often should I water my hanging kohlrabi bottle garden?
The watering frequency will depend on the climate, the type of soil you are using, and the size of the bottles. Generally, you should water your kohlrabi when the top inch of soil feels dry to the touch. Avoid overwatering, as this can lead to root rot. During hot and dry weather, you may need to water more frequently. Check the soil moisture regularly and adjust your watering schedule accordingly. Consider using a watering can with a gentle nozzle to avoid disturbing the soil.
How do I fertilize kohlrabi grown in hanging bottles?
Kohlrabi is a heavy feeder and benefits from regular fertilization. You can use a balanced liquid fertilizer, such as a 10-10-10 or 20-20-20, diluted to half strength. Fertilize every two to three weeks during the growing season. Alternatively, you can use a slow-release fertilizer incorporated into the soil mix at planting time. Avoid over-fertilizing, as this can lead to excessive foliage growth and reduced bulb development.
How do I protect my kohlrabi from pests and diseases in a bottle garden?
While hanging bottle gardens can help reduce pest pressure, it’s still important to monitor your plants regularly for signs of pests or diseases. Common pests that affect kohlrabi include aphids, cabbage worms, and flea beetles. You can control these pests by handpicking them off the plants, using insecticidal soap, or applying neem oil. To prevent diseases, ensure good air circulation around the plants and avoid overwatering. Remove any infected leaves or plants promptly to prevent the spread of disease.
How long does it take for kohlrabi to mature in a hanging bottle garden?
Kohlrabi typically matures in 55 to 60 days from planting. However, the exact time will depend on the variety of kohlrabi, the growing conditions, and the climate. You can harvest kohlrabi when the bulb reaches about 2 to 3 inches in diameter. The leaves are also edible and can be harvested at any time. Regular harvesting encourages continued production.
Can I grow other vegetables or herbs alongside kohlrabi in the same bottle?
While it’s possible to grow other plants alongside kohlrabi, it’s important to choose companion plants that have similar growing requirements and won’t compete for resources. Good companion plants for kohlrabi include lettuce, spinach, radishes, and herbs like dill and chamomile. Avoid planting kohlrabi with members of the brassica family, such as broccoli or cabbage, as they can attract the same pests and diseases.
What do I do with the bottles after the growing season is over?
After the growing season is over, you can clean the bottles and store them for reuse next year. Alternatively, you can recycle them or repurpose them for other gardening projects. Consider using them to start seedlings indoors or to create other types of vertical gardens. You can also donate them to local schools or community gardens.
Leave a Comment