
Hanging sweet potato planting: Ever dreamt of a lush, cascading curtain of vibrant green vines adorned with the promise of homegrown sweetness? Forget the traditional garden bed – we’re taking sweet potato cultivation to new heights! For centuries, cultures around the globe have cherished sweet potatoes, not just for their delicious flavor and nutritional powerhouse status, but also for their ornamental beauty. From the vibrant purple-leaved varieties to the classic orange-fleshed gems, these plants offer a visual feast.
But why should you consider hanging sweet potato planting? Well, imagine maximizing your growing space, even if you only have a small balcony or patio. Plus, hanging baskets offer excellent drainage, reducing the risk of root rot, a common issue with ground-planted sweet potatoes. And let’s be honest, a hanging sweet potato vine is simply stunning! This DIY guide will walk you through everything you need to know to create your own hanging sweet potato paradise. I’m excited to share these simple yet effective tricks that will transform your space and provide you with a bountiful harvest. Get ready to impress your neighbors with your innovative gardening skills!
DIY Hängende Süßkartoffel-Pflanzgefäße: Ein Leitfaden für üppige Ranken und reiche Ernte
Hallo liebe Gartenfreunde! Habt ihr Lust auf etwas Neues und Aufregendes in eurem Garten oder auf eurem Balkon? Dann lasst uns gemeinsam hängende Süßkartoffel-Pflanzgefäße bauen! Das ist nicht nur eine tolle Möglichkeit, Platz zu sparen, sondern auch ein echter Hingucker und eine super Möglichkeit, eine reiche Ernte zu erzielen. Ich zeige euch, wie ihr das ganz einfach selbst machen könnt.
Was ihr für eure hängenden Süßkartoffel-Pflanzgefäße braucht:
* Süßkartoffeln: Am besten Bio-Süßkartoffeln, da diese nicht mit Wachstumsinhibitoren behandelt wurden.
* Große Plastikeimer oder -körbe: Mindestens 20 Liter Fassungsvermögen sind ideal. Je größer, desto besser für die Wurzelentwicklung.
* Bohrmaschine mit Bohraufsätzen: Für die Entwässerungslöcher und die Aufhängung.
* Starkes Seil oder Kette: Zum Aufhängen der Pflanzgefäße. Achtet auf eine hohe Tragkraft!
* Hochwertige Blumenerde: Eine Mischung aus Kompost, Gartenerde und Kokosfaser ist optimal.
* Optional: Wurmhumus oder organischer Dünger für einen zusätzlichen Nährstoffkick.
* Optional: Jute oder Kokosfaser-Einlagen für die Körbe, um die Erde besser zu halten.
* Messer oder scharfes Werkzeug: Zum Zuschneiden der Süßkartoffeln.
* Wasser: Zum Befeuchten der Erde und der Süßkartoffeln.
* Geduld und Liebe: Das Wichtigste für jedes Gartenprojekt!
Vorbereitung der Süßkartoffeln: Der Schlüssel zum Erfolg
Bevor wir mit dem eigentlichen Bau der Pflanzgefäße beginnen, müssen wir die Süßkartoffeln vorbereiten, damit sie austreiben. Hier sind die Schritte, die ich immer befolge:
1. Süßkartoffeln auswählen: Sucht euch gesunde, feste Süßkartoffeln aus. Vermeidet solche mit weichen Stellen oder Beschädigungen.
2. Süßkartoffeln halbieren (optional): Große Süßkartoffeln könnt ihr halbieren, um mehr “Slips” (Triebe) zu erhalten. Kleine Süßkartoffeln können ganz bleiben.
3. Zahnstocher-Methode: Steckt 3-4 Zahnstocher in die Mitte der Süßkartoffel, sodass sie als Stütze dienen.
4. In Wasser stellen: Füllt ein Glas oder eine Schale mit Wasser und platziert die Süßkartoffel so darauf, dass die untere Hälfte im Wasser steht. Achtet darauf, dass die Zahnstocher die Süßkartoffel stabilisieren.
5. Warm und hell stellen: Stellt das Glas an einen warmen und hellen Ort, aber nicht in die direkte Sonne. Ein Fensterbrett ist ideal.
6. Wasser regelmäßig wechseln: Wechselt das Wasser alle paar Tage, um Schimmelbildung zu vermeiden.
7. Geduld haben: Es kann einige Wochen dauern, bis die Süßkartoffeln austreiben. Habt Geduld und beobachtet sie aufmerksam.
Die Pflanzgefäße vorbereiten: Ein stabiles Zuhause für eure Süßkartoffeln
Jetzt, wo die Süßkartoffeln vorbereitet sind, kümmern wir uns um die Pflanzgefäße.
1. Entwässerungslöcher bohren: Bohrt mehrere Entwässerungslöcher in den Boden der Eimer oder Körbe. Das ist wichtig, damit überschüssiges Wasser ablaufen kann und die Wurzeln nicht faulen.
2. Aufhängungslöcher bohren: Bohrt drei oder vier Löcher gleichmäßig verteilt am oberen Rand der Eimer oder Körbe. Diese Löcher dienen zur Befestigung des Seils oder der Kette.
3. Optional: Jute oder Kokosfaser-Einlagen anbringen: Wenn ihr Körbe verwendet, könnt ihr sie mit Jute oder Kokosfaser-Einlagen auskleiden, um die Erde besser zu halten und ein Austrocknen zu verhindern.
4. Seil oder Kette befestigen: Fädelt das Seil oder die Kette durch die Aufhängungslöcher und knotet es fest. Achtet darauf, dass die Aufhängung stabil ist und das Gewicht der bepflanzten Gefäße tragen kann.
Das Einpflanzen der Süßkartoffel-Slips: Der Start in ein grünes Leben
Sobald die Süßkartoffeln Triebe (Slips) gebildet haben, können wir sie einpflanzen.
1. Slips vorsichtig abbrechen: Wenn die Triebe etwa 15-20 cm lang sind, könnt ihr sie vorsichtig von der Süßkartoffel abbrechen. Achtet darauf, dass ihr die Wurzeln nicht beschädigt.
2. Slips in Wasser wurzeln lassen (optional): Ihr könnt die Slips auch zuerst in einem Glas Wasser wurzeln lassen, bevor ihr sie einpflanzt. Das erhöht die Erfolgschancen.
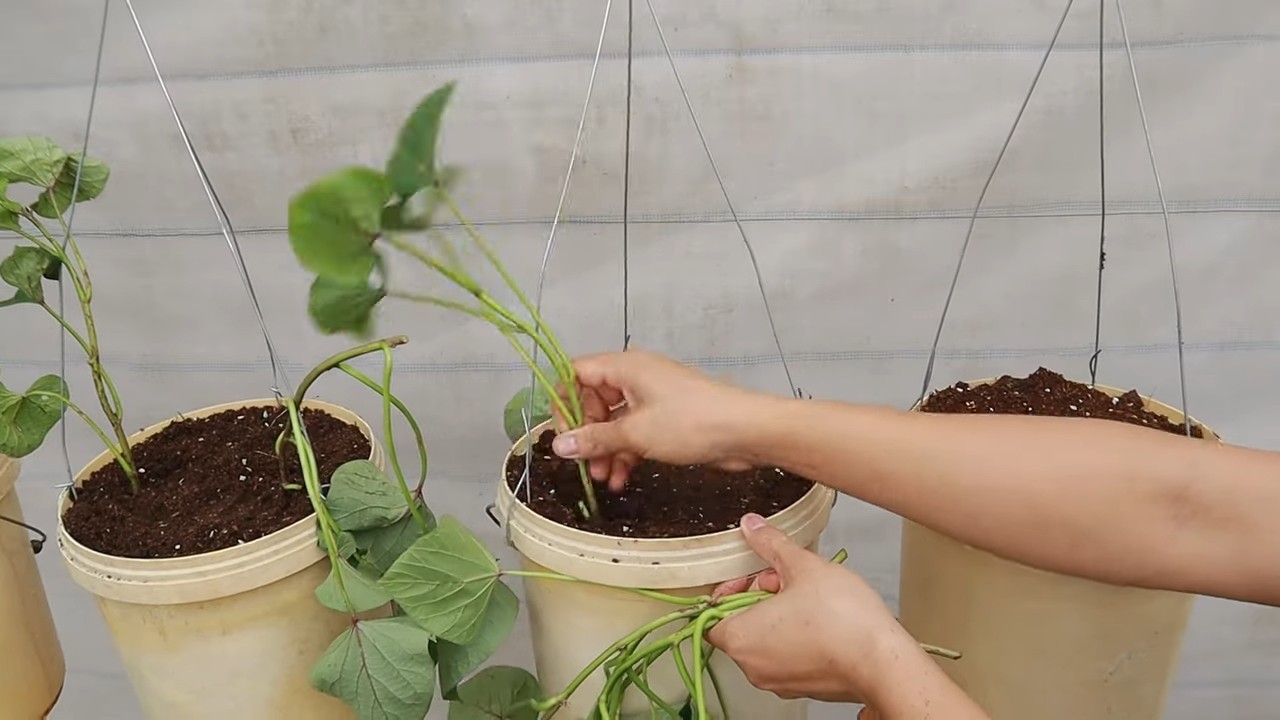
3. Pflanzgefäße mit Erde füllen: Füllt die vorbereiteten Pflanzgefäße mit hochwertiger Blumenerde. Lasst etwa 5-10 cm Platz bis zum Rand.
4. Slips einpflanzen: Macht kleine Löcher in die Erde und setzt die Slips hinein. Achtet darauf, dass die Wurzeln gut bedeckt sind.
5. Angießen: Gießt die frisch eingepflanzten Slips gründlich an.
Pflege der hängenden Süßkartoffel-Pflanzgefäße: Gießen, Düngen, Ernten
Die Pflege der hängenden Süßkartoffel-Pflanzgefäße ist relativ einfach, aber wichtig für eine reiche Ernte.
1. Gießen: Gießt die Pflanzen regelmäßig, besonders an heißen Tagen. Die Erde sollte immer leicht feucht sein, aber nicht nass.
2. Düngen: Düngt die Pflanzen alle paar Wochen mit einem organischen Dünger oder Wurmhumus. Das fördert das Wachstum und die Knollenbildung.
3. Sonnenlicht: Süßkartoffeln lieben die Sonne. Stellt die Pflanzgefäße an einen sonnigen Standort, an dem sie mindestens 6 Stunden Sonne pro Tag bekommen.
4. Ranken leiten: Die Süßkartoffelpflanzen bilden lange Ranken. Ihr könnt sie an einem Spalier oder einer Wand entlangleiten, um Platz zu sparen und das Wachstum zu fördern.
5. Schädlinge kontrollieren: Achtet auf Schädlinge wie Blattläuse oder Schnecken. Bei Bedarf könnt ihr biologische Schädlingsbekämpfungsmittel einsetzen.
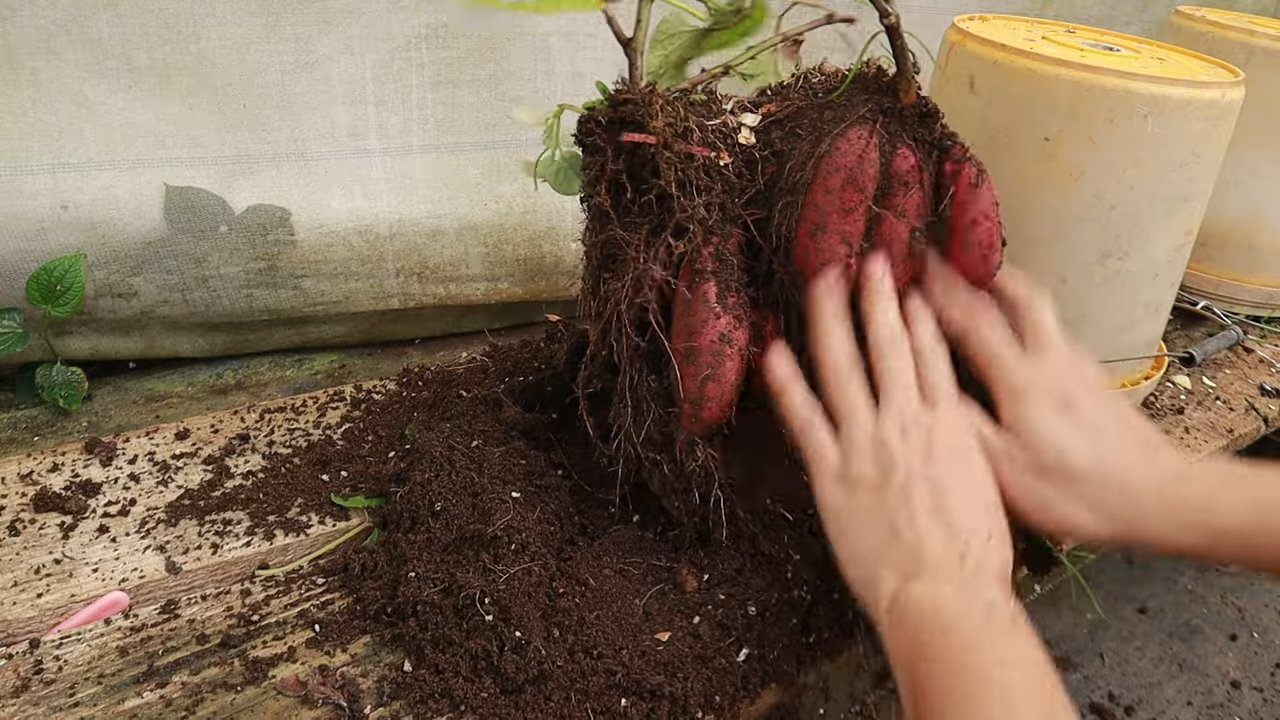
6. Ernten: Die Erntezeit ist im Herbst, etwa 90-120 Tage nach dem Pflanzen. Ihr könnt die Süßkartoffeln ernten, wenn die Blätter gelb werden und absterben. Grabt die Knollen vorsichtig aus und lasst sie einige Tage an einem trockenen Ort aushärten, bevor ihr sie lagert.
Zusätzliche Tipps und Tricks für eine erfolgreiche Ernte
* Sortenwahl: Wählt Süßkartoffelsorten, die für den Anbau in Pflanzgefäßen geeignet sind. Einige Sorten sind kompakter und produzieren mehr Knollen.
* Mulchen: Mulcht die Erde mit Stroh oder Holzhackschnitzeln, um die Feuchtigkeit zu halten und Unkraut zu unterdrücken.
* Regelmäßiges Drehen: Dreht die Pflanzgefäße regelmäßig, damit alle Seiten gleichmäßig Sonne bekommen.
* Überwinterung: In kälteren Regionen könnt ihr die Süßkartoffelpflanzen im Herbst ins Haus holen und überwintern lassen. Schneidet die Ranken zurück und stellt die Pflanzen an einen hellen und kühlen Ort.
Häufige Probleme und Lösungen
* Gelbe Blätter: Gelbe Blätter können ein Zeichen für Überwässerung, Nährstoffmangel oder Schädlingsbefall sein. Überprüft die Bodenfeuchtigkeit, düngt die Pflanzen und kontrolliert sie auf Schädlinge.
* Keine Knollenbildung: Keine Knollenbildung kann durch zu wenig Sonnenlicht, zu viel Stickstoffdünger oder zu kalte Temperaturen verursacht werden. Stellt die Pflanzen an einen sonnigeren Standort, verwendet einen Dünger mit weniger Stickstoff und schützt sie vor Frost
Conclusion
So, there you have it! Transforming a humble sweet potato into a stunning, cascading hanging plant is not only surprisingly simple, but also incredibly rewarding. Forget those expensive nursery trips for unique foliage – you can cultivate your own vibrant, living art right at home. This DIY hanging sweet potato project is a must-try for several compelling reasons.
First, it’s an incredibly budget-friendly way to add a touch of green to your indoor or outdoor spaces. A single sweet potato, some water, and a little patience are all you need to get started. Compared to purchasing a mature hanging plant, the savings are significant.
Second, it’s a fantastic conversation starter. Imagine the delight of your guests when they learn that your beautiful trailing vine originated from a common root vegetable! It’s a unique and unexpected display that’s sure to garner compliments.
Third, it’s an educational and engaging activity, especially for children. Watching the roots and vines emerge is a fascinating process that teaches valuable lessons about plant growth and propagation. It’s a hands-on way to connect with nature and foster a love for gardening.
Fourth, and perhaps most importantly, it’s incredibly versatile. While we’ve focused on a simple water propagation method, there are several variations you can explore. For example, once the sweet potato has sprouted roots and vines in water, you can carefully transplant it into a pot filled with well-draining potting mix. This will provide the plant with more nutrients and allow it to grow even larger and more vigorously.
Consider experimenting with different varieties of sweet potatoes. Some varieties have more vibrant foliage than others, ranging from deep purple to bright green. You can also try training the vines to grow in specific directions, creating a truly customized display. For a more decorative touch, use a beautiful glass jar or vase for the water propagation stage. The clear container will allow you to observe the root development and add an aesthetic element to the process.
Don’t be afraid to get creative and personalize your hanging sweet potato plant. Add small decorative stones or marbles to the bottom of the jar for added visual appeal. You can even incorporate small air plants or other epiphytes into the arrangement for a truly unique and eye-catching display.
We wholeheartedly encourage you to give this DIY trick a try. It’s a simple, affordable, and rewarding way to add a touch of nature to your home. And remember, the key to success is patience. It may take a few weeks for the sweet potato to sprout, but the results are well worth the wait.
Once you’ve created your own hanging sweet potato masterpiece, we’d love to see it! Share your photos and experiences with us on social media using [Your Hashtag Here]. Let’s inspire others to embrace the beauty and simplicity of this amazing DIY project. Happy planting!
Frequently Asked Questions (FAQ)
How long does it take for a sweet potato to sprout roots and vines?
The time it takes for a sweet potato to sprout roots and vines can vary depending on several factors, including the variety of sweet potato, the temperature, and the amount of light it receives. Generally, you can expect to see roots emerging within 1-2 weeks, and vines starting to sprout within 3-4 weeks. However, it could take longer, especially in cooler temperatures or with certain varieties. Be patient and ensure the sweet potato is kept in a warm, bright location. Change the water regularly to prevent bacterial growth and encourage healthy root development. If you don’t see any signs of growth after a month, try a different sweet potato.
What type of sweet potato works best for this project?
While any sweet potato can technically be used for this project, some varieties tend to sprout more readily and produce more attractive foliage. Sweet potatoes with smoother skin and fewer blemishes are generally a better choice. Varieties with vibrant purple or reddish skin often produce foliage with a similar hue, adding an extra touch of visual interest. Experimenting with different varieties is part of the fun! You can even try using organic sweet potatoes, as they are less likely to have been treated with growth inhibitors.
How often should I change the water?
It’s important to change the water regularly to prevent the growth of bacteria and algae, which can inhibit root development and potentially harm the sweet potato. We recommend changing the water every 2-3 days. When you change the water, gently rinse the sweet potato to remove any accumulated slime or debris. Use clean, room-temperature water.
What kind of light does the sweet potato need?
Sweet potatoes need bright, indirect light to thrive. Avoid placing the sweet potato in direct sunlight, as this can scorch the foliage. A location near a window that receives morning or afternoon sun is ideal. If you don’t have access to natural light, you can supplement with a grow light.
Can I plant the sweet potato in soil after it sprouts?
Yes, absolutely! Once the sweet potato has developed a good root system and several healthy vines, you can carefully transplant it into a pot filled with well-draining potting mix. Choose a pot that is large enough to accommodate the growing roots. When transplanting, be gentle to avoid damaging the roots. Water thoroughly after planting and keep the soil consistently moist, but not waterlogged.
How do I care for a sweet potato plant that is growing in soil?
Sweet potato plants growing in soil require regular watering and fertilization. Water the plant when the top inch of soil feels dry to the touch. Fertilize every 2-4 weeks with a balanced liquid fertilizer. Prune the vines as needed to maintain the desired shape and size. You can also train the vines to grow up a trellis or other support structure.
Are sweet potato leaves edible?
Yes, sweet potato leaves are edible and are a popular vegetable in many parts of the world. They are rich in vitamins and minerals. However, it’s important to note that only the leaves of sweet potatoes are edible; the leaves of regular potatoes are toxic. Before eating sweet potato leaves, wash them thoroughly and cook them to remove any bitterness. They can be used in salads, stir-fries, soups, and other dishes.
Can I grow a sweet potato from a store-bought sweet potato?
Yes, you can definitely grow a sweet potato plant from a store-bought sweet potato. However, some commercially grown sweet potatoes may be treated with growth inhibitors to prevent them from sprouting prematurely. If you’re having trouble getting a store-bought sweet potato to sprout, try using an organic sweet potato, as they are less likely to have been treated with these chemicals.
My sweet potato is rotting. What should I do?
If your sweet potato is starting to rot, it’s important to take action quickly to prevent the rot from spreading. Remove the affected areas with a sharp knife. Make sure to use a clean knife to avoid introducing bacteria. You can also try dipping the cut end of the sweet potato in cinnamon, which has antifungal properties. Change the water more frequently and ensure the sweet potato is not sitting in stagnant water. If the rot is extensive, it may be best to discard the sweet potato and start with a fresh one.
Can I grow a sweet potato indoors year-round?
Yes, you can grow a sweet potato indoors year-round, provided you provide it with adequate light, water, and nutrients. Sweet potatoes thrive in warm temperatures and bright, indirect light. If you live in a colder climate, you may need to supplement with a grow light during the winter months. Regular fertilization is also important to ensure healthy growth. With proper care, you can enjoy the beauty of a hanging sweet potato plant indoors throughout the year.


Leave a Comment