
Harvesting Cauliflower at Home can feel like a real victory! Imagine the satisfaction of serving up a delicious, homegrown cauliflower dish, knowing you nurtured it from tiny seedling to bountiful head. But let’s be honest, knowing when and how to harvest is the key to avoiding a mushy, bitter disappointment. Have you ever waited too long, only to find your prize cauliflower has bolted and gone to seed? I know I have!
Cauliflower, a descendant of wild cabbage, has been cultivated for centuries, with evidence suggesting its presence in the Mediterranean region as far back as the 6th century BC. Over time, dedicated gardeners have refined the process, developing techniques to maximize yield and flavor. Now, you can benefit from their wisdom!
This DIY guide is your secret weapon to perfectly timed harvesting cauliflower at home. We’ll walk you through the telltale signs of ripeness, the best tools to use, and even some clever tricks to extend your harvest season. Forget store-bought cauliflower – with these simple hacks, you’ll be enjoying fresh, flavorful cauliflower straight from your garden in no time. Let’s get started!
Harvesting Cauliflower Like a Pro: A DIY Guide
Okay, so you’ve nurtured your cauliflower plant from a tiny seedling to a leafy behemoth, and now you’re staring at that beautiful, creamy white head, wondering, “Is it ready?” Don’t worry, I’ve been there! Harvesting cauliflower at the right time is crucial for getting that perfect texture and flavor. Pick it too early, and it’ll be small and underdeveloped. Wait too long, and it can become loose, grainy, and even bitter. This guide will walk you through everything you need to know to harvest your cauliflower at its peak.
What You’ll Need
Before we dive in, let’s gather our supplies. This is a pretty straightforward process, so you won’t need much:
* A sharp knife or garden shears: A clean, sharp blade is essential for a clean cut.
* Gloves (optional): Cauliflower leaves can be a bit prickly, so gloves can protect your hands.
* A basket or container: To carry your freshly harvested cauliflower.
* A helper (optional, but recommended for larger heads): An extra pair of hands can be useful for supporting the head as you cut.
Determining Readiness: Is Your Cauliflower Ripe?
This is the million-dollar question! Here’s what to look for to determine if your cauliflower is ready to harvest:
* Head Size: This is the most obvious indicator. Most cauliflower varieties are ready when the head reaches 6-8 inches in diameter. However, check your seed packet or plant tag for the specific size expected for your variety. Some are bred to be larger or smaller.
* Head Compactness: The head should be firm and tightly packed. If the curds (the little florets that make up the head) are starting to separate or the head feels loose, it’s likely overripe.
* Color: The head should be a uniform, creamy white color. Some varieties may have a slight tinge of green or purple, which is perfectly normal. However, avoid harvesting if the head is yellowing or has brown spots.
* Leaf Condition: The leaves surrounding the head should be healthy and green. If the leaves are wilting or turning yellow, it could indicate that the cauliflower is past its prime.
* Time Since Planting: As a general guideline, cauliflower typically takes 50-100 days from transplanting to harvest, depending on the variety and growing conditions. Keep track of when you planted your cauliflower to get a rough estimate of when it will be ready.
Step-by-Step Harvesting Instructions
Alright, let’s get down to business! Here’s how to harvest your cauliflower:
1. Choose the Right Time of Day: The best time to harvest cauliflower is in the morning, after the dew has dried. This is when the plant is at its freshest and the head is less likely to be damaged.
2. Prepare Your Tools: Make sure your knife or garden shears are clean and sharp. This will ensure a clean cut and prevent the spread of disease.
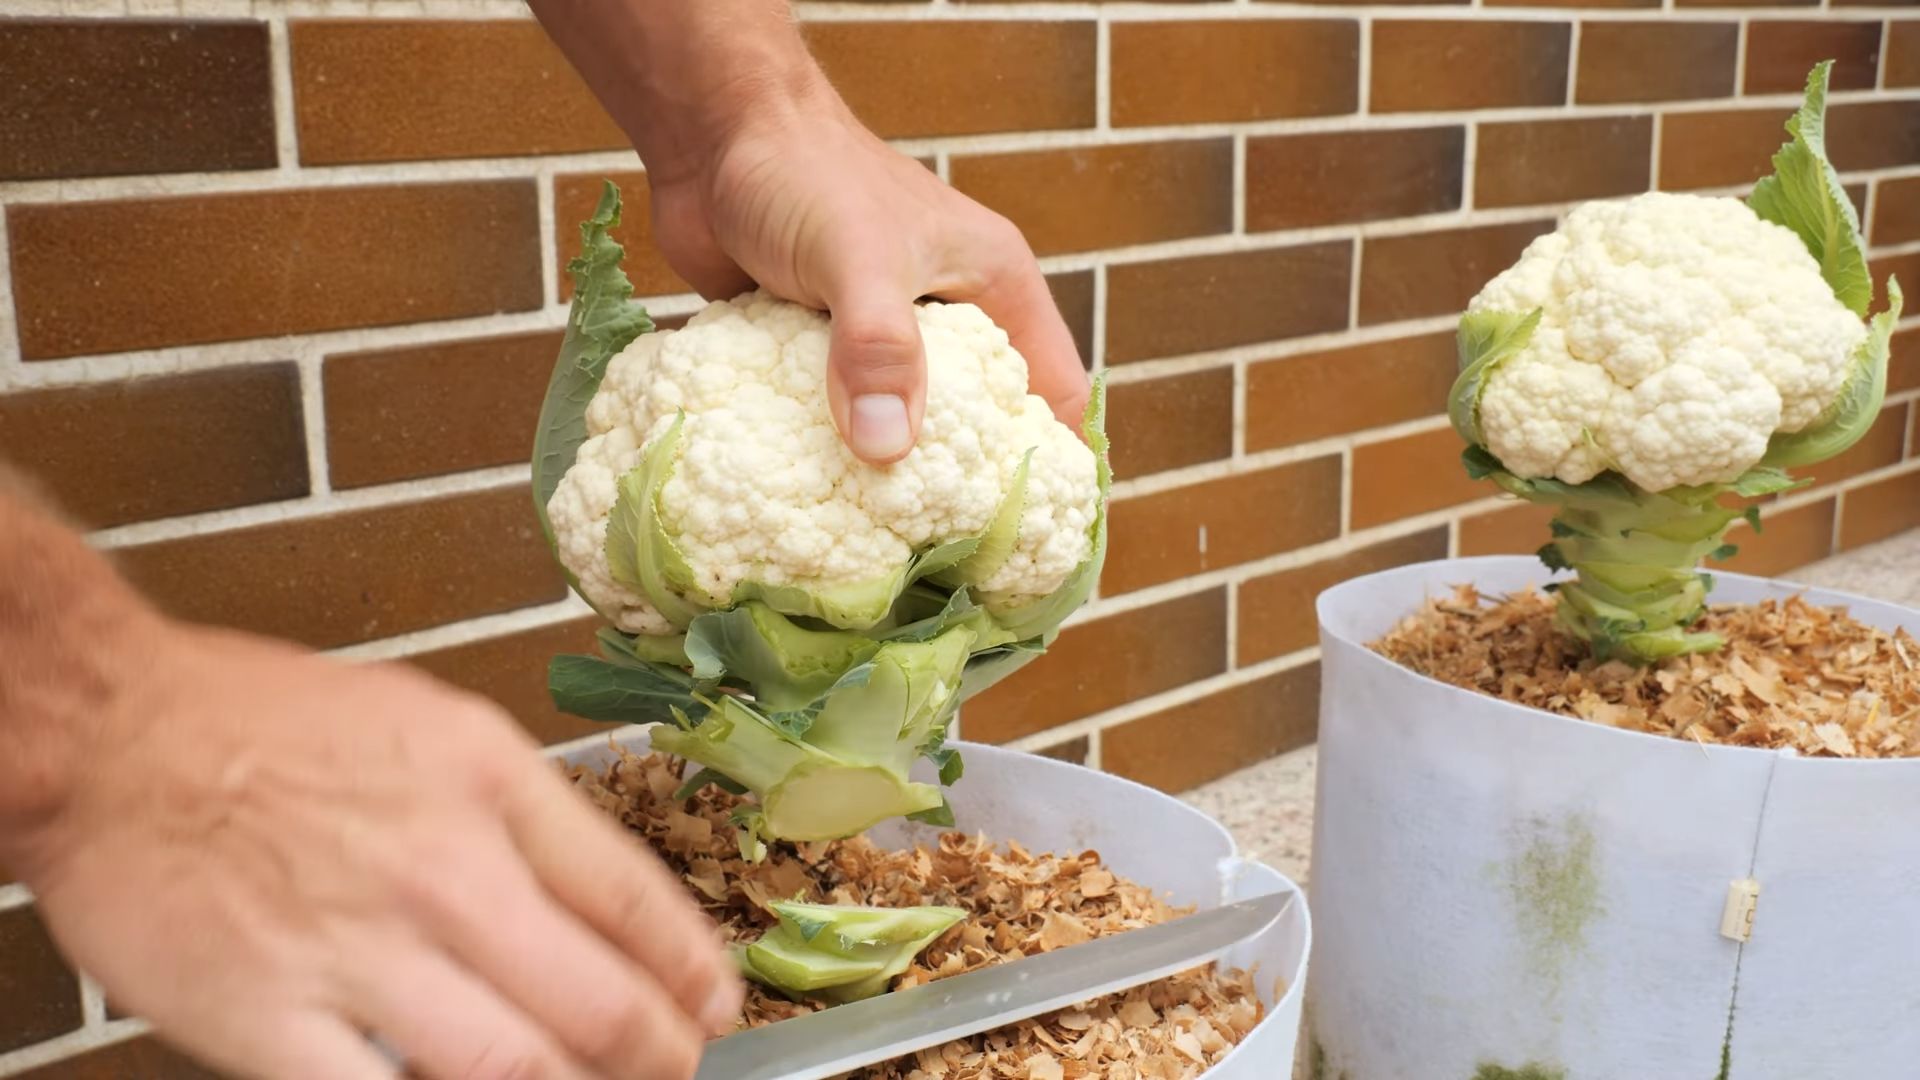
3. Locate the Cutting Point: Identify the point on the stem where you’ll make your cut. You want to leave a few inches of stem attached to the head. This will help to protect the head and prevent it from drying out.
4. Make the Cut: Using your sharp knife or garden shears, carefully cut through the stem at the point you identified. Make a clean, smooth cut to avoid damaging the plant. If you have a helper, have them support the head as you cut to prevent it from falling and bruising.
5. Remove Excess Leaves: After you’ve harvested the head, you can remove some of the larger, outer leaves. This will make the cauliflower easier to handle and store. However, leave a few of the smaller, inner leaves attached to protect the head.
6. Inspect the Head: Before you bring your cauliflower inside, take a close look at the head for any signs of pests or diseases. If you find anything, remove it immediately.
7. Store Your Cauliflower: Store your freshly harvested cauliflower in the refrigerator. It will keep for up to a week if stored properly. To store it, wrap the head loosely in plastic wrap or place it in a perforated plastic bag.
Troubleshooting Common Issues
Sometimes, things don’t go exactly as planned. Here are a few common issues you might encounter when harvesting cauliflower and how to deal with them:
* Cauliflower Head is Too Small: If your cauliflower head is smaller than expected, it could be due to a number of factors, such as poor soil, insufficient watering, or pest problems. Make sure your cauliflower is getting enough nutrients and water, and protect it from pests.
* Cauliflower Head is Loose or Grainy: If your cauliflower head is loose or grainy, it’s likely overripe. This can happen if you wait too long to harvest it. Check your cauliflower regularly and harvest it as soon as it’s ready.
* Cauliflower Head is Yellowing or Browning: If your cauliflower head is yellowing or browning, it could be due to sunscald or disease. To prevent sunscald, blanch the head by tying the outer leaves together over the head when it starts to form. If your cauliflower has a disease, remove the affected leaves and treat the plant with an appropriate fungicide.
* Pests on Cauliflower Head: Aphids, cabbage worms, and other pests can sometimes infest cauliflower heads. Inspect your cauliflower regularly and remove any pests you find. You can also use insecticidal soap or other organic pest control methods to protect your plants.
Extending the Harvest: Succession Planting
Want to enjoy fresh cauliflower throughout the growing season? Try succession planting! This involves planting new cauliflower seedlings every few weeks. This way, you’ll have a continuous supply of cauliflower to harvest.
Here’s how to do it:
1. Start Seeds Indoors: Start your cauliflower seeds indoors about 6-8 weeks before the last expected frost.
2. Transplant Seedlings: Transplant the seedlings outdoors after the last frost, spacing them about 18-24 inches apart.
3. Plant New Seedlings Every Few Weeks: Plant a new batch of seedlings every 2-3 weeks to ensure a continuous harvest.
4. Choose Different Varieties: Consider planting different varieties of cauliflower with varying maturity dates. This will further extend your harvest season.
Enjoying Your Harvest: Cauliflower Recipes
Now that you’ve harvested your beautiful cauliflower, it’s time to enjoy it! Cauliflower is a versatile vegetable that can be used in a variety of dishes. Here are a few of my favorite cauliflower recipes:
* Roasted Cauliflower: Toss cauliflower florets with olive oil, salt, pepper, and your favorite spices, then roast in the oven until tender and slightly browned.
* Cauliflower Mash: Steam or boil cauliflower until tender, then mash with butter, milk, and seasonings for a healthy alternative to mashed potatoes.
* Cauliflower Rice: Pulse raw cauliflower florets in a food processor until they resemble rice, then sauté or steam until tender.
* Cauliflower Pizza Crust: Combine riced cauliflower with cheese, egg, and seasonings, then bake into a pizza crust.
* Cauliflower Soup: Blend cooked cauliflower with broth, cream, and seasonings for a creamy and delicious soup.
Blanching Cauliflower: Keeping it White
Sometimes, even with the best care, your cauliflower head might start to develop a slight yellow or green tinge. This is due to sun exposure. To prevent this, you can blanch the cauliflower. Blanching involves covering the developing head with its own leaves to protect it from the sun.
Here’s how to blanch cauliflower:
1. Wait for Head Formation: Once the cauliflower head starts to form, usually when it’s about 2-3 inches in diameter, it’s time to blanch.
2. Gather the Leaves: Gently gather the large outer leaves around the head.
3. Secure the Leaves: Use twine, rubber bands, or even clothespins to tie the leaves together over the head. Make sure the leaves are loose enough to allow for air circulation.
4. Check Regularly: Check the head regularly to make sure it’s still white. You may need to adjust the leaves as the head grows.
5. Harvest When Ready: Harvest the cauliflower when the head is the desired size and firmness.
Dealing with Pests and Diseases
Even the most diligent gardeners can face pest and disease problems. Here are some common cauliflower issues and how to address them:
* Cabbage Worms: These green caterpillars can devour cauliflower leaves. Handpick them off the plants or use Bacillus thuringiensis (Bt), a natural insecticide.
* Aphids: These tiny insects suck sap from the leaves, weakening the plant. Spray with insecticidal soap or neem oil.
* Clubroot: This fungal disease causes swollen roots and stunted growth. Prevent it by ensuring good soil drainage and rotating crops. If you have clubroot, amend

Conclusion
So, there you have it! Harvesting cauliflower at home isn’t just a chore; it’s a rewarding experience that connects you directly to the food you eat. From nurturing the plant from seedling to maturity, to finally reaping the benefits of your labor with a crisp, fresh head of cauliflower, the entire process is incredibly satisfying.
Why is this DIY trick a must-try? Because it guarantees freshness that you simply can’t replicate with store-bought cauliflower. The moment you cut that head from the plant, you know exactly where it came from and how it was grown. No pesticides, no long transport times, just pure, unadulterated cauliflower goodness. Plus, you’ll be amazed at the difference in taste. Home-grown cauliflower tends to be sweeter and more flavorful than what you find in the supermarket.
But the benefits extend beyond just taste and freshness. Harvesting your own cauliflower reduces your carbon footprint by eliminating the need for transportation and packaging. It also encourages you to eat seasonally and appreciate the natural cycles of food production. And let’s not forget the sheer joy of gardening! It’s a fantastic way to relieve stress, get some exercise, and connect with nature.
Ready to take your cauliflower game to the next level? Consider these variations and suggestions:
* Succession Planting: Plant cauliflower seeds or seedlings every few weeks to ensure a continuous harvest throughout the growing season. This way, you’ll always have fresh cauliflower on hand.
* Colored Cauliflower: Experiment with different varieties of cauliflower, such as purple, orange, or green. These colorful options add visual appeal to your dishes and offer slightly different flavor profiles.
* Cauliflower Rice: Once you’ve harvested your cauliflower, try making your own cauliflower rice. It’s a healthy and delicious alternative to traditional rice and can be used in a variety of recipes.
* Roasted Cauliflower: Roasting cauliflower brings out its natural sweetness and creates a wonderfully caramelized flavor. Toss it with olive oil, herbs, and spices for a simple yet satisfying side dish.
* Cauliflower Cheese: A classic comfort food dish that’s perfect for a chilly evening. Use your freshly harvested cauliflower to create a creamy and cheesy masterpiece.
Don’t be intimidated if you’re a beginner gardener. Harvesting cauliflower at home is easier than you might think. Just follow the tips and guidelines outlined in this article, and you’ll be well on your way to enjoying a bountiful harvest.
We encourage you to try this DIY trick and experience the satisfaction of growing and harvesting your own cauliflower. And most importantly, share your experience with us! We’d love to hear about your successes, challenges, and favorite ways to use your home-grown cauliflower. Post photos of your harvest on social media using #HomeGrownCauliflower and tag us so we can see your amazing results. Let’s build a community of cauliflower enthusiasts and inspire others to embrace the joys of gardening. Happy harvesting!
Frequently Asked Questions (FAQ)
Q: How do I know when my cauliflower is ready to harvest?
A: The most reliable indicator is the size and compactness of the head. A mature cauliflower head should be firm, dense, and typically 6-8 inches in diameter, depending on the variety. The curds (the individual florets that make up the head) should be tightly packed together. If the curds start to separate or the head begins to loosen, it’s time to harvest. Also, check the color. A healthy cauliflower head should be uniformly white (or the color specified for the variety you’re growing). Discoloration or yellowing can indicate that the cauliflower is past its prime.
Q: What tools do I need to harvest cauliflower?
A: You’ll need a sharp knife or pruning shears. A clean, sharp blade is essential for making a clean cut and preventing damage to the plant. You might also want to wear gloves to protect your hands from dirt and potential irritants. A basket or container to collect your harvested cauliflower is also helpful.
Q: How do I properly cut the cauliflower head from the plant?
A: Using your sharp knife or pruning shears, cut the stem of the cauliflower head about 2-3 inches below the head. This will leave a few leaves attached to the head, which can help protect it during storage. Make sure your cut is clean and straight to minimize stress on the remaining plant.
Q: Can I harvest cauliflower in the rain?
A: While it’s generally best to harvest cauliflower on a dry day, it’s not always possible. If you must harvest in the rain, be extra careful not to damage the head or the surrounding leaves. Gently pat the cauliflower dry after harvesting to prevent rot.
Q: How long can I store freshly harvested cauliflower?
A: Freshly harvested cauliflower can be stored in the refrigerator for up to a week. To maximize its shelf life, wrap the head loosely in a plastic bag or store it in a perforated bag. Avoid washing the cauliflower until you’re ready to use it, as moisture can promote spoilage.
Q: What if my cauliflower head is small or doesn’t form properly?
A: Several factors can contribute to small or poorly formed cauliflower heads, including insufficient sunlight, inadequate watering, nutrient deficiencies, and pest infestations. Ensure your cauliflower plants receive at least 6 hours of direct sunlight per day, water them regularly, and fertilize them with a balanced fertilizer. Protect your plants from pests and diseases by using appropriate control methods.
Q: Can I eat the leaves of the cauliflower plant?
A: Yes, the leaves of the cauliflower plant are edible! They have a slightly stronger flavor than the head but can be used in a variety of dishes. You can sauté them, steam them, or add them to soups and stews. Just be sure to wash them thoroughly before using them.
Q: What can I do with the remaining cauliflower plant after harvesting the head?
A: Don’t discard the entire plant after harvesting the head! You can leave the roots in the ground, and they may produce small side shoots or florets that you can harvest later. Alternatively, you can compost the plant to enrich your soil.
Q: My cauliflower head has brown spots. Is it still safe to eat?
A: Small brown spots on the cauliflower head are usually a sign of oxidation or minor damage. You can simply cut away the affected areas and use the rest of the head. However, if the brown spots are extensive or accompanied by a foul odor, it’s best to discard the cauliflower.
Q: What are some common pests that affect cauliflower, and how can I control them?
A: Common cauliflower pests include cabbage worms, aphids, and flea beetles. You can control these pests by using row covers to protect your plants, hand-picking pests off the plants, or using organic insecticides such as Bacillus thuringiensis (Bt) for cabbage worms or insecticidal soap for aphids and flea beetles. Regularly inspect your plants for signs of infestation and take action promptly to prevent widespread damage.
Leave a Comment