
Harvesting Purple Bush Beans can feel like uncovering hidden jewels in your garden! I remember the first time I grew these vibrant veggies; it was like a treasure hunt every few days. For centuries, beans have been a staple crop in cultures worldwide, providing essential nutrients and playing a vital role in sustainable agriculture. While the common green bean is well-known, purple bush beans offer a delightful twist, adding color and excitement to your plate.
But let’s be honest, knowing when and how to properly harvest them can be a little tricky. Pick them too early, and they’re underdeveloped; wait too long, and they become tough and stringy. That’s where this DIY guide comes in! I’m going to share my tried-and-true tricks for harvesting purple bush beans at their peak of flavor and tenderness.
Why is this important? Because nothing beats the taste of freshly picked, homegrown produce. Plus, knowing the right techniques will maximize your yield and ensure you enjoy a bountiful harvest all season long. So, grab your gardening gloves, and let’s dive into the secrets of successfully harvesting these beautiful and delicious beans!
Harvesting Purple Bush Beans: A Beginner’s Guide
Okay, so you’ve planted your purple bush beans, nurtured them, and now they’re bursting with vibrant color! Congratulations! But knowing *when* and *how* to harvest them is crucial to enjoying their peak flavor and ensuring a continuous harvest. Don’t worry, it’s easier than you think! I’m going to walk you through everything you need to know.
Understanding Purple Bush Beans
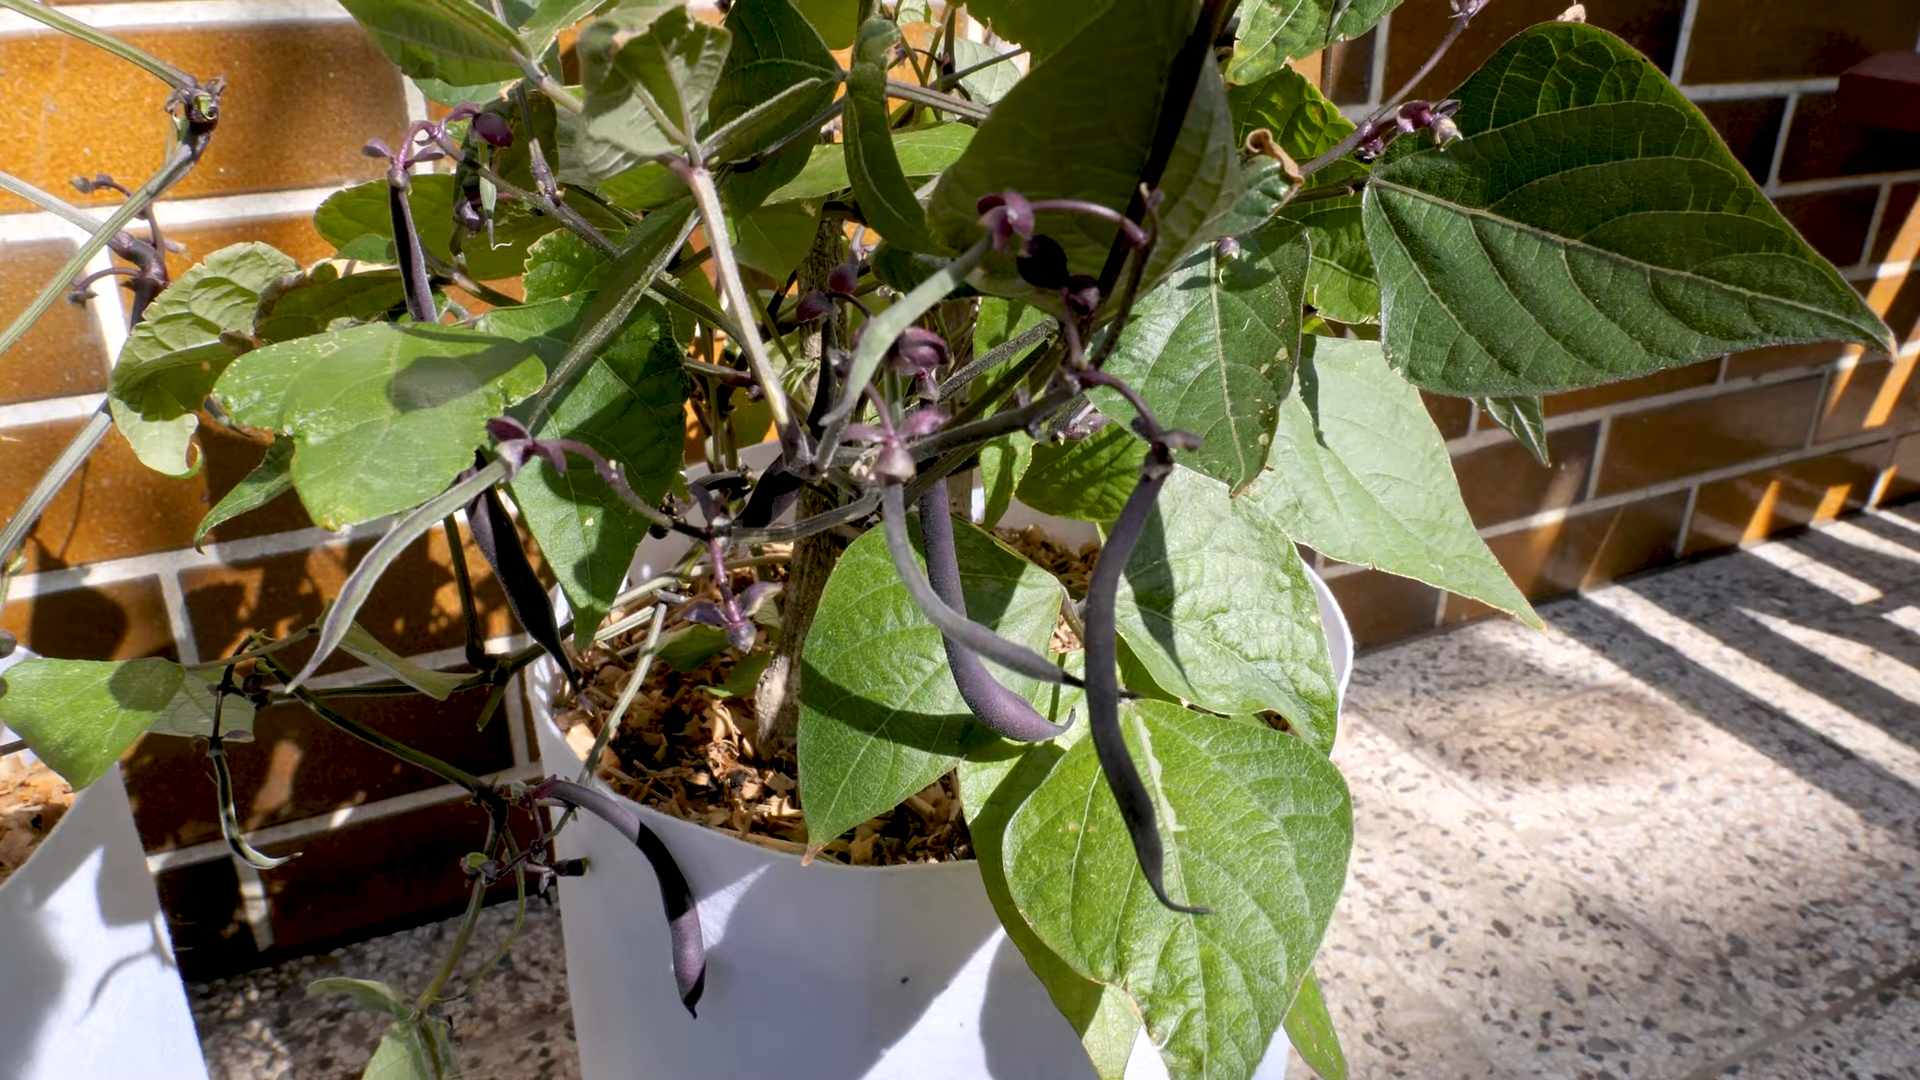
Before we dive into the harvesting process, let’s quickly touch on what makes purple bush beans special. These beans are not only visually stunning in your garden, but they also offer a unique flavor profile – often described as slightly sweeter than green beans. The purple color comes from anthocyanins, which are powerful antioxidants, making them a healthy addition to your diet.
The “bush” part means they grow in a compact, self-supporting form, unlike pole beans that need a trellis. This makes them perfect for smaller gardens or even container gardening.
When to Harvest: The Key to Flavor
This is the million-dollar question! Harvesting at the right time is essential for optimal taste and texture. Here’s what to look for:
* **Timing:** Generally, purple bush beans are ready for harvest about 50-60 days after planting. However, this can vary depending on the variety, weather conditions, and your specific growing environment.
* **Size:** Aim for beans that are about 4-6 inches long. This is usually when they’re at their most tender.
* **Appearance:** The pods should be plump and firm, but not bulging with beans. You want them to be well-formed but not overly mature.
* **Feel:** Gently squeeze a bean pod. It should feel firm but yield slightly to pressure. If it feels hard and the beans inside are very prominent, it’s likely past its prime.
* **Color:** The purple color should be vibrant and consistent. Fading or discoloration can indicate that the bean is overripe.
* **Taste Test (Optional):** If you’re unsure, pick one bean and snap it in half. If it snaps easily and the inside is tender, it’s ready to go! If it’s tough or stringy, wait a few more days.
Remember: It’s better to harvest a little early than too late. Overripe beans can become tough and less flavorful.
Tools You’ll Need
Luckily, you don’t need a ton of fancy equipment for harvesting. Here’s a basic list:
* **Gardening Gloves:** Protect your hands from dirt and potential irritants.
* **Harvesting Basket or Bucket:** To collect your bounty.
* **Sharp Scissors or Pruning Shears (Optional):** While you can snap the beans off by hand, using scissors or shears can be gentler on the plant and prevent damage.
Step-by-Step Harvesting Guide
Alright, let’s get down to business! Here’s a detailed guide to harvesting your purple bush beans:
1. **Prepare Your Tools:** Gather your gloves, basket, and scissors (if using). Make sure your scissors or shears are clean to prevent the spread of disease.
2. **Inspect Your Plants:** Carefully examine your bean plants, looking for pods that meet the criteria mentioned above (size, appearance, feel, color).
3. **Harvesting by Hand:**
* Gently hold the bean pod with one hand.
* With your other hand, carefully snap the bean pod off the plant at the point where it connects to the stem.
* Avoid pulling or yanking, as this can damage the plant and reduce future yields.
4. **Harvesting with Scissors or Shears:**
* Hold the bean pod with one hand.
* Using your scissors or shears, snip the bean pod off the plant at the point where it connects to the stem.
* Make a clean cut to minimize damage to the plant.
5. **Place Beans in Basket:** As you harvest, place the beans gently into your basket or bucket. Avoid piling them too high, as this can bruise them.
6. **Repeat the Process:** Continue inspecting and harvesting beans from all of your plants.
7. **Regular Harvesting is Key:** Purple bush beans are prolific producers! To encourage continuous production, harvest your beans every 2-3 days. This will prevent the plants from putting all their energy into maturing existing beans and encourage them to produce more flowers and pods.
8. **Check Underneath:** Don’t forget to look underneath the leaves! Sometimes, beans can be hidden from view.
9. **Handle with Care:** Be gentle when handling the beans to avoid bruising or damaging them.
Post-Harvest Care: Extending the Harvest
Once you’ve harvested your beans, the
Okay, so you’ve planted your purple bush beans, nurtured them, and now they’re bursting with vibrant color! Congratulations! But knowing *when* and *how* to harvest them is crucial to enjoying their peak flavor and ensuring a continuous harvest. Don’t worry, it’s easier than you think! I’m going to walk you through everything you need to know.
Understanding Purple Bush Beans
Before we dive into the harvesting process, let’s quickly touch on what makes purple bush beans special. These beans are not only visually stunning in your garden, but they also offer a unique flavor profile – often described as slightly sweeter than green beans. The purple color comes from anthocyanins, which are powerful antioxidants, making them a healthy addition to your diet.
The “bush” part means they grow in a compact, self-supporting form, unlike pole beans that need a trellis. This makes them perfect for smaller gardens or even container gardening.
When to Harvest: The Key to Flavor
This is the million-dollar question! Harvesting at the right time is essential for optimal taste and texture. Here’s what to look for:
* **Timing:** Generally, purple bush beans are ready for harvest about 50-60 days after planting. However, this can vary depending on the variety, weather conditions, and your specific growing environment.
* **Size:** Aim for beans that are about 4-6 inches long. This is usually when they’re at their most tender.
* **Appearance:** The pods should be plump and firm, but not bulging with beans. You want them to be well-formed but not overly mature.
* **Feel:** Gently squeeze a bean pod. It should feel firm but yield slightly to pressure. If it feels hard and the beans inside are very prominent, it’s likely past its prime.
* **Color:** The purple color should be vibrant and consistent. Fading or discoloration can indicate that the bean is overripe.
* **Taste Test (Optional):** If you’re unsure, pick one bean and snap it in half. If it snaps easily and the inside is tender, it’s ready to go! If it’s tough or stringy, wait a few more days.
Remember: It’s better to harvest a little early than too late. Overripe beans can become tough and less flavorful.
Tools You’ll Need
Luckily, you don’t need a ton of fancy equipment for harvesting. Here’s a basic list:
* **Gardening Gloves:** Protect your hands from dirt and potential irritants.
* **Harvesting Basket or Bucket:** To collect your bounty.
* **Sharp Scissors or Pruning Shears (Optional):** While you can snap the beans off by hand, using scissors or shears can be gentler on the plant and prevent damage.
Step-by-Step Harvesting Guide
Alright, let’s get down to business! Here’s a detailed guide to harvesting your purple bush beans:
1. **Prepare Your Tools:** Gather your gloves, basket, and scissors (if using). Make sure your scissors or shears are clean to prevent the spread of disease.
2. **Inspect Your Plants:** Carefully examine your bean plants, looking for pods that meet the criteria mentioned above (size, appearance, feel, color).
3. **Harvesting by Hand:**
* Gently hold the bean pod with one hand.
* With your other hand, carefully snap the bean pod off the plant at the point where it connects to the stem.
* Avoid pulling or yanking, as this can damage the plant and reduce future yields.
4. **Harvesting with Scissors or Shears:**
* Hold the bean pod with one hand.
* Using your scissors or shears, snip the bean pod off the plant at the point where it connects to the stem.
* Make a clean cut to minimize damage to the plant.
5. **Place Beans in Basket:** As you harvest, place the beans gently into your basket or bucket. Avoid piling them too high, as this can bruise them.
6. **Repeat the Process:** Continue inspecting and harvesting beans from all of your plants.
7. **Regular Harvesting is Key:** Purple bush beans are prolific producers! To encourage continuous production, harvest your beans every 2-3 days. This will prevent the plants from putting all their energy into maturing existing beans and encourage them to produce more flowers and pods.
8. **Check Underneath:** Don’t forget to look underneath the leaves! Sometimes, beans can be hidden from view.
9. **Handle with Care:** Be gentle when handling the beans to avoid bruising or damaging them.
Post-Harvest Care: Extending the Harvest
Once you’ve harvested your beans, there are a few things you can do to keep your plants healthy and productive:
* **Water Regularly:** Ensure your plants receive adequate water, especially during hot weather.
* **Fertilize (Optional):** If your plants are looking a little tired, you can give them a boost with a balanced fertilizer. Follow the instructions on the fertilizer package.
* **Remove Old or Damaged Pods:** Remove any old, damaged, or diseased pods to prevent the spread of problems.
* **Watch for Pests and Diseases:** Keep an eye out for any signs of pests or diseases and take action promptly.
Storing Your Harvest
Now that you have a basket full of beautiful purple bush beans, you’ll want to store them properly to maintain their freshness. Here are a few options:
* **Refrigeration:** Store unwashed beans in a perforated plastic bag in the refrigerator for up to 5-7 days.
* **Freezing:** Blanch the beans in boiling water for 2-3 minutes, then plunge them into ice water to stop the cooking process. Drain well and freeze in freezer bags or containers. Frozen beans can last for up to 8-12 months.
* **Canning:** Canning is a great way to preserve your beans for long-term storage. Follow a tested and approved canning recipe for best results.
* **Pickling:** Pickled beans are a delicious and tangy treat. There are many different pickling recipes available online.
Troubleshooting Common Issues
Sometimes, things don’t go exactly as planned. Here are a few common issues you might encounter and how to address them:
* **Beans are tough or stringy:** This usually indicates that the beans were harvested too late. Make sure to harvest them when they’re young and tender.
* **Plants are not producing many beans:** This could be due to a variety of factors, such as poor soil, lack of water, or insufficient sunlight. Make sure your plants are getting the nutrients and care they need.
* **Pests are attacking the plants:** Common bean pests include aphids, bean beetles, and spider mites. Use organic pest control methods to protect your plants.
* **Diseases are affecting the plants:** Common bean diseases include powdery mildew and bean rust. Use disease-resistant varieties and practice good garden hygiene to prevent problems.
Enjoying Your Purple Bush Beans
The best part of harvesting your own beans is, of course, eating them! Purple bush beans are incredibly versatile and can be used in a variety of dishes. Here are a few ideas:
* **Steamed or Boiled:** Simply steam or boil the beans until tender-crisp and serve with a little butter and salt.
* **Sautéed:** Sauté the beans with garlic, onions, and other vegetables for a quick and easy side dish.
* **Roasted:** Roast the beans in the oven with olive oil and your favorite seasonings.
* **Salads:** Add the beans to salads for a pop of color and flavor.
* **Soups and Stews:** Use the beans in soups and stews for added nutrition and texture.
* **Pickled:** Enjoy them as a tangy snack or side dish.
Fun Fact: When cooked, some varieties of purple bush beans may turn green! Don’t worry, they’re still delicious.
Conclusion
Harvesting purple bush beans is a rewarding experience that allows you to enjoy fresh, flavorful, and nutritious produce from your own garden. By following these tips and guidelines, you can ensure a bountiful harvest and enjoy the fruits (or rather, vegetables!) of your labor. Happy gardening!
Conclusion
So, there you have it! Mastering the art of harvesting purple bush beans doesn’t require a green thumb of mythical proportions. It’s a simple, rewarding process that brings the vibrant flavors of your garden directly to your table. We’ve walked through the key steps, from identifying the perfect moment of ripeness to employing the gentle touch needed to avoid damaging your precious plants.
Why is this DIY trick a must-try? Because it’s about more than just gathering vegetables. It’s about connecting with the food you eat, understanding its journey from seed to plate, and savoring the unparalleled freshness that only homegrown produce can offer. Store-bought beans simply can’t compete with the crisp, sweet flavor of freshly harvested purple bush beans. Plus, you’ll be minimizing your environmental impact by reducing your reliance on commercially grown and transported produce.
But the benefits extend beyond taste and sustainability. Harvesting your own beans is a mindful activity, a chance to slow down, appreciate the beauty of your garden, and engage in a truly satisfying task. It’s a stress reliever, a connection to nature, and a source of immense pride.
Now, let’s talk variations and suggestions. While we’ve focused on the general principles of harvesting purple bush beans, remember that every garden is unique. The specific timing of your harvest will depend on your local climate, the variety of beans you’re growing, and the overall health of your plants. Don’t be afraid to experiment and adjust your approach based on your own observations.
Consider succession planting to extend your harvest season. By planting new seeds every few weeks, you can enjoy a continuous supply of fresh beans throughout the summer and into the fall. You can also explore different methods of preserving your harvest, such as freezing, canning, or pickling, to enjoy the taste of summer even during the colder months.
Another fun variation is to let some of your beans mature fully on the vine and harvest them as dried beans. These can be stored for later use in soups, stews, and other hearty dishes. Just be sure to allow the pods to dry completely before shelling the beans and storing them in an airtight container.
Don’t be afraid to get creative with your harvest! Try adding your freshly harvested purple bush beans to salads, stir-fries, or pasta dishes. They’re also delicious simply steamed or sautéed with a little butter and garlic. The possibilities are endless!
We wholeheartedly encourage you to try this DIY trick and experience the joy of harvesting your own purple bush beans. It’s a simple, rewarding, and delicious way to connect with nature and enjoy the fruits (or rather, vegetables) of your labor.
And most importantly, we want to hear about your experience! Share your tips, tricks, and photos with us in the comments below. Let us know what challenges you faced, what successes you celebrated, and what delicious dishes you created with your homegrown beans. Your feedback will help other gardeners learn and grow, and together, we can create a community of passionate and successful bean harvesters. So, get out there, get your hands dirty, and start harvesting! Happy gardening!
Frequently Asked Questions (FAQ)
Q: How do I know when my purple bush beans are ready to harvest?
A: This is the most crucial question! The ideal time to harvest purple bush beans is when the pods are firm, plump, and have reached their mature color – a deep, vibrant purple. They should be about the thickness of a pencil and snap easily when bent. Avoid harvesting when the pods are overly large, bulging, or starting to turn yellow or brown, as this indicates they are becoming tough and less flavorful. Regular checking is key. Start checking a few days after you think they might be ready.
Q: What’s the best way to harvest purple bush beans without damaging the plant?
A: Gently hold the stem just above the bean pod with one hand and use your other hand to carefully snap or twist the pod off the plant. Avoid pulling or yanking, as this can damage the delicate branches and reduce future yields. Using small pruning shears or scissors can also be helpful, especially if the pods are tightly attached. Be mindful of the surrounding foliage and avoid disturbing the roots.
Q: How often should I harvest my purple bush beans?
A: Bush beans are prolific producers, so you’ll need to harvest them regularly – typically every 2-3 days – once they start producing. This encourages the plant to continue producing new pods. Leaving mature beans on the plant signals to the plant that it has completed its reproductive cycle, slowing down or stopping further production. Consistent harvesting is the key to a bountiful harvest.
Q: What if my purple bush beans are turning green?
A: Some varieties of purple bush beans will naturally turn green when cooked. This is perfectly normal and doesn’t affect the flavor. However, if your beans are turning green *before* you harvest them, it could be a sign that they are overripe or that the plant is stressed. Ensure the plant is getting adequate water and nutrients, and harvest the beans more frequently.
Q: Can I eat the entire purple bush bean pod?
A: Yes, you can eat the entire pod of most purple bush bean varieties. The pods are tender and flavorful when harvested at the right stage of maturity. However, if the pods are tough or stringy, you may want to remove the strings along the sides before cooking.
Q: How should I store my harvested purple bush beans?
A: For best results, store your harvested purple bush beans in the refrigerator in a plastic bag or container. They will typically last for 5-7 days. Avoid washing them before storing, as this can promote spoilage. Wash them just before you’re ready to use them.
Q: My purple bush beans are covered in pests! What should I do?
A: Pests can be a common problem in the garden. Inspect your plants regularly for signs of aphids, bean beetles, or other pests. You can try spraying the plants with a strong stream of water to dislodge the pests. Insecticidal soap or neem oil can also be effective, but be sure to follow the instructions carefully. Companion planting with herbs like marigolds or basil can also help deter pests.
Q: Can I save seeds from my purple bush beans for next year?
A: Yes, you can save seeds from your purple bush beans, but only if they are not hybrid varieties. To save seeds, allow some of the pods to mature fully on the vine until they are dry and brown. Shell the beans and store them in an airtight container in a cool, dry place. Be aware that seeds from hybrid varieties may not produce plants that are true to type.
Q: What are some good companion plants for purple bush beans?
A: Purple bush beans benefit from being planted near certain companion plants. Good choices include:
* **Marigolds:** These flowers deter many common garden pests.
* **Basil:** Basil repels aphids and other insects.
* **Carrots:** Carrots help to improve soil drainage.
* **Cucumbers:** Cucumbers provide shade for the bean plants.
* **Potatoes:** Potatoes help to break up the soil.
Avoid planting beans near onions or garlic, as these can inhibit their growth.
Q: What kind of soil do purple bush beans need?
A: Purple bush beans thrive in well-drained soil that is rich in organic matter. Amend your soil with compost or aged manure before planting to improve its fertility and drainage. A slightly acidic to neutral soil pH (around 6.0 to 7.0) is ideal.
Q: How much sun do purple bush beans need?
A: Purple bush beans need at least 6-8 hours of direct sunlight per day to thrive. Choose a sunny location in your garden for planting.
Q: What are some creative ways to use my harvested purple bush beans?
A: Beyond the usual steaming or sautéing, get creative! Try pickling them for a tangy snack, adding them to a vibrant summer salad with feta cheese and a lemon vinaigrette, or incorporating them into a hearty bean stew with smoked sausage. You can even blanch and freeze them for use in winter dishes. Don’t be afraid to experiment and discover your favorite ways to enjoy your homegrown purple bush beans!

Leave a Comment