
Basil Jar Herb Hack: Ever dream of having fresh, fragrant basil right at your fingertips, ready to elevate your pasta dishes, salads, and cocktails? I know I have! But let’s be honest, keeping basil alive and thriving can feel like a Herculean task, especially if you’re short on space or gardening experience. That’s where this game-changing DIY basil jar herb hack comes in – it’s a simple, effective, and surprisingly beautiful way to ensure you always have a supply of this culinary staple.
Growing herbs indoors has a rich history, dating back to ancient civilizations who recognized the medicinal and culinary benefits of having fresh herbs readily available. Think of the Romans cultivating herbs in their courtyards or medieval monks tending to their medicinal gardens. Today, we’re carrying on that tradition, adapting it to our modern lives and smaller spaces. This particular basil jar herb hack is perfect for apartment dwellers, busy professionals, or anyone who wants to add a touch of green to their home without the fuss of traditional gardening.
Why do you need this DIY trick? Because store-bought basil can be expensive and often wilts within days of bringing it home. This hack not only saves you money but also reduces food waste. Plus, there’s something incredibly satisfying about nurturing your own plants and harvesting fresh herbs for your meals. So, get ready to transform a simple jar into a thriving basil haven – I promise, you’ll be amazed at how easy and rewarding it is!
DIY Self-Watering Basil Jar: Never Let Your Basil Wilt Again!
Hey there, fellow plant lovers! Are you tired of your basil constantly wilting, even when you think you’re watering it enough? I know I was! Basil can be a bit dramatic, and keeping it consistently moist without overwatering can be a real challenge. That’s why I’m so excited to share this super easy and effective DIY self-watering basil jar hack. It’s a game-changer, and it’ll keep your basil happy and thriving!
What You’ll Need:
Before we dive in, let’s gather our supplies. This is a pretty simple project, so you probably already have most of these things lying around:
* A large glass jar: Think pickle jar, mason jar, or even a large spaghetti sauce jar. The bigger, the better, as it will hold more water and require less frequent refills. Make sure it’s clean!
* A smaller plastic pot: This needs to fit comfortably inside the glass jar, leaving about an inch or two of space around the sides and at least a few inches of space between the bottom of the pot and the bottom of the jar. A standard nursery pot works perfectly.
* Cotton rope or strips of cotton fabric: This will act as our wick, drawing water up from the reservoir to the soil. Make sure it’s natural cotton, as synthetic materials won’t wick water as effectively.
* Potting mix: Use a good quality potting mix that drains well. Basil doesn’t like to sit in soggy soil.
* Gravel or small rocks: This will help with drainage in the smaller pot.
* Basil plant: Of course! You can either start with a small basil plant from the nursery or propagate your own from cuttings.
* Water: For obvious reasons!
Step-by-Step Instructions:
Alright, let’s get our hands dirty! Here’s how to assemble your self-watering basil jar:
1. Prepare the Smaller Pot: First, we need to get the smaller pot ready. If your pot has drainage holes (and it should!), line the bottom with a layer of gravel or small rocks. This will prevent the potting mix from washing out and clogging the holes. I usually use about an inch or two of gravel.
2. Insert the Wick: This is the key to the whole self-watering system! Take your cotton rope or fabric strips and thread them through the drainage holes of the smaller pot. You want to have a good length of the wick hanging out of the bottom of the pot – enough to reach the bottom of the glass jar when the pot is placed inside. I usually aim for about 6-8 inches of wick hanging down. If you have multiple drainage holes, you can thread a wick through each one for better water distribution.
3. Add Potting Mix: Now, fill the smaller pot with your potting mix. Leave about an inch of space at the top of the pot. Gently pat down the soil to remove any air pockets.
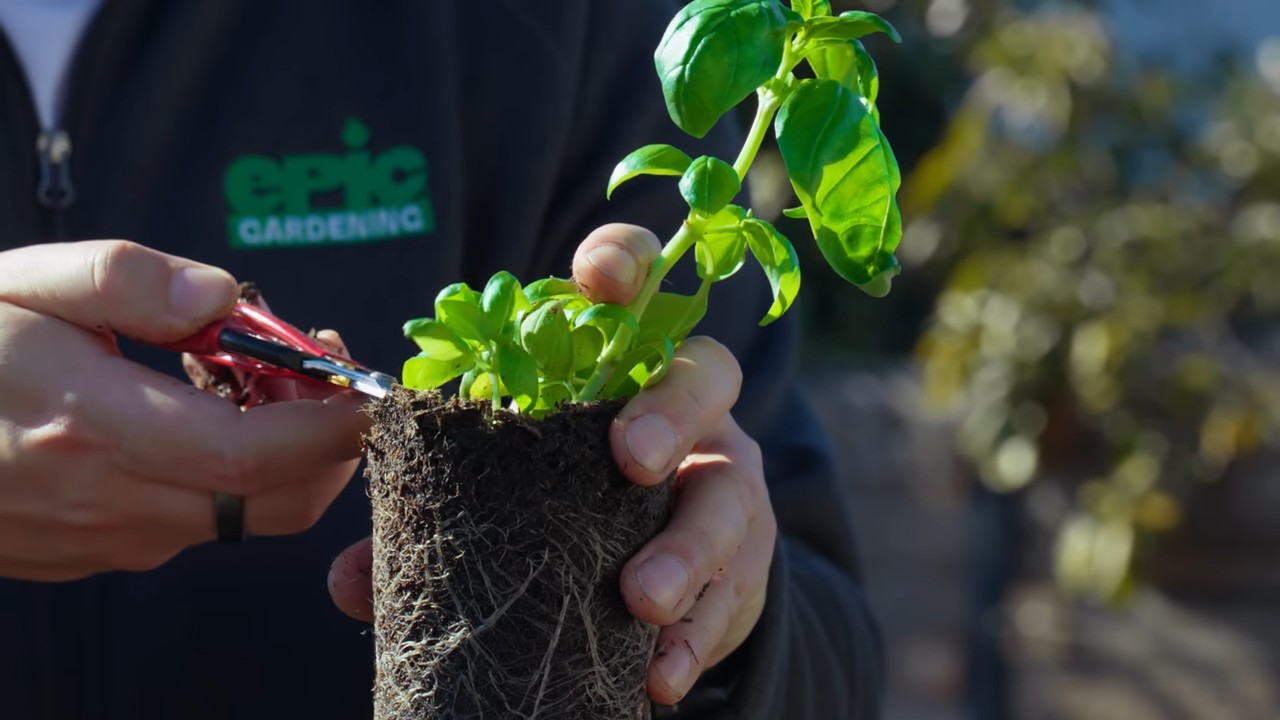
4. Plant Your Basil: Carefully remove your basil plant from its original container and gently loosen the roots. Plant it in the center of the smaller pot, making sure the top of the root ball is level with the soil surface. Fill in around the plant with more potting mix and gently pat it down.
5. Water Thoroughly (Initially): This is important for getting the wicking action started. Water the basil plant thoroughly from the top until water starts to drain out of the bottom of the smaller pot. This will saturate the soil and the wick.
6. Prepare the Glass Jar: Now, let’s get the glass jar ready. Make sure it’s clean and dry.
7. Place the Pot Inside the Jar: Carefully lower the smaller pot into the glass jar, making sure the wicks are hanging down into the jar. The bottom of the pot should be elevated above the bottom of the jar, with the wicks touching the bottom.
8. Add Water to the Reservoir: Pour water into the glass jar, being careful not to splash the soil in the smaller pot. Fill the jar until the water level is about an inch or two below the bottom of the smaller pot. You don’t want the pot sitting directly in the water, just the wicks.
9. Monitor the Water Level: Keep an eye on the water level in the glass jar. As the basil plant drinks water, the water level will decrease. Refill the jar as needed, making sure the wicks are always submerged in water.
Tips and Tricks for Success:
Here are a few extra tips to help you get the most out of your self-watering basil jar:
* Choose the Right Jar Size: The size of the jar will depend on the size of your basil plant and how often you want to refill the water. A larger jar will hold more water and require less frequent refills, but it will also take up more space.
* Use the Right Potting Mix: A well-draining potting mix is essential for preventing root rot. Avoid using garden soil, as it can be too heavy and compact.
* Don’t Overwater Initially: While it’s important to water the basil plant thoroughly when you first plant it, avoid overwatering it in the long run. The self-watering system will provide a consistent supply of moisture, so you shouldn’t need to water it from the top very often.
* Monitor for Pests: Keep an eye out for pests like aphids or spider mites. If you notice any pests, treat them promptly with an appropriate insecticide or insecticidal soap.
* Provide Adequate Sunlight: Basil needs at least 6-8 hours of sunlight per day. Place your self-watering basil jar in a sunny location, such as a windowsill or under a grow light.
* Fertilize Regularly: Basil is a heavy feeder, so it’s important to fertilize it regularly. Use a balanced liquid fertilizer diluted to half strength every 2-4 weeks.
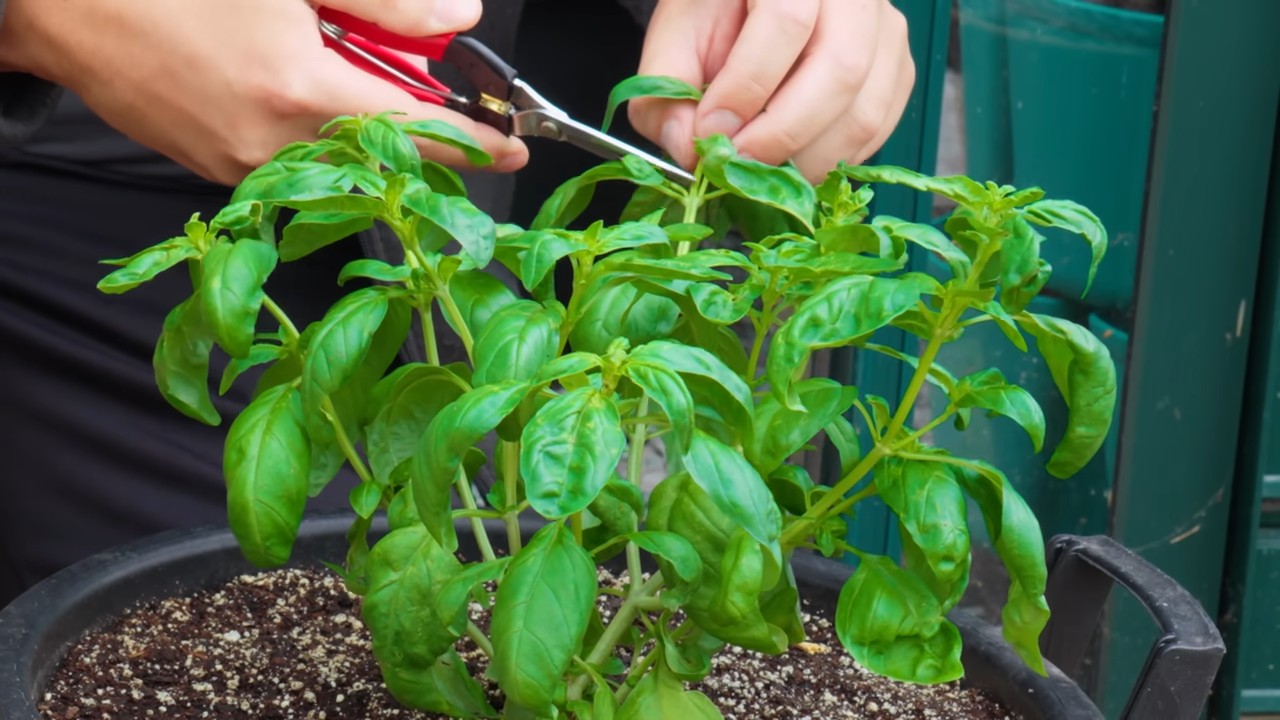
* Pinch Off Flowers: To encourage bushy growth and prevent the plant from going to seed, pinch off any flowers that appear.
* Rotate the Plant: Rotate the plant regularly to ensure even growth on all sides.
* Consider Adding a Lid (Optional): If you live in a very dry climate, you might consider adding a lid to the glass jar to help reduce evaporation. Just make sure the lid has some ventilation holes to prevent condensation from building up.
* Experiment with Different Wicking Materials: While cotton rope or fabric strips work well, you can also experiment with other wicking materials, such as felt or nylon rope. Just make sure the material is absorbent and doesn’t decompose easily.
* Clean the Jar Periodically: Over time, algae or mineral deposits may build up on the inside of the glass jar. Clean the jar periodically with soap and water to keep it looking its best.
Troubleshooting:
Even with the best intentions, things can sometimes go wrong. Here are a few common problems you might encounter and how to fix them:
* Basil is Wilting: If your basil is wilting, even though the water reservoir is full, it could be a sign that the wick isn’t working properly. Check to make sure the wick is still submerged in water and that it’s not clogged with soil or debris. You may need to replace the wick if it’s no longer wicking water effectively. Also, make sure the basil isn’t getting too much direct sunlight, which can cause it to wilt.
* Soil is Too Wet: If the soil in the smaller pot is constantly soggy, it could be a sign that the wick is wicking too much water. Try using a smaller wick or raising the water level in the glass jar. You can also try adding more gravel to the bottom of the smaller pot to improve drainage.
* Algae Growth: Algae growth in the glass jar is a common problem, especially if the jar is exposed to a lot of sunlight. While algae isn’t necessarily harmful to the basil plant, it can be unsightly. To prevent algae growth, try placing the jar in a less sunny location or using an opaque jar. You can also add a few drops of hydrogen peroxide to the water to kill the algae.
* Root Rot: Root rot is a serious problem that can kill your basil plant. It’s usually caused by overwatering or poor drainage. If you suspect root rot, remove the basil plant from the pot and inspect the roots. If the roots are brown and mushy, they’re likely rotting. Cut away any affected roots and repot the plant in fresh potting mix. Make sure the pot has good drainage and avoid overwatering.
Enjoy Your Thriving Basil!
And that’s it! You’ve successfully created your own self-watering basil jar. Now you can enjoy fresh, flavorful basil whenever you need it, without worrying about constantly watering it. I’ve found this method to be incredibly effective, and my basil plants have never been happier. I hope you have the same success! Happy gardening!
Conclusion
So, there you have it! The Basil Jar Herb Hack – a simple, yet revolutionary way to keep your basil fresh and vibrant for weeks, not days. We’ve all been there, haven’t we? Buying a beautiful bunch of basil, only to watch it wilt and turn black within a few days, a sad, green graveyard in your refrigerator. This DIY trick is more than just a clever storage solution; it’s a game-changer for home cooks who value fresh ingredients and hate food waste.
Why is this a must-try? Because it’s effective, economical, and incredibly easy. Think about the money you’ll save by not having to constantly replace spoiled basil. Imagine the joy of having fresh basil readily available whenever you need it, whether it’s for a Caprese salad, a pesto pasta, or a simple garnish. This method extends the life of your basil significantly, allowing you to enjoy its aromatic flavor and vibrant color for much longer.
But the beauty of this hack lies in its adaptability. Feel free to experiment with variations to suit your specific needs and preferences. For instance, if you live in a particularly dry climate, you might consider changing the water in the jar every other day instead of every few days. You could also try adding a small amount of plant food to the water to provide extra nutrients to the basil.
Another variation involves the type of container you use. While a mason jar works perfectly, you can also use any clean glass or plastic container that is tall enough to accommodate the basil stems and wide enough to allow for good air circulation. Just make sure the container is food-safe and thoroughly cleaned before use.
Consider the type of basil you are storing. While this hack works well for most common basil varieties, such as Genovese basil, it may be less effective for more delicate varieties like Thai basil. For these more delicate types, you might want to try wrapping the leaves in a slightly damp paper towel before placing them in the jar.
Beyond basil, this method can also be adapted for other herbs, although results may vary. Herbs like mint, parsley, and cilantro can also benefit from being stored in water, although they may not last as long as basil. Experiment and see what works best for you!
We are confident that once you try this Basil Jar Herb Hack, you’ll wonder how you ever lived without it. It’s a simple, effective, and sustainable way to keep your basil fresh and flavorful.
So, go ahead, give it a try! We encourage you to share your experiences with us. Did it work for you? Did you discover any helpful variations? Let us know in the comments below! Share your photos and tips on social media using #BasilJarHerbHack. We can’t wait to see how this simple trick transforms your cooking and helps you reduce food waste. Embrace the freshness, embrace the flavor, and embrace the Basil Jar Herb Hack!
Frequently Asked Questions (FAQ)
1. How long will basil last using the Basil Jar Herb Hack?
Typically, basil stored using this method can last for 2-3 weeks, sometimes even longer, depending on the initial freshness of the basil and the environmental conditions. The key is to change the water regularly and ensure the leaves stay dry. Keep an eye on the leaves; if they start to turn brown or wilt, it’s time to discard them.
2. What kind of basil works best with this method?
Genovese basil, the most common type of basil found in grocery stores, works exceptionally well with this method. Other varieties like lemon basil and curly basil also tend to respond well. More delicate varieties, such as Thai basil, may not last as long, but you can still try the hack, ensuring you change the water more frequently and keep a close eye on the leaves.
3. Can I use tap water, or do I need filtered water?
Tap water is generally fine to use, but if your tap water has a strong chlorine smell or taste, it’s best to use filtered water. Chlorine can sometimes affect the flavor and longevity of the basil. Using filtered water can help ensure the basil stays fresh and flavorful for longer.
4. How often should I change the water in the jar?
It’s recommended to change the water every 2-3 days. This helps prevent the growth of bacteria and keeps the basil stems hydrated. When you change the water, give the jar a quick rinse to remove any sediment or debris.
5. Should I cover the basil leaves with a plastic bag?
While some people recommend covering the basil leaves with a plastic bag, it’s generally not necessary and can actually be detrimental. Covering the leaves can trap moisture and lead to mold growth. The key is to keep the leaves dry and allow for good air circulation. If you live in a very dry climate, you can loosely cover the leaves with a plastic bag, but make sure to leave some openings for air to circulate.
6. What if the basil leaves start to turn black?
If the basil leaves start to turn black, it’s usually a sign that they are starting to decompose. Remove any black leaves immediately to prevent them from affecting the rest of the basil. If a significant portion of the basil has turned black, it’s best to discard the entire bunch.
7. Can I store other herbs using this method?
Yes, you can store other herbs using this method, although the results may vary. Herbs like mint, parsley, and cilantro can also benefit from being stored in water. However, they may not last as long as basil. Experiment and see what works best for you. For more delicate herbs, consider wrapping the leaves in a slightly damp paper towel before placing them in the jar.
8. Does the temperature of the refrigerator matter?
Yes, the temperature of your refrigerator can affect the longevity of the basil. Ideally, you want to store the basil in a part of the refrigerator that is not too cold, as extreme cold can damage the leaves. The door of the refrigerator is often a good place to store the basil, as it tends to be slightly warmer than the rest of the refrigerator.
9. Can I use this method for basil that I’ve already cut?
Yes, you can use this method for basil that you’ve already cut, but it’s best to start with fresh, uncut basil. Cut basil tends to deteriorate more quickly than uncut basil. If you are using cut basil, make sure to trim the stems before placing them in the water.
10. Is it better to store the basil in the refrigerator or on the countertop?
While some people prefer to store basil on the countertop, storing it in the refrigerator using the Basil Jar Herb Hack will significantly extend its lifespan. The cooler temperature slows down the decomposition process and helps the basil stay fresh for longer. Just make sure to change the water regularly and keep the leaves dry.
Leave a Comment