
Long Bean Growing Tips are your ticket to a bountiful harvest of these delicious and versatile vegetables, right in your own backyard! Have you ever dreamed of snipping fresh, vibrant long beans straight from the vine for your stir-fries, salads, or even just a simple, satisfying snack? I know I have! For centuries, long beans, also known as yardlong beans or asparagus beans, have been a staple in Asian cuisine, symbolizing prosperity and longevity. Their cultivation has been passed down through generations, a testament to their ease of growth and nutritional value.
But let’s face it, sometimes gardening can feel a little daunting, especially when you’re aiming for a specific crop. That’s where these DIY tricks and hacks come in! I’m here to share my tried-and-true methods for maximizing your long bean yield, even if you’re a beginner gardener. Imagine the satisfaction of bypassing the grocery store and enjoying the freshest, most flavorful long beans you’ve ever tasted. These Long Bean Growing Tips will empower you to cultivate a thriving garden, save money, and enjoy the fruits (or rather, the beans!) of your labor. So, grab your gardening gloves, and let’s get started!
DIY: From Seed to Stir-Fry: Growing Long Beans Like a Pro!
Okay, let’s talk long beans! These vigorous climbers, also known as yardlong beans, asparagus beans, or Chinese long beans, are a fantastic addition to any garden. They’re not only delicious in stir-fries, salads, and curries, but they’re also incredibly rewarding to grow. I’m going to walk you through everything I’ve learned about cultivating these beauties, from starting seeds to harvesting a bountiful crop. Get ready to impress your friends and family with your homegrown long bean bounty!
Getting Started: Seed Germination and Preparation
Before we even think about planting in the ground, let’s get those seeds germinating. This gives them a head start and ensures a higher success rate.
* Soaking Seeds: This is a crucial step! Soaking the seeds softens the outer shell and helps them sprout faster.
* Paper Towel Method: A simple and effective way to germinate seeds indoors.
* Choosing the Right Potting Mix: Well-draining soil is key to healthy seedlings.
Step-by-Step Germination Guide:
1. Soak the Seeds: Place your long bean seeds in a small bowl of lukewarm water. Let them soak for 12-24 hours. This rehydrates the seeds and kickstarts the germination process. I usually do this overnight so they’re ready to go in the morning.
2. Prepare Your Paper Towels: Take two sheets of paper towels and dampen them thoroughly with water. Wring out any excess water – you want them damp, not dripping.
3. Arrange the Seeds: Lay one of the damp paper towels flat on a clean surface. Space the soaked long bean seeds evenly across the paper towel, leaving about an inch between each seed.
4. Cover and Seal: Cover the seeds with the second damp paper towel. Gently press down to ensure good contact between the seeds and the paper towels.
5. Place in a Bag: Carefully slide the paper towel with the seeds into a resealable plastic bag. This creates a humid environment that promotes germination. You can also use a plastic container with a lid.
6. Find a Warm Spot: Place the bag or container in a warm location, ideally around 70-80°F (21-27°C). A sunny windowsill or the top of your refrigerator can work well. Avoid direct sunlight, which can overheat the seeds.
7. Check Daily: Check the paper towels daily to ensure they remain moist. If they start to dry out, lightly mist them with water.
8. Wait for Sprouts: Within a few days (usually 3-7 days), you should see small sprouts emerging from the seeds. Once the sprouts are about ½ inch long, they’re ready to be planted.
9. Prepare Small Pots: Fill small pots (2-3 inches in diameter) with a well-draining potting mix. I like to use a mix of peat moss, perlite, and vermiculite.
10. Plant the Sprouts: Gently remove the sprouted seeds from the paper towel. Be careful not to damage the delicate roots. Plant each seed in a separate pot, burying the sprout about ½ inch deep.
11. Water Gently: Water the pots gently to moisten the soil. Avoid overwatering, which can lead to root rot.
12. Provide Light: Place the pots in a sunny location or under grow lights. Seedlings need plenty of light to grow strong and healthy.
13. Keep Moist: Keep the soil consistently moist, but not soggy. Water when the top inch of soil feels dry to the touch.
14. Harden Off: Before transplanting the seedlings outdoors, you’ll need to “harden them off.” This means gradually exposing them to outdoor conditions over a period of 7-10 days. Start by placing them in a sheltered location for a few hours each day, gradually increasing the amount of time they spend outdoors. This helps them acclimate to the sun, wind, and temperature changes.
Preparing the Garden Bed: Location, Soil, and Support
Long beans are vigorous climbers, so choosing the right location and providing adequate support are essential.
* Sunlight Requirements: Long beans need at least 6-8 hours of direct sunlight per day.
* Soil Preparation: Well-drained, fertile soil is crucial for healthy growth.
* Building a Trellis or Support System: These beans can grow quite long, so a sturdy trellis is a must.
Step-by-Step Garden Bed Preparation:
1. Choose a Sunny Location: Select a spot in your garden that receives at least 6-8 hours of direct sunlight each day. This is non-negotiable! Long beans thrive in sunny conditions.
2. Test Your Soil: Before planting, it’s a good idea to test your soil’s pH level. Long beans prefer a slightly acidic to neutral soil pH (around 6.0-7.0). You can purchase a soil testing kit at most garden centers.
3. Amend the Soil: If your soil is heavy clay or sandy, you’ll need to amend it with organic matter. Add plenty of compost, well-rotted manure, or other organic amendments to improve drainage, fertility, and water retention. I usually dig in a generous amount of compost a few weeks before planting.
4. Loosen the Soil: Use a garden fork or tiller to loosen the soil to a depth of at least 12 inches. This allows the roots to penetrate easily and access nutrients.
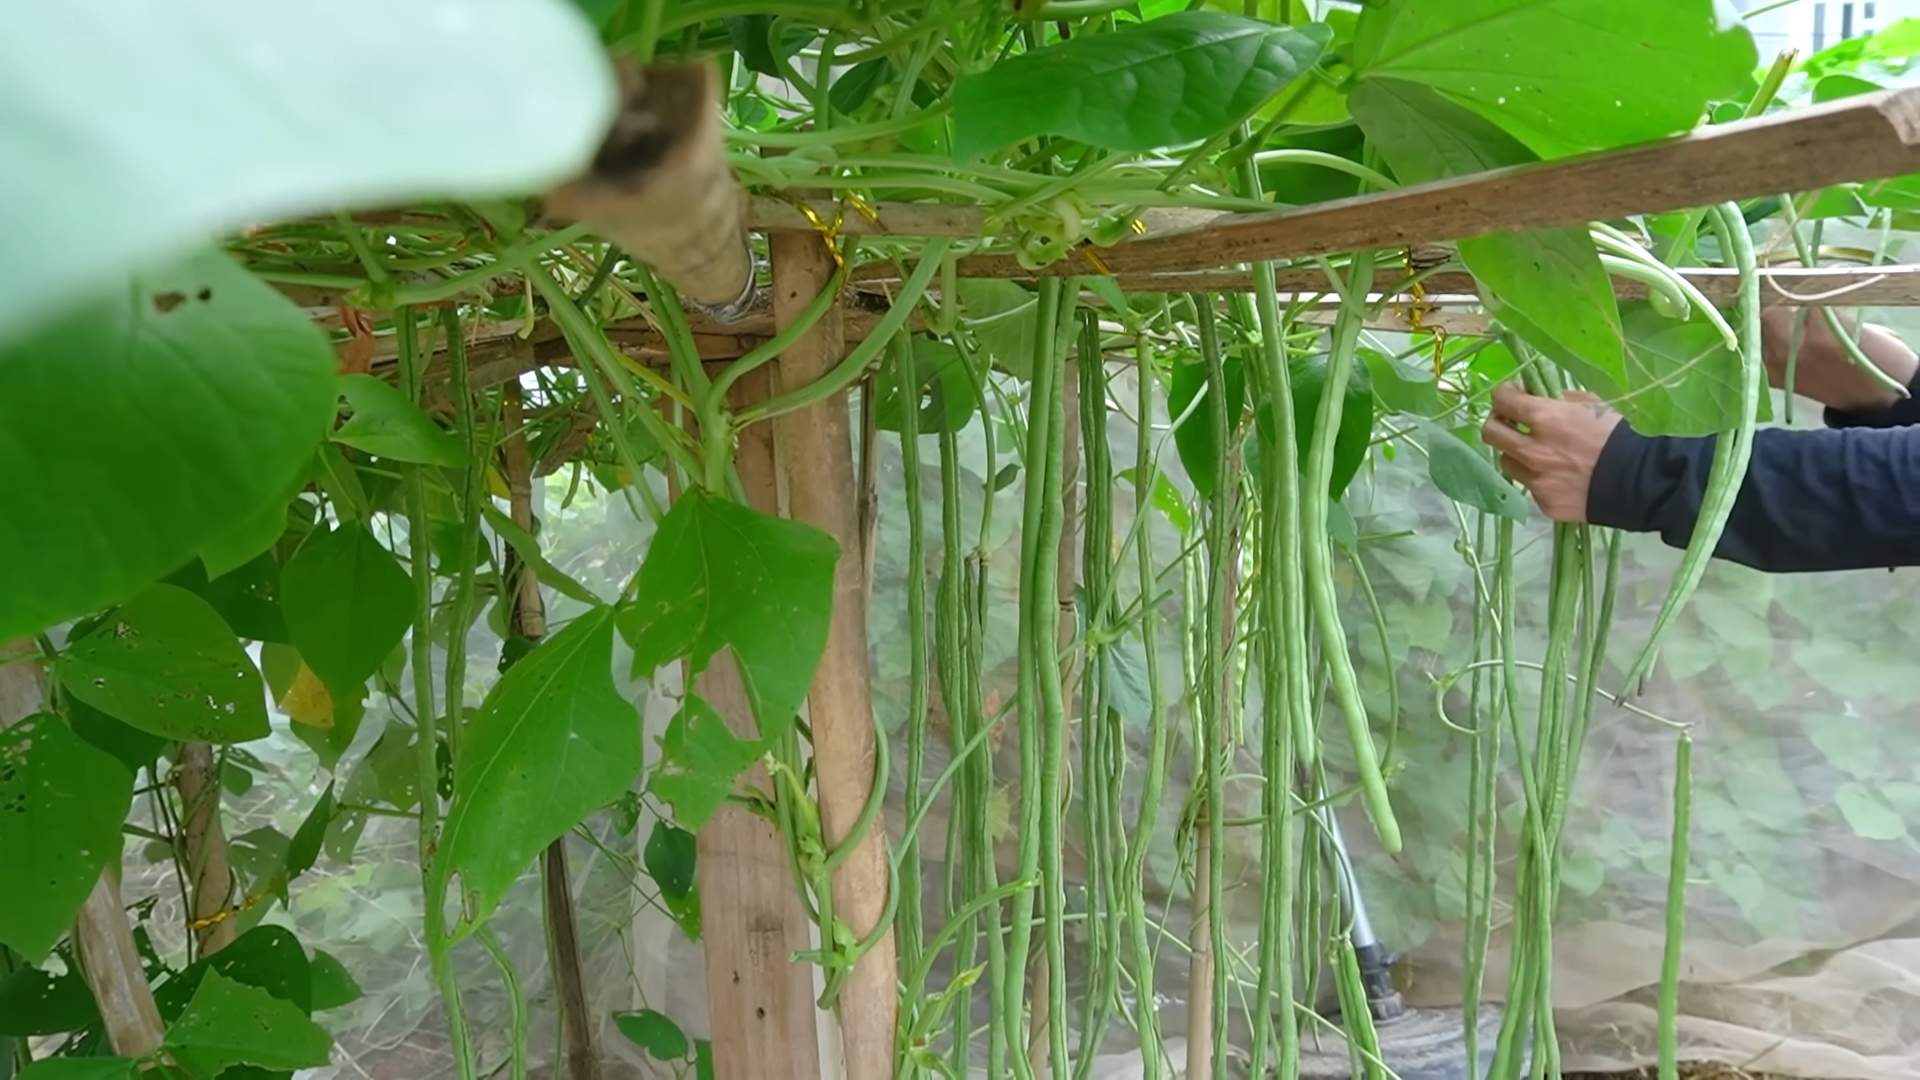
5. Build a Trellis: Long beans are climbers and need a sturdy trellis or support system to grow on. You can use a variety of materials, such as bamboo poles, wooden stakes, wire mesh, or even an existing fence. Make sure the trellis is at least 6-8 feet tall to accommodate the long bean vines. I’ve had success with A-frame trellises and even just running twine between sturdy posts.
6. Install the Trellis Before Planting: It’s much easier to install the trellis before you plant the seedlings. This prevents you from disturbing the roots later on.
7. Consider Spacing: If you’re planting multiple long bean plants, space them about 6-8 inches apart along the base of the trellis. This allows them enough room to grow without overcrowding each other.
8. Water the Soil: Before transplanting the seedlings, water the soil thoroughly to moisten it. This helps the roots establish quickly.
Transplanting and Ongoing Care
Now for the exciting part – getting those seedlings into the ground!
* Transplanting Seedlings: Handle the seedlings with care to avoid damaging the roots.
* Watering and Fertilizing: Consistent watering and regular fertilization are essential for healthy growth.
Okay, let’s talk long beans! These vigorous climbers, also known as yardlong beans, asparagus beans, or Chinese long beans, are a fantastic addition to any garden. They’re not only delicious in stir-fries, salads, and curries, but they’re also incredibly rewarding to grow. I’m going to walk you through everything I’ve learned about cultivating these beauties, from starting seeds to harvesting a bountiful crop. Get ready to impress your friends and family with your homegrown long bean bounty!
Getting Started: Seed Germination and Preparation
Before we even think about planting in the ground, let’s get those seeds germinating. This gives them a head start and ensures a higher success rate.
* Soaking Seeds: This is a crucial step! Soaking the seeds softens the outer shell and helps them sprout faster.
* Paper Towel Method: A simple and effective way to germinate seeds indoors.
* Choosing the Right Potting Mix: Well-draining soil is key to healthy seedlings.
Step-by-Step Germination Guide:
1. Soak the Seeds: Place your long bean seeds in a small bowl of lukewarm water. Let them soak for 12-24 hours. This rehydrates the seeds and kickstarts the germination process. I usually do this overnight so they’re ready to go in the morning.
2. Prepare Your Paper Towels: Take two sheets of paper towels and dampen them thoroughly with water. Wring out any excess water – you want them damp, not dripping.
3. Arrange the Seeds: Lay one of the damp paper towels flat on a clean surface. Space the soaked long bean seeds evenly across the paper towel, leaving about an inch between each seed.
4. Cover and Seal: Cover the seeds with the second damp paper towel. Gently press down to ensure good contact between the seeds and the paper towels.
5. Place in a Bag: Carefully slide the paper towel with the seeds into a resealable plastic bag. This creates a humid environment that promotes germination. You can also use a plastic container with a lid.
6. Find a Warm Spot: Place the bag or container in a warm location, ideally around 70-80°F (21-27°C). A sunny windowsill or the top of your refrigerator can work well. Avoid direct sunlight, which can overheat the seeds.
7. Check Daily: Check the paper towels daily to ensure they remain moist. If they start to dry out, lightly mist them with water.
8. Wait for Sprouts: Within a few days (usually 3-7 days), you should see small sprouts emerging from the seeds. Once the sprouts are about ½ inch long, they’re ready to be planted.
9. Prepare Small Pots: Fill small pots (2-3 inches in diameter) with a well-draining potting mix. I like to use a mix of peat moss, perlite, and vermiculite.
10. Plant the Sprouts: Gently remove the sprouted seeds from the paper towel. Be careful not to damage the delicate roots. Plant each seed in a separate pot, burying the sprout about ½ inch deep.
11. Water Gently: Water the pots gently to moisten the soil. Avoid overwatering, which can lead to root rot.
12. Provide Light: Place the pots in a sunny location or under grow lights. Seedlings need plenty of light to grow strong and healthy.
13. Keep Moist: Keep the soil consistently moist, but not soggy. Water when the top inch of soil feels dry to the touch.
14. Harden Off: Before transplanting the seedlings outdoors, you’ll need to “harden them off.” This means gradually exposing them to outdoor conditions over a period of 7-10 days. Start by placing them in a sheltered location for a few hours each day, gradually increasing the amount of time they spend outdoors. This helps them acclimate to the sun, wind, and temperature changes.
Preparing the Garden Bed: Location, Soil, and Support
Long beans are vigorous climbers, so choosing the right location and providing adequate support are essential.
* Sunlight Requirements: Long beans need at least 6-8 hours of direct sunlight per day.
* Soil Preparation: Well-drained, fertile soil is crucial for healthy growth.
* Building a Trellis or Support System: These beans can grow quite long, so a sturdy trellis is a must.
Step-by-Step Garden Bed Preparation:
1. Choose a Sunny Location: Select a spot in your garden that receives at least 6-8 hours of direct sunlight each day. This is non-negotiable! Long beans thrive in sunny conditions.
2. Test Your Soil: Before planting, it’s a good idea to test your soil’s pH level. Long beans prefer a slightly acidic to neutral soil pH (around 6.0-7.0). You can purchase a soil testing kit at most garden centers.
3. Amend the Soil: If your soil is heavy clay or sandy, you’ll need to amend it with organic matter. Add plenty of compost, well-rotted manure, or other organic amendments to improve drainage, fertility, and water retention. I usually dig in a generous amount of compost a few weeks before planting.
4. Loosen the Soil: Use a garden fork or tiller to loosen the soil to a depth of at least 12 inches. This allows the roots to penetrate easily and access nutrients.
5. Build a Trellis: Long beans are climbers and need a sturdy trellis or support system to grow on. You can use a variety of materials, such as bamboo poles, wooden stakes, wire mesh, or even an existing fence. Make sure the trellis is at least 6-8 feet tall to accommodate the long bean vines. I’ve had success with A-frame trellises and even just running twine between sturdy posts.
6. Install the Trellis Before Planting: It’s much easier to install the trellis before you plant the seedlings. This prevents you from disturbing the roots later on.
7. Consider Spacing: If you’re planting multiple long bean plants, space them about 6-8 inches apart along the base of the trellis. This allows them enough room to grow without overcrowding each other.
8. Water the Soil: Before transplanting the seedlings, water the soil thoroughly to moisten it. This helps the roots establish quickly.
Transplanting and Ongoing Care
Now for the exciting part – getting those seedlings into the ground!
* Transplanting Seedlings: Handle the seedlings with care to avoid damaging the roots.
* Watering and Fertilizing: Consistent watering and regular fertilization are essential for healthy growth.
* Pest and Disease Control: Keep an eye out for common pests and diseases and take action promptly.
Step-by-Step Transplanting and Care Guide:
1. Choose a Cloudy Day: Transplanting seedlings on a cloudy day or in the late afternoon minimizes stress on the plants.
2. Dig Holes: Dig holes that are slightly larger than the root balls of the seedlings. Space the holes about 6-8 inches apart along the base of the trellis.
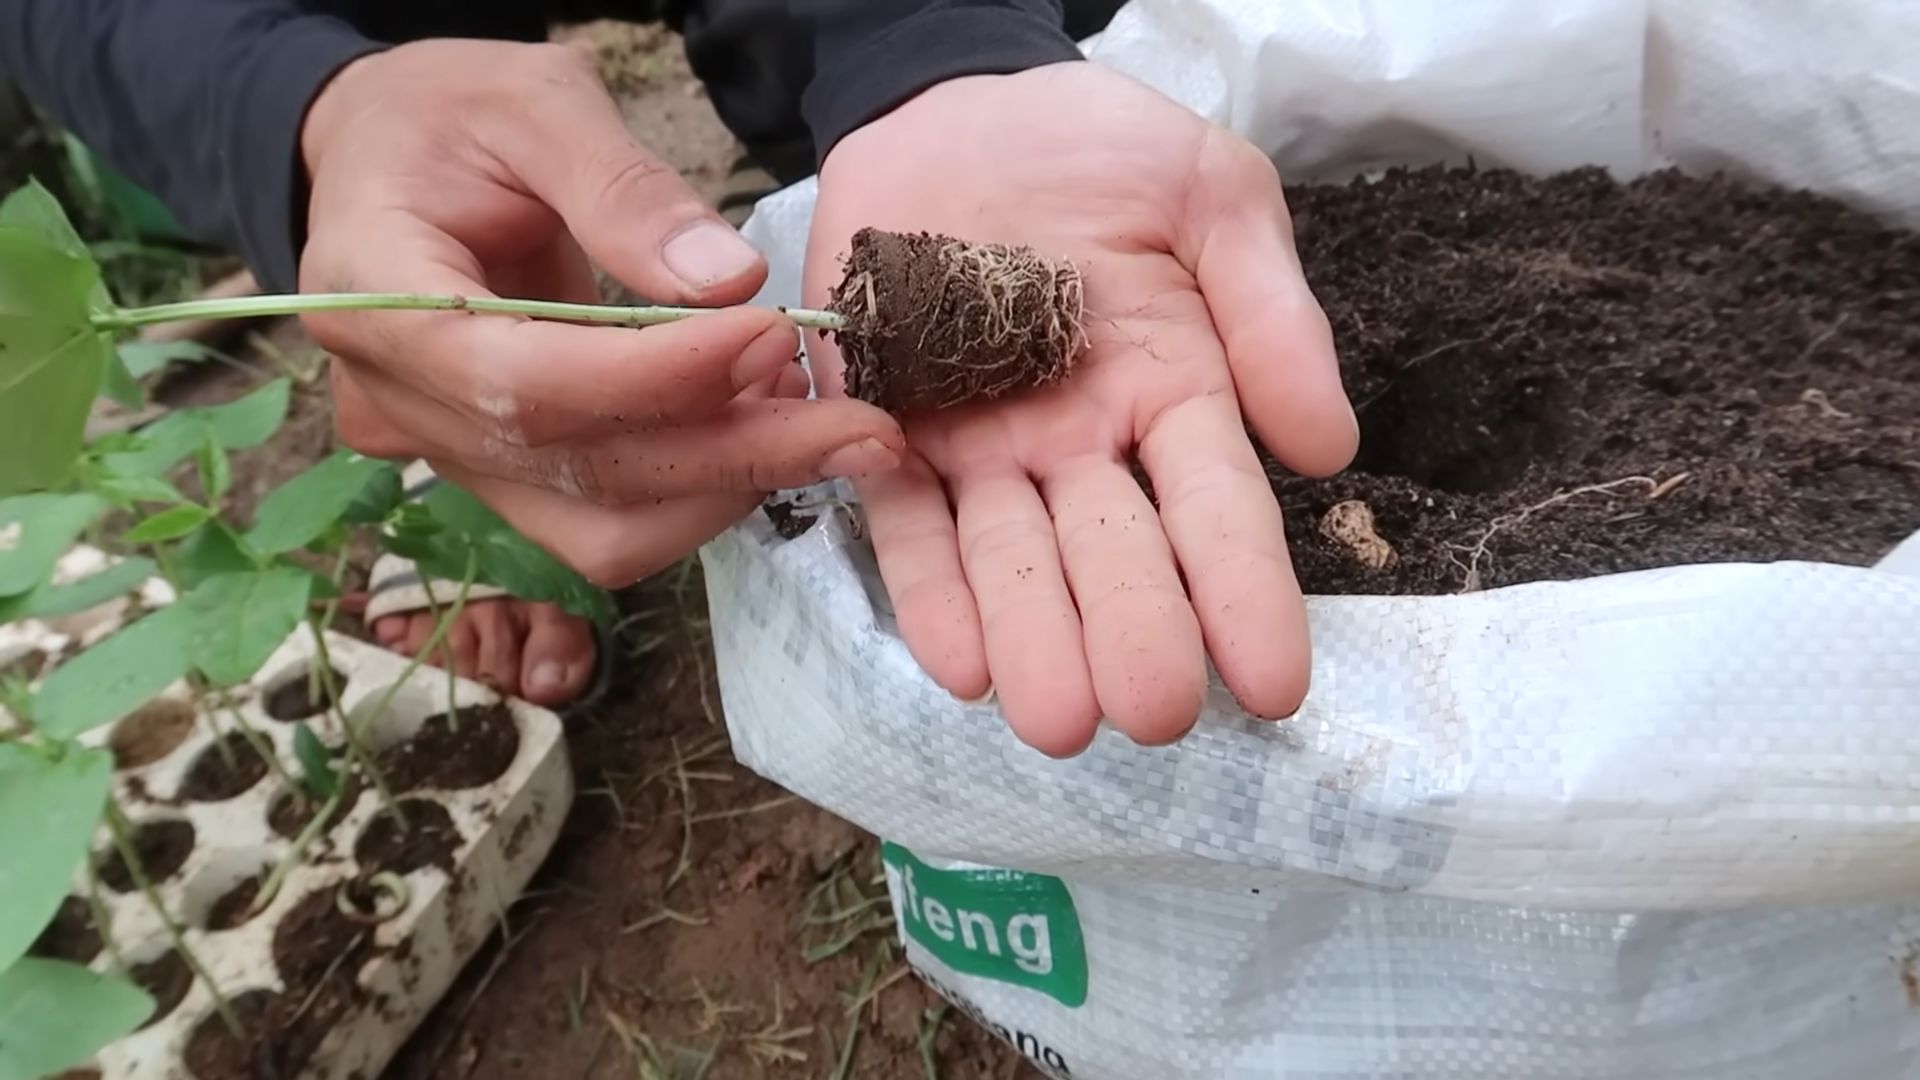
3. Gently Remove Seedlings: Carefully remove the seedlings from their pots. Gently loosen the roots if they are tightly bound.
4. Place Seedlings in Holes: Place each seedling in a hole, making sure the top of the root ball is level with the surrounding soil.
5. Fill with Soil: Fill the holes with soil, gently firming it around the base of the seedlings.
6. Water Thoroughly: Water the seedlings thoroughly after transplanting. This helps settle the soil and encourages root growth.
7. Mulch Around Plants: Apply a layer of mulch around the base of the plants to help retain moisture, suppress weeds, and regulate soil temperature. I like to use straw or shredded leaves.
8. Water Regularly: Long beans need consistent moisture, especially during hot, dry weather. Water deeply whenever the top inch of soil feels dry to the touch. Aim for about 1 inch of water per week.
9. Fertilize Regularly: Feed your long bean plants every 2-3 weeks with a balanced fertilizer. You can use a liquid fertilizer or a slow-release granular fertilizer. Follow the instructions on the fertilizer package. I often use a fertilizer that’s higher in phosphorus to encourage flowering and bean production.
10. Train the Vines: As the long bean vines grow, gently train them to climb the trellis. You may need to tie them to the trellis with soft twine or plant clips.
11. Watch for Pests: Keep an eye out for common pests such as aphids, bean beetles, and spider mites. If you spot any pests, take action promptly. You can use insecticidal soap, neem oil
Conclusion
So, there you have it! Mastering the art of growing long beans doesn’t require a green thumb blessed by the gardening gods. It simply requires a little know-how, a dash of patience, and the willingness to embrace these simple yet effective DIY tricks. We’ve covered everything from optimizing your soil with homemade compost to creating your own natural pest control solutions. These aren’t just shortcuts; they’re sustainable and cost-effective ways to nurture your long bean plants and reap a bountiful harvest.
Why is this a must-try? Because it empowers you to take control of your garden’s ecosystem. You’re not relying on harsh chemicals or expensive store-bought products. Instead, you’re harnessing the power of nature to create a thriving environment where your long beans can flourish. Imagine the satisfaction of serving a dish made with long beans you grew yourself, knowing that you nurtured them from seed to table using your own ingenuity. That’s a reward that money simply can’t buy.
But the journey doesn’t end here! Feel free to experiment with these techniques. For example, try different types of organic matter in your compost to see which yields the best results for your soil. Explore various combinations of herbs and spices in your homemade pest repellent to find the most effective blend for your specific garden environment. Consider companion planting strategies, such as planting marigolds alongside your long beans to deter nematodes. The possibilities are endless!
And speaking of variations, consider the type of long bean you’re growing. Some varieties may be more susceptible to certain pests or diseases than others. Adjust your DIY pest control methods accordingly. Similarly, different soil types may require different composting strategies. Observe your plants closely and adapt your approach as needed. Remember, gardening is a continuous learning process.
We wholeheartedly encourage you to try these **long bean growing tips** and share your experiences with us. Did you find a particular DIY trick especially helpful? Did you discover a new variation that worked wonders for your garden? We want to hear all about it! Share your photos, tips, and stories in the comments section below. Let’s create a community of passionate gardeners who are dedicated to growing healthy, delicious long beans using sustainable and innovative methods. Together, we can unlock the full potential of our gardens and enjoy the fruits (or rather, the beans!) of our labor. Don’t be afraid to get your hands dirty and embrace the joy of DIY gardening. Your long bean plants – and your taste buds – will thank you for it!
Frequently Asked Questions (FAQ)
What if I don’t have a lot of space for composting?
That’s perfectly fine! You don’t need a massive compost bin to create nutrient-rich soil for your long beans. Consider using a small kitchen compost bin for food scraps and yard waste. You can also try vermicomposting, which uses worms to break down organic matter. Vermicomposting is ideal for small spaces and can be done indoors. The resulting worm castings are an excellent soil amendment for your long bean plants. Another option is to simply bury your food scraps directly in the garden bed near your long bean plants. As they decompose, they will release nutrients into the soil. Just be sure to bury them deep enough to prevent attracting pests.
How often should I apply the homemade pest repellent?
The frequency of application will depend on the severity of the pest infestation and the weather conditions. As a general rule, apply the homemade pest repellent every 7-10 days, or more frequently if you notice a significant increase in pest activity. After heavy rain, it’s a good idea to reapply the repellent, as the rain may wash it away. Always test the repellent on a small area of the plant first to ensure that it doesn’t cause any damage. Observe your plants closely and adjust the frequency of application as needed. Remember, prevention is key! Regularly inspecting your plants for pests and diseases can help you catch problems early and prevent them from becoming widespread.
What are some common pests that affect long beans, and how can I identify them?
Long beans are susceptible to a variety of pests, including aphids, bean beetles, spider mites, and nematodes. Aphids are small, soft-bodied insects that cluster on the undersides of leaves and suck plant sap. They can cause leaves to curl and distort. Bean beetles are small, oval-shaped beetles that feed on leaves and pods. They can cause significant damage to your long bean plants. Spider mites are tiny, spider-like creatures that spin webs on leaves and suck plant sap. They can cause leaves to turn yellow and brown. Nematodes are microscopic worms that live in the soil and feed on plant roots. They can cause stunted growth and yellowing leaves. To identify these pests, regularly inspect your plants for signs of damage, such as holes in leaves, yellowing leaves, or webbing. You can also use a magnifying glass to get a closer look at the insects.
Can I use these DIY tricks for other types of beans?
Absolutely! Many of these DIY tricks can be adapted for use with other types of beans, such as bush beans, pole beans, and lima beans. The principles of soil preparation, composting, and pest control are generally the same for all types of beans. However, you may need to adjust the specific techniques based on the needs of the particular bean variety. For example, some bean varieties may be more susceptible to certain pests or diseases than others. Similarly, different soil types may require different composting strategies. Always research the specific needs of the bean variety you are growing and adapt your approach accordingly.
What if my long bean plants are not producing any beans?
There are several reasons why your long bean plants may not be producing beans. One common reason is lack of pollination. Long beans are self-pollinating, but they still benefit from the help of pollinators like bees and butterflies. If you’re not seeing many pollinators in your garden, you can try hand-pollinating the flowers yourself. Another reason could be insufficient sunlight. Long beans need at least 6-8 hours of sunlight per day to produce a good crop. Make sure your plants are located in a sunny spot. Over-fertilizing with nitrogen can also inhibit bean production. Nitrogen promotes leafy growth, but it can suppress flowering and bean formation. Use a balanced fertilizer or one that is lower in nitrogen. Finally, stress from pests, diseases, or drought can also reduce bean production. Make sure your plants are healthy and well-watered.
Leave a Comment