
Multiply Lemongrass Quickly and effortlessly? Yes, you absolutely can! Imagine having an endless supply of this fragrant, citrusy herb right at your fingertips, ready to add a burst of flavor to your Thai curries, soothing teas, and refreshing summer drinks. Forget those expensive trips to the grocery store – with a few simple tricks, you can cultivate a thriving lemongrass patch right in your own backyard.
Lemongrass, also known as Cymbopogon citratus, boasts a rich history, deeply intertwined with Asian culinary traditions and traditional medicine. For centuries, it has been cherished for its aromatic properties and potential health benefits. From ancient Ayurvedic practices to modern-day aromatherapy, lemongrass has proven its versatility. But beyond its cultural significance, the real magic lies in its ease of propagation.
Let’s face it, buying lemongrass from the store can be hit-or-miss, and often, you only need a small amount for a recipe. That’s where this DIY guide comes in! I’m going to show you how to multiply lemongrass quickly and efficiently, ensuring you always have a fresh supply on hand. This isn’t just about saving money; it’s about connecting with nature, enjoying the satisfaction of growing your own food, and adding a touch of homegrown goodness to your meals. So, grab your gardening gloves, and let’s get started on this exciting journey of lemongrass propagation!
Multiply Your Lemongrass Like a Pro: A DIY Guide
Hey there, fellow plant enthusiast! Are you obsessed with the fresh, citrusy aroma of lemongrass? I know I am! And if you’re anything like me, you’re probably always looking for ways to get more of this amazing herb. Well, you’re in luck! I’m going to share my tried-and-true method for multiplying lemongrass quickly and easily. Trust me, it’s simpler than you think, and you’ll be swimming in lemongrass in no time!
Understanding Lemongrass Propagation
Before we dive into the nitty-gritty, let’s quickly cover the basics. Lemongrass is typically propagated through division or from cuttings. Division involves separating the clumps of an established plant, while cuttings involve rooting individual stalks. We’ll be focusing on a method that combines elements of both, giving you the best chance of success. This method is especially effective if you’re starting with store-bought lemongrass stalks.
What You’ll Need
Okay, let’s gather our supplies. Here’s what you’ll need to get started:
* Lemongrass Stalks: Choose healthy-looking stalks from your local grocery store or nursery. Look for stalks that are firm, green, and free from blemishes. The thicker the better!
* A Sharp Knife or Pruning Shears: A clean, sharp blade is essential for making precise cuts and preventing disease.
* A Glass or Jar: To root the lemongrass stalks in water.
* Water: Tap water is fine, but filtered water is even better.
* Potting Mix: A well-draining potting mix is crucial for healthy growth after the roots develop. I like to use a mix of potting soil, perlite, and vermiculite.
* Pots: Choose pots that are at least 6 inches in diameter to give the lemongrass plenty of room to grow.
* Optional: Rooting Hormone: While not strictly necessary, rooting hormone can help speed up the rooting process.
* Spray Bottle: For misting the lemongrass.
Step-by-Step Guide to Multiplying Lemongrass
Alright, let’s get our hands dirty! Follow these steps carefully, and you’ll be well on your way to a thriving lemongrass patch.
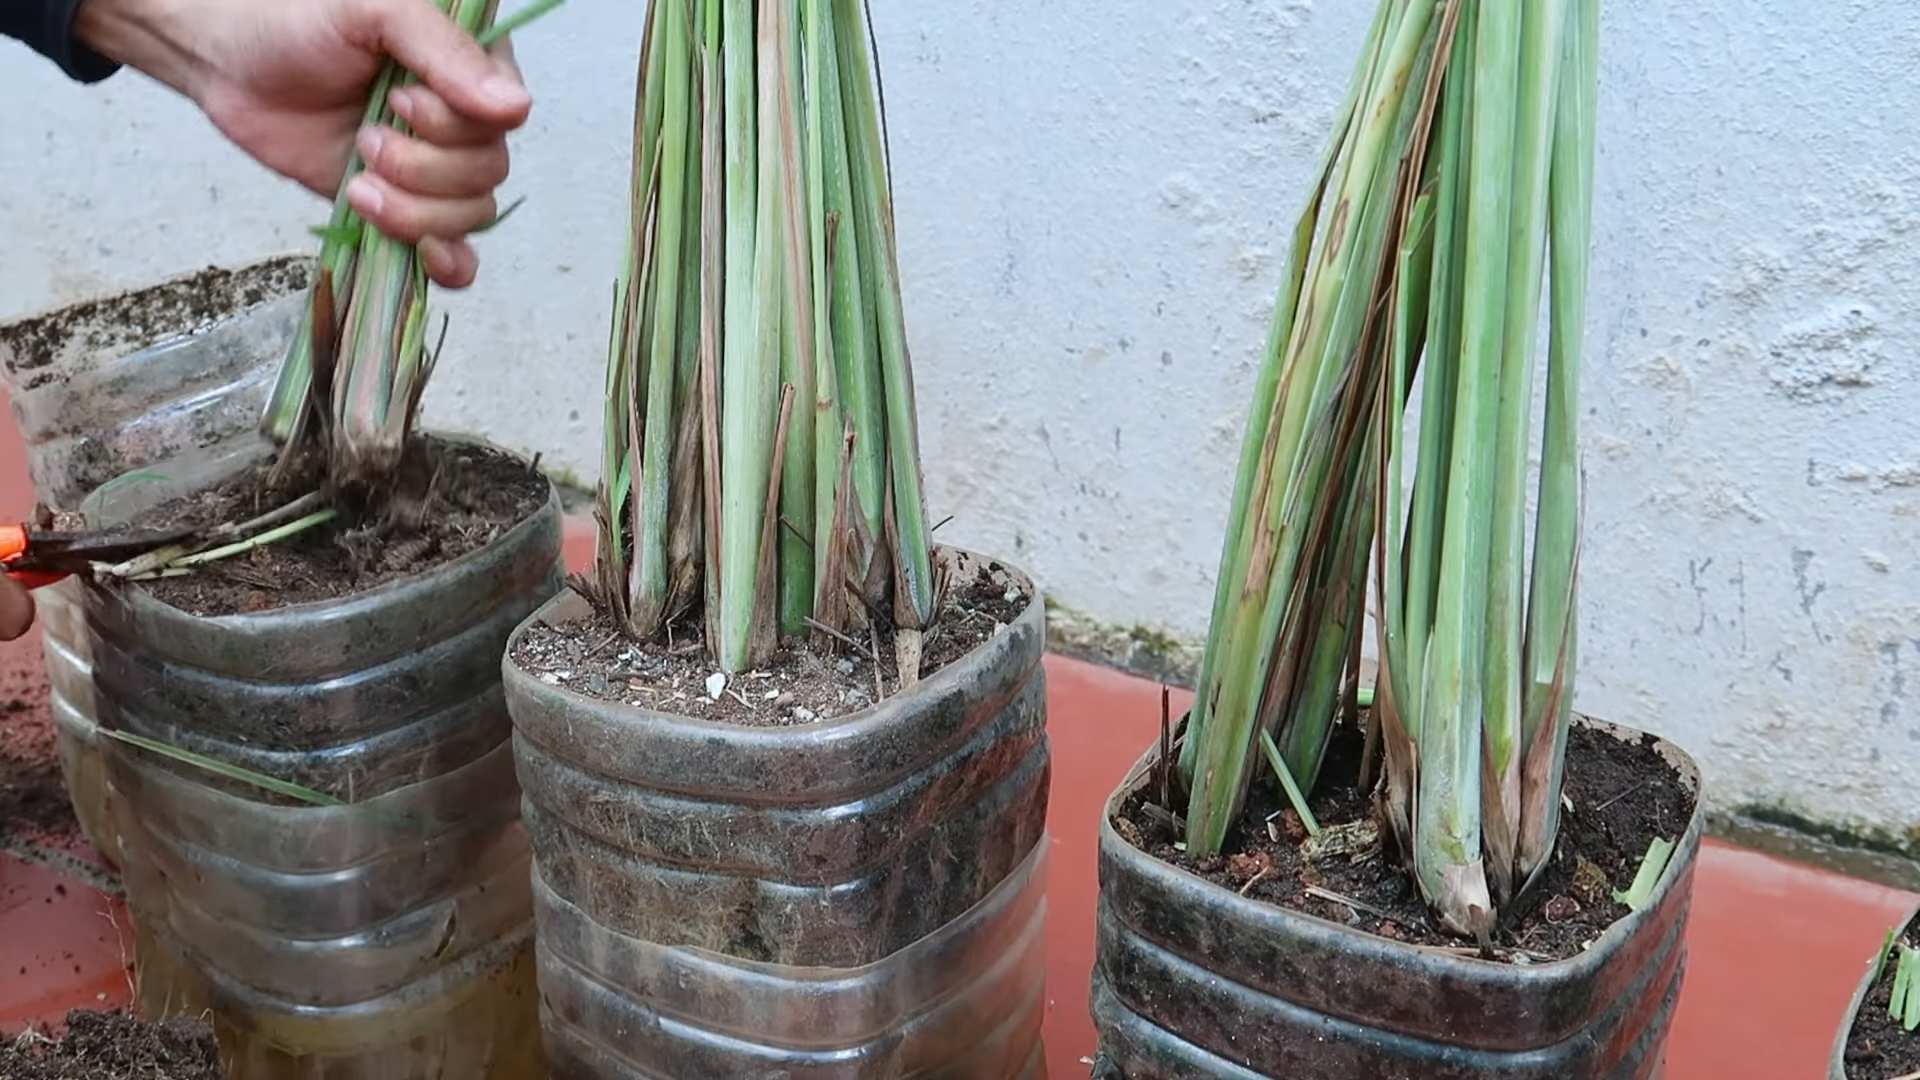
Section 1: Preparing the Lemongrass Stalks
This is a crucial step, so pay close attention! We need to prepare the stalks in a way that encourages root growth.
1. Trim the Tops: Using your sharp knife or pruning shears, trim the tops of the lemongrass stalks, leaving about 4-6 inches of the stalk. This will help the plant focus its energy on root development rather than leaf growth. Make sure the cut is clean and angled slightly.
2. Remove the Outer Layers: Gently peel away the dry, outer layers of the lemongrass stalk, revealing the fresh, green inner layers. This will expose the nodes where the roots will emerge. Be careful not to damage the inner stalk.
3. Optional: Score the Base: Lightly score the base of the stalk with your knife. This can encourage root growth by creating small wounds that stimulate cell division. Be gentle; you don’t want to cut too deep.
Section 2: Rooting the Lemongrass in Water
Now comes the fun part – watching those roots sprout!
4. Place in Water: Fill your glass or jar with water, making sure the water level is high enough to cover the bottom 2-3 inches of the lemongrass stalks.
5. Arrange the Stalks: Place the prepared lemongrass stalks in the water, making sure the cut ends are submerged. Don’t overcrowd the jar; give each stalk enough space to breathe.
6. Find a Sunny Spot: Place the jar in a warm, sunny location, such as a windowsill. Lemongrass loves sunlight, so the more light it gets, the better.
7. Change the Water Regularly: Change the water every 1-2 days to prevent bacteria growth and keep the water fresh. This is super important for healthy root development!
8. Be Patient: It may take a few weeks for roots to appear, so be patient. You should start to see small roots emerging from the nodes within 1-3 weeks. Keep the water fresh and the stalks in a sunny spot, and they’ll eventually root.
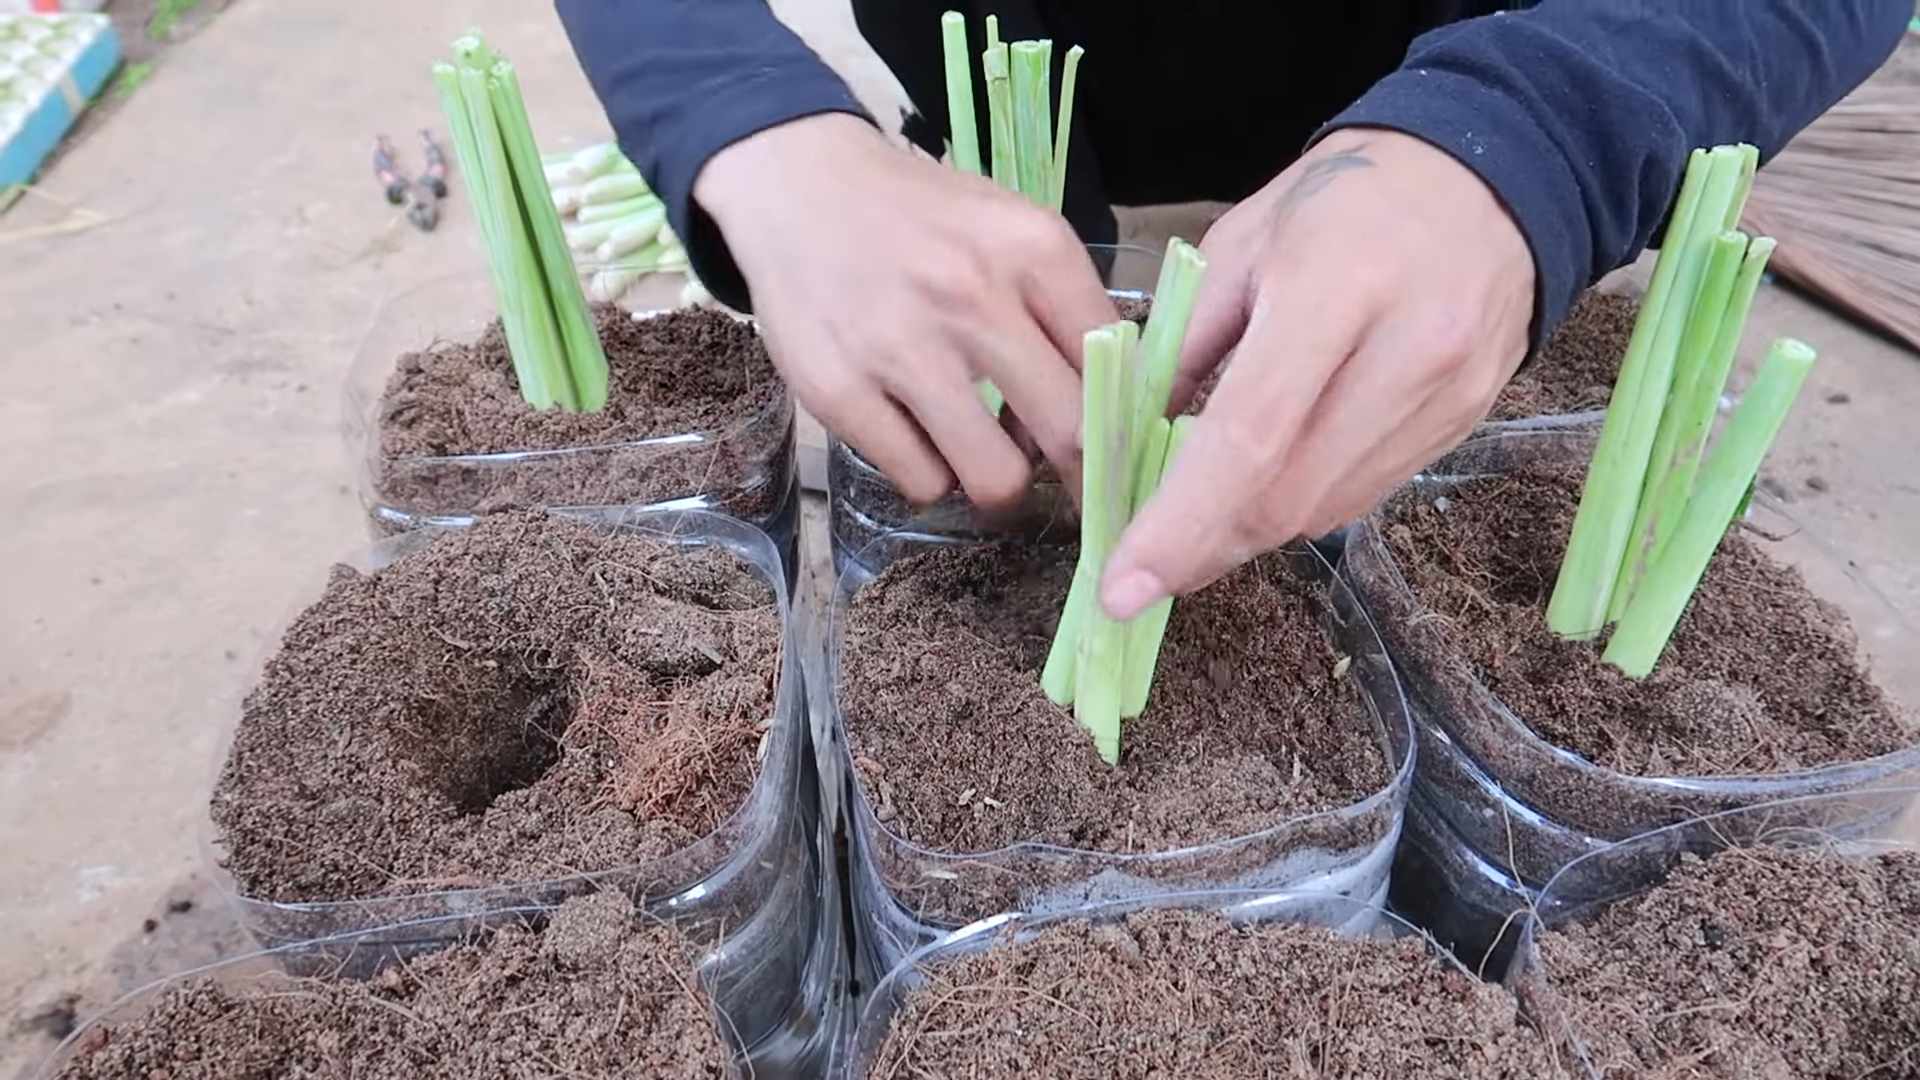
Section 3: Planting the Rooted Lemongrass
Once the roots are about 1-2 inches long, it’s time to plant your lemongrass!
9. Prepare the Pots: Fill your pots with well-draining potting mix, leaving about an inch of space at the top.
10. Make a Hole: Use your finger or a small trowel to create a hole in the center of each pot, large enough to accommodate the roots of the lemongrass stalk.
11. Plant the Lemongrass: Carefully remove the rooted lemongrass stalk from the water and gently place it in the hole. Make sure the roots are spread out and not tangled.
12. Cover the Roots: Gently fill the hole with potting mix, making sure the roots are completely covered.
13. Water Thoroughly: Water the newly planted lemongrass thoroughly, until water drains out of the bottom of the pot.
Section 4: Caring for Your New Lemongrass Plants
Congratulations! You’ve successfully multiplied your lemongrass. Now, let’s make sure they thrive.
14. Water Regularly: Lemongrass needs consistent moisture, so water it regularly, especially during hot, dry weather. Check the soil moisture by sticking your finger into the soil. If the top inch feels dry, it’s time to water.
15. Fertilize Occasionally: Feed your lemongrass plants with a balanced fertilizer every few weeks during the growing season (spring and summer). This will help them grow strong and healthy.
16. Provide Plenty of Sunlight: Lemongrass loves sunlight, so make sure your plants get at least 6 hours of direct sunlight per day.
17. Protect from Frost: Lemongrass is not frost-hardy, so if you live in a cold climate, you’ll need to bring your plants indoors during the winter.
18. Harvest Regularly: You can start harvesting lemongrass stalks once they are about 1 foot tall. Simply cut the stalks near the base of the plant. Regular harvesting will encourage new growth.
Troubleshooting Tips
Sometimes, things don’t go exactly as planned. Here are a few common problems you might encounter and how to fix them:
* Stalks Not Rooting: If your lemongrass stalks aren’t rooting after a few weeks, try changing the water more frequently, ensuring they are getting enough sunlight, and consider using rooting hormone. Also, make sure the stalks are healthy and haven’t started to rot.
* Yellowing Leaves: Yellowing leaves can indicate overwatering or underwatering. Check the soil moisture and adjust your watering accordingly. It could also be a sign of nutrient deficiency, so try fertilizing your plants.
* Slow Growth: Slow growth can be caused by insufficient sunlight, lack of nutrients, or poor soil. Make sure your plants are getting enough sunlight, fertilize them regularly, and use a well-draining potting mix.
Extra Tips for Success
Here are a few extra tips to help you achieve lemongrass multiplication success:
* Use Filtered Water: While tap water is generally fine, filtered water can be even better for rooting lemongrass, as it contains fewer chemicals that could inhibit root growth.
* Maintain Humidity: Lemongrass loves humidity, so consider misting your plants regularly, especially during dry weather.
* Choose the Right Pot Size: As your lemongrass plants grow, you may need to transplant them into larger pots. Choose pots that are at least 12 inches in diameter to give them plenty of room to grow.
* Consider Hydroponics: If you’re feeling adventurous, you can even try rooting lemongrass in a hydroponic system. This can be a very efficient way to propagate lemongrass, as it provides the plants with a constant supply of nutrients and water.
Enjoy Your Abundant Lemongrass!
And there you have it! You’re now equipped with the knowledge and skills to multiply your lemongrass like a pro. With a little patience and care, you’ll have a thriving lemongrass patch in no time. Enjoy the fresh, citrusy aroma and the delicious flavor of your homegrown lemongrass! I hope this guide was helpful, and happy gardening!
Conclusion
So, there you have it! This simple yet effective DIY trick for multiplying lemongrass quickly is a game-changer for any home gardener or culinary enthusiast. Forget constantly buying lemongrass from the store – with a little patience and this easy method, you can have a thriving lemongrass patch right in your own backyard or even on your windowsill.
Why is this a must-try? Because it’s cost-effective, sustainable, and incredibly rewarding. Imagine the satisfaction of harvesting your own fresh lemongrass whenever you need it for a fragrant Thai curry, a soothing tea, or a refreshing summer drink. The vibrant citrusy aroma will fill your kitchen, and you’ll know you grew it yourself!
Beyond the basic method, there are a few exciting variations you can explore. For instance, if you live in a colder climate, consider keeping your propagated lemongrass indoors during the winter months. A sunny windowsill or a grow light will help it thrive until the weather warms up. You can also experiment with different types of potting soil to see which one yields the best results. Some gardeners swear by a well-draining mix with added compost, while others prefer a slightly acidic soil.
Another variation involves the initial rooting process. While water propagation is effective, you can also try rooting the lemongrass stalks directly in a moist potting mix. This method can sometimes lead to faster root development, but it requires careful monitoring to ensure the soil stays consistently damp but not waterlogged.
Don’t be afraid to get creative with your lemongrass once you have a plentiful supply. Infuse it into oils and vinegars for a unique culinary twist. Dry the leaves and stalks to create your own lemongrass tea blend. Or use it to make natural insect repellent – lemongrass is known for its mosquito-repelling properties.
The possibilities are endless! But the first step is to try this DIY trick for multiplying lemongrass quickly. We’re confident that you’ll be amazed by how easy and successful it is.
We encourage you to give it a try and share your experience with us! Post photos of your growing lemongrass on social media using #LemongrassLove and tell us about any variations you tried or challenges you encountered. Your feedback will help other gardeners learn and grow, and we can all celebrate the joy of homegrown lemongrass together. So go ahead, get your hands dirty, and start multiplying your lemongrass today! You’ll be reaping the rewards of fresh, fragrant lemongrass in no time.
Frequently Asked Questions (FAQ)
1. What kind of lemongrass is best for propagation?
The best lemongrass for propagation is generally fresh lemongrass stalks purchased from a grocery store or Asian market. Look for stalks that are firm, green, and healthy-looking, with a bulbous base. Avoid stalks that are dry, brown, or damaged, as they are less likely to root successfully. While you can technically propagate from any type of lemongrass, culinary varieties tend to be the most readily available and easiest to work with. If you have access to different varieties, experiment to see which one thrives best in your local climate and growing conditions.
2. How long does it take for lemongrass to root using this method?
The time it takes for lemongrass to root can vary depending on several factors, including the temperature, humidity, and the health of the stalks. Generally, you can expect to see roots emerging within 2-4 weeks. It’s important to be patient and maintain consistent moisture levels during this period. Check the water regularly and change it every few days to prevent algae growth. Once the roots are about 1-2 inches long, the lemongrass is ready to be transplanted into soil.
3. What type of soil is best for planting propagated lemongrass?
Lemongrass thrives in well-draining soil that is rich in organic matter. A good potting mix for lemongrass should consist of a combination of garden soil, compost, and perlite or vermiculite. The compost provides essential nutrients, while the perlite or vermiculite improves drainage and aeration. You can also add a slow-release fertilizer to the soil to provide a steady supply of nutrients as the lemongrass grows. Avoid using heavy clay soils, as they can become waterlogged and lead to root rot.
4. How much sunlight does lemongrass need?
Lemongrass needs plenty of sunlight to thrive. Aim for at least 6-8 hours of direct sunlight per day. If you are growing lemongrass indoors, place it near a sunny window or use a grow light to supplement natural light. Insufficient sunlight can result in weak, leggy growth and reduced essential oil production, which affects the flavor and aroma of the lemongrass.
5. How often should I water my lemongrass?
Water lemongrass regularly, especially during hot and dry weather. The soil should be kept consistently moist but not waterlogged. Check the soil moisture by sticking your finger into the soil – if it feels dry to the touch, it’s time to water. Avoid overwatering, as this can lead to root rot. During the winter months, when growth slows down, you can reduce watering frequency.
6. Can I grow lemongrass in a container?
Yes, lemongrass can be successfully grown in a container. Choose a pot that is at least 12 inches in diameter to allow for adequate root growth. Make sure the pot has drainage holes to prevent waterlogging. Use a well-draining potting mix and water regularly. Container-grown lemongrass may need to be fertilized more frequently than lemongrass grown in the ground, as nutrients can leach out of the soil more quickly.
7. How do I harvest lemongrass?
To harvest lemongrass, simply cut the stalks near the base of the plant using a sharp knife or pruning shears. You can harvest individual stalks as needed, or you can harvest the entire plant at once. The lower, thicker portion of the stalk is the most flavorful and is typically used in cooking. The upper, thinner leaves can also be used to make tea or added to soups and stews for flavor.
8. How do I store harvested lemongrass?
Freshly harvested lemongrass can be stored in the refrigerator for up to two weeks. Wrap the stalks in a damp paper towel and place them in a plastic bag. You can also freeze lemongrass for longer storage. To freeze lemongrass, chop the stalks into small pieces and place them in a freezer bag or airtight container. Frozen lemongrass can be stored for up to six months.
9. Is lemongrass a perennial or an annual?
Lemongrass is a perennial in warm climates (USDA zones 9-11), meaning it will live for several years. In colder climates, it is typically grown as an annual, meaning it will need to be replanted each year. However, you can overwinter lemongrass indoors by bringing it inside before the first frost and providing it with plenty of sunlight and water.
10. What are some common problems with growing lemongrass and how can I fix them?
Some common problems with growing lemongrass include yellowing leaves, root rot, and pest infestations. Yellowing leaves can be caused by nutrient deficiencies, overwatering, or underwatering. Root rot is caused by excessive moisture and poor drainage. Pests such as aphids and spider mites can also attack lemongrass. To prevent these problems, use well-draining soil, water regularly but not excessively, and fertilize as needed. If you notice pests, treat the plants with insecticidal soap or neem oil.
Leave a Comment