
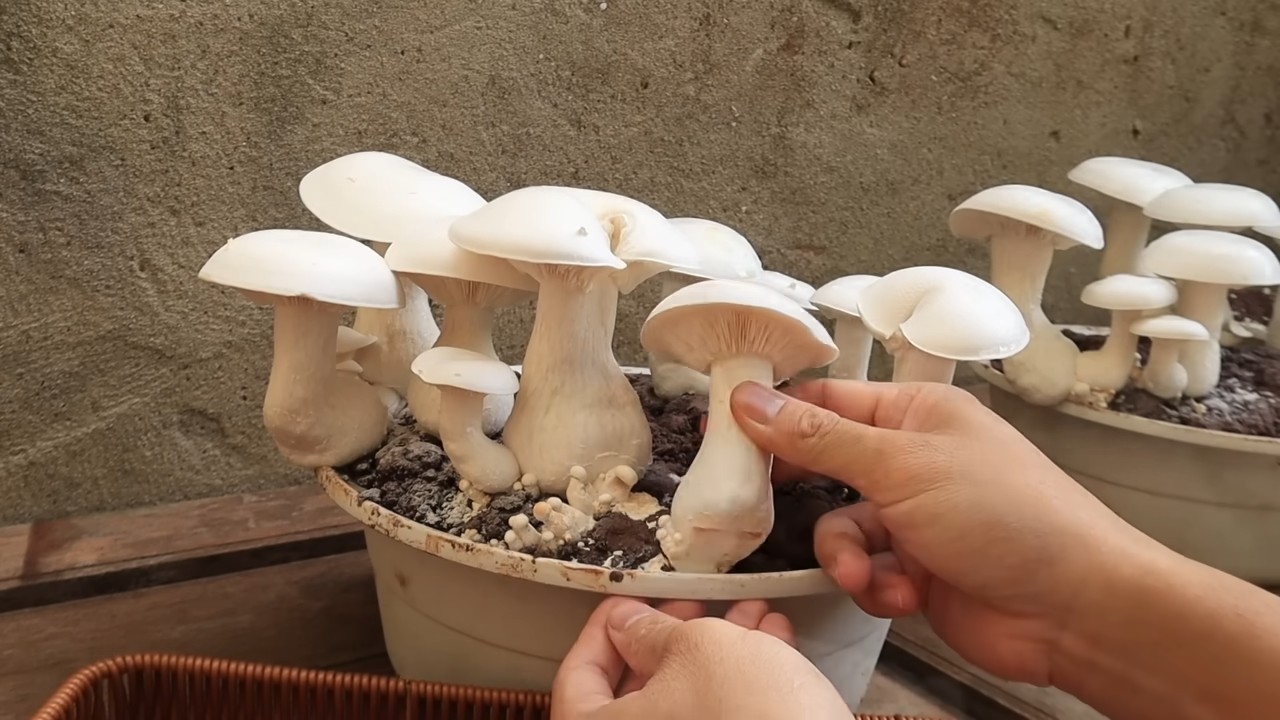
Mushroom Growing in a Bowl: Imagine harvesting fresh, delicious mushrooms right from your kitchen counter! Forget those expensive grocery store trips and embrace the rewarding world of home cultivation. This isn’t some futuristic fantasy; it’s a surprisingly simple and satisfying DIY project that anyone can undertake.
For centuries, mushroom cultivation has been revered in various cultures, from ancient China, where they were considered delicacies and symbols of longevity, to European traditions where foraging for wild mushrooms was a cherished autumnal ritual. Now, you can bring that rich history and culinary delight into your own home with this easy-to-follow guide.
Why should you try mushroom growing in a bowl? Well, beyond the sheer joy of nurturing life and the satisfaction of harvesting your own food, it’s also incredibly practical. Store-bought mushrooms can be pricey and often lack the freshness and flavor of homegrown varieties. Plus, this DIY project is a fantastic way to reduce your carbon footprint by minimizing transportation and packaging waste. I’m excited to show you how to create your own mini-mushroom farm, transforming a simple bowl into a source of fresh, flavorful fungi. Let’s get started!
Grow Your Own Gourmet Mushrooms in a Bowl: A Beginner’s Guide
Hey there, fellow fungi enthusiasts! Ever dreamt of harvesting your own delicious mushrooms right from your kitchen counter? Well, dream no more! I’m going to walk you through a super simple and rewarding DIY project: growing mushrooms in a bowl. It’s easier than you think, and the satisfaction of eating something you nurtured from start to finish is truly amazing. This guide focuses on growing oyster mushrooms, as they are beginner-friendly and thrive in this type of setup. Let’s get started!
What You’ll Need
Before we dive in, let’s gather our supplies. This is crucial for a smooth and successful mushroom-growing experience.
* Oyster Mushroom Spawn: This is the “seed” of your mushrooms. You can find it online or at specialty gardening stores. Make sure it’s a reputable source to ensure healthy spawn.
* Substrate: This is the food source for your mushrooms. Straw is an excellent choice because it’s readily available and easy to prepare. You can also use coffee grounds, but for this guide, we’ll stick with straw.
* A Bowl: Choose a bowl that’s large enough to hold your substrate and spawn. A plastic or ceramic bowl works well. I prefer using a bowl that’s at least 8 inches in diameter and 6 inches deep.
* A Large Pot or Container: You’ll need this to pasteurize the straw.
* Heat Source: A stove or hot plate will do the trick.
* Thermometer: Essential for monitoring the temperature during pasteurization.
* Spray Bottle: For misting the mushrooms later on.
* Gloves: To keep things sanitary.
* Optional: A clear plastic bag or container to create a humidity dome.
Preparing the Substrate: Pasteurization is Key!
This is arguably the most important step. Pasteurization kills off any competing organisms that could prevent your mushrooms from growing. We’re not sterilizing (which would kill everything, including beneficial microbes), just reducing the competition.
1. Chop the Straw: Cut the straw into smaller pieces, about 2-3 inches long. This makes it easier for the mushroom mycelium to colonize. I usually use scissors or garden shears for this.
2. Soak the Straw: Place the chopped straw in your large pot or container and cover it with water. Make sure all the straw is submerged. Let it soak for at least an hour. This helps the straw absorb moisture, which is essential for mushroom growth.
3. Pasteurize the Straw: Now comes the heat! Place the pot on your heat source and bring the water to a temperature of 160-180°F (71-82°C). Maintain this temperature for 60-90 minutes. Use your thermometer to monitor the temperature closely. This is crucial! Too hot, and you’ll kill beneficial microbes. Too cold, and you won’t kill enough competitors.
4. Drain and Cool: After pasteurization, carefully drain the hot water from the straw. Let the straw cool down completely before handling it. You want it to be cool enough to touch without burning yourself. This usually takes a few hours. I often spread the straw out on a clean surface to speed up the cooling process.
Inoculating the Bowl: Layering for Success
Now for the fun part: introducing the mushroom spawn to the prepared substrate!
1. Clean Your Bowl: Thoroughly clean your bowl with soap and water to remove any potential contaminants.
2. Layering Time: Start by placing a layer of pasteurized straw at the bottom of the bowl, about 1-2 inches thick.
3. Add Spawn: Sprinkle a generous layer of oyster mushroom spawn over the straw. Don’t be shy! You want good coverage.
4. Repeat: Continue layering straw and spawn, alternating between the two, until you reach the top of the bowl. The final layer should be straw.
5. Gentle Press: Gently press down on the top layer of straw to compact it slightly. This helps the spawn make good contact with the substrate.
Incubation: The Waiting Game
This is where patience comes in. The mycelium (the vegetative part of the mushroom) needs time to colonize the straw.
1. Ideal Conditions: Place the bowl in a dark, humid, and well-ventilated location. The ideal temperature for oyster mushroom colonization is around 65-75°F (18-24°C).
2. Humidity Control: If your environment is dry, you can create a humidity dome by placing a clear plastic bag or container over the bowl. Make sure there’s some ventilation to prevent the buildup of excess moisture, which can lead to mold. I usually poke a few holes in the bag.
3. Monitor and Mist: Check the bowl regularly. The straw should remain moist but not soggy. If it starts to dry out, mist it lightly with water from your spray bottle.
4. Patience is Key: It will take several weeks for the mycelium to fully colonize the straw. You’ll know it’s happening when you see white, fuzzy growth spreading throughout the substrate. This is the mycelium doing its thing!
Fruiting: Time to Harvest!
Once the straw is fully colonized, it’s time to trigger fruiting, which is when the mushrooms start to grow.
1. Introduce Light: Move the bowl to a location with indirect light. Mushrooms need light to fruit properly.
2. Increase Humidity: Maintain high humidity levels. You can mist the mushrooms several times a day or use a humidity dome.
3. Ventilation is Important: Ensure good ventilation to prevent the buildup of carbon dioxide, which can lead to deformed mushrooms.
4. Watch Them Grow: Within a few days, you should start to see small mushroom “pins” forming. These will rapidly grow into mature mushrooms.
5. Harvest Time: Harvest the mushrooms when the caps are fully developed but before they start to drop spores. You can gently twist or cut them off at the base.
Troubleshooting: Common Issues and Solutions
Even with the best preparation, things can sometimes go wrong. Here are some common issues and how to address them:
* Mold: If you see green, blue, or black mold growing in your bowl, it’s a sign of contamination. Unfortunately, you’ll likely need to discard the entire batch. To prevent mold, ensure proper pasteurization and maintain good ventilation.
* Slow Colonization: If the mycelium is slow to colonize, it could be due to low temperatures, dry conditions, or poor-quality spawn. Make sure the temperature is within the ideal range, keep the substrate moist, and use reputable spawn.
* Deformed Mushrooms: Deformed mushrooms can be caused by high levels of carbon dioxide or low humidity. Ensure good ventilation and maintain high humidity levels.
* No Fruiting: If the mycelium has fully colonized the straw but no mushrooms are forming, it could be due to lack of light or improper temperature. Move the bowl to a location with indirect light and ensure the temperature is within the ideal range.
Enjoy Your Harvest!
Congratulations! You’ve successfully grown your own mushrooms in a bowl. Now it’s time to enjoy the fruits (or rather, fungi) of your labor. Oyster mushrooms are incredibly versatile and can be used in a variety of dishes. Sauté them with garlic and butter, add them to soups and stews, or use them as a topping for pizza. The possibilities are endless!
And the best part? You can often get multiple flushes (harvests) from the same bowl. After harvesting, simply mist the substrate and maintain the ideal conditions. You should see another flush of mushrooms in a few weeks.
Growing mushrooms in a bowl is a fun, rewarding, and educational experience. I hope this guide has inspired you to give it a try. Happy growing!

Conclusion
So, there you have it! Growing mushrooms in a bowl isn’t just a quirky science experiment; it’s a genuinely rewarding and surprisingly simple way to bring fresh, flavorful fungi right to your kitchen counter. Forget those expensive, pre-packaged mushrooms from the grocery store – with a little patience and this easy DIY trick, you can cultivate your own delicious supply.
Why is this a must-try? Because it’s accessible, sustainable, and incredibly satisfying. You don’t need a sprawling garden or specialized equipment. A simple bowl, some readily available materials, and a touch of care are all it takes to embark on your mushroom-growing adventure. Plus, you’ll know exactly where your food comes from and how it was grown, giving you peace of mind and a connection to the natural world.
But the fun doesn’t stop there! Feel free to experiment with different types of mushrooms. While oyster mushrooms are a fantastic starting point due to their resilience and rapid growth, you can explore other varieties like shiitake or even wine cap mushrooms as you gain experience. Consider adding different substrates to your mix, such as coffee grounds or straw, to see how they affect the flavor and yield of your harvest. You can even try varying the humidity levels by covering the bowl with different materials, like plastic wrap with ventilation holes or a damp cloth.
This method of mushroom growing in a bowl is also a fantastic educational opportunity. It’s a great way to teach children about the life cycle of fungi and the importance of sustainable food practices. Imagine the excitement of watching tiny pins emerge and transform into fully formed mushrooms right before their eyes!
Don’t be intimidated if your first attempt isn’t perfect. Mushroom growing is a learning process, and every experiment, successful or not, will provide valuable insights. The key is to be patient, observant, and willing to adapt your approach as needed.
We wholeheartedly encourage you to give this DIY trick a try. It’s a fun, educational, and delicious way to connect with nature and enjoy the fruits (or rather, fungi) of your labor. Once you’ve harvested your first batch of homegrown mushrooms, we’d love to hear about your experience! Share your photos, tips, and any variations you’ve tried in the comments below. Let’s build a community of home mushroom growers and inspire others to embrace the magic of fungi! Happy growing!
Frequently Asked Questions (FAQ)
What kind of mushrooms are best for growing in a bowl?
Oyster mushrooms are generally considered the best choice for beginners. They are relatively easy to cultivate, grow quickly, and are quite forgiving of minor environmental fluctuations. Their aggressive mycelium also helps to outcompete potential contaminants. Other good options include shiitake and wine cap mushrooms, but these may require a bit more experience and attention to detail. Avoid trying to grow wild mushrooms unless you are an expert mycologist, as many are poisonous and difficult to cultivate.
What kind of bowl should I use?
Almost any clean bowl will work, but a bowl with a wide opening is preferable as it allows for better air circulation. Glass, ceramic, or food-grade plastic bowls are all suitable. Make sure the bowl is thoroughly cleaned and sanitized before use to minimize the risk of contamination. A bowl with a lid or the ability to be covered is also helpful for maintaining humidity.
What is the best substrate for growing mushrooms in a bowl?
A mixture of pasteurized straw, coffee grounds, and hardwood sawdust is a popular and effective substrate. The straw provides bulk and aeration, the coffee grounds add nitrogen, and the sawdust provides a carbon source. You can also use other materials like cardboard, shredded paper, or even coco coir, but be sure to pasteurize them properly to kill any competing organisms. The ideal substrate will retain moisture without becoming waterlogged.
How do I pasteurize the substrate?
Pasteurization is crucial to eliminate competing molds and bacteria that can hinder mushroom growth. There are several ways to pasteurize your substrate:
* **Hot Water Pasteurization:** Submerge the substrate in hot water (around 160-180°F or 71-82°C) for 1-2 hours. This is a simple and effective method for smaller batches.
* **Steam Pasteurization:** Place the substrate in a heat-resistant container and steam it for 1-2 hours. This method is ideal for larger quantities.
* **Microwave Pasteurization:** For small amounts, you can microwave the substrate in a microwave-safe container with some water for a few minutes until it reaches a temperature of around 160-180°F (71-82°C).
After pasteurization, allow the substrate to cool completely before inoculating it with mushroom spawn.
Where should I place the bowl while the mushrooms are growing?
The ideal location is a cool, dark, and humid place. A basement, closet, or even under the kitchen sink can work well. Avoid direct sunlight, as it can dry out the substrate and inhibit mushroom growth. The temperature should be between 60-75°F (15-24°C) for most oyster mushroom varieties.
How often should I water the mushrooms?
The substrate should be kept consistently moist, but not waterlogged. Mist the surface of the substrate with water once or twice a day, or as needed, to maintain humidity. You can also cover the bowl with plastic wrap or a damp cloth to help retain moisture. If you notice condensation forming on the inside of the cover, reduce the amount of watering.
How long does it take for mushrooms to grow?
The time it takes for mushrooms to grow can vary depending on the mushroom variety, the substrate used, and the environmental conditions. Oyster mushrooms typically take 1-2 weeks to colonize the substrate and another 1-2 weeks to produce mature mushrooms. Shiitake mushrooms may take longer, up to several months.
How do I know when the mushrooms are ready to harvest?
Mushrooms are typically ready to harvest when the caps have fully expanded and the edges are starting to curl upwards. The gills underneath the cap should be visible and well-developed. Harvest the mushrooms by gently twisting them off the substrate.
Can I get multiple harvests from the same bowl?
Yes, you can often get multiple flushes (harvests) from the same bowl. After harvesting the first flush, rehydrate the substrate by soaking it in water for a few hours. Then, drain the excess water and return the bowl to its growing location. You should see new pins (baby mushrooms) forming within a week or two.
What if my mushroom bowl gets moldy?
Mold contamination is a common problem in mushroom cultivation. If you notice small patches of mold, you can try to remove them with a clean spoon or knife. However, if the mold is widespread, it’s best to discard the entire bowl to prevent the spread of contamination. To minimize the risk of mold, ensure that your substrate is properly pasteurized and that your growing environment is clean and well-ventilated.
Is growing mushrooms in a bowl safe?
Yes, growing edible mushrooms in a bowl is generally safe, as long as you are using a known edible species and following proper hygiene practices. Always wash your hands thoroughly before handling the substrate or mushrooms. Avoid consuming any mushrooms that you are unsure about, and never harvest or consume wild mushrooms unless you are an expert mycologist.

Leave a Comment