
Mushroom growing in plastic bottles might sound like something out of a sci-fi movie, but trust me, it’s a surprisingly simple and rewarding DIY project you can tackle right in your own home! Forget trekking to the grocery store for those gourmet mushrooms; imagine harvesting your own fresh, delicious fungi right from repurposed plastic bottles.
For centuries, mushrooms have held a special place in various cultures, revered for their culinary and medicinal properties. From ancient Chinese emperors seeking the “elixir of life” in rare mushrooms to modern-day chefs crafting delectable dishes, the allure of these fascinating fungi remains strong. But you don’t need to be an expert mycologist to enjoy the fruits (or rather, the mushrooms!) of your labor.
In today’s world, where sustainability and self-sufficiency are becoming increasingly important, learning how to cultivate your own food is a game-changer. And that’s where this DIY trick comes in! Mushroom growing in plastic bottles is not only an eco-friendly way to recycle waste, but it also provides you with a constant supply of fresh, organic mushrooms. Plus, it’s a fantastic conversation starter! Who wouldn’t be impressed by your ability to transform discarded plastic into a thriving mushroom farm? I’m excited to show you how easy and fun it can be to grow your own mushrooms at home!
Pilze züchten in Plastikflaschen: Dein DIY-Guide für zu Hause
Hey Pilzfreunde! Hast du dich jemals gefragt, wie du deine eigenen köstlichen Pilze zu Hause züchten kannst, ohne viel Platz oder teure Ausrüstung zu benötigen? Dann bist du hier genau richtig! Ich zeige dir, wie du mit einfachen Plastikflaschen und ein paar anderen leicht erhältlichen Materialien deine eigene kleine Pilzzucht starten kannst. Es ist einfacher, als du denkst, und macht unglaublich viel Spaß!
Was du brauchst: Die Materialliste
Bevor wir loslegen, lass uns sicherstellen, dass du alles griffbereit hast. Hier ist eine Liste der Dinge, die du für dein Pilzzucht-Projekt benötigst:
* Plastikflaschen: Am besten eignen sich 1,5- oder 2-Liter-Flaschen. Je mehr, desto mehr Pilze kannst du züchten! Achte darauf, dass sie sauber und leer sind.
* Pilzbrut: Das ist das “Saatgut” für deine Pilze. Du kannst sie online oder in Gartencentern kaufen. Austernpilze (Pleurotus ostreatus) sind eine gute Wahl für Anfänger, da sie relativ einfach zu züchten sind.
* Substrat: Das ist das Material, auf dem deine Pilze wachsen werden. Stroh, Kaffeesatz oder Sägemehl sind beliebte Optionen. Ich persönlich mag Stroh, weil es leicht zu bekommen und zu verarbeiten ist.
* Kalk: Wenn du Stroh verwendest, brauchst du Kalk, um es zu pasteurisieren. Das hilft, unerwünschte Mikroorganismen abzutöten.
* Großer Topf oder Eimer: Zum Pasteurisieren des Substrats.
* Bohrmaschine oder Messer: Um Löcher in die Plastikflaschen zu machen.
* Sprühflasche: Zum Befeuchten der Pilze.
* Handschuhe: Um deine Hände sauber zu halten.
* Desinfektionsmittel: Um die Flaschen und Werkzeuge zu reinigen.
* Klebeband (optional): Zum Abdecken der Löcher, falls nötig.
Vorbereitung ist alles: Das Substrat pasteurisieren
Die Pasteurisierung des Substrats ist ein wichtiger Schritt, um sicherzustellen, dass deine Pilze gesund wachsen und nicht von anderen Mikroorganismen überwuchert werden.
1. Stroh zerkleinern: Wenn du Stroh verwendest, schneide oder zerkleinere es in kleinere Stücke (ca. 5-10 cm lang). Das erleichtert die Pasteurisierung und die spätere Besiedlung durch die Pilzbrut.
2. Kalk hinzufügen: Gib das zerkleinerte Stroh in einen großen Topf oder Eimer und füge Kalk hinzu. Die Menge hängt von der Menge des Strohs ab, aber eine Faustregel ist, etwa 1-2% Kalk bezogen auf das Trockengewicht des Strohs.
3. Mit Wasser bedecken: Fülle den Topf oder Eimer mit Wasser, bis das Stroh vollständig bedeckt ist. Rühre gut um, um sicherzustellen, dass der Kalk gleichmäßig verteilt ist.
4. Einweichen: Lasse das Stroh für 12-24 Stunden einweichen. Dadurch wird der pH-Wert erhöht und unerwünschte Mikroorganismen abgetötet.
5. Erhitzen (optional, aber empfohlen): Für eine effektivere Pasteurisierung kannst du das Stroh für etwa 1 Stunde bei 65-70°C erhitzen. Das geht am besten in einem großen Topf auf dem Herd. Achte darauf, dass das Stroh nicht kocht!
6. Abkühlen lassen: Lasse das Stroh nach dem Einweichen oder Erhitzen vollständig abkühlen, bevor du es weiterverarbeitest. Es sollte handwarm sein.
7. Abtropfen lassen: Drücke das überschüssige Wasser aus dem Stroh, bis es feucht, aber nicht tropfnass ist.
Die Pilzzucht-Flaschen vorbereiten
Jetzt, wo dein Substrat vorbereitet ist, können wir uns den Plastikflaschen widmen.
1. Flaschen reinigen: Stelle sicher, dass die Plastikflaschen sauber und trocken sind. Du kannst sie mit Wasser und Seife waschen und anschließend mit Desinfektionsmittel besprühen.
2. Löcher bohren: Bohre oder schneide Löcher in die Seiten der Plastikflaschen. Diese Löcher dienen als Belüftung und als Austrittspunkte für die Pilze. Die Löcher sollten etwa 1-2 cm groß sein und in einem Abstand von 5-10 cm zueinander angeordnet sein. Ich mache meistens 4-6 Löcher pro Flasche.
3. Optional: Löcher abdecken: Wenn du befürchtest, dass die Löcher zu groß sind oder dass Schädlinge eindringen könnten, kannst du sie mit Klebeband abdecken. Lasse aber kleine Schlitze frei, damit die Pilze trotzdem herauswachsen können.
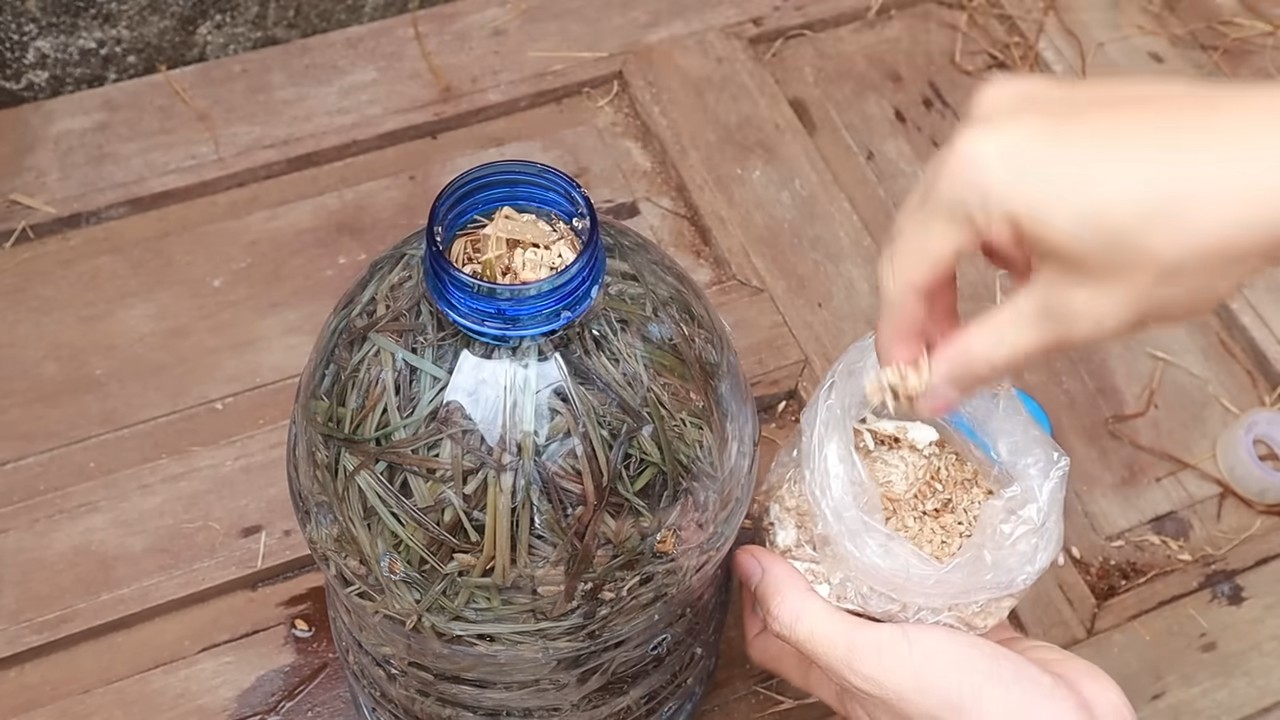
Die Flaschen befüllen: Substrat und Pilzbrut schichten
Jetzt kommt der spannende Teil: Das Befüllen der Flaschen mit Substrat und Pilzbrut.
1. Schichtweise befüllen: Fülle die Plastikflaschen schichtweise mit Substrat und Pilzbrut. Beginne mit einer Schicht Substrat (ca. 5-10 cm dick), dann eine Schicht Pilzbrut (ca. 1-2 cm dick), dann wieder eine Schicht Substrat usw.
2. Verhältnis beachten: Das Verhältnis von Substrat zu Pilzbrut sollte etwa 10:1 betragen. Das bedeutet, dass du für jede 10 Teile Substrat 1 Teil Pilzbrut benötigst.
3. Obere Schicht: Die oberste Schicht sollte aus Substrat bestehen.
4. Leicht andrücken: Drücke das Substrat und die Pilzbrut leicht an, damit sie gut miteinander verbunden sind. Aber nicht zu fest, damit die Pilze noch Platz zum Wachsen haben.
Die Inkubationsphase: Warten und beobachten
Nachdem du die Flaschen befüllt hast, beginnt die Inkubationsphase. In dieser Phase besiedelt die Pilzbrut das Substrat.
1. Geeigneten Ort finden: Stelle die befüllten Plastikflaschen an einen dunklen, kühlen und feuchten Ort. Eine Garage, ein Keller oder ein Schrank sind gute Optionen. Die Temperatur sollte idealerweise zwischen 18 und 24°C liegen.
2. Feuchtigkeit aufrechterhalten: Besprühe die Flaschen regelmäßig mit Wasser, um die Feuchtigkeit aufrechtzuerhalten. Das Substrat sollte feucht, aber nicht tropfnass sein.
3. Belüftung sicherstellen: Sorge für eine gute Belüftung, indem du den Raum regelmäßig lüftest.
4. Geduld haben: Die Inkubationsphase dauert in der Regel 2-4 Wochen. Während dieser Zeit wird das Substrat von einem weißen Myzel (Pilzgeflecht) durchzogen.
5. Auf Kontamination achten: Überprüfe die Flaschen regelmäßig auf Anzeichen von Kontamination, wie z.B. Schimmel oder unangenehme Gerüche. Wenn du Kontamination feststellst, entsorge die betroffene Flasche, um die Ausbreitung zu verhindern.
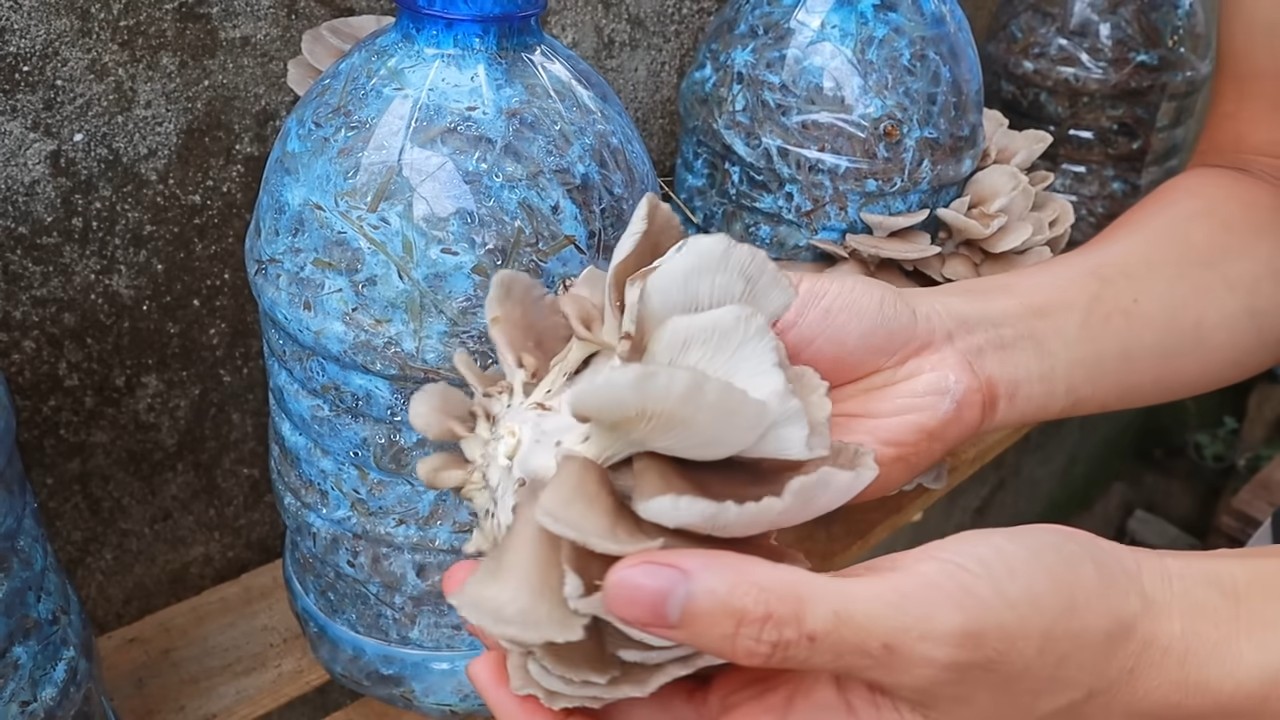
Die Fruchtungsphase: Pilze ernten
Wenn das Substrat vollständig von Myzel besiedelt ist, beginnt die Fruchtungsphase. Jetzt können die Pilze wachsen!
1. Licht erhöhen: Stelle die Flaschen an einen helleren Ort, aber vermeide direkte Sonneneinstrahlung.
2. Feuchtigkeit erhöhen: Besprühe die Flaschen mehrmals täglich mit Wasser, um die Luftfeuchtigkeit zu erhöhen. Du kannst auch eine Plastiktüte über die Flaschen stülpen, um die Feuchtigkeit zu halten. Achte aber darauf, dass die Tüte nicht direkt auf den Pilzen liegt und dass genügend Luft zirkulieren kann.
3. Belüftung beibehalten: Sorge weiterhin für eine gute Belüftung.
4. Pilze beobachten: Nach einigen Tagen sollten sich kleine Pilzköpfe an den Löchern bilden.
5. Ernten: Ernte die Pilze, wenn sie ausgewachsen sind, aber bevor sie ihre Sporen abwerfen. Das erkennst du daran, dass die Hüte sich leicht nach oben biegen. Schneide die Pilze mit einem scharfen Messer oder einer Schere ab.
Nach der Ernte: Weitere Ernten ermöglichen
Conclusion
So, there you have it! Transforming humble plastic bottles into thriving mushroom farms is not just a quirky DIY project; it’s a sustainable, cost-effective, and incredibly rewarding way to cultivate your own delicious fungi. We’ve explored the simplicity of the process, highlighting how accessible it is even for beginners with limited space or gardening experience. The beauty of this method lies in its adaptability. You’re not confined to a specific type of mushroom; oyster mushrooms, shiitake, and even some varieties of button mushrooms can flourish in these repurposed containers.
But why is this DIY trick a must-try? Beyond the obvious benefit of fresh, homegrown mushrooms, it’s about embracing sustainability. We’re actively reducing plastic waste by giving these bottles a new lease on life, diverting them from landfills and transforming them into vessels of nourishment. It’s a small act with a significant impact, contributing to a more eco-conscious lifestyle.
Furthermore, growing your own mushrooms offers unparalleled control over the quality and safety of your food. You know exactly what goes into your mushrooms – no pesticides, no hidden chemicals, just pure, natural goodness. This is especially important in today’s world where food safety and traceability are paramount concerns.
The possibilities for variation are endless. Experiment with different substrates like coffee grounds, straw, or even cardboard. Try different bottle sizes to optimize space and yield. Consider creating a vertical mushroom garden by stacking multiple bottle farms, maximizing your growing area. You can even get creative with the aesthetics, painting the bottles or decorating them to blend seamlessly with your home decor.
Don’t be afraid to get your hands dirty and embrace the learning process. Mushroom cultivation can be a bit of a science experiment, and there will be successes and failures along the way. But that’s part of the fun! Each attempt will teach you something new about the fascinating world of fungi.
We wholeheartedly encourage you to embark on this exciting journey of growing mushrooms in plastic bottles. It’s a project that combines sustainability, self-sufficiency, and the sheer joy of nurturing life. Once you taste the difference between store-bought and homegrown mushrooms, you’ll never look back.
So, gather your plastic bottles, choose your mushroom spawn, and prepare to be amazed by the abundance you can create. And most importantly, share your experiences with us! We’d love to hear about your successes, your challenges, and any unique variations you discover. Let’s build a community of mushroom enthusiasts, sharing knowledge and inspiring each other to grow our own food and live more sustainably. Let us know what kind of mushrooms you are growing in plastic bottles.
Frequently Asked Questions (FAQ)
What types of mushrooms are best suited for growing in plastic bottles?
Oyster mushrooms are generally considered the easiest and most forgiving variety for beginners. They are fast-growing, relatively tolerant of environmental fluctuations, and produce a generous yield. Shiitake mushrooms can also be grown in plastic bottles, but they require a more specific substrate and a longer incubation period. Button mushrooms are more challenging and may not be as successful in this setup, as they require specific casing layers and environmental controls. Ultimately, the best type of mushroom depends on your experience level, the availability of spawn, and your desired flavor profile. Research the specific needs of each variety before you begin.
What is the best substrate to use for growing mushrooms in plastic bottles?
The ideal substrate depends on the type of mushroom you’re growing. Oyster mushrooms thrive on a variety of substrates, including straw, coffee grounds, and even cardboard. Shiitake mushrooms prefer hardwood sawdust or wood chips. It’s crucial to properly pasteurize or sterilize the substrate to eliminate competing molds and bacteria. Pasteurization involves heating the substrate to a specific temperature for a certain duration, while sterilization requires higher temperatures and pressures, typically achieved using an autoclave or pressure cooker. Coffee grounds are a great option for beginners as they are readily available and often already pasteurized during the brewing process.
How do I pasteurize or sterilize the substrate?
For pasteurization, you can soak the substrate in hot water (around 160-180°F or 71-82°C) for at least an hour. This will kill off most of the unwanted microorganisms without completely eliminating the beneficial ones. For sterilization, you’ll need a pressure cooker or autoclave. Place the substrate in heat-resistant bags or jars and process them at 15 PSI for 90 minutes. Always follow the manufacturer’s instructions for your pressure cooker or autoclave. Proper pasteurization or sterilization is crucial for preventing contamination and ensuring a successful mushroom crop.
How do I maintain the proper humidity for mushroom growth in plastic bottles?
Maintaining adequate humidity is essential for mushroom development. The plastic bottle environment helps retain moisture, but you may still need to supplement it. Regularly mist the inside of the bottle with water, especially when you see the first signs of pinning (the formation of tiny mushroom buds). You can also create a humidity tent by placing a clear plastic bag over the bottle, ensuring there’s enough airflow to prevent excessive moisture buildup and mold growth. Monitor the humidity levels regularly and adjust your misting schedule accordingly.
How long does it take to grow mushrooms in plastic bottles?
The time it takes to grow mushrooms varies depending on the variety, the substrate, and the environmental conditions. Oyster mushrooms typically fruit within a few weeks of inoculation, while shiitake mushrooms may take several months. Patience is key! Monitor your mushroom farm regularly and provide the necessary care. Don’t be discouraged if your first attempt isn’t successful. Learn from your mistakes and try again.
What are some common problems I might encounter, and how can I fix them?
Contamination is a common problem. If you see green, black, or other colored molds growing on your substrate, it’s likely contaminated. Remove the contaminated bottle immediately to prevent the spread of the mold. Insufficient humidity can lead to dry, cracked mushrooms. Increase the frequency of misting or create a more humid environment. Pests, such as fungus gnats, can also be a nuisance. Use sticky traps or introduce beneficial nematodes to control them.
Can I reuse the plastic bottles after harvesting the mushrooms?
Yes, you can reuse the plastic bottles multiple times. After harvesting, remove any remaining substrate and clean the bottles thoroughly with soap and water. You may need to sterilize them again before reusing them. However, keep in mind that plastic can degrade over time, so eventually, the bottles may become brittle or cracked.
Is growing mushrooms in plastic bottles safe? Are there any health concerns?
Growing mushrooms in plastic bottles is generally safe, as long as you follow proper hygiene practices and use food-grade plastic bottles. Avoid using bottles that have contained harmful chemicals or pesticides. Always wash your hands thoroughly before handling the substrate or mushrooms. Ensure proper ventilation to prevent the buildup of carbon dioxide. And of course, only consume mushrooms that you have positively identified as edible. If you’re unsure about the identity of a mushroom, don’t eat it.
How do I know when the mushrooms are ready to harvest?
The timing of harvest depends on the type of mushroom. Oyster mushrooms are typically ready to harvest when the caps are fully formed and the edges are still slightly curled downward. Shiitake mushrooms are ready when the caps have flattened out and the gills are visible. Harvest the mushrooms by gently twisting them off the substrate. Avoid cutting them, as this can leave behind a stump that can attract pests and diseases.
Can I grow mushrooms indoors year-round using this method?
Yes, one of the advantages of growing mushrooms in plastic bottles is that you can do it indoors year-round. You’ll need to provide the right environmental conditions, including temperature, humidity, and light. A cool, dark, and humid environment is ideal for most mushroom varieties. You can use a grow tent or a dedicated room to create the perfect growing conditions. With proper care and attention, you can enjoy a continuous supply of fresh, homegrown mushrooms throughout the year.
Leave a Comment