
Mushroom Growing with Leftovers? Yes, you read that right! Imagine turning your kitchen scraps into a delicious and sustainable source of food. Forget those expensive grocery store runs for exotic mushrooms; with a few simple tricks, you can cultivate your own gourmet fungi right at home, using materials you’d normally toss in the bin.
The practice of mushroom cultivation has ancient roots, dating back centuries in Eastern cultures where mushrooms were revered for their medicinal and culinary properties. From humble beginnings, it has evolved into a sophisticated science, but the core principle remains the same: harnessing the power of nature to create something amazing.
In today’s world, where sustainability and self-sufficiency are more important than ever, learning mushroom growing with leftovers is a game-changer. Not only does it reduce food waste, but it also provides you with a fresh, healthy, and incredibly rewarding hobby. Plus, who wouldn’t want to impress their friends and family with homegrown shiitake or oyster mushrooms? I know I would!
This DIY guide will walk you through the process step-by-step, showing you how to transform coffee grounds, cardboard, and other common kitchen waste into a thriving mushroom farm. Get ready to unlock the secrets of the fungal kingdom and embark on a delicious and eco-friendly adventure!
Growing Mushrooms From Kitchen Scraps: A Fun and Frugal DIY Project
Hey there, fellow DIY enthusiasts! Ever thought about turning your kitchen scraps into a delicious and sustainable food source? Well, get ready to dive into the fascinating world of mushroom cultivation using nothing but your leftover coffee grounds, cardboard, and a little bit of patience. I’m going to walk you through a simple and rewarding method for growing oyster mushrooms right at home. It’s easier than you think, and the satisfaction of harvesting your own homegrown mushrooms is truly unbeatable!
What You’ll Need: The Mushroom Growing Arsenal
Before we get started, let’s gather our supplies. This is a low-cost project, so most of these items are probably already lying around your house.
* Oyster Mushroom Spawn: This is the most crucial ingredient! You can purchase oyster mushroom spawn online or from a local mushroom farm. Make sure it’s a reputable source to ensure healthy and viable spawn. I recommend starting with a small bag (around 5 lbs) for your first attempt.
* Coffee Grounds: Used coffee grounds are an excellent substrate for oyster mushrooms. They’re readily available, already pasteurized from the brewing process, and packed with nutrients. Ask your local coffee shop if they’ll save their grounds for you – they’re usually happy to get rid of them! Aim for at least 5-10 lbs of coffee grounds for a good-sized batch.
* Cardboard: Corrugated cardboard is another essential component. It provides structure and additional nutrients for the mushrooms. Avoid cardboard with glossy printing or tape. Tear it into small pieces, about 1-2 inches square.
* Bucket or Container: You’ll need a clean bucket or container (around 5-gallon size) to mix your substrate. Make sure it’s food-grade plastic.
* Spray Bottle: A spray bottle filled with clean water is necessary to keep the substrate moist.
* Large Clear Plastic Bag: This will act as a humidity tent to create the ideal growing environment for your mushrooms. A garbage bag will work, but clear is better so you can monitor progress.
* Gloves: Wearing gloves will help prevent contamination of your substrate.
* Rubbing Alcohol: For sanitizing your work area and tools.
* Optional: Micropore Tape: This breathable tape can be used to cover holes in your bag for better air exchange.
Step-by-Step Guide to Mushroom Magic
Now that we have everything we need, let’s get our hands dirty!
Phase 1: Preparing the Substrate
This phase is all about creating the perfect environment for the mushroom spawn to thrive. Cleanliness is key here, so let’s start by sanitizing our workspace.
1. Sanitize Your Workspace: Wipe down your work surface with rubbing alcohol to minimize the risk of contamination. This is a crucial step, so don’t skip it!
2. Prepare the Cardboard: Tear the cardboard into small pieces (1-2 inches square). This increases the surface area for the mushrooms to colonize.
3. Pasteurize the Cardboard (Optional but Recommended): While coffee grounds are already pasteurized, cardboard can harbor unwanted microbes. To pasteurize, boil the cardboard pieces in a large pot of water for about an hour. This will kill off any competing organisms. Let the cardboard cool completely before proceeding. If you skip this step, make sure your cardboard is clean and free of any visible mold.
4. Mix the Substrate: In your clean bucket, combine the coffee grounds and cardboard pieces. The ideal ratio is roughly 70% coffee grounds and 30% cardboard. Mix thoroughly, ensuring the cardboard is evenly distributed throughout the coffee grounds.
5. Hydrate the Substrate: The substrate needs to be moist but not soaking wet. Add water gradually, mixing as you go, until the mixture feels like a wrung-out sponge. You should be able to squeeze a handful of the substrate and only get a few drops of water.
Phase 2: Inoculation – Planting the Seeds of Mushroom Growth
This is where the magic truly begins! We’re introducing the oyster mushroom spawn to the prepared substrate.
1. Sanitize Your Gloves: Put on your gloves and wipe them down with rubbing alcohol.
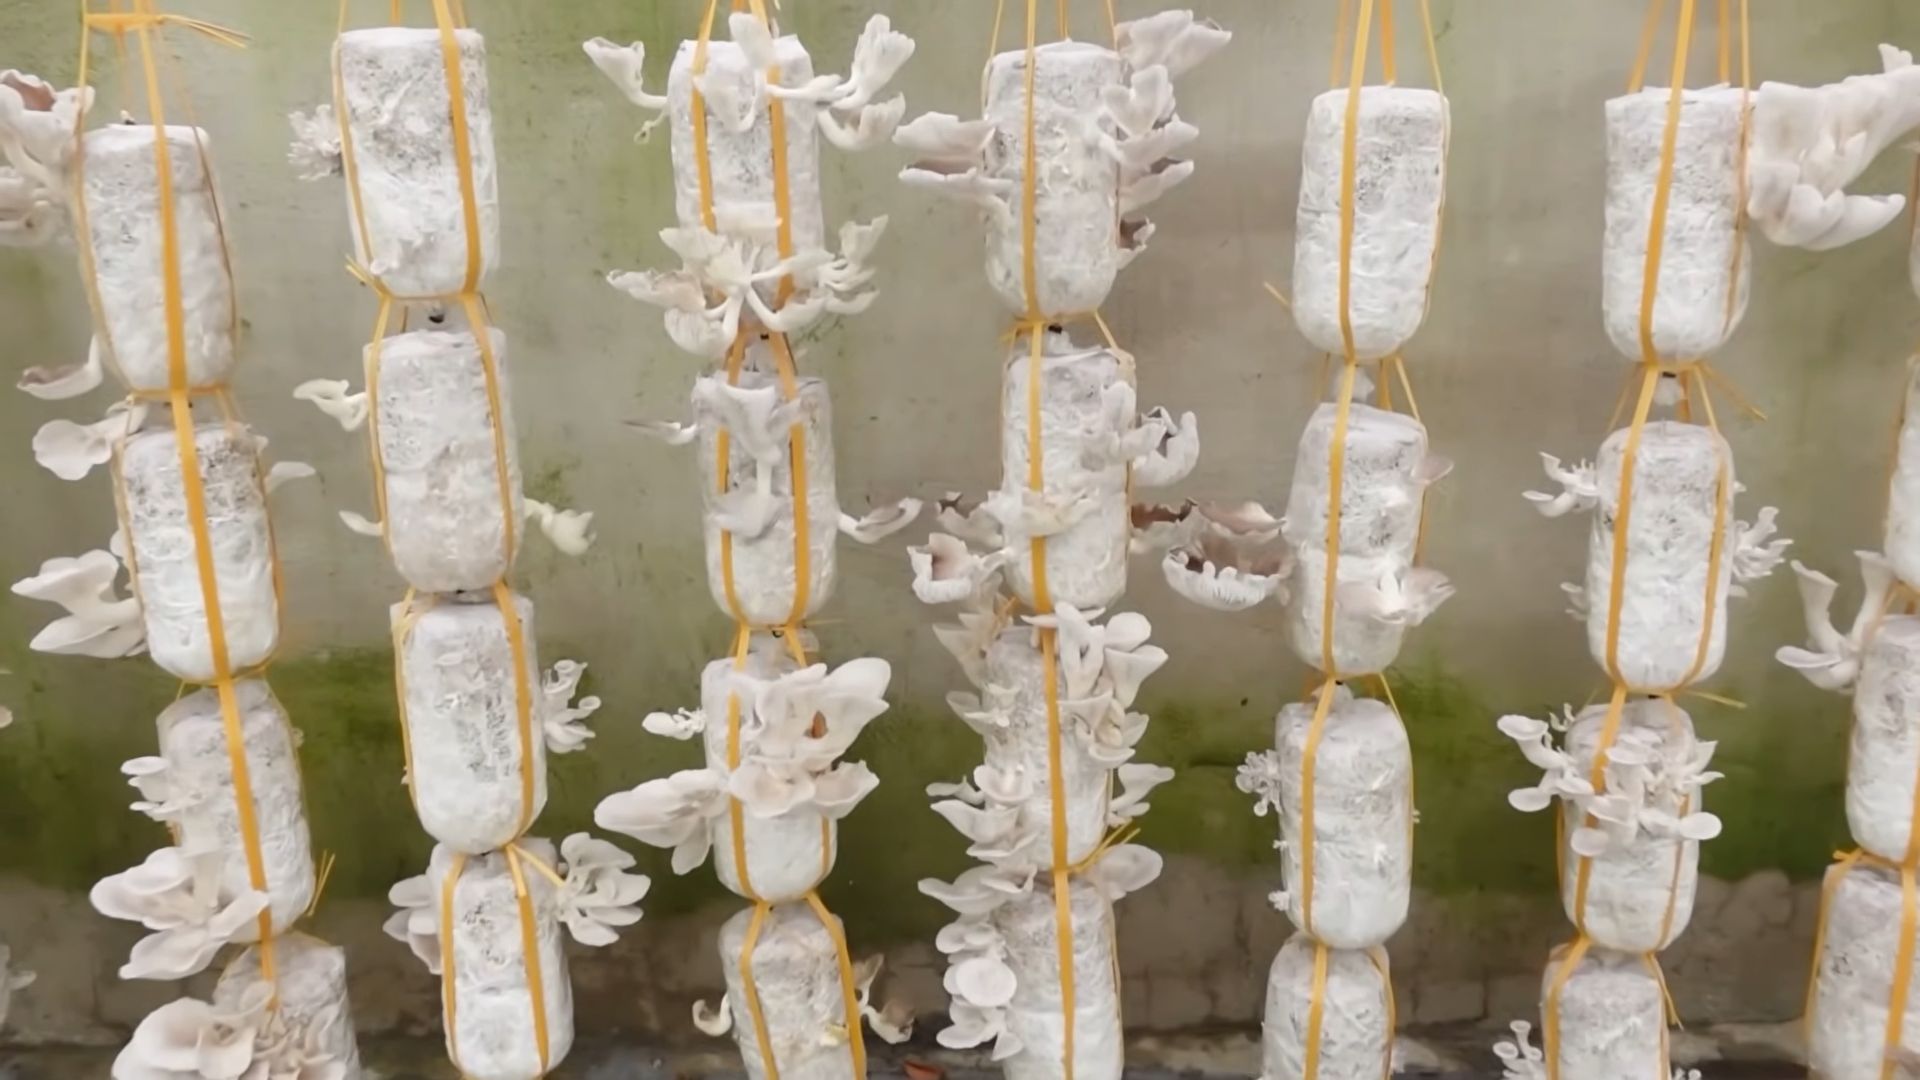
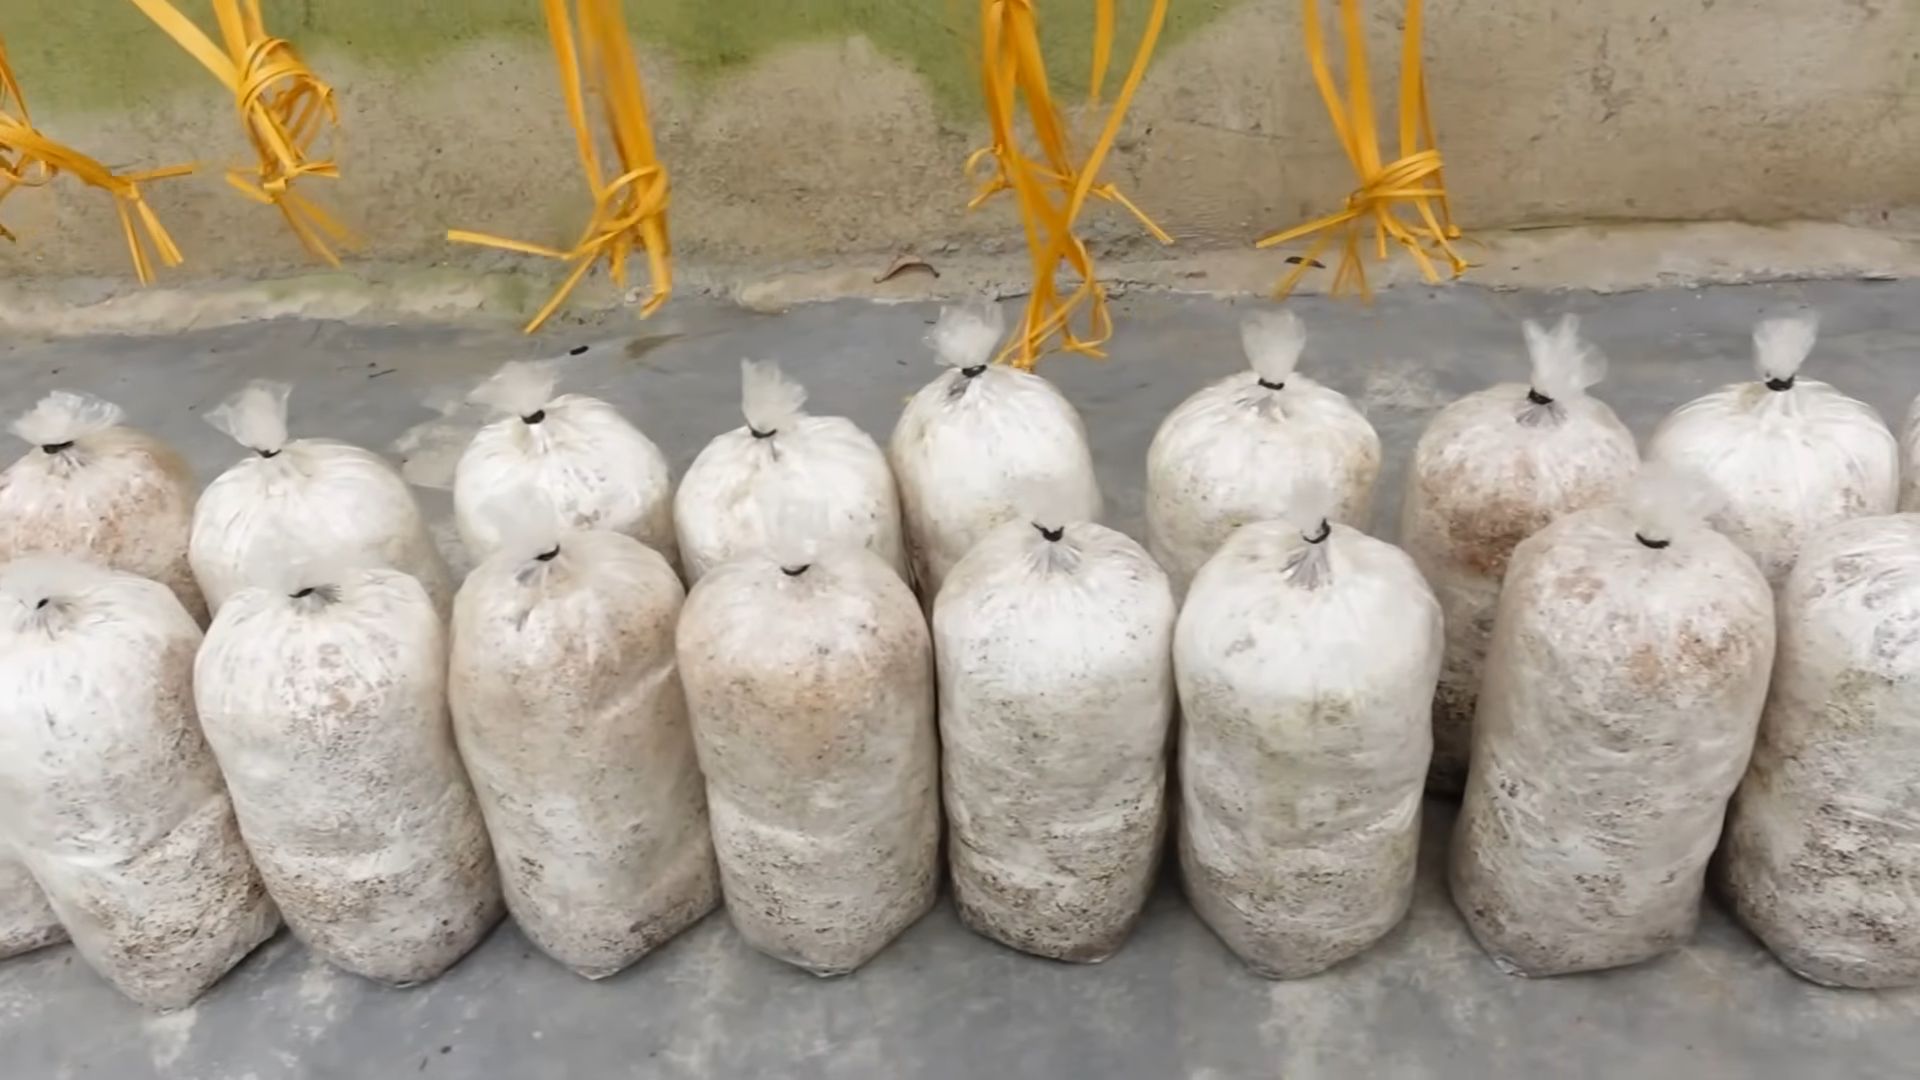
2. Layer the Substrate and Spawn: In your plastic bag, create alternating layers of substrate and mushroom spawn. Start with a layer of substrate, then sprinkle a layer of spawn on top. Repeat this process until you’ve used all of the substrate and spawn, finishing with a layer of spawn on top. The goal is to distribute the spawn evenly throughout the substrate.
3. Seal the Bag: Close the plastic bag tightly, leaving some air inside. This will create a humid environment for the mushrooms to grow.
4. Create Air Exchange: Oyster mushrooms need fresh air to thrive. You can create air exchange by poking small holes in the bag with a clean needle or knife. Space the holes a few inches apart. Alternatively, you can use micropore tape to cover the holes, which will allow air to pass through while preventing contamination.
Phase 3: Incubation – The Waiting Game
Now comes the hardest part: waiting! During this phase, the mushroom spawn will colonize the substrate, forming a network of white mycelium.
1. Find a Suitable Location: Place the bag in a dark, cool, and humid location. A basement, closet, or under the sink are all good options. The ideal temperature is between 65-75°F (18-24°C).
2. Monitor the Colonization: Check the bag regularly for signs of colonization. You should start to see white, fuzzy mycelium spreading throughout the substrate within a week or two.
3. Maintain Humidity: If the substrate appears to be drying out, mist the inside of the bag with water using your spray bottle. Be careful not to overwater, as this can lead to mold growth.
4. Patience is Key: The colonization process can take anywhere from 2-4 weeks, depending on the temperature and humidity. Don’t be discouraged if it takes longer. Just be patient and keep monitoring the bag.
Phase 4: Fruiting – The Grand Finale!
Once the substrate is fully colonized (it will appear almost entirely white), it’s time to trigger fruiting, which is when the mushrooms start to grow.
1. Introduce Light: Move the bag to a location with indirect light. Direct sunlight can dry out the mushrooms.
2. Increase Air Exchange: Increase the air exchange by cutting larger holes in the bag or opening the bag slightly. This will encourage the mushrooms to fruit.
3. Maintain Humidity: Mist the inside of the bag with water regularly to maintain high humidity. You can also place a tray of water near the bag to increase humidity.
4. Watch for Pinheads: Within a few days, you should start to see small mushroom “pinheads” forming on the surface of the substrate. These are the baby mushrooms!
5. Harvest Your Mushrooms: The mushrooms will grow rapidly over the next few days. Harvest them when the caps are still slightly curled downwards. To harvest, simply twist the mushrooms off the substrate at the base.
Troubleshooting: Common Issues and Solutions
Even with the best preparation, things can sometimes go wrong. Here are some common issues you might encounter and how to address them:
* Mold Growth: If you see green, black, or other colored mold growing in your bag, it means the substrate has been contaminated. Unfortunately, there’s not much you can do at this point. Dispose of the contaminated substrate and start over with fresh materials. To prevent mold growth, make sure to sanitize your workspace and tools thoroughly.
* Slow Colonization: If the mycelium is growing slowly, it could be due to low temperature or humidity. Try moving the bag to a warmer location and misting it more frequently.
* No Fruiting: If the substrate is fully colonized but no mushrooms are forming, it could be due to lack of light or air exchange. Try moving the bag to a location with indirect light and increasing the air exchange by cutting larger holes in the bag.
* Small Mushrooms: If the mushrooms are small and stunted, it could be due to lack of humidity or nutrients. Try misting the bag more frequently and adding a small amount of nutrient-rich material, such as spent grain from brewing, to the substrate.
Tips for Success: Maximizing Your Mushroom Harvest
Here are a few extra tips to help you achieve a bountiful mushroom harvest:
* Use Fresh Coffee Grounds: The fresher the coffee grounds, the better. They contain more nutrients and are less likely to be contaminated.
* Experiment with Different Substrates: While coffee grounds and cardboard are a great starting point, you can also experiment with other substrates, such as straw, sawdust, or wood chips.
* Maintain a Clean Environment: Cleanliness is crucial for successful mushroom cultivation. Sanitize your workspace and tools regularly to prevent contamination.
* Be Patient:
Conclusion
So, there you have it! Turning your kitchen scraps into a thriving mushroom patch is not only incredibly satisfying but also a fantastic way to reduce waste and enjoy fresh, homegrown goodness. This DIY mushroom growing method, using your everyday leftovers, is a game-changer for anyone looking to embrace a more sustainable lifestyle and add a touch of culinary magic to their home.
Why is this a must-try? Because it’s accessible, affordable, and surprisingly easy. Forget complicated setups and expensive equipment. All you need are some mushroom stems, coffee grounds, cardboard, and a little patience. The environmental benefits are undeniable – you’re diverting waste from landfills and creating a valuable resource in its place. Plus, the taste of freshly grown mushrooms, cultivated with your own hands, is simply unmatched.
But the beauty of this method lies in its adaptability. Feel free to experiment with different types of mushrooms. Oyster mushrooms are particularly well-suited for this technique, but you can also try shiitake or even wine cap mushrooms, depending on availability and your local climate. Consider adding other nitrogen-rich materials to your substrate, such as grass clippings or shredded newspaper, to further enrich the growing medium. You can also adjust the humidity levels by misting more or less frequently, depending on your environment.
Don’t be afraid to get creative! Perhaps you want to build a more elaborate growing container using recycled materials, or maybe you want to try inoculating logs with mushroom spawn for a longer-term project. The possibilities are endless.
We wholeheartedly encourage you to give this DIY mushroom growing trick a try. It’s a rewarding experience that connects you to the natural world and provides you with a delicious and sustainable food source. Once you’ve harvested your first batch of homegrown mushrooms, we’d love to hear about your experience! Share your photos, tips, and any variations you’ve tried in the comments below. Let’s build a community of mushroom enthusiasts and inspire others to embrace the magic of growing their own food from leftovers. This is more than just a recipe; it’s a step towards a more sustainable and fulfilling lifestyle. So, grab your mushroom stems, gather your coffee grounds, and get ready to embark on a fascinating journey into the world of DIY mushroom cultivation. You won’t regret it!
Frequently Asked Questions (FAQ)
What types of mushrooms work best with this method?
Oyster mushrooms are generally considered the easiest and most reliable choice for beginners using this method. They are relatively fast-growing and tolerant of a wider range of conditions. Shiitake and wine cap mushrooms can also be grown using similar techniques, but they may require more specific conditions and a longer incubation period. Experimentation is key! Consider your local climate and the availability of mushroom spawn when making your selection. Remember that different mushroom species have different nutritional needs, so research the specific requirements of the variety you choose.
How long does it take to grow mushrooms using leftovers?
The time it takes to grow mushrooms can vary depending on several factors, including the type of mushroom, the temperature, humidity, and the quality of your substrate. Generally, you can expect to see the first signs of mycelial growth (the white, thread-like network that is the vegetative part of the fungus) within a week or two. Pinheads (tiny mushroom formations) should appear within a few weeks after that, and you can typically harvest your first crop within a month or two. Keep in mind that patience is essential! Consistent monitoring and maintenance are crucial for success.
What if my mushroom growing container starts to smell bad?
A foul odor is usually a sign of contamination. This could be due to bacteria or mold competing with the mushroom mycelium. If you notice a bad smell, it’s important to remove the contaminated area immediately to prevent it from spreading. Ensure proper ventilation and avoid overwatering, as excessive moisture can create an environment conducive to unwanted growth. Using sterilized materials and maintaining a clean workspace can also help prevent contamination. If the contamination is widespread, it may be necessary to discard the entire batch and start over.
How do I know when the mushrooms are ready to harvest?
The ideal time to harvest mushrooms depends on the species. Oyster mushrooms are typically ready to harvest when the caps are fully formed and the edges are still slightly curled downwards. Shiitake mushrooms are ready when the caps have opened and the gills are visible. It’s best to harvest mushrooms before they release their spores, as this can reduce their shelf life. Gently twist or cut the mushrooms from the substrate, being careful not to damage the surrounding mycelium.
Can I use any type of coffee grounds?
Used coffee grounds are an excellent source of nitrogen for mushroom growth. Both caffeinated and decaffeinated coffee grounds can be used. However, it’s important to use coffee grounds that are relatively fresh and free from mold or other contaminants. Avoid using coffee grounds that have been sitting for an extended period, as they may have already started to decompose.
What other materials can I use in my mushroom substrate?
In addition to coffee grounds and cardboard, you can incorporate other nitrogen-rich materials into your mushroom substrate. Shredded newspaper, straw, grass clippings, and even vegetable scraps can be used to enrich the growing medium. However, it’s important to ensure that these materials are free from pesticides or other harmful chemicals. Sterilizing the substrate before inoculation can also help prevent contamination and improve your chances of success.
How do I maintain the humidity levels in my mushroom growing container?
Maintaining proper humidity is crucial for mushroom growth. You can increase humidity by misting the substrate regularly with water. A spray bottle is ideal for this purpose. You can also cover the container with a plastic bag or lid to trap moisture. However, be sure to provide adequate ventilation to prevent the buildup of excess moisture, which can lead to mold growth. Monitoring the moisture levels regularly and adjusting your misting schedule accordingly is essential.
Can I grow mushrooms indoors and outdoors?
Yes, you can grow mushrooms both indoors and outdoors, depending on your climate and the type of mushroom you are growing. Indoor cultivation allows for greater control over temperature, humidity, and light, making it easier to create optimal growing conditions. Outdoor cultivation can be more challenging, but it can also be more rewarding, as it allows you to mimic the natural environment of the mushrooms. Choose a location that is shaded and protected from direct sunlight and strong winds.
How many times can I harvest mushrooms from the same substrate?
You can typically harvest multiple flushes (crops) of mushrooms from the same substrate. After harvesting the first flush, allow the substrate to rest for a few weeks, and then rehydrate it by soaking it in water. This will encourage the mycelium to produce another flush of mushrooms. The number of flushes you can harvest will depend on the quality of the substrate and the growing conditions.
Is growing mushrooms from leftovers safe to eat?
Yes, mushrooms grown from leftovers are generally safe to eat, provided that you follow proper hygiene practices and use clean materials. It’s important to ensure that the substrate is free from contaminants and that the mushrooms are properly cooked before consumption. If you are unsure about the safety of your mushrooms, it’s best to err on the side of caution and discard them. Always consult with a qualified expert if you have any concerns.
Leave a Comment