
Peanut Growing Foam Box: Ever dreamt of harvesting your own crunchy, delicious peanuts right in your backyard, even if you don’t have a sprawling farm? I know I have! The idea of fresh, homegrown peanuts is incredibly appealing, and that’s where the magic of a DIY peanut growing foam box comes in.
For centuries, peanuts have been a staple crop, originating in South America and spreading across the globe. They’re not just tasty snacks; they’re packed with nutrients and hold cultural significance in many cuisines. But let’s face it, growing peanuts can seem daunting, especially if you’re dealing with limited space or less-than-ideal soil conditions. That’s where this simple, yet effective, DIY project shines.
This article will guide you through creating your very own peanut growing foam box, a fantastic solution for urban gardeners, apartment dwellers, or anyone looking for a fun and rewarding gardening project. I’ll show you how to build a cost-effective and efficient growing environment that maximizes your peanut yield. Forget complicated setups and expensive equipment! With a few readily available materials and my easy-to-follow instructions, you’ll be enjoying homegrown peanuts in no time. So, let’s get our hands dirty and unlock the secrets to successful peanut cultivation with this amazing DIY trick!
DIY Peanut Growing Foam Box: From Seed to Snack!
Hey there, fellow gardening enthusiasts! Ever thought about growing your own peanuts? It’s surprisingly easy and incredibly rewarding. Forget the sprawling fields – we’re going to create a mini peanut paradise right in your backyard (or even on your balcony!) using a simple foam box. This guide will walk you through every step, from prepping the box to harvesting your homegrown peanuts. Let’s get started!
Materials You’ll Need:
* A large foam box (the kind used for shipping perishables works perfectly!)
* Drill with various sized bits
* Potting soil (well-draining is key!)
* Peanut seeds (raw, unsalted peanuts from the grocery store will do!)
* Watering can or hose
* Gardening gloves (optional, but recommended)
* Measuring tape or ruler
* Sharp knife or box cutter
* Landscape fabric or burlap (optional, for lining the box)
* Small rocks or gravel (for drainage)
* Fertilizer (specifically for legumes, optional)
* A sunny spot!
Preparing Your Foam Box: The Foundation for Success
This is arguably the most important part. A well-prepared box means happy, healthy peanuts!
1. Choose Your Box Wisely: First, find a foam box that’s at least 12 inches deep and wide. The bigger, the better, as peanut plants need room to spread their roots. Make sure it’s clean and free of any lingering odors from its previous contents.
2. Drill Drainage Holes: Drainage is absolutely crucial to prevent root rot. Using your drill, create several drainage holes (about 1/2 inch in diameter) in the bottom of the box. Space them about 6-8 inches apart. I usually go overboard here – better safe than sorry!
3. Line the Box (Optional but Recommended): While foam boxes are great insulators, they can sometimes degrade over time. Lining the box with landscape fabric or burlap will help protect it and prevent soil from seeping out. Cut the fabric slightly larger than the box’s interior dimensions and secure it with staples or by folding it over the edges. This also helps with water retention.
4. Add a Drainage Layer: To further improve drainage, add a layer of small rocks or gravel to the bottom of the box, about 2-3 inches deep. This will prevent the drainage holes from becoming clogged with soil.
Planting Your Peanut Seeds: Giving Life to Your Peanut Patch
Now for the fun part – planting those peanuts!
1. Choose Your Peanut Variety (Sort Of): You can use raw, unsalted peanuts from the grocery store. Just make sure they are raw and haven’t been roasted or treated in any way. Virginia peanuts tend to work well.
2. Soak the Seeds (Optional but Recommended): Soaking the peanut seeds in water for 24 hours before planting can help speed up germination. I’ve found it makes a noticeable difference.
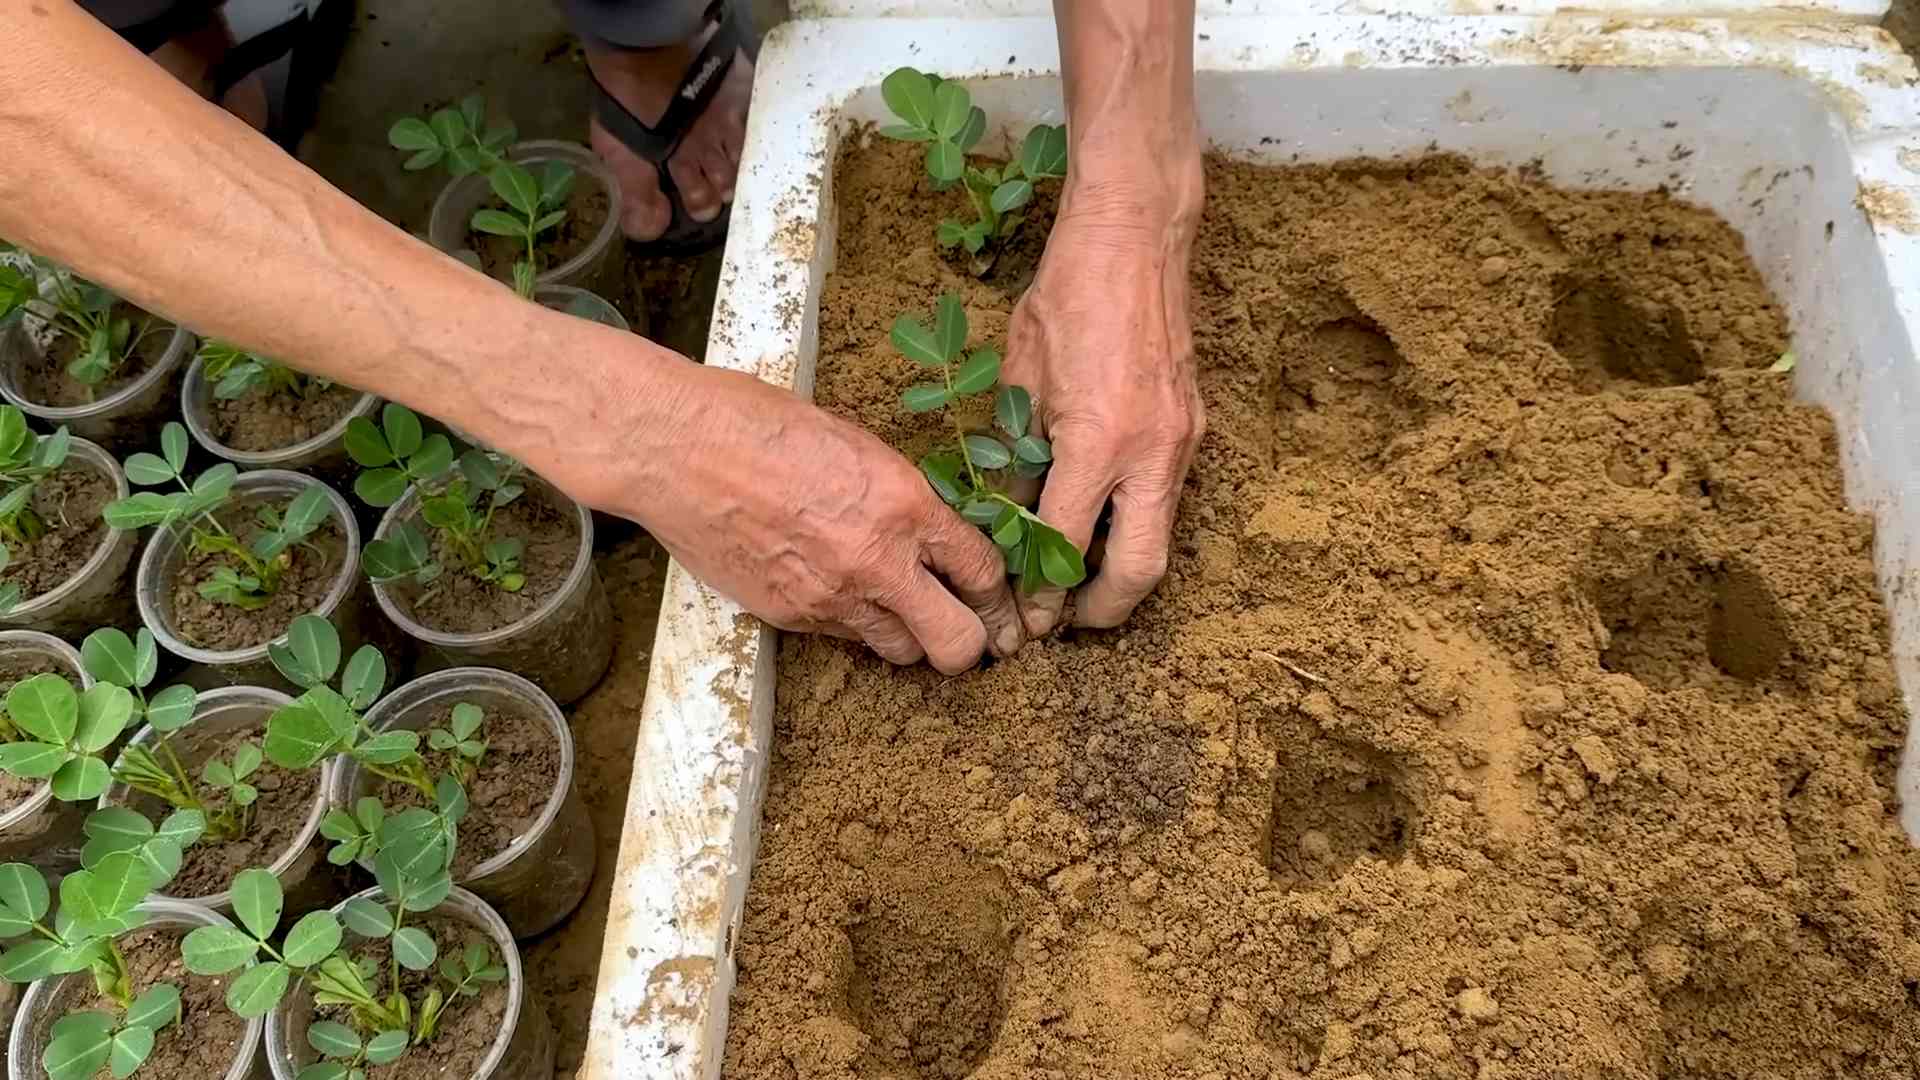
3. Fill the Box with Soil: Fill the foam box with well-draining potting soil, leaving about 2-3 inches of space at the top. Peanut plants prefer slightly sandy soil, so you can mix in some sand if you like.
4. Plant the Seeds: Plant the peanut seeds about 1-2 inches deep and 6-8 inches apart. This gives them enough room to grow without overcrowding.
5. Water Gently: Water the soil gently after planting, making sure to moisten it thoroughly but not saturate it.
Caring for Your Peanut Plants: Nurturing Your Crop
Consistent care is key to a bountiful peanut harvest.
1. Sunlight is Your Friend: Place the foam box in a location that receives at least 6-8 hours of direct sunlight per day. Peanuts are sun-loving plants!
2. Watering Regularly: Water your peanut plants regularly, especially during hot, dry weather. The soil should be consistently moist but not waterlogged. Check the soil moisture by sticking your finger into the soil – if it feels dry an inch or two down, it’s time to water.
3. Weed Control: Keep the area around your peanut plants free of weeds. Weeds compete for nutrients and water, which can stunt the growth of your peanut plants. Hand-pulling weeds is the best method.
4. Fertilizing (Optional): While peanuts are legumes and can fix nitrogen from the air, you can still give them a boost with a fertilizer specifically formulated for legumes. Follow the instructions on the fertilizer package. I usually fertilize once a month during the growing season.
5. Hilling the Plants: As your peanut plants grow, you’ll notice small, peg-like structures forming at the base of the plant. These pegs are what will eventually develop into peanuts. To encourage peanut production, hill the soil around the base of the plants, covering the pegs with soil. This provides them with the darkness and moisture they need to develop.
Harvesting Your Peanuts: The Sweet Reward
After months of care, it’s finally time to harvest your peanuts!
1. Timing is Everything: Peanuts typically take about 120-150 days to mature. You’ll know they’re ready to harvest when the leaves start to turn yellow and the plant begins to die back. This usually happens in the late summer or early fall.
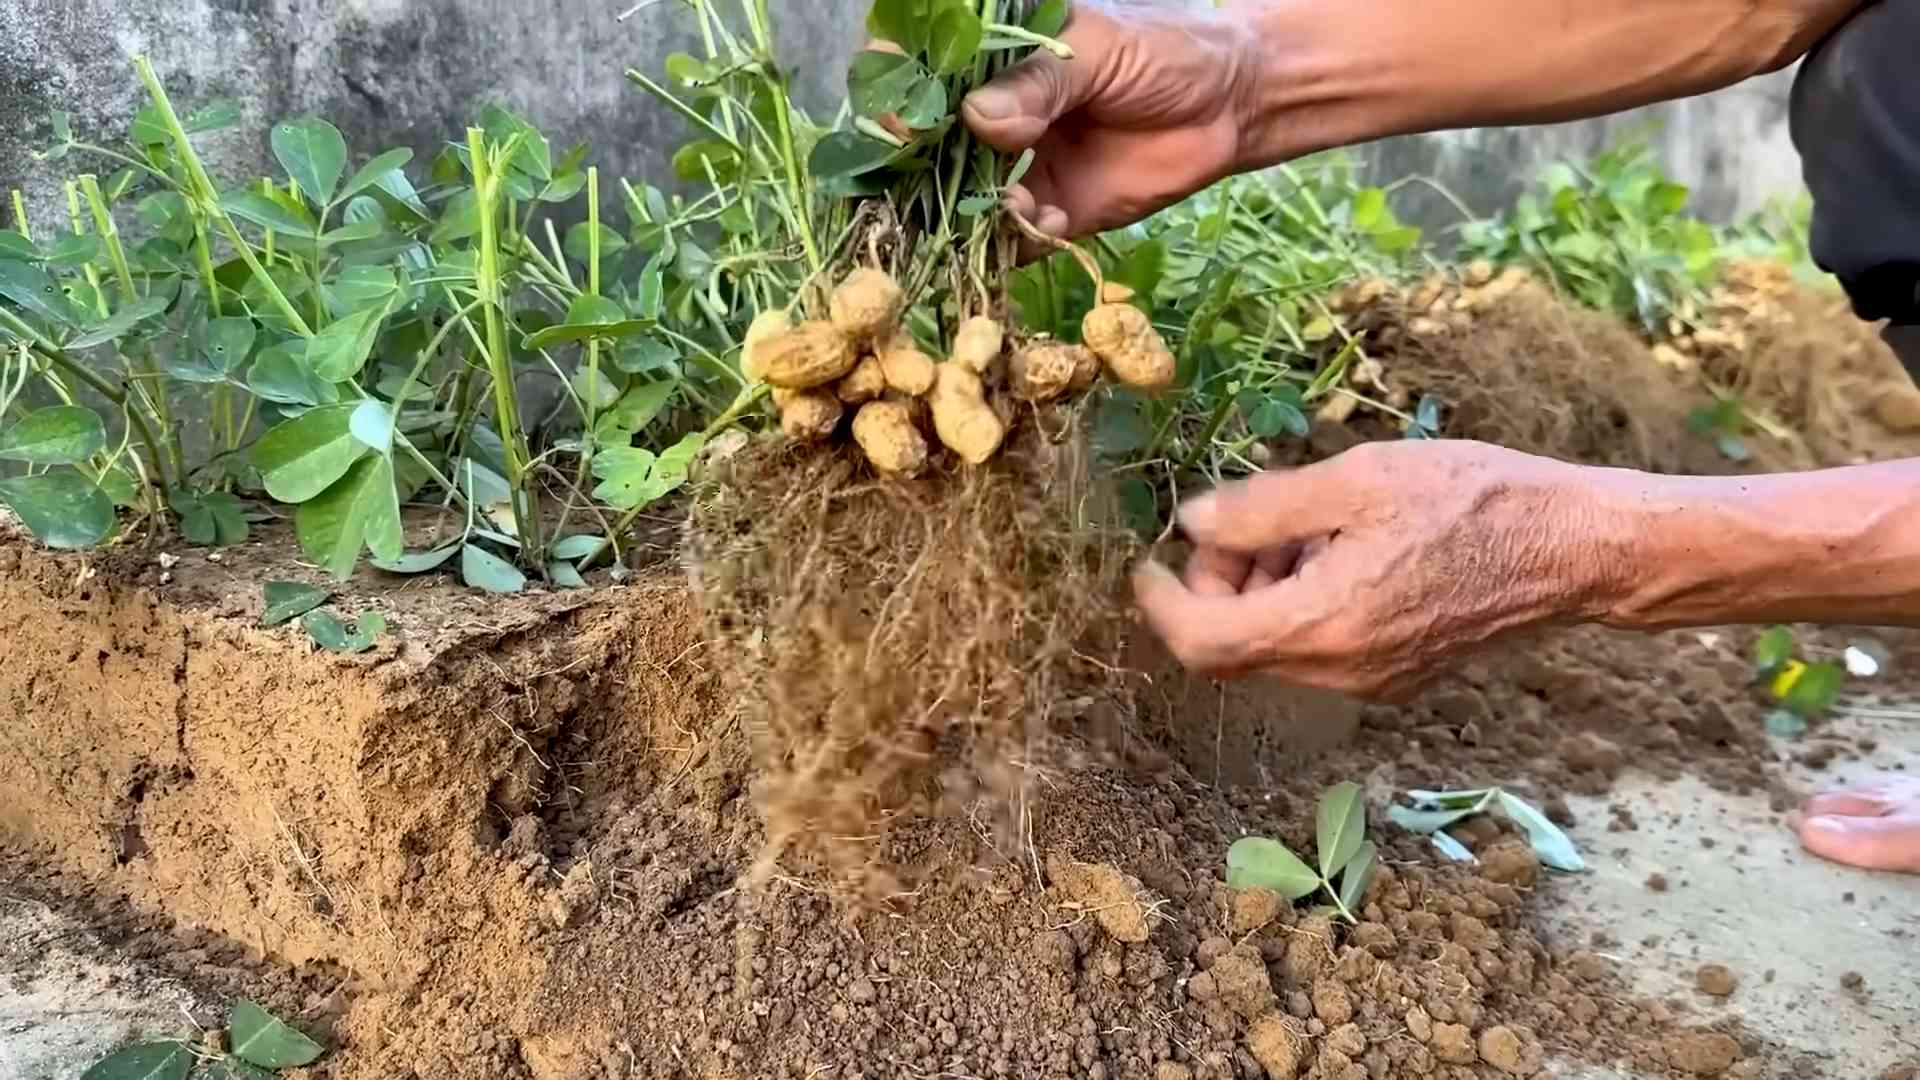
2. Digging Up the Treasure: Gently dig up the entire plant, being careful not to damage the peanuts. I use a garden fork to loosen the soil around the plant before pulling it up.
3. Shake Off the Soil: Shake off as much soil as possible from the roots and peanuts.
4. Curing Your Peanuts: Curing is essential for developing the flavor and preventing mold. Hang the entire plant upside down in a well-ventilated area for 2-4 weeks. You can also spread the peanuts out on a screen or tray to dry.
5. Separating the Peanuts: Once the peanuts are cured, you can separate them from the plant.
6. Roasting (Optional): If you want to roast your peanuts, preheat your oven to 350 degrees Fahrenheit. Spread the peanuts out on a baking sheet and roast for 20-25 minutes, or until they are golden brown and fragrant.
Troubleshooting: Common Peanut Growing Problems
Even with the best care, you might encounter some problems. Here are a few common issues and how to address them:
* Yellowing Leaves: This could be a sign of nutrient deficiency, overwatering, or underwatering. Check the soil moisture and consider fertilizing with a legume-specific fertilizer.
* Poor Peanut Production: This could be due to insufficient sunlight, poor soil, or lack of hilling. Make sure your plants are getting enough sunlight, amend the soil with sand if necessary, and hill the soil around the base of the plants regularly.
* Root Rot: This is caused by overwatering. Make sure your foam box has adequate drainage and avoid overwatering.
* Pests: Aphids and spider mites can sometimes attack peanut plants. Treat them with insecticidal soap or neem oil.
Enjoying Your Homegrown Peanuts: The Fruits (or Nuts!) of Your Labor
Congratulations! You’ve successfully grown your own peanuts in a foam box. Now it’s time to enjoy the fruits (or nuts!) of your labor. Eat them raw, roasted, or use them in your favorite recipes. Knowing you grew them yourself makes them taste even better!
Growing peanuts in a foam box is a fun and rewarding project that anyone can do. With a little bit of care and attention, you can enjoy a bountiful harvest of homegrown peanuts. Happy gardening!
Conclusion
So, there you have it! This simple, yet incredibly effective, DIY peanut growing foam box is a game-changer for anyone looking to cultivate their own delicious peanuts, regardless of space constraints or gardening experience. We’ve walked you through the process, highlighting the ease of construction and the benefits it offers – from improved drainage and aeration to better temperature control and protection from pests.
Why is this a must-try? Because it democratizes peanut cultivation! No longer is growing your own peanuts limited to those with expansive gardens or specialized equipment. This foam box method brings the joy and satisfaction of harvesting your own homegrown peanuts right to your doorstep, balcony, or even your indoor growing setup. Imagine the pride of serving freshly roasted peanuts that you nurtured from seed to harvest.
But the beauty of this DIY project lies not only in its simplicity but also in its adaptability. Feel free to experiment with different foam box sizes to accommodate varying peanut plant quantities. Consider adding a layer of landscape fabric to the bottom of the box before adding your soil mix to further enhance drainage and prevent soil loss. For those in colder climates, you might even explore using a dark-colored foam box to absorb more sunlight and provide extra warmth to the peanut plants.
Another exciting variation is to incorporate companion planting within your peanut growing foam box. Marigolds, for example, are known to deter nematodes, a common peanut pest. Basil can also be a beneficial companion, attracting pollinators and repelling other unwanted insects. Experiment with different combinations to discover what works best for your specific environment and peanut variety.
Furthermore, you can tailor the soil mix to your specific needs. While the recommended mix of potting soil, compost, and perlite works well, you might consider adding a small amount of bone meal to provide extra phosphorus, which is essential for root development and peanut production. Always remember to test your soil pH and adjust accordingly to ensure optimal growing conditions.
The possibilities are truly endless! This DIY peanut growing foam box is not just a container; it’s a canvas for your gardening creativity. It’s an opportunity to connect with nature, learn about the peanut life cycle, and enjoy the fruits (or rather, nuts!) of your labor.
We wholeheartedly encourage you to give this DIY trick a try. It’s a rewarding and educational experience that will undoubtedly enhance your gardening journey. And most importantly, don’t forget to share your experiences with us! We’d love to see your peanut growing foam box creations, hear about your successes (and even your challenges), and learn from your unique adaptations. Share your photos, tips, and stories in the comments section below. Let’s build a community of peanut-growing enthusiasts and inspire others to embark on this exciting adventure! Let’s get growing and enjoy the delicious rewards of our own homegrown peanuts!
Frequently Asked Questions (FAQ)
What type of foam box should I use?
Ideally, you should use a food-grade foam box, like the kind used to transport produce or seafood. These are generally safe and won’t leach harmful chemicals into your soil. Avoid using foam boxes that have been used to transport chemicals or other potentially toxic substances. If you’re unsure about the safety of a particular foam box, it’s best to err on the side of caution and choose a different one. The thickness of the foam is also important; a thicker foam box will provide better insulation and structural support. Aim for a foam box that is at least 1-2 inches thick.
How big should my peanut growing foam box be?
The size of your foam box will depend on how many peanut plants you want to grow. A good rule of thumb is to provide at least 12 inches of space between each plant. A box that is approximately 24 inches long, 18 inches wide, and 12 inches deep should be sufficient for 2-3 peanut plants. You can adjust the dimensions accordingly based on your specific needs and available space. Remember that peanut plants need room for their roots to spread, so a deeper box is generally better than a shallow one.
What kind of soil mix is best for growing peanuts in a foam box?
Peanuts thrive in well-draining soil that is rich in organic matter. A good soil mix for your peanut growing foam box would consist of equal parts potting soil, compost, and perlite. The potting soil provides a good base for the plants to grow in, the compost adds essential nutrients, and the perlite improves drainage and aeration. You can also add a small amount of bone meal to the mix to provide extra phosphorus, which is important for root development and peanut production. Avoid using heavy clay soils, as they can become waterlogged and inhibit peanut growth.
How often should I water my peanut plants in the foam box?
Water your peanut plants regularly, especially during hot and dry weather. The soil should be kept consistently moist, but not waterlogged. Check the soil moisture level by sticking your finger into the soil; if the top inch feels dry, it’s time to water. Water deeply, allowing the water to drain out of the drainage holes in the bottom of the foam box. Avoid overhead watering, as this can promote fungal diseases. Instead, water at the base of the plants.
How much sunlight do peanut plants need?
Peanut plants need at least 6-8 hours of direct sunlight per day to thrive. Choose a location for your peanut growing foam box that receives plenty of sunlight. If you’re growing your peanuts indoors, you may need to supplement with artificial lighting, such as grow lights. Rotate the foam box regularly to ensure that all sides of the plants receive adequate sunlight.
When is the best time to plant peanuts in a foam box?
The best time to plant peanuts is in the spring, after the last frost. The soil temperature should be at least 65 degrees Fahrenheit for optimal germination. You can start your peanut seeds indoors 4-6 weeks before the last frost and then transplant them into the foam box once the weather warms up. Alternatively, you can direct sow the seeds directly into the foam box after the last frost.
How long does it take for peanuts to mature in a foam box?
Peanuts typically take 120-150 days to mature, depending on the variety and growing conditions. You’ll know that your peanuts are ready to harvest when the leaves start to turn yellow and the plants begin to die back. You can also dig up a few plants to check the peanuts; they should be plump and well-formed.
How do I harvest peanuts from a foam box?
To harvest your peanuts, carefully dig up the entire plant, being careful not to damage the peanuts. Gently shake off any excess soil and then hang the plants upside down in a dry, well-ventilated area for 2-3 weeks to cure. Once the peanuts are cured, you can remove them from the plants and roast them or use them in your favorite recipes.
Can I reuse the soil in my peanut growing foam box?
Yes, you can reuse the soil in your peanut growing foam box, but it’s important to amend it with fresh compost and other organic matter to replenish the nutrients that were used by the peanut plants. You should also test the soil pH and adjust accordingly. Consider rotating your crops and planting different types of plants in the foam box each year to prevent soilborne diseases.
What are some common pests and diseases that affect peanut plants?
Some common pests that affect peanut plants include aphids, spider mites, and nematodes. Common diseases include leaf spot and root rot. You can prevent these problems by providing your plants with proper care, including adequate sunlight, water, and nutrients. You can also use organic pest control methods, such as insecticidal soap or neem oil, to control pests. Ensure good drainage to prevent root rot.

Leave a Comment