
Water Based Potato Growing: Ever dreamt of harvesting a bounty of potatoes without ever touching soil? I know, it sounds like something out of a science fiction movie, but trust me, it’s totally achievable with a few simple tricks! For centuries, humans have toiled in the earth to cultivate these starchy staples, but now, we’re diving into the fascinating world of hydroponics and exploring a cleaner, more efficient way to grow potatoes right in your own home.
The idea of growing plants in water isn’t new. In fact, evidence suggests that the Hanging Gardens of Babylon, one of the Seven Wonders of the Ancient World, may have utilized hydroponic principles! But bringing this technology into our homes allows us to control the environment, minimize pests, and maximize yields.
Why should you try water based potato growing? Well, imagine skipping the back-breaking digging and weeding. Think about having fresh, homegrown potatoes available year-round, regardless of the weather outside. Plus, it’s a fantastic way to reduce your environmental footprint by conserving water and eliminating the need for harmful pesticides. This DIY guide will walk you through every step, from selecting the right potato varieties to troubleshooting common issues. So, grab your supplies, and let’s get growing!
DIY Water-Based Potato Growing: A Guide to Hydroponic Spuds!
Hey there, fellow gardening enthusiasts! Ever thought about growing potatoes without all the digging and soil mess? Well, get ready to dive into the exciting world of hydroponics with this super fun and surprisingly easy water-based potato growing project! I’m going to walk you through every step, so even if you’re a complete beginner, you’ll be harvesting your own homegrown potatoes in no time.
What You’ll Need: The Supply List
Before we get started, let’s gather all the necessary supplies. Trust me, having everything on hand will make the process much smoother.
* Potatoes: Seed potatoes are ideal, but you can also use regular potatoes that have started to sprout “eyes.” Choose organic if possible.
* Large Container: A dark-colored plastic storage bin (around 20-30 gallons) works perfectly. The darkness helps prevent algae growth.
* Net Pots: These will hold your potato plants. I recommend 6-inch net pots.
* Hydroponic Grow Media: Clay pebbles (hydroton) or coco coir are excellent choices. They provide support for the roots.
* Air Pump and Air Stone: This is crucial for oxygenating the water, which is essential for healthy root growth.
* Hydroponic Nutrients: A balanced nutrient solution specifically formulated for hydroponics is a must. Look for one designed for vegetative growth initially, then switch to one for flowering/fruiting as the plants mature.
* pH Meter and pH Up/Down Solutions: Maintaining the correct pH level is vital for nutrient absorption.
* Water: Tap water is generally fine, but let it sit for 24 hours to allow chlorine to dissipate.
* Drill and Hole Saw Attachment: For creating holes in the lid of your container for the net pots.
* Timer: To control the air pump.
* Optional: Reflective material (like Mylar) to line the inside of your container for increased light reflection.
Step-by-Step Instructions: From Spud to Success
Okay, let’s get our hands dirty (well, not really, since it’s hydroponics!). Follow these steps carefully, and you’ll be well on your way to a bountiful potato harvest.
1. Prepare the Container:
* First, thoroughly clean your plastic storage bin with soap and water. Rinse it well to remove any residue.
* If you’re using reflective material, now’s the time to line the inside of the container. This will help maximize light exposure to the plants.
* Next, grab your lid and decide how many potato plants you want to grow. Space the net pots evenly across the lid.
* Using your hole saw attachment, carefully drill holes in the lid that are slightly smaller than the diameter of your net pots. This will ensure a snug fit.
* Insert the net pots into the holes you’ve created. They should fit securely.
2. Prepare the Seed Potatoes:
* If you’re using seed potatoes, you can plant them directly. If you’re using regular potatoes, you’ll want to encourage them to sprout.
* Place the potatoes in a cool, dark place for a few days until they start to develop “eyes” (small sprouts).
* You can cut larger potatoes into smaller pieces, making sure each piece has at least one or two eyes. Let the cut surfaces callous over for a day or two before planting to prevent rot.
3. Set Up the Hydroponic System:
* Place the air stone at the bottom of the container.
* Connect the air stone to the air pump with the tubing.
* Fill the container with water, leaving a few inches of space at the top.
* Add your hydroponic nutrients according to the manufacturer’s instructions. Be careful not to over-fertilize!
* Use your pH meter to check the pH level of the water. The ideal pH for potatoes is between 5.5 and 6.5. Adjust the pH using pH up or pH down solutions as needed.
4. Plant the Potatoes:
* Fill the net pots with your chosen grow media (clay pebbles or coco coir).
* Place one potato (or potato piece with eyes) in each net pot, burying it slightly in the grow media. The eyes should be facing upwards.
* Gently water the grow media to moisten it.
5. Provide Light and Air:
* Place the lid with the net pots on top of the container.
* Turn on the air pump. You should see bubbles rising from the air stone, indicating that the water is being oxygenated.
* Potatoes need plenty of light to grow. If you’re growing indoors, you’ll need to provide artificial light using grow lights. Aim for at least 12-16 hours of light per day.
* Set your timer to control the air pump. Running it for 15 minutes every hour is usually sufficient.
Monitoring and Maintenance: Keeping Your Potatoes Happy
Now that your hydroponic potato system is up and running, it’s important to monitor it regularly and make adjustments as needed.
* Water Level: Check the water level frequently and add more water as needed to keep the roots submerged.
* Nutrient Levels: Monitor the nutrient levels in the water using a nutrient meter (EC meter). Adjust the nutrient solution as needed according to the manufacturer’s instructions.
* pH Level: Check the pH level of the water regularly and adjust it as needed to maintain the ideal range of 5.5-6.5.
* Algae Growth: Algae can sometimes grow in hydroponic systems. To prevent algae growth, keep the container in a dark place and consider using an algaecide specifically designed for hydroponics.
* Pest Control: Keep an eye out for pests like aphids or spider mites. If you find any pests, treat them with an appropriate organic insecticide.
* Support: As the potato plants grow, they may need some support. You can use stakes or trellises to help them stay upright.
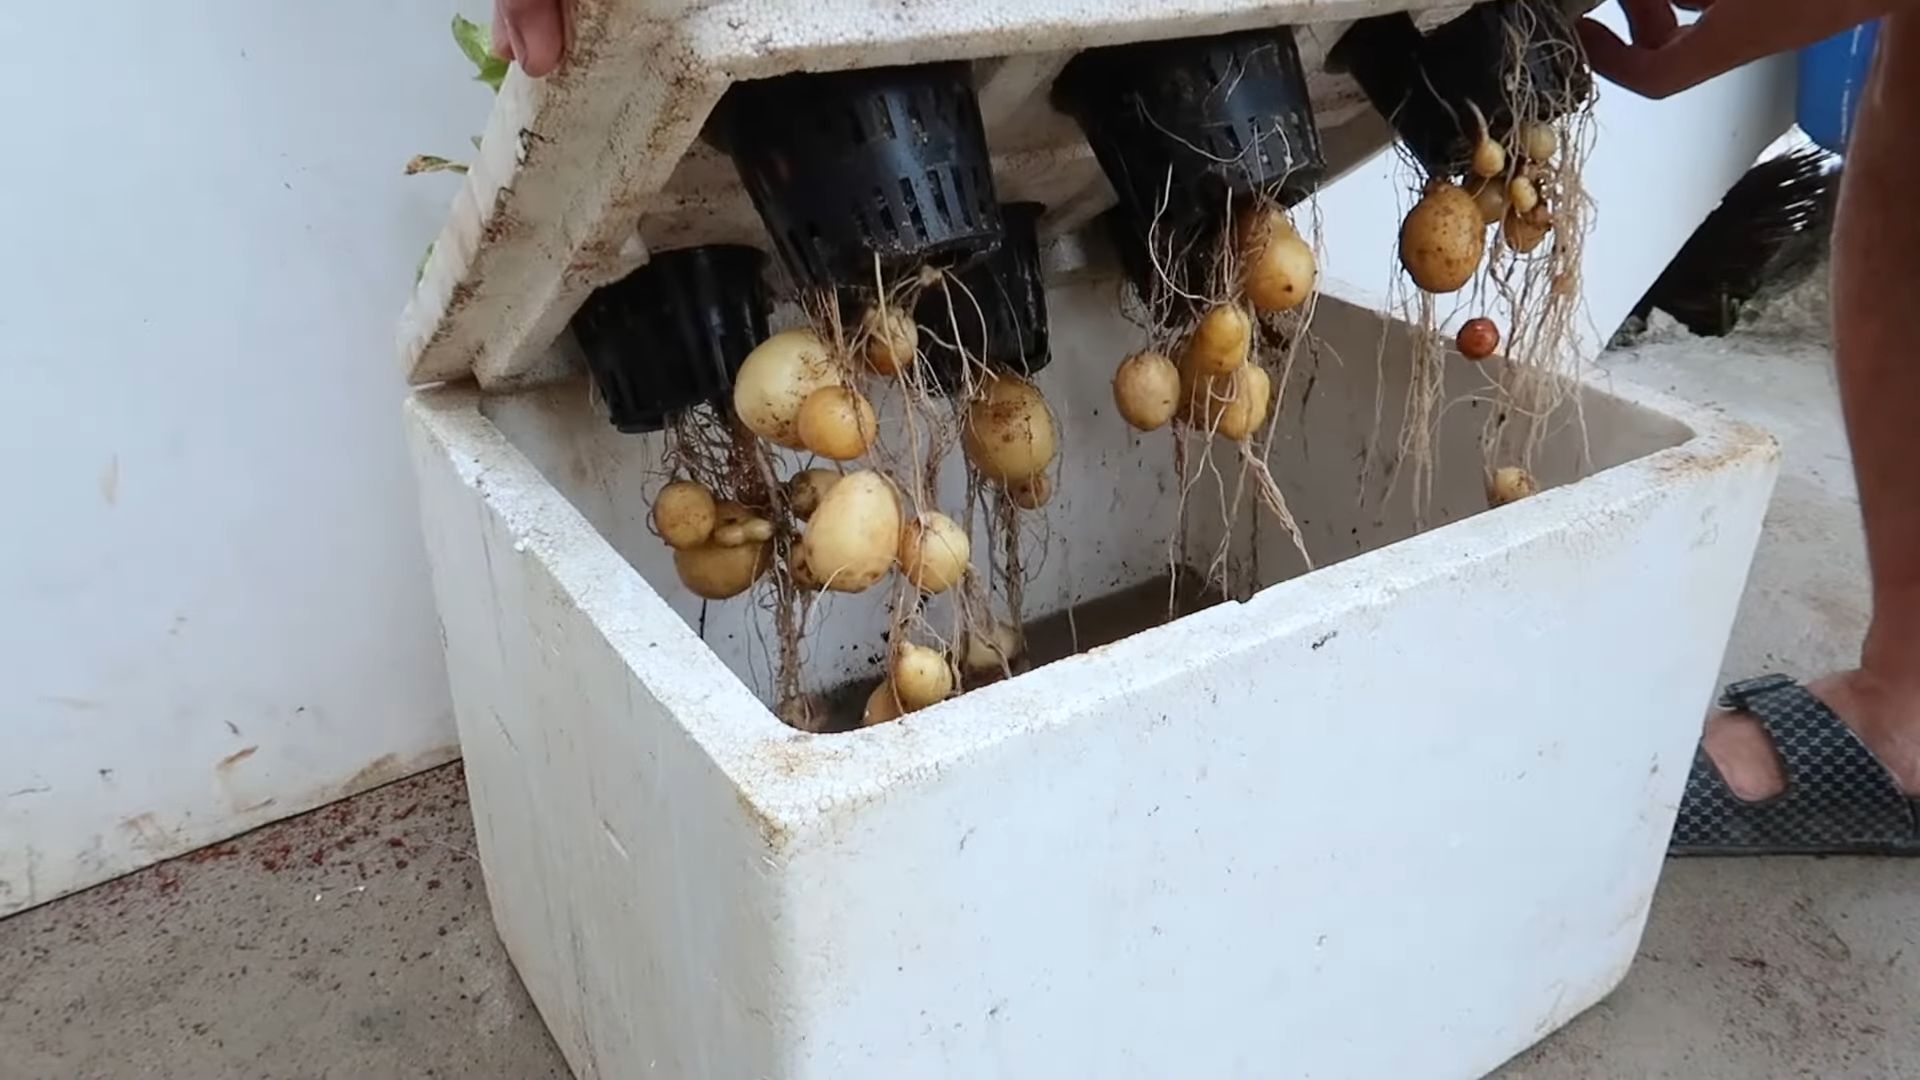
Harvesting Your Hydroponic Potatoes: The Grand Finale!
After a few months (usually around 80-100 days), your hydroponic potatoes will be ready to harvest!
* Check for Maturity: The potato plants will start to flower and the foliage will begin to yellow and die back. This is a sign that the potatoes are maturing.
* Harvesting: Carefully remove the lid from the container. Gently lift the potato plants out of the net pots. You should see potatoes growing along the roots.
* Cleaning: Rinse the potatoes with water to remove any dirt or debris.
* Storage: Store your harvested potatoes in a cool, dark, and dry place.
Troubleshooting: Common Issues and Solutions
Even with the best planning, you might encounter some challenges along the way. Here are a few common issues and how to address them:
* Yellowing Leaves: This could be a sign of nutrient deficiency. Check the nutrient levels in the water and adjust accordingly. It could also be a pH imbalance, so double check that.
* Slow Growth: This could be due to insufficient light, low nutrient levels, or incorrect pH. Make sure your plants are getting enough light and that the nutrient solution is properly balanced.
* Root Rot: This is caused by a lack of oxygen in the water. Make sure your air pump is working properly and that the air stone is providing adequate aeration.
* Pest Infestation: Treat any pest infestations promptly with an appropriate organic insecticide.
Tips for Success: Making the Most of Your Hydroponic Potato Garden
Here are a few extra tips to help you achieve a successful hydroponic potato harvest:
* Start with Healthy Seed Potatoes: Using high-quality seed potatoes is essential for a good harvest.
* Maintain Optimal Water Temperature: Potatoes prefer cool water temperatures. Aim for a water temperature between 60-70°F (15-21°C).
* Provide Adequate Light: Potatoes need plenty of light to grow. If you’re growing indoors, use high-quality grow lights.
* Don’t Over-Fertilize: Over-fertilizing can damage the plants. Follow the manufacturer’s instructions carefully when adding nutrients to the water.
* Be Patient: Growing potatoes takes time. Don’t get discouraged if you don’t see results immediately. Just keep monitoring the plants and making adjustments as needed.
Why Hydroponic Potatoes? The Benefits Explained
You might be wondering, why go through all this trouble to grow potatoes in water? Well, there are several advantages to hydroponic potato growing:
* Space-Saving: Hydroponics allows you to grow potatoes in a small space, making it ideal for apartment dwellers or anyone

Conclusion
So, there you have it! Growing potatoes in water might sound unconventional, but it’s a surprisingly simple and rewarding way to cultivate your own spuds, even without a traditional garden. This method offers a fantastic opportunity to witness the entire potato life cycle firsthand, from sprouting eyes to the development of new tubers. It’s a particularly appealing option for apartment dwellers, urban gardeners, or anyone simply looking for a fun and educational gardening project.
The beauty of this water-based potato growing technique lies in its adaptability. While we’ve outlined a straightforward approach, feel free to experiment! Consider using different varieties of potatoes to observe how they perform in a water environment. You could also try adding a diluted liquid fertilizer specifically formulated for root vegetables to the water every few weeks to potentially boost growth and yield. Just remember to start with a very weak solution to avoid shocking the plants.
Another variation to explore is the type of container you use. While a clear glass jar allows you to monitor root development, an opaque container might encourage more tuber formation since potatoes prefer darkness. If you opt for an opaque container, be sure to regularly check the water level and overall health of the plant.
This DIY potato growing trick is a must-try because it’s not only easy and space-saving but also incredibly educational and visually appealing. Imagine the satisfaction of harvesting your own potatoes, grown right on your windowsill! Plus, it’s a fantastic conversation starter and a great way to introduce children to the wonders of gardening and food production.
Don’t be intimidated by the novelty of growing potatoes in water. The process is surprisingly forgiving, and even if you encounter a few hiccups along the way, you’ll learn valuable lessons about plant growth and resilience. The key is to provide adequate light, change the water regularly, and be patient.
We wholeheartedly encourage you to give this water-based potato growing method a try. It’s a fun, engaging, and ultimately rewarding experience that will connect you more deeply with the food you eat. And most importantly, we want to hear about your experiences! Share your successes, your challenges, and any variations you discover in the comments below. Let’s create a community of water-based potato growers and learn from each other’s journeys. Happy growing!
Frequently Asked Questions (FAQs)
What kind of potatoes work best for growing in water?
Generally, any variety of potato can be grown in water, but some tend to perform better than others. Russet potatoes, Yukon Gold potatoes, and red potatoes are all popular choices and tend to sprout readily. Smaller potatoes or “seed potatoes” specifically sold for planting are also excellent options. Avoid using potatoes that have been treated with sprout inhibitors, as these will not grow. Organic potatoes are often a good choice as they are less likely to be treated with chemicals. Experiment with different varieties to see which ones thrive best in your specific environment.
How much light do water-grown potatoes need?
Potatoes grown in water need plenty of light, ideally at least six to eight hours of direct sunlight per day. A south-facing window is usually the best option. If you don’t have access to sufficient natural light, you can supplement with a grow light. Position the grow light a few inches above the potato plant and keep it on for 12-16 hours per day. Insufficient light can lead to weak, leggy growth and reduced tuber formation.
How often should I change the water?
Changing the water regularly is crucial for preventing the growth of bacteria and algae, which can harm the potato plant. Aim to change the water every two to three days, or more frequently if it appears cloudy or discolored. When changing the water, gently rinse the roots of the potato to remove any accumulated debris. Use fresh, clean water that is at room temperature.
Can I use tap water?
While tap water can be used, it’s best to let it sit out for 24 hours before using it to allow chlorine and other chemicals to dissipate. Alternatively, you can use filtered water or rainwater. Avoid using softened water, as it contains high levels of sodium, which can be harmful to plants.
How long does it take to grow potatoes in water?
The time it takes to grow potatoes in water can vary depending on several factors, including the variety of potato, the amount of light it receives, and the temperature. Generally, you can expect to see sprouts within one to two weeks. Small tubers may start to form within a month or two. It typically takes around three to four months to grow potatoes to a harvestable size.
How do I know when the potatoes are ready to harvest?
The best way to determine if your water-grown potatoes are ready to harvest is to observe the plant’s foliage. When the leaves start to turn yellow and die back, it’s a sign that the plant is nearing the end of its life cycle and the potatoes are ready to be harvested. You can also gently feel around the roots to check the size of the tubers.
Can I eat the potatoes grown in water?
Yes, the potatoes grown in water are perfectly safe to eat, provided they are healthy and free from any signs of disease or rot. However, keep in mind that water-grown potatoes may be smaller than those grown in soil. Be sure to wash the potatoes thoroughly before cooking.
What if my potato starts to rot?
If you notice any signs of rot, such as soft spots or a foul odor, remove the affected potato immediately to prevent the rot from spreading to other potatoes or contaminating the water. You can try cutting away the rotted portion and replanting the healthy part, but it’s often best to start with a fresh potato.
Can I grow potatoes in water indefinitely?
While you can continue to grow potatoes in water for an extended period, the yield may decrease over time. Eventually, the plant will exhaust the nutrients available in the water and may become less productive. To maintain a consistent harvest, it’s best to start with fresh potatoes every few months.
Can I add fertilizer to the water?
Yes, you can add a diluted liquid fertilizer to the water to provide the potato plant with additional nutrients. Use a fertilizer specifically formulated for root vegetables and follow the instructions on the label. Start with a very weak solution to avoid shocking the plant. Over-fertilizing can lead to excessive foliage growth at the expense of tuber formation. A balanced fertilizer with an NPK ratio of 10-10-10 or 5-5-5 is generally a good choice.


Leave a Comment