
Water Spinach Self Watering DIY: Your Guide to Effortless Greens!
Have you ever dreamed of fresh, vibrant water spinach gracing your dinner table, but felt intimidated by the thought of constant watering and care? I get it! Life gets busy, and sometimes our green thumbs need a little help. That’s where this amazing DIY project comes in. We’re diving headfirst into the world of water spinach self watering DIY, a simple and effective way to cultivate this delicious and nutritious vegetable with minimal effort.
Water spinach, also known as Ong Choy or Kangkong, has a rich history, deeply rooted in Asian cuisine. For centuries, it’s been a staple in dishes across Southeast Asia, prized for its mild flavor and impressive nutritional benefits. But you don’t need to be a seasoned gardener to enjoy this leafy green.
This water spinach self watering DIY project is perfect for busy individuals, apartment dwellers with limited space, or anyone who simply wants to simplify their gardening routine. Imagine harvesting fresh, crisp water spinach whenever you need it, without the daily chore of watering! This method not only saves you time and effort but also ensures consistent moisture levels, leading to healthier and more productive plants. Let’s unlock the secrets to a thriving water spinach garden, the easy way!
DIY Self-Watering Water Spinach Container: A Beginner’s Guide
Hey there, fellow plant enthusiasts! Are you ready to dive into a super easy and rewarding DIY project? I’m going to show you how to create a self-watering container specifically designed for growing water spinach (also known as kangkong or ong choy). This method is fantastic because it minimizes daily watering, keeps your water spinach consistently moist (which they LOVE), and is perfect for small spaces like balconies or patios. Let’s get started!
What You’ll Need: The Supply List
Before we get our hands dirty, let’s gather all the necessary materials. Don’t worry, most of these are readily available and won’t break the bank.
* Two Plastic Containers: One large (at least 10 gallons) and one smaller (around 5 gallons) that can fit inside the larger one with a few inches of space around the sides and bottom. Think of it like a pot-in-pot system. I often repurpose old storage bins or buckets. Make sure they are food-grade plastic if possible, especially the inner container.
* Drill with Various Drill Bits: You’ll need a small drill bit for drainage holes and a larger one (around 1/2 inch) for creating holes for the wicking system.
* Wicking Material: This is crucial for drawing water up to the soil. I highly recommend using strips of old t-shirts made of cotton, nylon rope, or even strips of felt. Avoid synthetic materials that don’t absorb water well. You’ll need enough to reach from the bottom of the outer container to the top of the inner container.
* Potting Mix: Choose a high-quality potting mix that retains moisture well. A mix containing peat moss, perlite, and vermiculite is ideal. Avoid using garden soil directly, as it can compact and hinder drainage.
* Water Spinach Seeds or Cuttings: You can easily find water spinach seeds online or at Asian grocery stores. Alternatively, you can use cuttings from existing water spinach plants.
* Water: Obviously!
* Optional: Slow-Release Fertilizer: This will provide your water spinach with a steady supply of nutrients.
* Optional: Landscape Fabric or Weed Barrier: To prevent soil from falling into the water reservoir.
* Measuring Tape or Ruler: For accurate measurements.
* Gloves: To keep your hands clean.
Phase 1: Preparing the Containers
This is where we transform our ordinary plastic containers into a functional self-watering system.
1. Drill Drainage Holes in the Inner Container: Take the smaller container (the one that will hold the soil) and drill several small drainage holes (about 1/4 inch) in the bottom. Space them evenly apart. These holes are essential for allowing excess water to drain out and prevent the soil from becoming waterlogged. I usually drill about 6-8 holes.
2. Drill Wicking Holes in the Inner Container: Now, drill larger holes (around 1/2 inch) near the bottom of the inner container, on the sides. These holes will be for the wicking material to pass through. The number of holes depends on how many wicks you want to use. I usually go for 3-4 holes, evenly spaced around the container. Make sure these holes are high enough that they won’t be submerged when the inner container is placed inside the outer container. We want the wicks to draw water *up*, not be constantly sitting in it.
3. Prepare the Outer Container: The larger container will act as the water reservoir. You don’t need to drill any holes in this container unless you want an overflow drain. If you live in an area with heavy rainfall, drilling an overflow hole a few inches from the bottom can prevent the reservoir from overflowing and potentially drowning your water spinach. I usually skip this step unless I know I’m expecting a lot of rain.
Phase 2: Setting Up the Wicking System
This is the heart of our self-watering system. The wicks are what will keep your water spinach consistently hydrated.
1. Cut the Wicking Material: Cut your chosen wicking material into strips long enough to reach from the bottom of the outer container, through the wicking holes in the inner container, and up to the top of the soil level. It’s better to err on the side of too long than too short.
2. Thread the Wicks: Thread each strip of wicking material through the wicking holes you drilled in the inner container. Make sure a significant portion of the wick is hanging down inside the container and another portion is sticking out. The portion inside the container will be buried in the soil, and the portion hanging down will sit in the water reservoir.
3. Secure the Wicks (Optional): To prevent the wicks from slipping out of the holes, you can tie a knot at the end of each wick inside the container. This will also help to anchor them in the soil.
Phase 3: Assembling the Self-Watering Container
Now, let’s put everything together!
1. Place the Inner Container Inside the Outer Container: Carefully place the inner container (with the wicks attached) inside the larger outer container. Make sure the bottom of the inner container is elevated above the bottom of the outer container. This creates the water reservoir. You can use bricks, rocks, or even empty plastic bottles to elevate the inner container. The goal is to have a few inches of space between the bottom of the inner container and the bottom of the outer container.
2. Add Landscape Fabric (Optional): If you’re using landscape fabric, place a layer over the bottom of the inner container, covering the drainage holes. This will prevent soil from falling into the water reservoir and clogging it up.
3. Fill with Potting Mix: Now, fill the inner container with your chosen potting mix. Leave a few inches of space at the top for watering and adding fertilizer. As you fill, gently bury the portion of the wicks that are inside the container in the soil. Make sure the wicks are distributed evenly throughout the soil.
4. Water Thoroughly: Water the potting mix thoroughly from the top until water starts to drain out of the drainage holes. This will help to saturate the soil and establish good contact between the soil and the wicks.
Phase 4: Planting Your Water Spinach
The moment we’ve been waiting for!
1. Sowing Seeds: If you’re using seeds, sow them directly into the potting mix, following the instructions on the seed packet. Water spinach seeds typically germinate within a week or two.
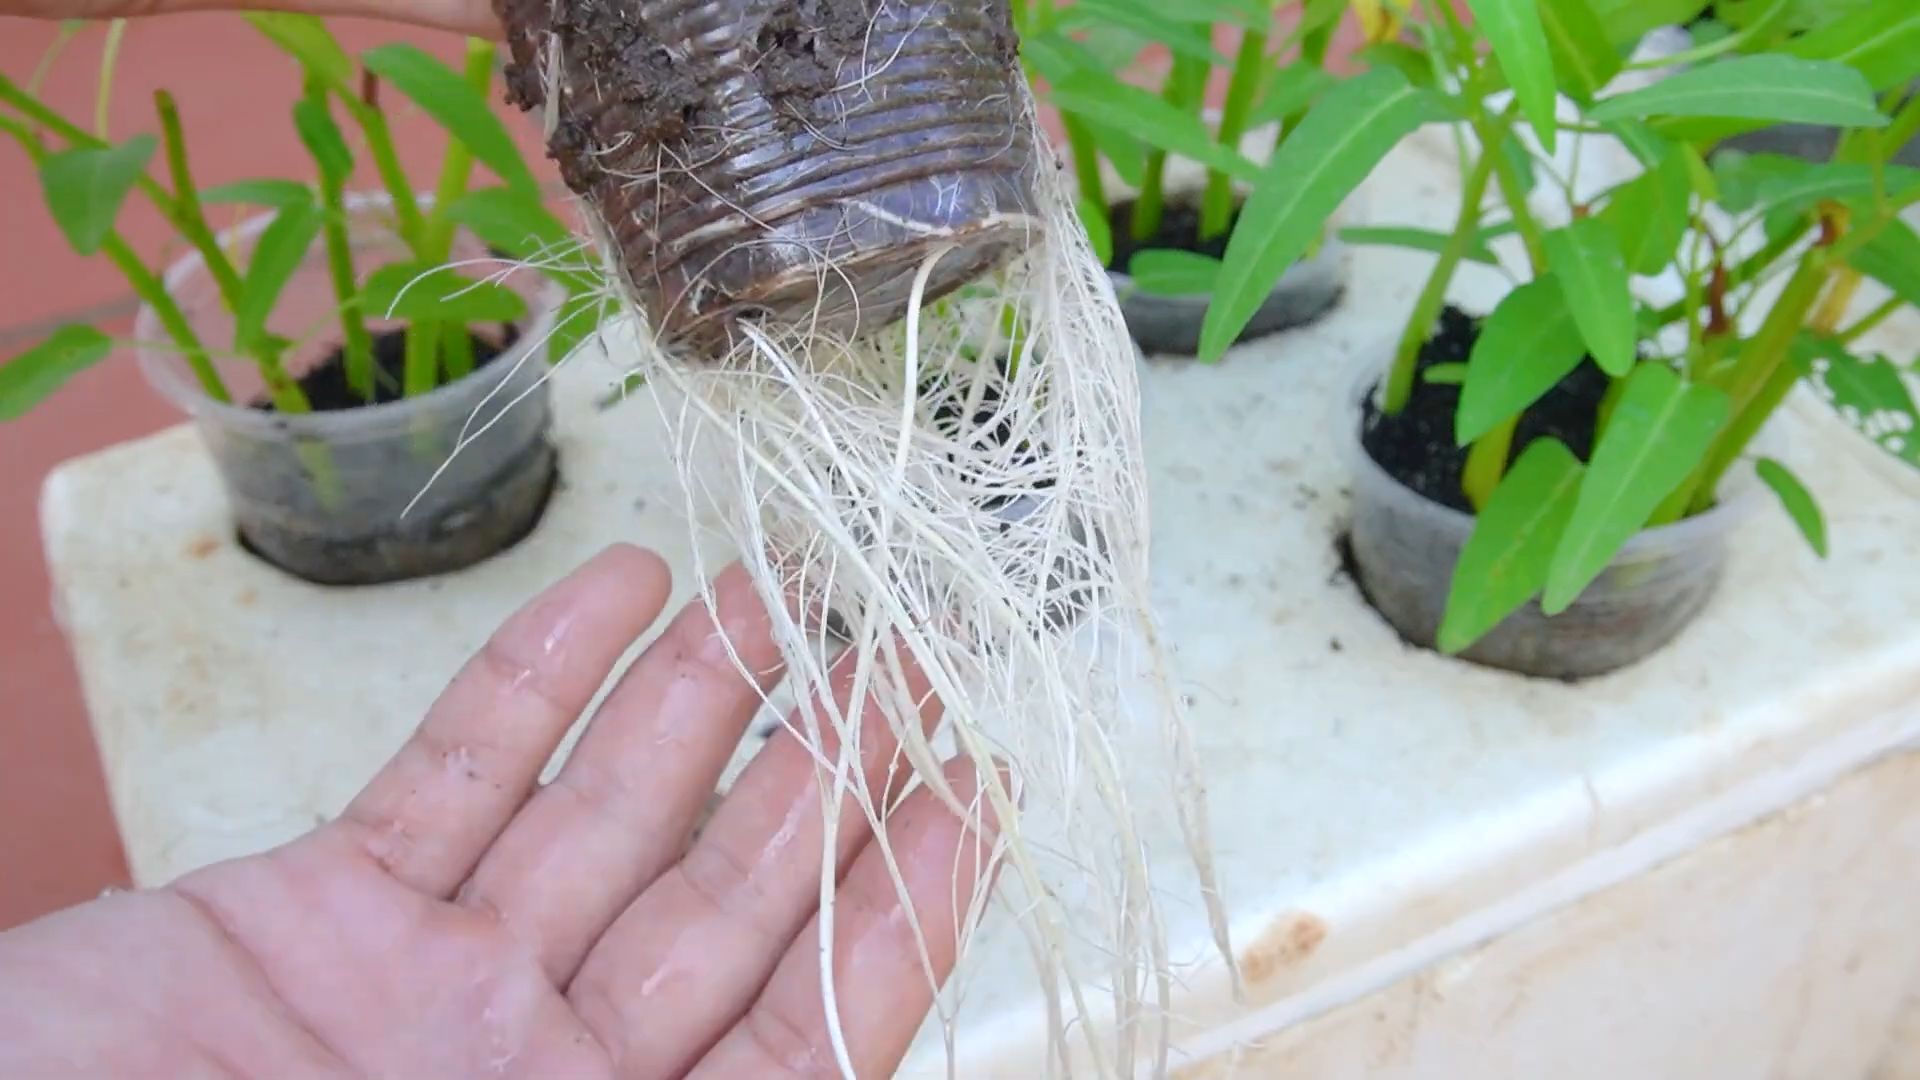
2. Planting Cuttings: If you’re using cuttings, make sure they have at least a few nodes (the points where leaves emerge). Plant the cuttings in the potting mix, burying the nodes. Keep the soil consistently moist until the cuttings develop roots.
3. Add Slow-Release Fertilizer (Optional): If you’re using slow-release fertilizer, sprinkle it over the surface of the potting mix, following the instructions on the fertilizer package.
4. Water the Reservoir: Fill the outer container with water, making sure the water level is below the bottom of the inner container. The wicks will draw the water up into the soil.
5. Place in a Sunny Location: Water spinach thrives in full sun, so place your self-watering container in a location that receives at least 6-8 hours of sunlight per day.
Phase 5: Maintaining Your Water Spinach
A little bit of care goes a long way!
1. Monitor the Water Level: Regularly check the water level in the outer container and refill it as needed. The frequency of refilling will depend on the weather and the size of your container. I usually check mine every few days.
2. Top Watering (Initially): For the first few weeks, it’s a good idea to continue top-watering your water spinach in addition to filling the reservoir. This will help to ensure that the soil stays consistently moist while the wicking system gets established.
3. Fertilize Regularly: Water spinach is a heavy feeder, so fertilize it regularly with a balanced liquid fertilizer. Follow the instructions on the fertilizer package.
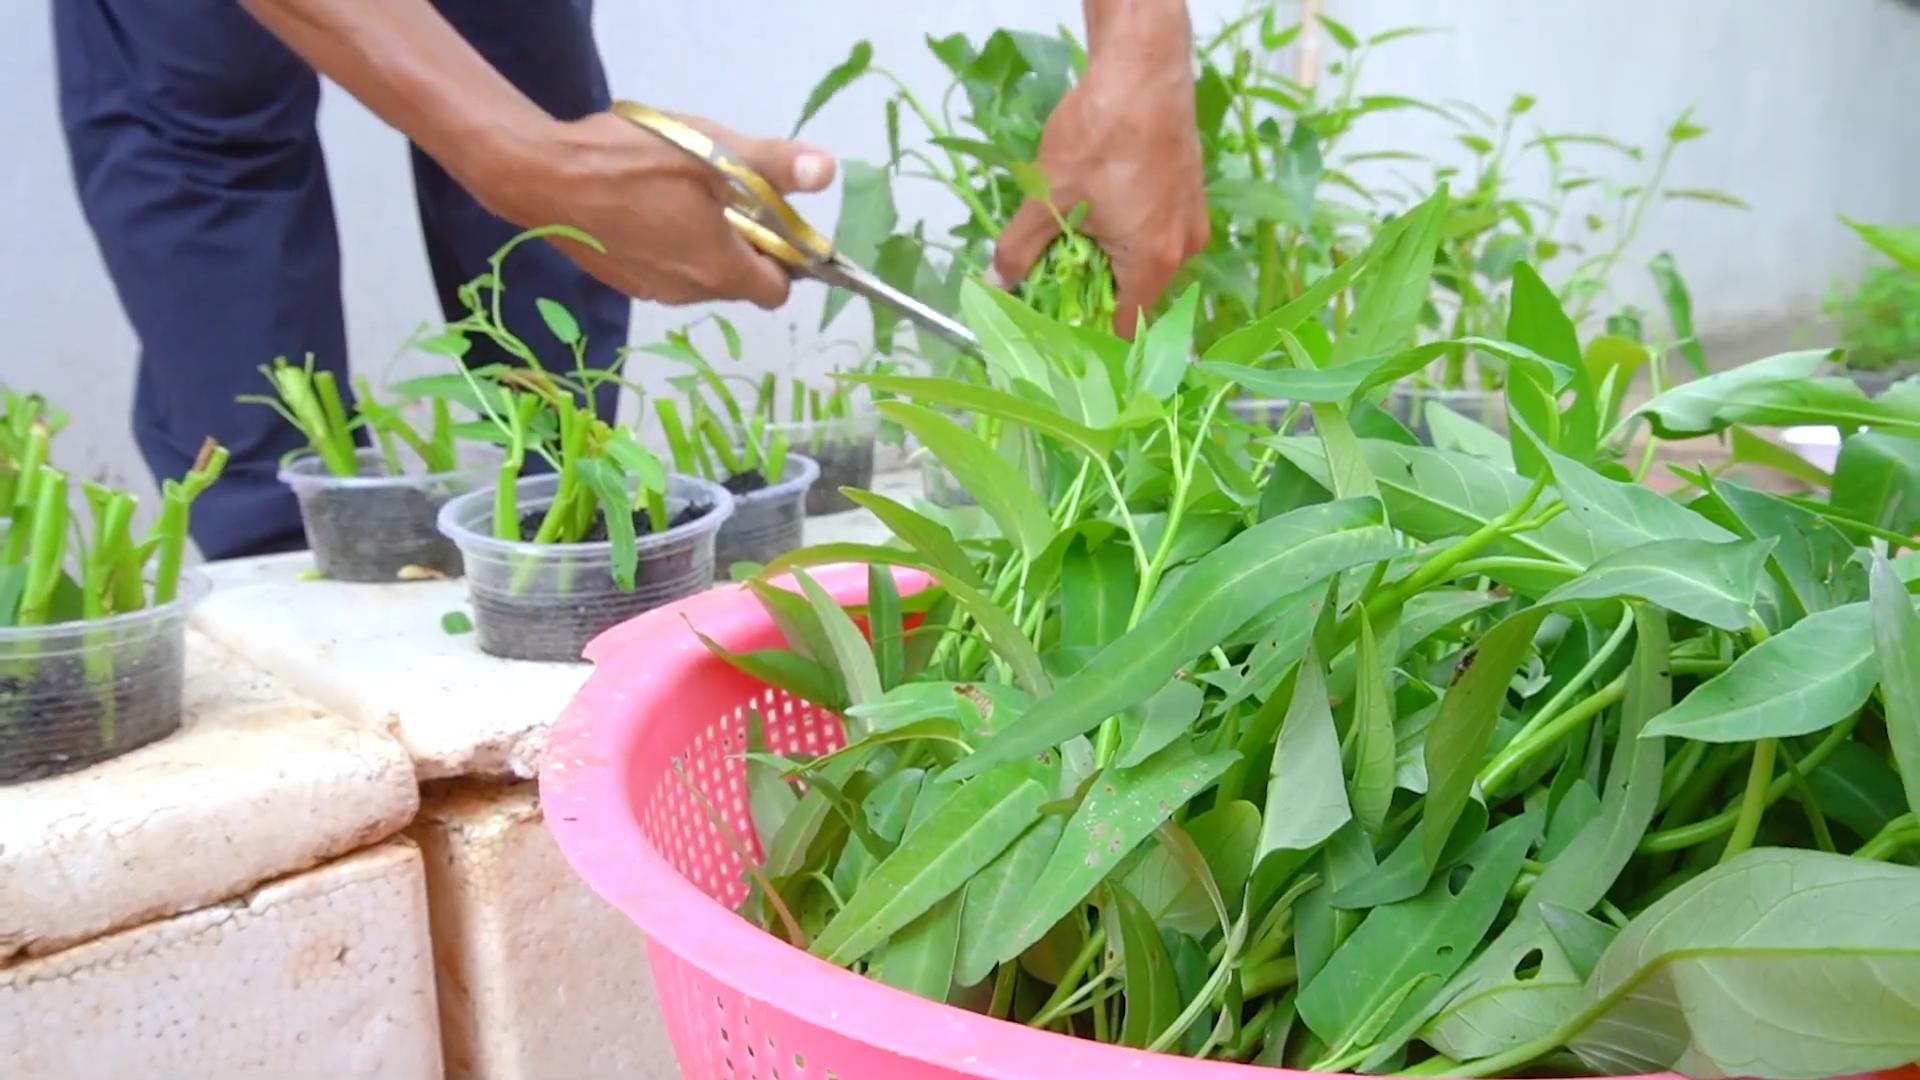
4. Harvest Regularly: Harvest your water spinach regularly by cutting the stems a few inches above the soil level. This will encourage new growth and keep your plants productive. You can start harvesting when the plants are about 6-8 inches tall.
5. Pest Control: Keep an eye out for pests such as aphids and spider mites. If you notice any pests, treat them with an appropriate insecticide or organic pest control method. I prefer using neem oil.
6. Enjoy Your Harvest!: Enjoy the fruits (or rather, the leaves) of your labor! Water spinach is delicious stir-fried, steamed, or added to soups.
Troubleshooting Tips
* Soil Too Wet: If the soil seems consistently waterlogged, even after reducing watering, it could be that the drainage holes are clogged or the wicks are too efficient. Try clearing the drainage holes and using
Conclusion
So, there you have it! This simple, yet incredibly effective, water spinach self-watering DIY project is more than just a gardening hack; it’s a game-changer for anyone who loves fresh greens but struggles with consistent watering. Imagine consistently vibrant, healthy water spinach ready for your stir-fries, soups, and salads, all thanks to a minimal effort setup.
Why is this a must-try? Because it addresses the most common hurdle in growing water spinach: maintaining consistently moist soil. Water spinach, also known as Ong Choy, thrives in damp conditions, and this self-watering system ensures that your plants receive the hydration they need, even when you’re busy or away. No more wilting leaves or stunted growth due to inconsistent watering schedules. This method is also incredibly cost-effective, utilizing readily available materials like plastic bottles or containers, making it an eco-friendly and budget-friendly solution.
Beyond the convenience and cost savings, this DIY project offers a fantastic opportunity to connect with nature and experience the satisfaction of growing your own food. There’s something truly rewarding about nurturing a plant from seed to harvest, and this self-watering system makes the process even more accessible and enjoyable.
Looking for variations? Absolutely! You can adapt this method to suit different container sizes and growing environments. For larger containers, consider using multiple water reservoirs to ensure even moisture distribution. If you’re growing water spinach indoors, you might want to add a grow light to supplement natural sunlight. Experiment with different types of wicking materials, such as cotton rope or strips of felt, to see which works best for your setup. You can even add a diluted liquid fertilizer to the water reservoir to provide your plants with an extra boost of nutrients. Another variation is to use a larger, opaque container for the water reservoir to prevent algae growth. This will keep your water cleaner and your plants healthier.
We encourage you to give this water spinach self-watering DIY a try. It’s a simple, effective, and rewarding project that will transform your gardening experience. Don’t be afraid to experiment and adapt the method to suit your specific needs and preferences.
But the real magic happens when you share your experiences! We’d love to hear about your successes, challenges, and creative adaptations. Share your photos and stories on social media using relevant gardening hashtags, or leave a comment below to connect with other gardening enthusiasts. Let’s build a community of water spinach growers and learn from each other’s experiences.
Growing your own food shouldn’t be a chore. It should be a fun, rewarding, and sustainable practice. This self-watering system makes it easier than ever to enjoy fresh, homegrown water spinach, regardless of your gardening experience or busy schedule. So, grab your supplies, get your hands dirty, and start growing! You’ll be amazed at how easy it is to cultivate your own delicious and nutritious greens with this simple DIY trick. Happy gardening!
Frequently Asked Questions (FAQ)
What exactly is water spinach, and why should I grow it?
Water spinach (Ipomoea aquatica), also known as Ong Choy, is a semi-aquatic leafy green vegetable popular in Asian cuisine. It’s incredibly nutritious, packed with vitamins, minerals, and antioxidants. It’s also fast-growing and relatively easy to cultivate, making it a great choice for beginner gardeners. Plus, the fresh, slightly sweet flavor of homegrown water spinach is far superior to anything you can find in the store.
What materials do I need for this water spinach self-watering DIY?
The beauty of this project is its simplicity. You’ll need:
* A container for growing the water spinach (a pot, bucket, or even a repurposed plastic container will work).
* A water reservoir (a plastic bottle, bucket, or any container that can hold water).
* A wicking material (cotton rope, strips of felt, or even an old t-shirt cut into strips).
* Potting soil suitable for vegetables.
* Water spinach seeds or cuttings.
* A drill or sharp object to create holes (if needed).
How does the self-watering system actually work?
The wicking material acts as a bridge between the water reservoir and the soil in the growing container. Water is drawn up through the wick via capillary action, keeping the soil consistently moist. This eliminates the need for frequent watering and ensures that your water spinach receives a steady supply of hydration.
How often do I need to refill the water reservoir?
The frequency of refilling depends on several factors, including the size of your container, the weather conditions, and the size of your water spinach plants. Check the water level in the reservoir regularly, and refill it when it gets low. In hot, sunny weather, you may need to refill it every day or two. In cooler, more humid conditions, you may only need to refill it once a week.
What kind of potting soil should I use?
Use a well-draining potting mix that’s specifically formulated for vegetables. This type of soil will provide the necessary nutrients and drainage for healthy water spinach growth. Avoid using garden soil, as it can be too heavy and compact, which can lead to root rot.
Can I use cuttings instead of seeds to grow water spinach?
Absolutely! In fact, growing water spinach from cuttings is often faster and easier than starting from seeds. Simply take cuttings from a mature water spinach plant, remove the lower leaves, and place the cuttings in water until roots develop. Once the roots are a few inches long, you can transplant the cuttings into your self-watering container.
What if the wicking material isn’t drawing up enough water?
Make sure the wicking material is in direct contact with both the water in the reservoir and the soil in the growing container. You may also need to experiment with different types of wicking materials to find one that works best for your setup. Cotton rope and felt strips are generally good choices. Also, ensure that the wicking material is not too tightly packed, as this can restrict water flow.
How much sunlight does water spinach need?
Water spinach thrives in full sun, meaning it needs at least six hours of direct sunlight per day. If you’re growing water spinach indoors, you may need to supplement natural sunlight with a grow light.
Are there any pests or diseases that I should be aware of?
Water spinach is generally resistant to pests and diseases, but it can be susceptible to aphids, spider mites, and fungal diseases. Inspect your plants regularly for any signs of infestation or disease, and take appropriate action if necessary. Insecticidal soap and neem oil are effective treatments for aphids and spider mites. Ensure good air circulation to prevent fungal diseases.
Can I use this self-watering system for other plants besides water spinach?
Yes! This self-watering system can be adapted for a variety of other plants that prefer consistently moist soil, such as herbs, lettuce, and even some vegetables. Just be sure to choose a potting mix and growing environment that are appropriate for the specific plant you’re growing.
How do I harvest water spinach?
You can start harvesting water spinach when the plants are about 6-8 inches tall. Simply cut the stems a few inches above the soil line. The plants will continue to produce new growth, allowing you to harvest multiple times.
Is it safe to eat water spinach grown in a plastic container?
Yes, as long as you use food-grade plastic containers. Look for containers that are labeled as BPA-free. Avoid using containers that were previously used to store chemicals or other potentially harmful substances.
How do I prevent algae growth in the water reservoir?
Algae growth can be prevented by using an opaque container for the water reservoir. This will block sunlight from reaching the water, which is necessary for algae to grow. You can also add a small amount of hydrogen peroxide to the water reservoir to help prevent algae growth.
What if my water spinach leaves are turning yellow?
Yellowing leaves can be a sign of several problems, including overwatering, underwatering, nutrient deficiencies, or pest infestations. Check the soil moisture level to ensure that it’s consistently moist but not waterlogged. Fertilize your plants with a balanced liquid fertilizer to provide them with the necessary nutrients. Inspect your plants for any signs of pests or diseases.
How do I know when my water spinach is ready to harvest?
Water spinach is ready to harvest when the stems are about 6-8 inches long and the leaves are a vibrant green color. The stems should be tender and easy to cut. Avoid harvesting stems that are too thick or tough, as they may be bitter.


Leave a Comment